Blog

Fibonacci Sequence

What is a sequence? A sequence is a specific list of numbers where each subsequent term is based on the previous term forming a pattern. Sequences can be infinite and go on forever, or they can be finite and end after only 5 terms. In this post, we are going to dive into one the most famous sequences of all time, drum roll please… the Fibonacci Sequence!

Why is the Fibonacci sequence so special? The Fibonacci sequence is a unique type of sequence because it is not only found in numbers, but found in nature, art, and life itself! Keep reading to learn more below!

History of the Fibonacci Sequence

The Fibonacci sequence is a profound one at that discovered by the Italian mathematician Leonardo Fibonacci, otherwise known as “Leonardo of Pisa” during the 13th century.

Leonardo studied Indian mathematicians sources and wrote his findings in a book titled the Book of Calculation or “liber abaci.” This was the first time the mathematical ideas from India were translated for a western audience in the 1200s. To find out more on the history of the Fibonacci sequence and the liber abaci, check out this resources at the end of this article.

Where did the Fibonacci sequence come from? The sequence is actually based on a problem involving a rabbits population. Read more about the details of this mathematical quandary by following the link in the resources section at the end of this article.

Fibonacci Sequence – The Most Famous Sequence!

fibonacci number

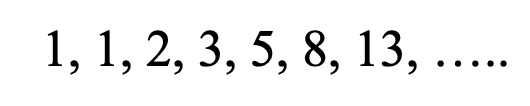
The above sequence, known as the “Fibonacci sequence,” is one of the most famous sequences in the world! How can a sequence be so famous? Why is it so special? Well, we’ll get to that in a minute, but before we do, can you see how the Fibonacci sequence forms a pattern? What would be the next term? Take a guess!

fibonacci number

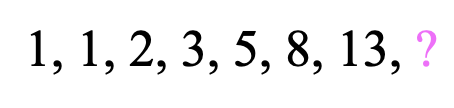
Take your time, trying to figure out the next term of the sequence before checking the answer below:

fibonacci number

Why!? Fibonacci Numbers Explained

The next term of the Fibonacci sequence is 21! The pattern of this sequence is all about adding the two previous terms together. That’s how we get 1+1=2, 1+2=3, 2+3=5, 3+5=8, 5+8=13, which brings us to get our missing term, 8+13=21. Take a look at how this sequence works below:

fibonacci series

Why is the Fibonacci Sequence Famous?

Now that we know the secret pattern behind this sequence, let’s look at why the Fibonacci sequence is so special! The Fibonacci sequence’s main claim to fame is that it is found throughout art, architecture and even in nature via the golden ratio.

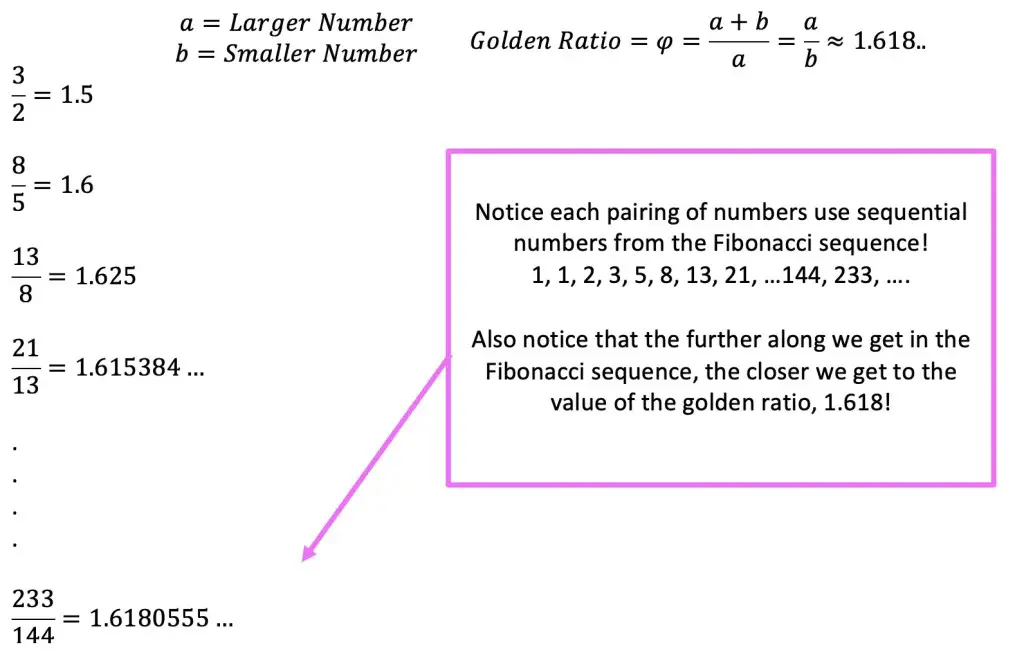
The Golden Ratio is a proportion that is considered to be the most pleasing ratio to the human eye! You may also know the Golden Ratio as the golden mean, the divine proportion, phi, or the Greek letter ϕ. It is an infinite and irrational number that approximates to 1.618 and is found by adding two numbers together and then dividing by the larger number. If these same two numbers are then set equal to the larger number divided by the smaller number successfully, then the two numbers are a golden ratio equal to 1.618! If this sounds too confusing to imagine, just take a look at the formula below:

Is it a Golden Ratio?

If the following formula holds true, then yes there is a golden ratio!

What is amazing about this ratio, is that it can be related back to the Fibonacci Sequence!

The Golden Ration + Fibonacci Sequence:

If we were to take the sequential numbers found within the Fibonacci sequence (1,1,2,3,5..), and plug them into the golden ratio formula above, it would approximate to the golden ratio value, 1.618, every time! The the further along we go in the sequence, the closer and closer we get to the golden ratio. Check out with the following examples below:

The Golden Ratio + Art + Architecture + Nature:

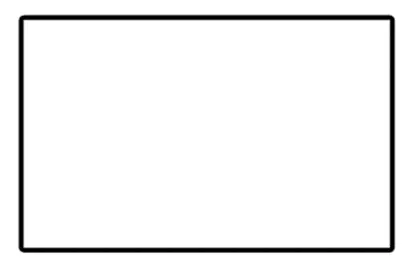
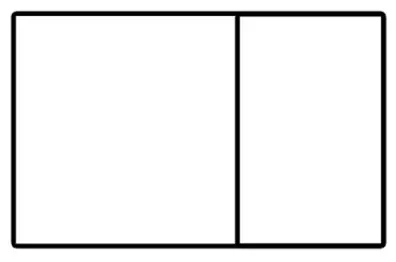
If we were to draw a rectangle that has golden ratio proportions, we would get something that looks like the golden rectangle below.

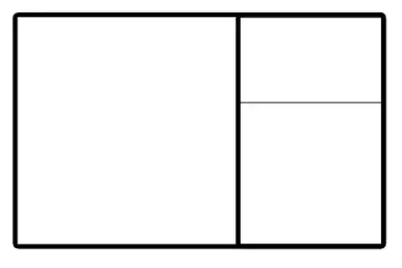
Now, let’s draw a golden rectangle, within our golden rectangle to see what happens:

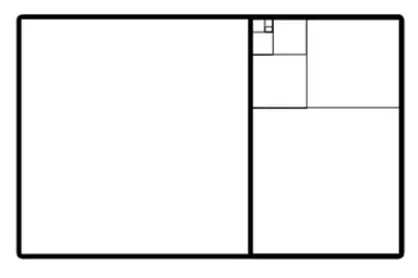
What happens if we continue this specific pattern and keep drawing in golden rectangles within each other?

Until eventually we get something like this….

The proportion between the width and height of these rectangles is 1.618 and is a visual demonstration of how the golden ratio is formed with numbers from the Fibonacci Sequence as the sequence approaches infinity.

consecutive fibonacci numbers

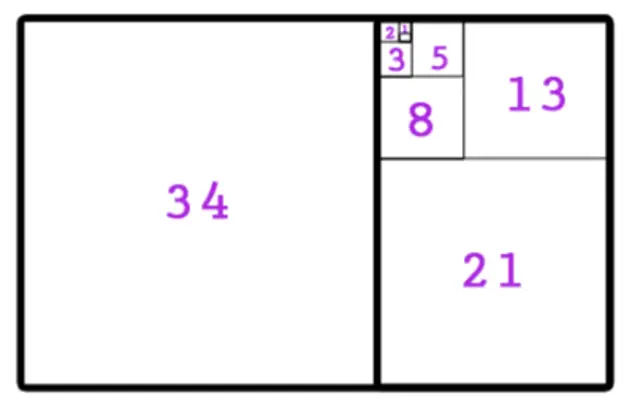
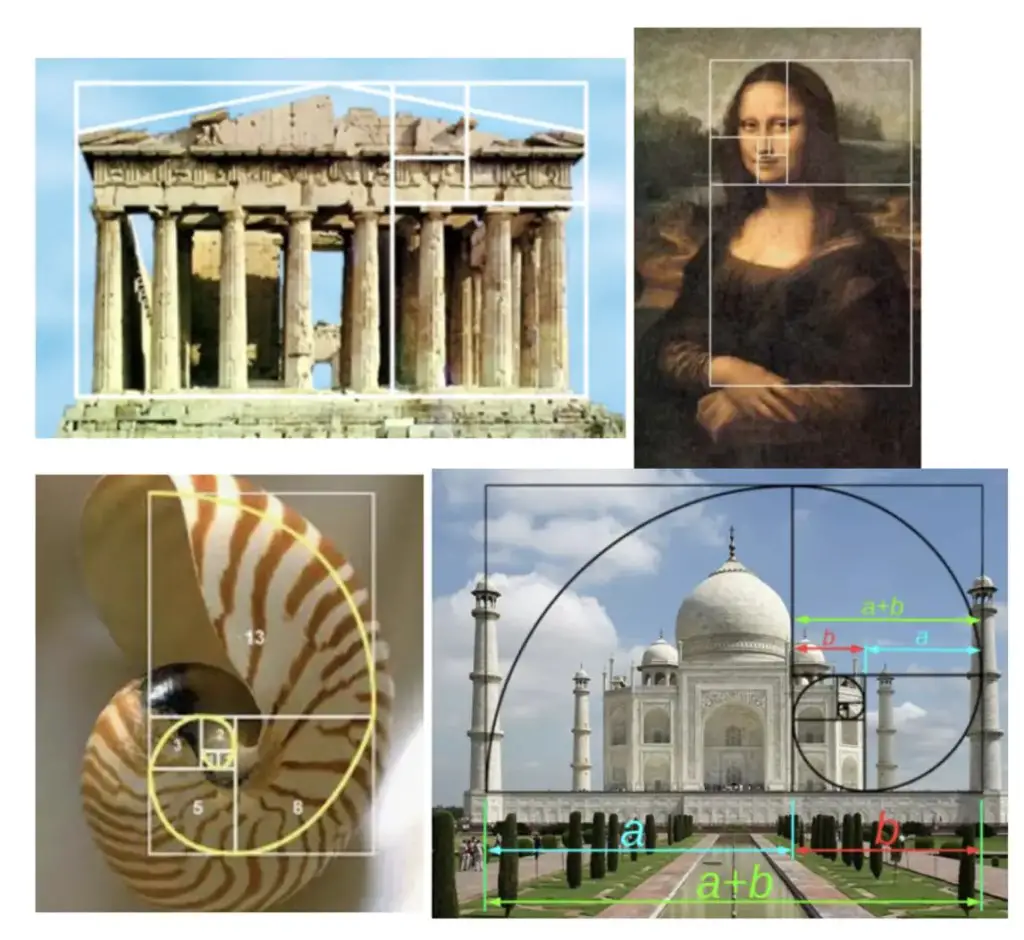
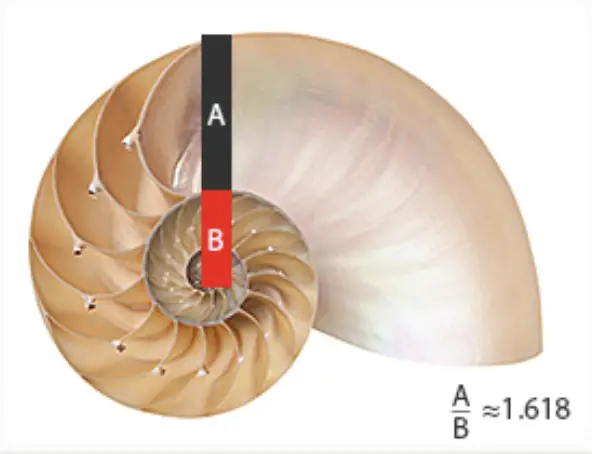
In the above rectangle, when all points of each golden rectangle are connected, something called a Fibonacci spiral (also known as the “golden spiral”) forms. We can see how the golden spiral can be found within the the nature such as the shell shown below and within the architecture of the Taj Mahal.

Also below, we have golden rectangles within the Greek Parthenon architecture and the famous “Mona Lisa” painting by Leonardo DaVinci.

Where can we find The Golden Spiral?

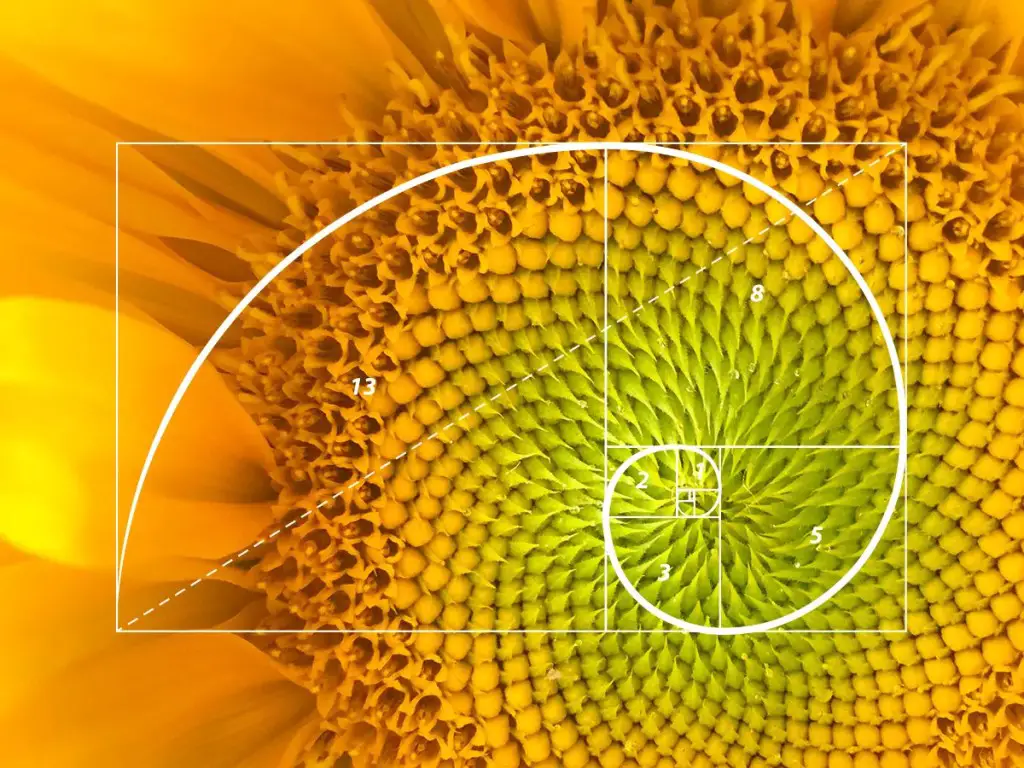
As we mentioned previously, the golden ratio can be found in art, architecture, and nature such as the petals of a flower. Now let’s look at even more examples below:

Loop Math GIF - Find & Share on GIPHY
GIF courtesy of GIPHY.com

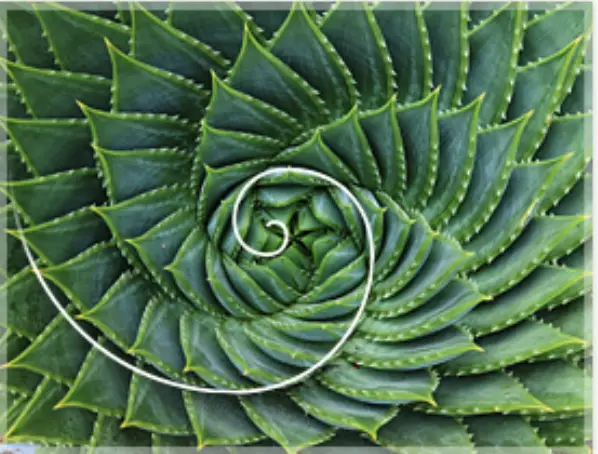
In nature, we can find Fibonacci spiral within the seeds of the sunflower and the direction in which the aloe leaves grow, shown below:

spirals
Photo Courtesy of https://clevelanddesign.com/
spirals
Photo Courtesy of https://clevelanddesign.com/
spirals
Photo Courtesy of https://clevelanddesign.com/

The Golden Ratio + YOU:

Photo Courtesy of https://clevelanddesign.com/

Want to know if you yourself has a face that fits the golden ratio?! Try measuring your face horizontally and vertically and plug in those values into the golden ratio formula, dividing the larger number by the smaller number. What did you get? Something close to 1.6 maybe!? Then you too are a walking example of the golden ratio and the Fibonacci sequence.

Fibonacci and Golden Ratio Resources:

If you’re looking to learn more about the golden ratio and the Fibonacci sequence, be sure to check out the resources I used for this article:

Fibonacci Sequence History: https://www.maa.org/press/periodicals/convergence/fibonaccis-liber-abaci

Rabbit_Problem:http://mathcenter.oxford.emory.edu/site/math125/fibonacciRabbits/

Select Images: https://clevelanddesign.com/insights/the-nature-of-design-the-fibonacci-sequence-and-the-golden-ratio/ and https://giphy.com/

Related Posts:

Looking for more posts on other types of sequences?! Check out these related posts below:

Arithmetic Sequences

Geometric Sequences

Recursive Sequences

Finite Arithmetic Series

Finite Geometric Series

Infinite Geometric Series

Golden Ratio in the Real World

Still got questions? No problem! Don’t hesitate to comment with any questions below. Thanks for stopping by and happy calculating! 🙂

Facebook ~ Twitter ~ TikTok ~ Youtube

Circle Inscribed in a Triangle

Greetings and welcome to MathSux! This post explores how to construct a circle inscribed in a triangle using a compass and straightedge. First we will find the Angle Bisector of each vertex of triangle ABC, then we will locate the incenter, measure the radius and use our compass to sketch and inscribe a circle into our triangle. If you have any questions, please check out the video below. Happy calculating! 🙂

Circle Inscribed in a Triangle Construction:

Inscribe a Circle in a Triangle

1) We start with triangle ABC and need to inscribe a circle within the triangle using a compass and straight edge.

2) We are going to create angle bisectors for each vertex of our triangle. Here we will start by making an arc with the point of the compass on angle A.

3) Next, we are going to go to the left where the arc we made and the triangle intersect and make another arc above our angle. Now bring the point of the compass to the right side where the arc we made and the triangle intersect and make another arc above our angle.

4) Using a ruler, connect angle A to the point of intersecting arcs, all the way to the other side of our triangle.

5) Now we are going to do the same thing, and find the angle bisector of angle B and angle C. For a review on how to find an angle bisector step by step, check out this link here.

6) Notice, the point of intersection where all three angle bisectors meet within the triangle is called the incenter.

7) Now we are going to create a perpendicular line segment by bringing the point of the compass to the incenter and creating an arc that intersects with triangle ABC.

8) Take our compass point to where the arc we just created and the triangle side intersect to create a new arc outside the triangle. Repeat on both sides of intersection.

9) Next, take a ruler align the incenter and intersection point we just created and draw a perpendicular line.

10) Using a compass, measure the length of the radius formed by the pink perpendicular line we just created. This will be the length of the radius of our circle!

11) Keeping that same distance we measured in the last step, draw a circle with the point of the compass at the incenter.

12) We have successfully inscribed a circle within our triangle ABC.

*Please note that this construction will work for different angles and for any type of triangle!

Constructions and Related Posts:

Looking to construct more than just a circle inside a triangle? Check out these related posts and step-by-step tutorials on geometry constructions below!

Construct an Equilateral Triangle

Perpendicular Line Segment through a Point

Angle Bisector

Construct a Square Inscribed in a Circle

Altitudes of a Triangle (Acute, Obtuse, Right)

How to Construct a Parallel Line

Bisect a Line Segment

How to Construct a 45 Degree Angle

Best Geometry Tools!

Looking to get the best construction tools? Any compass and straight-edge will do the trick, but personally, I prefer to use my favorite mini math toolbox from Staedler. Stadler has a geometry math set that comes with a mini ruler, compass, protractor, and eraser in a nice travel-sized pack that is perfect for students on the go and for keeping everything organized….did I mention it’s only $7.99 on Amazon?! This is the same set I use for every construction video in this post. Check out the link below and let me know what you think!

Facebook ~ Twitter ~ TikTok ~ Youtube

Looking for more constructions? Check out how to construct a square inscribed in a circle and an equilateral triangle by clicking on their respective links! And if you’re looking for even more geometry constructions, check out the link here!

Still got questions? Check out the video above and comment with any questions below. Happy calculating! Also, be sure to check us out on social media for exclusive math tips and tricks!

Facebook ~ Twitter ~ TikTok ~ Youtube

How to Construct a Parallel Line

Greeting math friends! In todays post, we are going to be learning how to construct a parallel line using a compass and straightedge. Just a reminder, parallel lines are lines with the same slope and go in the same direction without ever intersecting. Please check out the GIF and step by step tutorial on how to construct parallel lines below. If anything is unclear also don’t forget to check out the video or to comment with any questions! Thanks so much for stopping by and happy calculating!

What are Parallel Lines?

Parallel Lines are lines that have the same slope going in the same direction side by side and never intersect at any point. Ever. Infinitely, keeping the same distance between them. We can also denote that two lines are parallel by using special notation shown in the below example:

Horizontal lines m and n are parallel to each other

We can say line m is parallel to line n using words or by using the following notation:

line m is parallel to line n
line m is parallel to line m

How to Construct a Parallel Line:

Check out the GIF and detailed tutorial below to construct a parallel line given a line and a point using a compass and ruler.

Construct a parallel line

1) Before we begin, let’s take note that we are given line P and Point Q and need to make a parallel line using a compass and straight edge.

2) First, let’s draw a new point anywhere on our original line, line P, and label our new point, point R.

3) Next, using a straight edge or ruler, we are going to draw a line connecting Point Q to new Point R together. Notice we have created a new angle here!?

4) Now, we are going to open our compass to any length, and place the point of our compass on Point R. Next, we are going to swing our compass to create an arc.

5) Keeping that same distance on the compass, now we bring the point of the compass to Point Q, and create another arc.

6) Next, let’s go back to the first arc we made in step 4, and measure the length of our angle using the compass.

7) Keeping that same distance on the compass, measure out the same length on the point where the intersection of the line we created and the second arc we made meet, by placing the point of the compass on this intersection and marking with a dot the angle length.

8) Using a ruler or straight edge, we are now going to connect the point we just made in the previous step, with the original given Point Q to create a parallel line.

9) Check out our parallel line!

*Note in this example, we constructed a parallel line, given continuous line P. But the same construction steps would work with any type of line segment.

Transversals and Parallel Lines:

Why does this construction work in the first place? The short answer is Transversals and corresponding angles! But let’s dive deeper and see why below:

When two parallel lines are cut by a diagonal line ( called a transversal) it looks something like this:

parallel lines and transversals

Each angle above has at least one congruent counterpart. There are several different types of congruent relationships that happen when a transversal cuts two parallel lines but for when constructing a parallel line segment, this is due to corresponding angles. For more information, check out this post on Transversals here! And for an example of corresponding angles and how this applies to our proof, keep reading!

Corresponding Angles:

When a transversal line cuts across two parallel lines, corresponding angles are congruent.

Transversals and parallel Lines

The construction steps to create a parallel line work because of corresponding angles! When lines are parallel and are cut by a transversal, it creates all types of angle relationships including the corresponding angles shown above.

In the construction we did earlier in this post to create parallel lines, if you look back, you’ll notice that we created an angle at angle R and made sure to create a corresponding angle of the same length for angle Q.

Constructions and Related Posts:

Looking to construct more than just a parallel line? Check out these related posts and step by step tutorials on geometry constructions below!

Construct an Equilateral Triangle

Perpendicular Line Segment through a Point

Angle Bisector

Construct a 45º angle

Altitudes of a Triangle (Acute, Obtuse, Right)

Construct a Square inscribed in a Circle

Bisect a Line Segment

Still got questions? No problem! Don’t hesitate to comment with any questions below or to check out the video above. Thanks for stopping by and happy calculating! 🙂

Let’s be friends! Check us out on the following social media platforms for more practice questions and math examples!

Facebook ~ Twitter ~ TikTok ~ Youtube

Average Rate of Change Over Interval

Welcome MathSux friends! In todays lesson, we will be going over how to find the average rate of change over an interval of a function. This may sound intimidating at first, but all we are really doing is finding the slope, yes, the one we’re already familiar with over an interval given usually in the x-axis. Sounds simple enough? Check out the example below! Also, be sure to watch the video to check out multiple ways for solving these types of problems and the practice problems at the end of this post. Happy calculating!

Average rate of Change over Interval Example:

Step 1:  The first thing we must do is figure out what this question is saying. The interval, they give us, [1,3] represents the x-values on our graph.  So, they want to know what the average rate of change (or slope) is between these two x-values 1 and 3.  Let’s take a look and see what that means for us on the graph below!

Average Rate of Change Over Interval

Notice we found the points on our interval [1,3]?  This correlates to the coordinate points we will be working with to solve this problem (1,2) and (3,10)

Also, within our interval, [1,3], we will be finding the rate of change (otherwise known as the slope) of the two coordinates (1,2) and (3,10). Check out how we are only finding a small portion of our slope from this function in the diagram below, represented by the dotted green line.

Average Rate of Change Over Interval

Step 2:  Now that we understand what we must do, find the slope within the interval [1,3], using the corresponding points, (1,2) and (3,10), all we must do is plug our numbers into the good ole’ slope formula which we already know!

Using our coordinates, (1,2) and (3,10), we can plug in values into the slope formula below:

Try the following questions on your own on and check out the video above for more ways to answer this type of question and even more examples!

Practice Questions:

1) Find the average rate of change over the interval [0,2] for the function: h(x) = 2x2 +2

2) Find the average rate of change over the interval [-4,2] for the function: g(x)=(x+3)2

3) Find the average rate of change over the interval [-2,0] for the function: f(x)=-(x+1)3

4) Find the average rate of change over the interval [0,4] for the function: h(x)=x2+2x+1

Solution:

1) 4

2) 1

3) -1

4) 6

Looking to learn more about Algebra? Check out the algebra lessons page here. Thanks for stopping by and happy calculating! 🙂

Facebook ~ Twitter ~ TikTok ~ Youtube

What is Trigonometry

What is Trigonometry?

What is Trigonometry? Trigonometry is the study of triangles angles and sides in mathematics. By applying the rules of trigonometry, we can find unknown angles and side lengths in triangles and other shapes that can be broken down into triangles.

Who cares? Why do we need to know a triangles angles or side length? This is a fair question! Although on paper, trigonometry can feel useless, it is a great tool in solving real-world problems in architecture, astronomy, engineering, and even video game design! For example, what if we wanted to know the angle measure between our line of sight and the distance to the moon? Or what if wanted to find the perfect angle for a roof on a building? All of these questions would be answered using the beautiful subject of trigonometry.

Just like the word triangle, trigonometry includes the prefix “tri” meaning three. Three, the magic number in trigonometry as there also happens to be three main trigonometric functions (sine, cosine, and tangent) along with their inverses (secant, cosecant, and cotangent respectively). Sine, cosine, and tangent are the basic trig functions that allow us to find the values of angles and/or sides of a triangle of a right triangle.

History of Trigonometry

Where did trigonometry come from? The word trigonometry can be traced back to Greece, from the greek word “trignon” meaning triangle and the word “metron” which means to measure. Clearly trigonometry has history in Greece dating back to the 3rd century B.C. Although it has roots in Greek history, the subject can also be traced back to India in 5th century A.D. Each culture independently inventing trigonometry at first for astronomical purposes.

Basic Right Triangle Trigonometry

We have briefly touched upon the basic trigonometric functions (sine, cosine, and tangent), now let’s dive a little deeper and see how each function works with a right triangle!

Sine, Cosine, and Tangent, fondly known as Sin, Cos, and Tan are trigonometric functions that can be used to find angles and sides of right triangles (triangles with a 90º angle). Sin, Cos and Tan can be summarized by the very memorable acronym SOH CAH TOA:

what is trigonometry

The greek letter, θ, pronounced “theta,” is used to represent unknown angles in trigonometry and can be paired with each trig ratio (sin θ, cos θ, tan θ) which is exactly wha you see above.

In order to use our trig functions, we need to define the different parts of a right triangle based on the location of the angle. There will always be an opposite side that is opposite to angle θ, an adjacent side that is next to angle θ. And the last remaining side, the only side that will always be labeled the same (regardless of the angle θ) is the longest side of a right triangle, which is called the hypotenuse.

Let’s try an Example:

Given the following right triangle, find sin30º .

Step 1: Since we are going to find the sin30º, let’s write out our ratio for sine based on our acronym SOH CAH TOA. 

Step 2: Now we must identify our opposite and hypotenuse based on our angle θ. Remember the opposite is the opposite side length in relation to our angle θ, which in this case is 1.

The hypotenuse is always the longest side, which in this case is 2.

(The adjacent leg is radical 3, but in the case of finding sine, we don’t need this value).

acute angle
opposite leg

Step 3: Now that we have our values for the opposite (1) and hypotenuse (2), let’s plug them into our sin ratio for for our answer.

trigonometric ratio

If you are looking for more right triangle and SOH CAH TOA practice questions similar to the one above, please check out the video and link here.

Inverse Trigonometric Functions:

Inverse Trigonometric ratios are the inverses of the regular trig functions (sin, cos, and tan) we just went over! Check it out below:

inverse trigonometric function

We solve inverse trigonometric functions, the same exact way we do regular trig functions, let’s take a look at an example below:

Find the exact value of csc45º

right angle

Step 1: We know thatCSC is the inverse of sin, which is equal to 1/sin , so let’s use some SOH CAH TOA action to solve for sin45º as normal, then flip our answer to find the value of csc45º.

trigonometric function

Step 2: Now all we need to do is “flip” the answer we got in Step 1 to get its inverse which will be the value of csc45º.

trigonometric function

Unit Circle:

The Unit Circle is an important reference tool used throughout trigonometry to derive all sorts of formulas and explains how trig works in the first place!

Why is it called a unit circle?

Notice each point on the circle is one unit away from the origin below.

The Unit Circle

Why do the degrees go counter-clockwise?

A circle has  360º therefore, we can re-label the axis with 0º, 90º, 180º, 270º, and 360º . Notice the numbers go in a counterclockwise direction? This is based on the movement of the Earth around the sun, as it too travels counterclockwise.  Fun fact: Astronomy and the study of the movement of the sun and the earth are the origins of trigonometry!

Other things to notice about the Unit Circle:

1. Degrees follow a counter-clockwise pattern from 0 to 360 degrees.
2. Values of cosine are represented by x-coordinates.
3. Values of sine are represented by y-coordinates.
4. Using the unit circle we can find the degree and radian value of trigonometric functions (SOH CAH TOA).

Trig Functions and Quadrants:

Based on finding angles via the Pythagorean Theorem using reference triangles within each quadrant we can identify, to see which trig functions (sin, cos, tan) are positive in which quadrant. Let’s see how step by step with a proof!

Step 1: To prove why certain trig functions are positive in specific quadrants, draw a unit circle and add triangles within each quadrant. Notice it kind of looks like a bow tie and we added an angle θ within each triangle as well, this will come in handy later!

Step 2: Now we are going to find the trigonometric functions (sine, cosine, tangent) with respect to  θ for each triangle in each quadrant. Let’s close up on our triangle in quadrant I.

what is trigonometry

Notice the hypotenuse has a value of 1 because this is a unit circle, and “1” is the value of the radius.

We do not know the x and y values for this triangle, but we do know that both  x and y will be positive values.

If we were to find sinθ, we would get:

right angled triangle
adjacent side

What if we found cosθ and tanθ for our Quadrant I reference triangle?

We just proved that all our trig functions are positive in Quadrant I!  Check  below to see about Quadrants II, III, and IV:

Things to notice:

Notice all the positive functions are hi-lighted in green.

Just like we proved Quadrant I to be positive for all trig functions, the above diagram shows that only sin is positive in QII, only tan is positive in QIII and only cos in QIV.

We derived each, by using SOH CAH TOA on each reference right triangle with respect to θ.

There is much more to be discovered about the unit circle, if you are interested in learning more, please check out the video below and link here

Graphing Trig Functions:

We’ve seen the unit circle, now I have to wonder, what do trig functions (sin, cos, tan) look like when they are graphed on a coordinate plane? Get ready because they look pretty cool and the visualizations of these trig functions may surprise you!

Have you ever heard of a sine wave? A radio wave? That’s exactly what trig functions graphs look like because that is what they are!

Sin Graph: Sine function curves creates what looks like an “S” shape. As they say, “S” is for Sine, this is the easiest way to remember what the sine function looks like, check it out below!

Graphing Trig Functions

Cosine Graph: While Graphing Cosine, you may notice that the cosine function creates what looks like a “V” shape. As they say, “V” is for victory, but of course, in this case, it is for cosine!

trigonometry function

Tangent Graph: The tangent function looks totally different graphed when compared to sine and cosine. You may notice the dotted vertical lines below, these are called asymptotes and no values can exist here, check it out below!

Graphing Trig Functions

Why do trigonometric function graphs look this way? Derive and learn why trig ratios graphed look unique and more here. And if you want to learn how to transform a trig graph, check out this link here.

Special Triangles:

Special triangles, otherwise known as the superheroes of trigonometry, are a valuable reference tool for solving trigonometric functions.  The special triangles include the 30 60 90 triangle and the 45 45 90 triangle. Each of the right triangles you are about to see can be derived from the unit circle.

By knowing the below special triangles, we can answer questions such as “find the value of sin45º  and cos45º  without using a calculator.”  Special triangles will save the day when it comes to finding the unknown values of angles in a triangle.  Now, let’s look at our very special triangles below:

Trigonometric Identity:

Throughout trigonometry, there are many trigonometric identities that are derived which help solve proofs as well as make factoring linear/quadratic trig equations easier. Below is a sample of the trigonometric identities you will come across in this subject:

Inverse Identities:

Trig Identities
Inverse Function

Ratio Identities:

Trig Identities

Pythagorean Identity:

Trig Identities
what is trigonometry

If you are looking for more information on trigonometric identities, please check out the video below and practice questions here!

Finding Angles and Sides in Non-Right Triangles:

How would we find an unknown angle or side of a triangle, when the triangle is NOT a right triangle? The answer is to use the law of sines or the law of cosines. How do I know when to use the law of sines versus the law of cosines? It all depends on the information of the triangle that is given to us of course! See the differences below:

Law of Sines: Use when given ASA, AAS, and ambiguous case SSA of a triangle.

law of sines what is trigonometry

Law of Cosines: Use when given SSS or SAS of a triangle.

a2 = b2 + c2 -2bcCosA

b2 = a2 + c2 -2acCosB

c2 = a2 + b2 -2abCosC

Still got questions? Have a favorite part of trigonometry you want to share? Don’t hesitate to email or comment below! Also, don’t forget to follow us on social media to get the latest and greatest MathSux lessons, videos, questions, and more. Happy Calculating!

Facebook ~ Twitter ~ TikTok ~ Youtube

Law of Cosines

Greeting math friends and welcome to MathSux! In today’s post, we are going to cover the Law of Cosines!  Otherwise known as the cosine rule, this is a great formula for finding missing angle and side information on a triangle that is NOT a right triangle when we have SAS or SSS information about the triangle in question.  This formula is much more straight forward when compared to the law of sines, so if you have already mastered that formula, the law of cosines should be a breeze! Also, don’t forget to check out the practice questions at the end of this post to test your knowledge of the law of cosines.  Happy calculating!

Law of Cosines:

The law of cosines allows us to find missing sides and angles of any non-right triangle (a.k.a an oblique triangle) where we are given SAS or SSS information about the triangle in question.

If you take a peak below at the law of cosines, notice that it can be derived from the Pythagorean theorem, as it is reminiscent of the classic formula we all know and love, a2 + b2 = c2.

Also, notice each angle is across its opposite side (Angle A is opposite side a, Angle B is opposite to side b, and Angle C is opposite to side C).

a2 = b2 + c2 -2bcCosA

b2 = a2 + c2 -2acCosB

c2 = a2 + b2 -2abCosC

To find Angles we can also derive and use the following formulas based on the law of cosines from above:

law of cosines

Example #1: SAS Find the value of the missing side.

We can use the law of cosines to find missing sides when we are given an oblique triangle that has a side, angle, and side (SAS) information.

law of cosines

Step 1: First, let’s identify what type of information our triangle is providing us with.  Notice that we are given a side, an angle, and a side for SAS. Since our triangle contains SAS, we know we can apply the cosine rule to find the value of unknown side c.

SAS

Step2: Next, let’s write out our law of cosines formula to find the value of length c and plug in our given information to solve for c. In this case we can plug in for side a=10, side b=8, and opposite side c we have angle c=40º.

Remember to take the square root of both sides of the equation to get our solution for unknown side c!

law of cosines
acute triangle

Example #2: SSS Find the value of the missing angle.

When we want to find the value of a missing angle and are given SSS information of a triangle, we can either use the original law of cosines formula and use our knowledge of algebra and trigonometry to solve for the unknown angle, or, we can also a different version of the cosine rule shown below.  Either method works and will give you the correct answer, the choice is up to you!

law of cosine angles
law of cosines

Step 1: First, let’s identify what type of information our triangle is providing us with.  Notice that we are given a side, side, and another side for SSS. Since our triangle contains SSS, we know we can apply the cosine rule to find the value missing angle C.

SSS

Step 2: Next, let’s write our law of cosines formula and then plug in our given information. In this example, I will be using the original formula and then using algebra and trigonometry to find the correct answer, but feel free to apply one of the angle formulas above and see if you get the same answer!

Since we want to find the value of angle C, we will be using the formula that is set equal to C2:

 cosine
cosine

Think you are ready for more!? Try answering the following practice questions on the cosine rule on your own to truly master this formula! Then check your answers with the solutions below.

Practice Questions:

1) Find the value of missing side c, to the nearest hundredth.

2) Find the value of missing side a, to the nearest hundredth using the cosine formula.

obtuse triangle

3) Find the angle measure of unknown angle A, to the nearest degree using the cosine rule.

4) Find the value of missing angle B, to the nearest hundredth using the cosine rule.

Solution:

Still got questions on the law of cosines? Would you like to see how the cosine rule can be derived from the pythagorean theorem? Don’t hesitate to comment with any questions! If you want to check answers on your homework, you can also check out the law of cosines calculator here! And if you’re looking for more on trigonometry check out the related posts below.Happy calculating! 🙂

Facebook ~ Twitter ~ TikTok ~ Youtube

Related Trigonometry Posts:

The Unit Circle

Basic Right Triangle Trigonometric Ratios (SOH CAH TOA)

4545 90 Special Triangles

30 60 90 Special Triangles

Graphing Trigonometric Functions

Transforming Trig Functions

Factoring Trigonometric Functions

Trig Identities

Law of Sines

Greeting math friends and welcome to MathSux! In today’s post, we are going to go over the Law of Sines!  This is a great formula for finding missing angle and side information on a triangle that is NOT a right triangle, that is only if we are given ASA (Angle, Side, Angle) or AAS (Angle, Angle, Side) information of said triangle. 

There is also something called the “ambiguous case” that happens when we have SSA (Side, Side, Angle) information of a triangle, and it is just as mysterious as it sounds.  We can use the law of sine in the case of SSA to find missing angle and side information of a triangle as well, but there may be 0 triangles, 1 triangle, or even 2 triangles that exists in this case!

Sound confusing? Fear not, because we will cover everything in this post, including practice questions found throughout and at the bottom of this article.  Happy calculating!

Law of Sines:

The law of sines tells us that in any triangle (non-right triangles included!), the ratio of a sin of an angle to the value of its corresponding side are the same for all three sides of a triangle. Check out the formula below:

law of sines

Example #1: AAS Find the value of the missing side

law of sines

Step 1: First, let’s identify what type of information our triangle is providing us with.  Notice that we are given angle A , angle B, and side b for AAS. Since our triangle contains AAS, we know we can apply the law of sine to find the missing side.

sin b 
AAS
b c

Step 2: Next, let’s write our law of sine formula and then plug in our given information. Notice we set up our formula where each side (a and b) and the sine of its opposite angle (Sin A and Sin B) represent the denominator and numerator respectively.

sine rule
sin b

Step 3: Time to use some of our basic algebra and trigonometry skills and solve for unknown side length a by cross multiplying.

sine

* Tip! Remember when plugging sin, sin-1, and all other trigonometric functions into your calculator, to be sure that you are in degree mode!

Example #2: ASA Find the value of the missing side

sin

Step 1: First, let’s identify what type of information our triangle is providing us with.  Notice that we are given an angle A, side c , and an angle B for ASA. Since our triangle contains ASA, we know we can apply the law of sine to find the missing side.

angle sides angle

Step 2: Taking a look at the angles of our triangle, notice how side a is in between angle B and angle C. We have angle B, but notice the value of angle C is missing! So we first will need to find angle C. We can find the value of angle C, knowing that the interior angles of a triangle always add to 180º.

Angle C: 180º – (40º +60º) = 80º

sin

Step 3: Now that we have that missing angle value, we can find the length of side a. Let’s write our law of sines formula and then plug in our given information. Then we can cross multiply and use our knowledge of algebra and trigonometry to find the correct answer.

sine rule

* Tip! Remember when plugging sin, sin-1, and all other trigonometric functions into your calculator, to be sure that you are in degree mode!

Think you are ready to master the law of sines on your own for AAS and ASA triangles? Try the following practice questions on your own to test your law of sines knowledge!

Practice Questions:

1) Find the value of missing side, b, to the nearest tenth.

2) Find the value of missing side, c, to the nearest tenth.

angles a and b

3) Find the value of missing side, b, to the nearest tenth.

4) Find the value of missing side, c, to the nearest tenth.

Solutions:

The Ambiguous Case – SSA and Law of Sines

So far, we’ve seen how to find a missing side using the law of sine when given ASA or AAS of a triangle.  But now, we will see a special case scenario, otherwise known as the Ambiguous Case, where we are given SSA (Side, Side, Angle) of a triangle and must use the law of sines to see if there are potentially 0, 1, or 2 triangles that can potentially exist..

The Ambiguous case, is “ambiguous” because SSA is not enough information to find unknown angles and sides, as there can be more than one possible triangle with different angle measures.  Although there is not enough information, SSA does tell us enough to infer all potential triangles (0,1 or 2) by figuring out what potential angles may or may not exist.

There are a lot of rules and visualizations associated with the ambiguous case that I will not be getting into here.  If you would like to see more information and visualizations of the ambiguous case, please let me know in the comments.  Let’s see how it works with the next example:

Ambiguous Case Example

Step 1: First, let us draw a triangle and fill in the information that has been provided to us, knowing angle A is 30º, side a is 10 and side b has a length of 15.

Step 2: Next, let’s identify what type of information our triangle is providing us with.  Notice that we are given a side, side, and an angle for SSA. Since our triangle contains SSA, we know we can apply the law of sines and that this is going to be an ambiguous case, meaning there can be zero, one, or two potential triangles.

Step 3: Now, we can start off by using the law of sine to find the value of angle b.  We want to find angle B because we already have the value of side length b, opposite our unknown angle B.

sine rule

* Tip! Remember when plugging sin, sin-1, and all other trigonometric functions into your calculator, to be sure that you are in degree mode!

Step 4: But wait! We have found what appears to be value of unknown angle B, but since this is a SSA, ambiguous case, we are not 100% sure of our angle measure because of too many unknowns!

Why can there be more than one value for angle b?

Since we are given SSA of our triangle, that leaves too many unknown values not just for angle B, but also for unknown values angle C, and the length of AB.  This leads us to having more than one possible angle value for angle B. 

Does one triangle exist?  Yes!

We can see that one triangle exists using our found angle, angle b=49º.  Based on this, we can infer what angle C would be, knowing that the interior angles of a triangle add to 180º.

Angle C= 180º – (49º+30º) = 101º

Do two Triangles exist? Yes!

Since our angle B technically can have two values, we can once again look to the unit circle and remember that sin is positive in quadrant 2 (sin must be positive since we are dealing with the law of sines and triangles).  Knowing this we can use our reference angle 180º – θ, to find the potential bonus value for angle b, plugging in the angle value we found previously for angle B= 49º for θ. 

Alternate value for angle B = 180º – θ = 180º – 49º = 131º

obtuse angle

Based on this, we can infer what angle c would be, knowing that the interior angles of a triangle add to 180º.

Alternate value for angle C = 180º – (30º + 131º) = 19º

Note! In this case there are two triangles, but please note that that will not always be the case and the way to know that is to make sure all the angles of your second triangle add up to 180º and nothing over!

Think you are ready to give the ambiguous case and the sine rule a spin? Try the following practice questions on your own!

Practice Questions:

How many triangles can be constructed with the given measures?

law of sines

Solutions:

  1. 2 Triangles
  2. 1 Triangle
  3. 2 Triangles
  4. 1 Triangle

Still got questions on the law of sine? No problem! Don’t hesitate to comment with any questions or check out the video above. Happy calculating! If you want to check answers on your homework, check out the law of sines calculator here! 🙂

Facebook ~ Twitter ~ TikTok ~ Youtube

Related Trigonometry Posts:

The Unit Circle

Basic Right Triangle Trigonometric Ratios (SOH CAH TOA)

4545 90 Special Triangles

30 60 90 Special Triangles

Graphing Trig Functions

Transforming Trig Functions

Factoring Trig Functions

Law of Cosines

Trig Identities

Best books on History of Mathematics

So many books, such little time! I had this dangerous idea of compiling all the best books found in the mathematical universe. The history of mathematics and the evolution of this global subject spans language barriers, across time, and throughout the world!

Before you discount math as a dry subject devoid of anything interesting, remember that there are people and stories behind each and every mathematical discovery.

Remember that the history of mathematics includes everything you can think of, starting at the beginning with the origins of mathematics and the development of the number zero all the way to the more modern origins of STEM and computers!

The applications of math and logic can also be applied to so many different subjects (science, engineering, technology, chemistry, physics, art, etc.) that mathematical history can also be found in within the stories of these subjects as well.

The history of mathematics is more than just the math itself as it includes a history of people, culture and motivation as to why we as humans needed math in the first place!

The below list of math history books will take us on adventures from ancient civilizations all the way to more modern day stories and movies such as Hidden Figures.

The top math books are broken up by three main categories:

1) Top math history books – Learn in timeline order mathematic concepts and philosophies how and where they came from

2) Biographies – Learn in detail about the people behind the subject of mathematics

2) Top History math books for children- Entertaining for all, but mostly written for children, this collection of books will introduce mathematics as light, interesting, and fun!

Mathematical History Books

Concise History:

The first section is for anyone who wants to dive deep into the history of mathematics on an academic level. Great for the math nerds who want to know the story and history of mathematics, this section is great for reference as a teacher, professor , or just great for anyone who wants to learn more about mathematics and the people behind it.

1) A History of Mathematics by Carl Boyer and Uta C. Merzbach. Explore the history of mathematics through ancient civilizations around the world and connect them to the modern theorems we are all more familiar with. This book will show you the origins of the classroom mathematics we all do and forget why we do in the first place! Though, fair warning, this is a dense book and can read more like textbook, but great information and great source for reference or if you’re looking to read something a bit intense!

mathematical experience

2) Unknown Quantity: A Real and Imaginary History of Algebra by John Derbyshire. Discover the stories and histories behind the subjected of algebra, spanning place and time! See the origins and development of mathematical thought from the past all the way to modern times. In this math book, you will meet many mathematicians, learn about their contributions to the subject, as well as, their stories. If you ever wanted to answer questions such as, why are we learning this in the first place? and where did the quadratic equations come from, this is the math book for you!

mathematical association

3) Men of Mathematics by Eric Temple Bell. This is a mathematic classic (yet maybe dated) history of mathematics book. I only say it may be dated because it was written in 1937. Although it is from the 30’s, we must all admit that the ancient history of math to more modern day nineteenth century calculus with Isaac Newton has not changed and that is why it is still on this list. Just be ready to not hear much in terms of the development of technology, but be ready to learn about achievement in mathematics from several famous mathematicians throughout the ages.

Biography:

Mathematics is an invented subject. Invented by people throughout time all over the world. Learn in detail about who these people were, their struggles, their discoveries, and of course about their contributions to mathematics.

1) Hidden Figures: The American Dream and the Untold Story of the Black Women Mathematicians Who Helped Win the Space Race by Margot Lee Shetterly. The movie we all know and love was a book first! Always fun to read the book if you haven’t already to see any differences. And for those of you who don’t know what the book is about, it is based on the true story and follows a group of black women working at NASA as mathematicians, known as “human computers.” Although their contributions to NASA were essential at the time, they faced discrimination in the work place in the early 1960s.

mathematical experience

2) The Man from the Future: The Visionary Life of John von Neumann by Ananyo Bhattacharya. This is a biography about John von Neumann, a child prodigy of mathematics, born in Budapest, Hungary, who would grow up to create the first ever digital computer and theorized the future existence of nanotechnology. Known to be smarter than Albert Einstein, he also contributed to logic/sets, quantum mechanics, games theory, nuclear strategy, artificial intelligence, and more! This book takes us on a tour of Von Neumann’s life and ideas and is an interesting read for anyone looking to learn more about this genius scientist from the early 1900’s.

mathematical experience

3) Alan Turing: The Enigma by Andrew Hodges. Another book that eventually became the movie you may know as, “The Imitation Game.” This book is the story of Alan Turing, a British mathematician that helped saved the Allies from Nazis in WWII with his universal machine, a foundation of the modern computer as we know it! Turing creates his machine and uses to crack enigma, the German code, to unlock their secrets and eventually win WWII. Interesting to find the differences between the book and the movie to see real and imaginary history, as the book has much more mathematically intense and technical material when compared to the story of the movie. Good read for those who want to learn more about Turing and the math behind his machine!

conceptual development

4) Logicomix: An Epic Search for Truth by Apostolos Doxiadis and Christos H. Papadimitriou, illustrated by Alecos Papadatos and Annie Di Donna. This is a graphic novel and biography about the philosopher Bertrand Russell as he searches for the logical foundations of mathematics and connects with other mathematicians. This book takes us on a journey back in time to Europe during WWI and shows Russell’s life including both his mental and professional struggles. With beautiful illustrations, this is an interesting read for anyone looking to learn more about Bertrand Russell.

conceptual development

Mathematics History for Kids

The list of top math books for kids is great for classrooms, libraries and who are we kidding, adults will also enjoy these books too! This a great way to learn more about math in a kid friendly and easy to understand way. Many of these books provide great illustrations that are perfect for visualizing stories as well as math.

1) A Quick History of Math: From Counting Caveman to Computers (Quick Histories) by Clive Gifford, illustrated by Michael Young. This book is for children aged 8-12 and is choc full of illustrations, that beautifully represent math visually for better understanding of the subject. Perfect at home or in the classroom as it makes the history of math fun for kids in grades 3-7. Be prepared to have fun reading and dive into the ancient history of mathematics including the invention of zero and the pythagorean theorem, while picking up fun math tips and tricks along the way!

mathematical experience

2) The Girl With a Mind for Math: The Story of Raye Monatague by Julia Finley Mosca, illustrated by Daniel Rieley. A story about a little girl who defies all odds to reach her dreams of becoming an engineer! Her aptitude for math and STEM is amazing, but her determination, fearlessness and humor is at the heart of this story of mathematics! This is an amazing and inspiring book with technical and biographical back matter in the back. Did I mention this book is based on the real life story of Raye Montague?! Montague was the first female program manager of ships in the United States Navy. Great for classroom or library book to have for discussion.

3) Whats the Point of Math? by DK. Written for children in grades 4 through 7, I honestly think this book could stretch even beyond that as it can appeal to younger kids and even adults. All ages should be able to enjoy a book that makes math simple and easy to understand while using illustrations. Learn how the origins of mathematical concepts such as sequences, pattern recognition, and trigonometry and see how these topics impact our lives in modern times. While reading this book, enjoy mathematical brain teasers, puzzles, games, math magic tricks, and fun facts along the way! Increase mathematical thought for your kids, for your students, or maybe just yourself!

Have you read any of the above books? What did you think? Is there a book on mathematics you think is missing from the list? Let me know in the comments below!

Also, don’t forget to follow us on social media links below. Thanks for stopping by and Happy calculating!

Facebook ~ Twitter ~ TikTok ~ Youtube

Trig Identities

Hi everyone and welcome to MathSux! In today’s post, we are going to dip our toes into Trig Identities! There are a ton of trig identities out there but six trig functions that you’ll need to know for trig identity proofs, luckily most of them are related to the trigonometric functions you are probably already familiar with! Trig proofs involve working with trig functions we are already familiar with (sin θ, cos θ, tan θ), but breaking them down, inverting each trig function, and applying rules that are always true (otherwise known as trigonometric identities).

Proofs can feel a bit tricky at first, but with some practice they should start to feel more normal! The key is to always leave one side of the equation alone, while working with and manipulating the other side of the equation until it matches the other.

This is a great topic for getting more familiar with trig without actually having to work with any triangles. If you are familiar with the trig identities below you should feel good about answering these types of questions. Below you’ll also find a trig identity cheat sheet and a list of even more trigonometric identities that you may need! Also, don’t forget to check out the video and practice questions below to master trigonometric identities.  Happy calculating!

Trig Functions Identity Cheat Sheet:

Inverse Trigonometric Identities:

Inverse Trigonometric Identities, are the inverses of the same trig functions we all know and love (sin θ, cos θ, tan θ). When we take the inverse of sin θ, cos θ, tan θ, we end up getting these new trig functions: csc θ=1/sin θ, sec θ=1/cos θ, and cot θ=1/tan θ!  The trig functions and their inverses should all look familiar, so memorizing them should piece a piece of cake! Simple? Yes! These are a big key to solving many trig identity proofs.

Trig Identities

Trigonometric Ratio Identities:

Trigonometric Ratio Identities are great for breaking down tan θ and cot θ into tan θ=sin θ/cos θ and cot θ=cos θ/sin θ. Notice that tan and cot are the reciprocal of one another, all we need to do is remember the following:

Trig Identities

Trigonometric Pythagorean Identities:

Trigonometric Pythagorean Identities are based on none other than the pythagorean theorem in relation to trigonometry and the unit circle. The main equation to know for all of the listed Pythagorean Identities, is sin 2 θ+cos 2 θ=1. Knowing this one equation allows us to derive 8 more related pythagorean identity functions which will ultimately help us when breaking down trig functions in our trigonometric identity proofs. Below front and bolded is our main Pythagorean Identity:

Trig Identities

Now that we have everything we need to prove trig identities true, let’s apply our new knowledge and  take a look at an example below:

Example:

Step 1: First, we are going to focus on the left side of the equation only, trying to get it equal to the right side, leaving csc θ+cot θ unchanged.

Trig Identities

Step 2: Notice, we can expand the left side of the equation out, separating the sinθ in the denominator under each term of the numerator. This is based on basic rules for adding and subtracting fractions…nothing new or related to trig functions yet!

Trig Identities

Step 3: Now, looking at our trigonometric inverse and ratio identities, we can see that 1/sin θ can be re-written as the trig functions inverse identity, csc θ and that cos θ/sin θ can be re-written as trigonometric ratios identity as cot θ.  Let’s re-write those and fill them in below to get the correct answer and prove our trigonometric functions equation true:

Ready for more examples to try on your own!? Check out the practice problems below:

Practice Problems:

Prove each of the following true, then check your answer, with each worked through trig functions identity proof below.

Solutions:

Looking for more trigonometric identities? Check these out below for your reference! The trigonometric identities below are used for specific questions separate from the proof examples shown earlier in this post. But there will come a time when these will be needed so hold on to them for now and let me know if you’d like to see some examples!

Co-Function Identities:

Each of the Co-Function Identities below represents each basic trig function and their corresponding complementary angle, meaning that they each add to 90º (or in radians π/2).

trigonometric identities

Half Angle Identities:

trigonometric identities

Double Angle Identities:

trigonometric identities

Sum and Difference Identities:

Also known as ptolemy’s identities, the following are the sum and difference formulas for sine and cosine.

Still got questions? Have a favorite trigonometric identity? Don’t hesitate to email or comment below with any questions to clear things up! Happy calculating!

Also, don’t forget to follow us on social media to get the latest and greatest MathSux lessons, videos, questions, and more!

Facebook ~ Twitter ~ TikTok ~ Youtube

Related Trigonometry Posts:

The Unit Circle

Basic Right Triangle Trigonometric Ratios (SOH CAH TOA)

4545 90 Special Triangles

30 60 90 Special Triangles

Graphing Trigonometric Functions

Transforming Trig Functions

Factoring Trigonometric Functions

Law of Cosines

Law of Sines

Circle Theorems

Greetings and welcome to MathSux! In today’s post we are going to go over everything you need to know about circles. We will start by going over the different parts of a circle including the centre of the circle, radius, chord, tangent, and secant. Then we will break down different formulas of a circle to know which include area, circumference, area of a sector, and several different circle theorems used to find missing angles and arcs.

Below is a cheat sheet that sums everything up in this post, but if you keep reading, we’ll get into more detail about how these theorems work with different examples and explanations. So keep scrolling, keep reading, stay positive, and happy calculating!

Free Downloadable Circle Theorem Cheat Sheet:

Parts of a Circle:

This image has an empty alt attribute; its file name is Screen-Shot-2022-04-12-at-4.58.55-PM-1024x949.png

There are so many different parts to a circle! Let’s take a closer look at each part below with the following definitions:

  • Diameter: A line that cuts a circle in half through its center.
  • Radius: A line that goes from the center point to the edge of the circle. (Otherwise known as half the length of the diameter).
  • Center: All points along the circle are equidistant from this point. 
  • Chord: A line segment that has endpoints along a circle but does not cross its center.
  • Tangent: A continuous line that only touches the outer part of the circle.
  • Secant: A line that cuts through a circle at two points.

Circle’s Circumference:

A circle’s Circumference, measures the distance of length around the entire circle. It is like we are taking a walk around the circle and measuring how far we go along the way until we’re back where we started.

Area of a Circle:

The Area of a circle allows us to find the “area” or total value found within outline of a circle.

Circle Theorems

Area of a Sector:

We already know how to find the area of a circle, but what about the area of a sector? What does a sector even mean? A Sector is a piece of a circle, kind of like a piece of pie. Check out the example here for a clearer picture.

Arcs, Angles, & Measures of a Circle:

The Arc of a circle is a piece of the circle’s circumference.  Think of an arc like the outline of a piece of the pie, yum!

What’s with the degrees and arc AB notation ? Is there a difference?

An arc is measured in degrees by its central angle value (called an arc’s measure).  An arc is also measured by length in units of measurement such as inches or centimeters. Let’s look at the difference between each below:

Measure: The measure of an arc is the degree size of its central angle. In the example below, we can see that the degree value of arc AB is 90º (hi-lighted in green)

Circle Theorem

Length: The length of an arc is the length of the circle’s circumference and can be measured in units such as feet, inches, centimeters, etc. (hi-lighted in pink)

Circle Theorem

Are there different types of arcs?

There are two main different types of arcs: a major arc and a minor arc. As you may guess, one is bigger and one is smaller.  Let’s look at an Example:

Major Arc: An arc with a measure value greater than 180º (greater than half the circle). In the Example below, we can see that the major arc can be represented by  arc AB (hi-lighted in green).

Minor Arc: An arc with a measure value less than 180º (less than half the circle). In the Example below, we can see that the minor arc can be represented by  arc AB (hi-lighted in pink).

circle theorem

How do we calculate an arcs Length and Measure?

Finding Arc Length: To find the length of an arc, we only need one formula!

Finding Arc Measure: Calculating an arc’s measure varies depending on the presence of secants, tangents, chords, and radii. In fact, there are seven different potential situations for finding arcs measure! Surprising, I know, but  let’s look at each type one at a time:

  1. Central Angle (Two radii): When two radii are drawn from the center point of a circle, they form a central angle. A central angle is equal to the length of the arc. In the Example below, we see that arc AB has a length of 90º and  has an arc measure of 90º.  They are equal!
Circle Theorems

For more on central angles, check out the post here for practice questions and the video below:

2. Inscribed Angle: When two chords come together to touch the outline of a circle, they create something called an inscribed angle. An inscribed angle is equal to half the value of the arc length.

Circle Theorems

For more on inscribed angles, check out the post and practice questions here, and video below!

3. Intersecting Chords: When two chords intersect, they create four arcs and two sets of vertical angles.  Each set of vertical angles is congruent.  To find the value of one vertical angle, add the two arc lengths together and divide by 2.

4. Tangent and Chord: When a tangent and chord connect, they create an angle that touches the outline of the circle. The angle formed is equal to half the arc length.

Circle Theorems

5. Two Tangents: When two tangents touch the outer edge of the circle, it creates an angle.  The angle is equal to the difference between the intercepted arc lengths divided by two.

6. Two Secants: When two secants intersect outside the circle, it creates one angle and two intercepted arc lengths.  The angle is equal to the difference between the intercepted arc lengths divided by two.

Circle Theorems

For more on Intersecting Secants, check out the video below and link here for practice questions!

7. Secant and Tangent: When an angle is formed by a secant and tangent it creates one angle and two intercepted arc lengths.  The angle is equal to the difference between the intercepted arc lengths divided by two.

Circle Theorems

For more Secant & Tangent review, check out the video below!

Circle Theorems:

Theorem 1: In a circle, when an angle is formed by a tangent and radius it creates an angle.  This happens always and every time!

Circle Theorems

Theorem 2: In a circles, inscribed angles that intercept the same arc, have equal angles. These types of overlapping arcs can also be known as “angles subtended by an arc.” In the example below, angle A and angle B are angles subtended by arc CD.

Circle Theorems

Theorem 3: An inscribed angles in a semi-circle is a right angle.

Circle Theorems

Theorem 4: When a quadrilateral is inscribed in a circle, opposite angles are supplementary (add to 180º). Notice below, opposite angles A and C are supplementary, adding to 180º.

Circle Theorems

*Fun Fact! A quadrilateral inscribed in a circle is a called a Cyclic Quadrilateral!

Theorem 5: In a circle, congruent central angles, also have congruent arcs (or vice versa).

Theorem 6: In a circle, congruent central angles, also have congruent chords (or vice versa).

Now that wraps up all we need to know about circles, yay! Although we are done reviewing what we need to know, we must prepare for the questions that apply our new circle knowledge.  One Example might go something like this:

Given circle R has arc BC=95º, two tangents AB and  AC and two radii RB and RC, find the following angles and arcs.

Circle Theorems

Before we just look at the solution, make sure to try this on your own!  Remember all the answers to finding the arcs and angles of Circle R are based on the circle theorems and seven different ways of finding angles that we just went over in this post.  So, go back if you need to, I know I needed to!

And now for that long-awaited Solution:

Circle Theorems

Explanation:

Still got questions?  No problem! Check out the videos above or comment below for any questions and follow for the latest Free math lessons, videos, and practice questions! Happy calculating! 🙂

Facebook ~ Twitter ~ TikTok ~ Youtube

Tip! Also, don’t forget to check out the links found throughout this post for each related related lesson on central angles, inscribed angle theorems, intersecting secants theorem, and area of a sector, to dive even further into practice questions, videos, and more!