Happy Wednesday math peeps! In today’s post, we are going to go over Proving Similar Triangles, by going over:
1) What it means when two triangles are similar?
2) How to prove two triangles similar?
3) How to find missing side lengths given triangles are similar?
For even more practice, don’t forget to check out the video and practice problems below. Happy calculating! 🙂
What are Similar Triangles?
When two triangles have congruent angles and proportionate sides, they are similar. This means they can be different in size (smaller or larger) but as long as they have the same angles and the sides are in proportion, they are similar! We use the “~” to denote similarity.
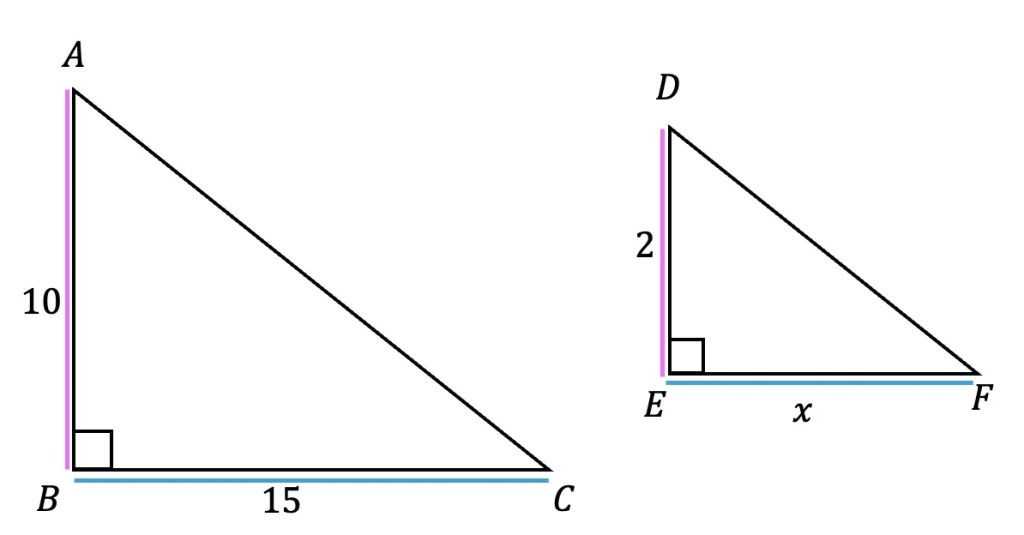
In the Example below, triangle ABC is similar to triangle DEF:
How can we Prove Triangles Similar?
There are three ways to prove similarity between two triangles, let’s take a look at each method below:
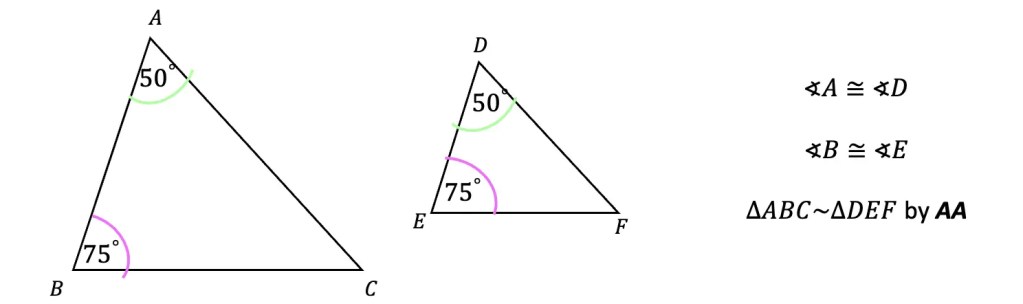
Angle-Angle(AA): When two different sized triangles have two angles that are congruent, the triangles are similar. Notice in the example below, if we have the value of two angles in a triangle, we can always find the third missing value which will also be equal.
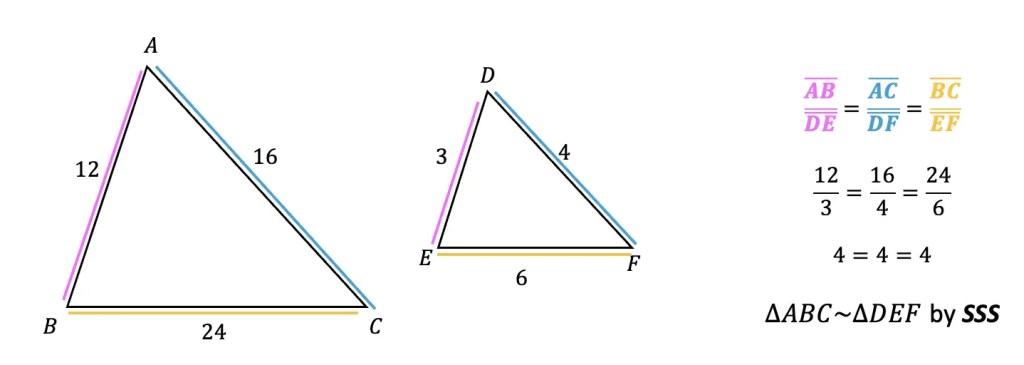
Side-Side-Side (SSS): When two different sized triangles have three corresponding sides in proportion to each other, the triangles are similar.
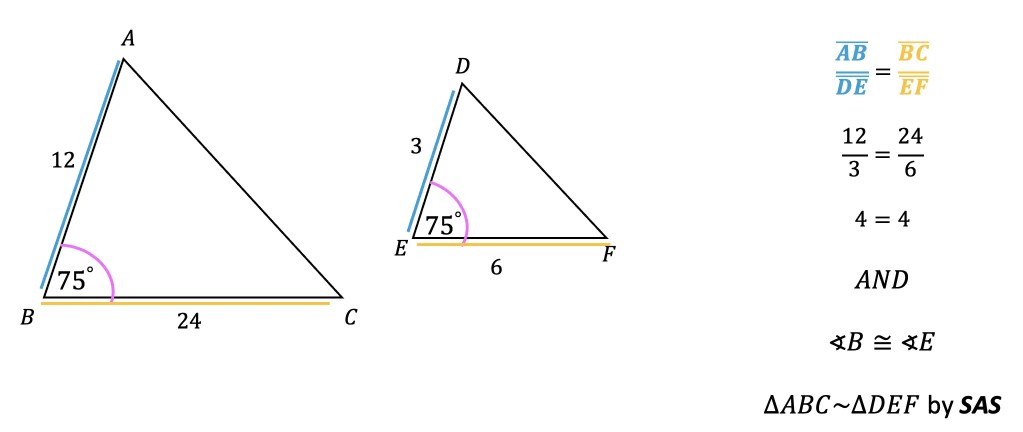
Side-Angle- Aside (SAS): When two different sized triangles have two corresponding sides in proportion to each other and a pair of congruent angles between each proportional side, the triangles are similar.
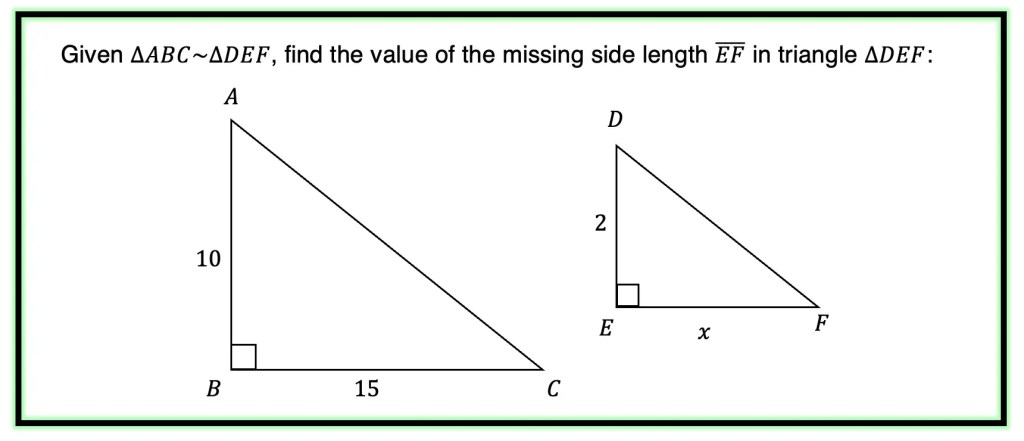
Let’s look at how to apply the above rules with the following Example:
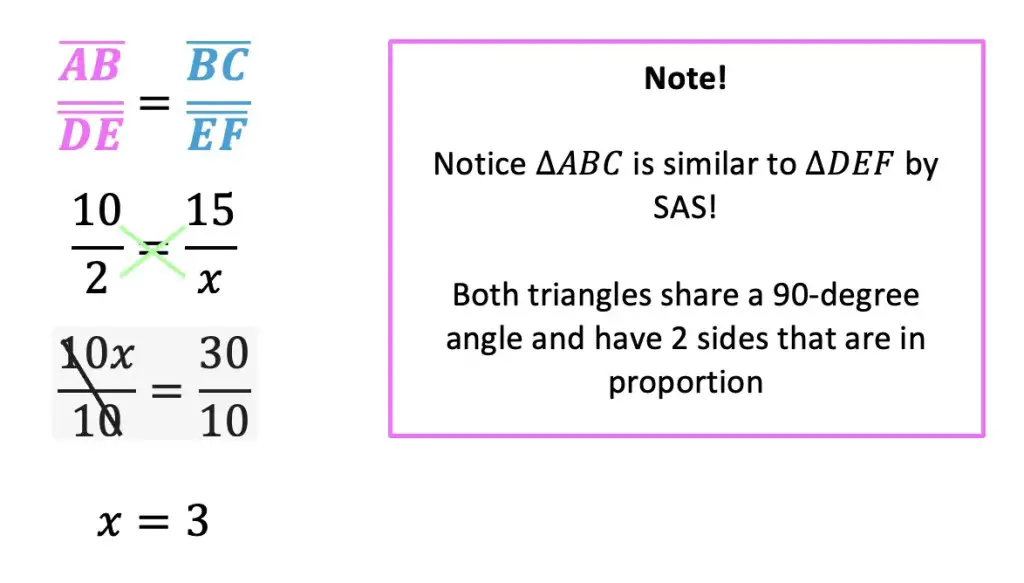
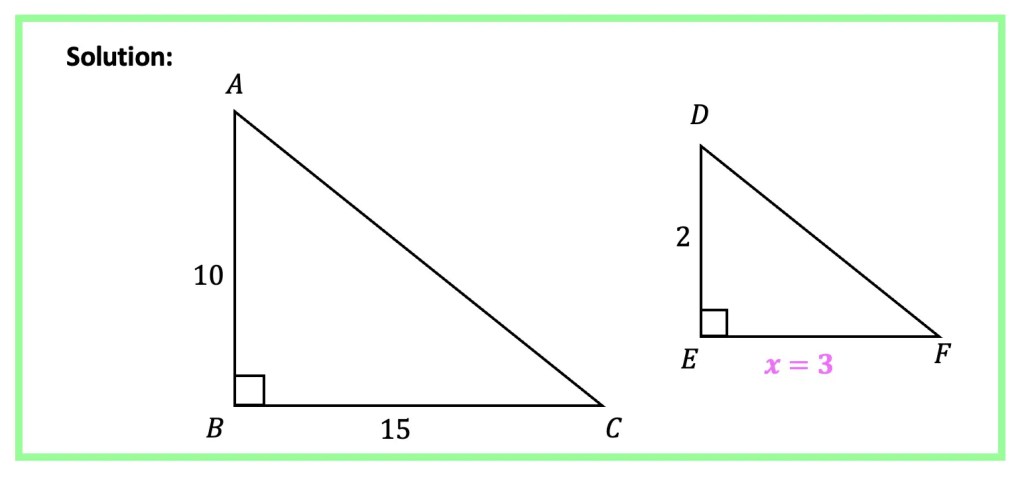
Step 1: Since, we know the triangles ABC and DEF are similar, we know that their corresponding sides must be in proportion! Therefore, we can set up a proportion and find the missing value of length EF by cross multiplying and solving for x.
Practice Questions:
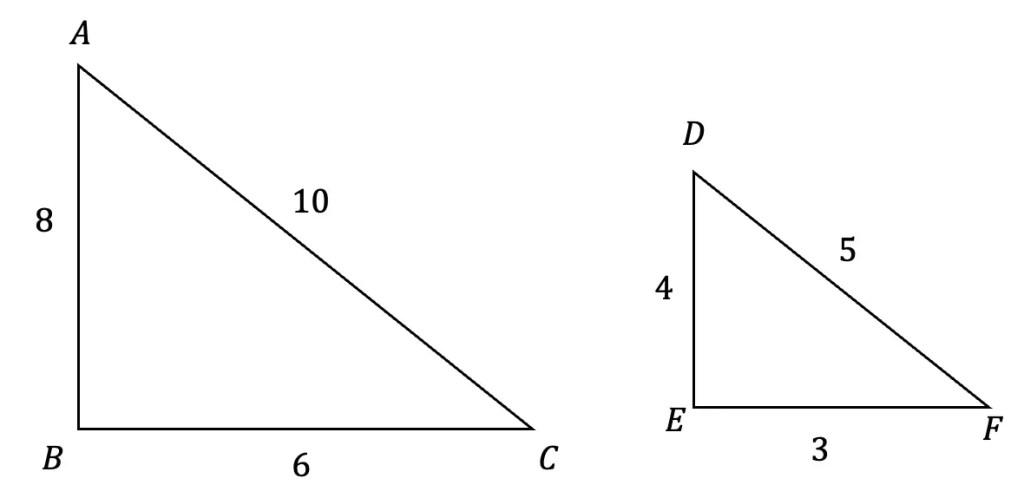
1) Are the following triangles similar? If so, how? Explain.
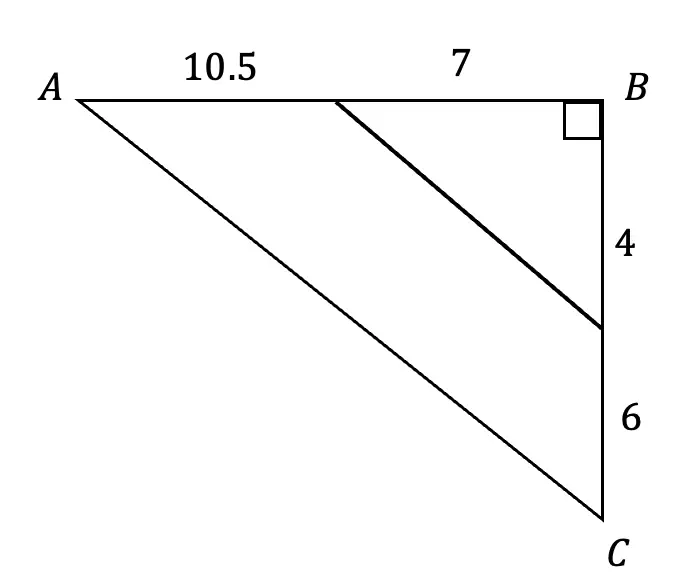
2) Are the following triangles similar? If so, how? Explain.
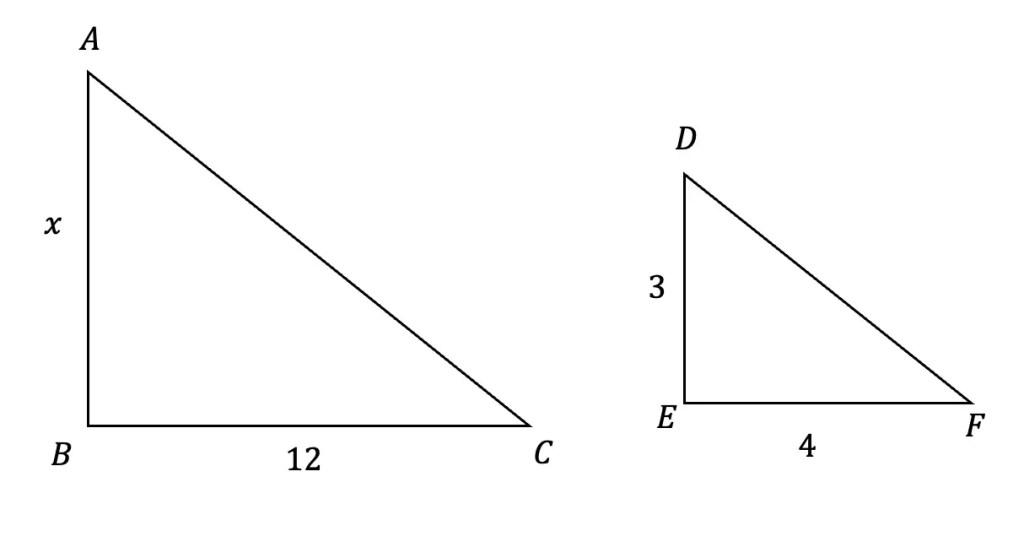
3) Given triangle ABC is similar to triangle DEF, find the side of missing length AB.
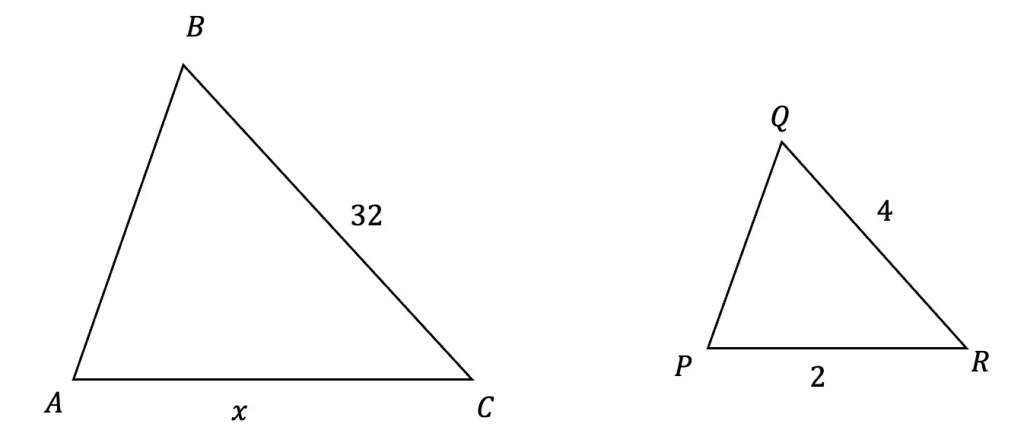
4) Given triangle ABC is similar to triangle PQR, find the side of missing length AC.
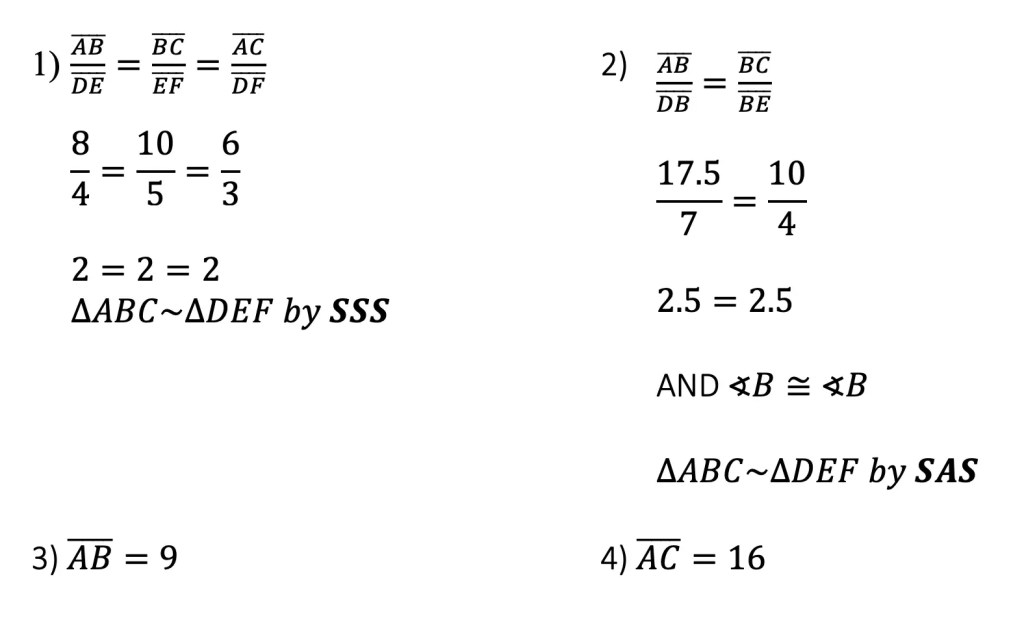
Solutions:
Still got questions? No problem! Don’t hesitate to comment with any questions below. Thanks for stopping by and happy calculating! 🙂
Greetings! We are going to do something a little different today and explore Math + Art: Math Behind Perspective Drawing. For all the artists out there who tend to not generally gravitate towards math, this post is for you! There are many ways math can be connected to art, and in this post we will explore the role parallel and perpendicular lines play when it comes to drawing 3-D shapes. And for those who want to learn even more, don’t forget to check out the video below to see how 2-point perspective applies geometry and angles to create 3-D shapes.
What is Perspective Drawing?
Perspective drawing is an art technique that allows us to draw real life objects in 3-D on a flat piece of paper. Notice in the example below that buildings, trees, and power lines get smaller and smaller as we look into the distance just as they would in real life.
What are the Basics of Perspective Drawing?
There are two main things we need to know about perspective drawing.
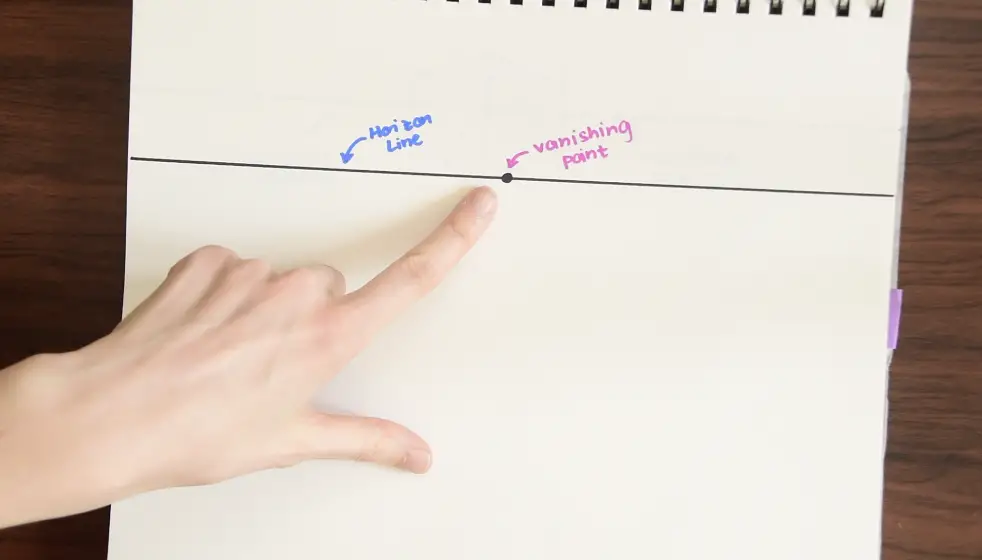
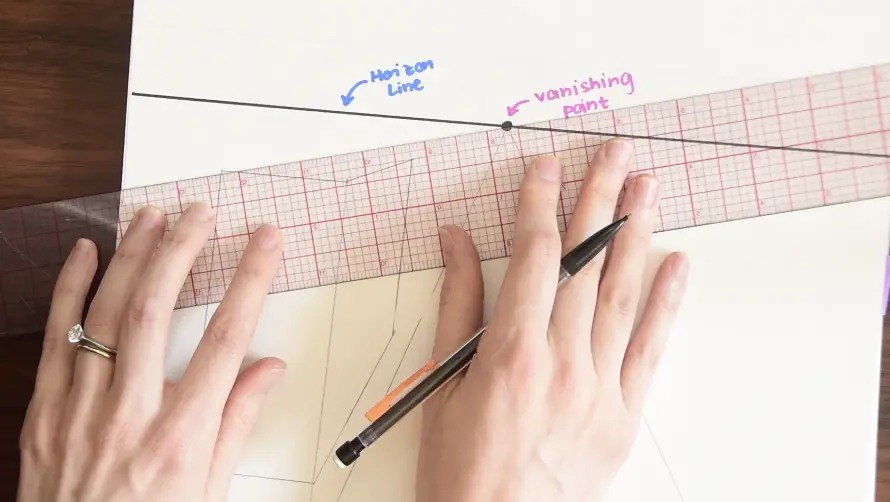
1- Horizon Line: A horizontal line that goes across the entire paper. This represents where land and sky meet.
2- Vanishing Point: This is where many of our lines will be directed in order to create that 3-D affect.
Where do I Begin?
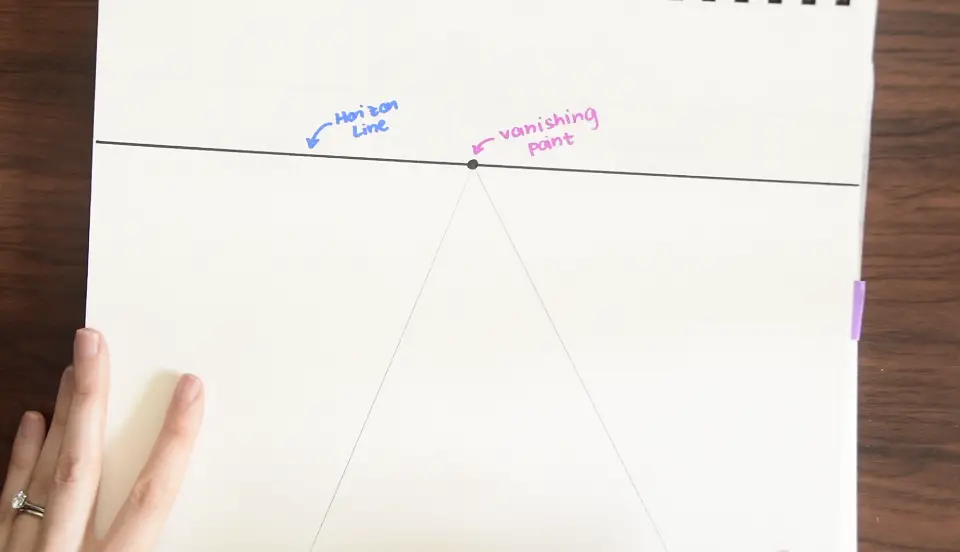
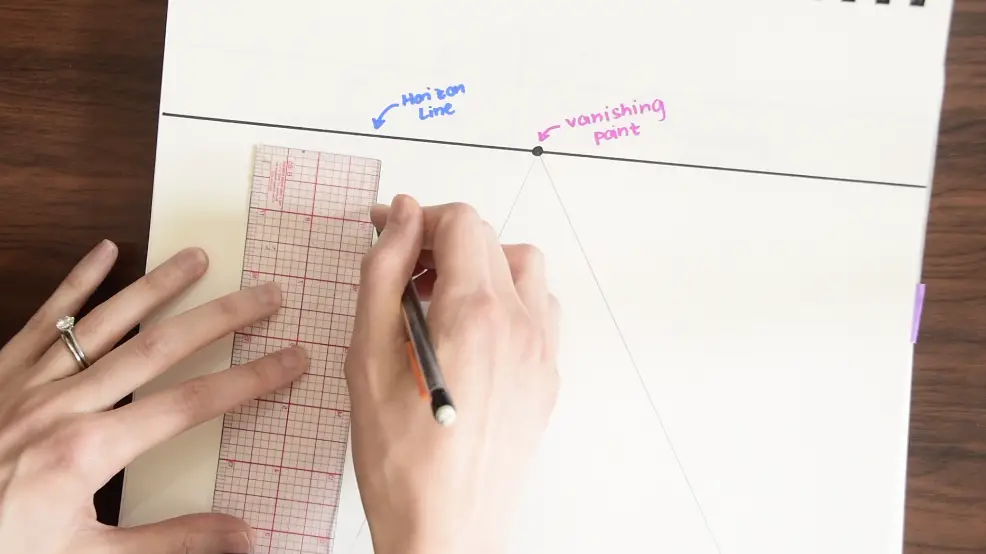
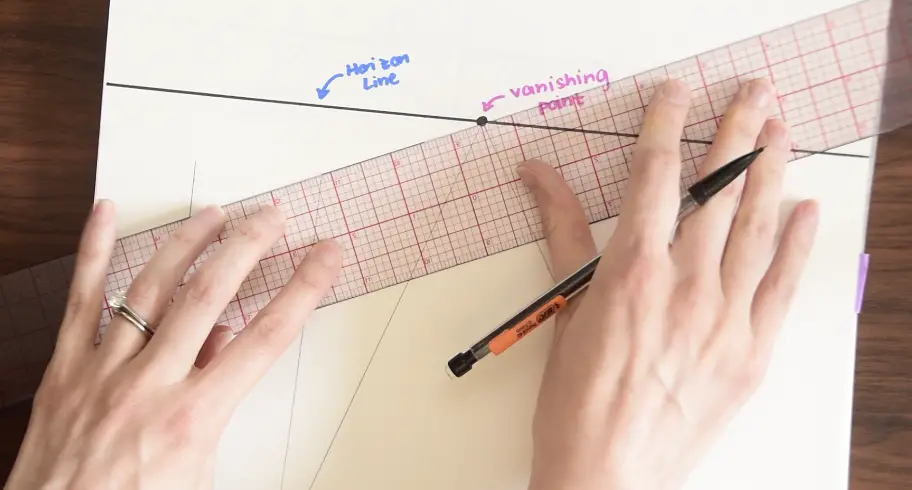
Step 1- Now that we have our horizon line and vanishing point, we can start by drawing a road. Use a ruler to draw two lines that lead to the vanishing point, this should resemble a triangle.
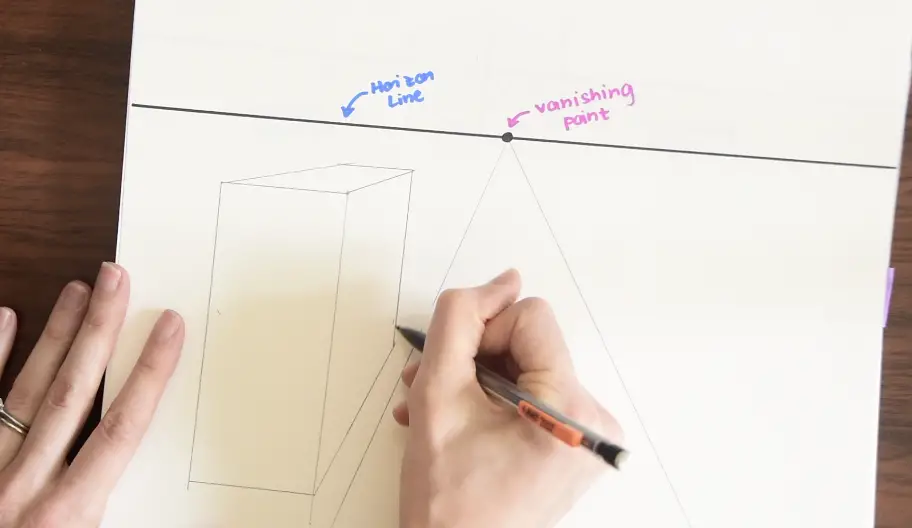
Step 2-From here we can start to draw a building by creating two straight lines that are perpendicular to our horizon line.
Step 3-Then line up the outermost corner of the building with the vanishing point using a ruler, and draw a line. Do this with each corner of our rectangle for a 3-D effect.
Step 3- continued….
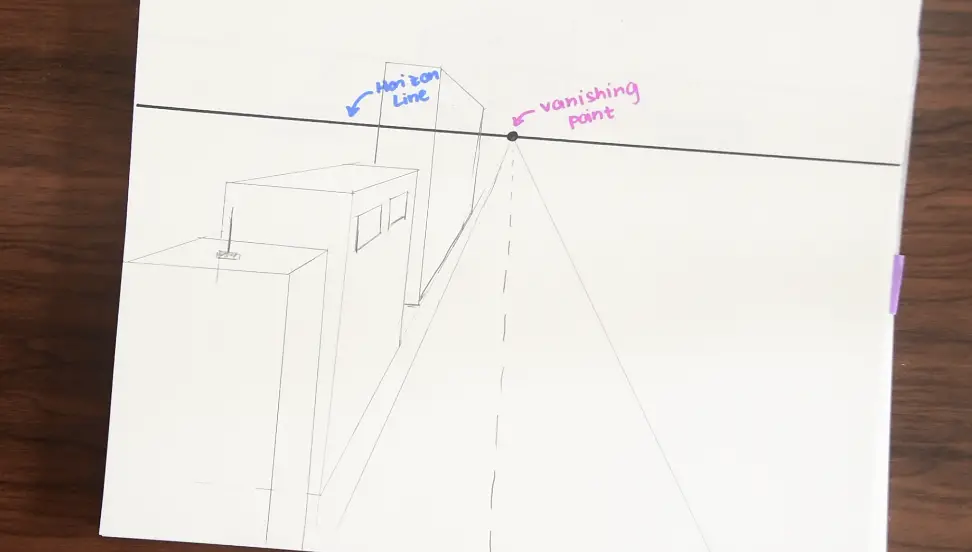
Step 4- For the remaining lines, use parallel and perpendicular lines to finish off our building.
Step 5- Get creative! Add more buildings, windows, antennas, and anything else you might see in a city -scape. Use your imagination! 🙂
This method of perspective drawing is called one-point perspective because there is one vanishing point. But there are also 2-point and 3-point perspectives we can draw!
Want to learn how to do 2-Point Perspective drawing with 2 vanishing points!? Check out the video above to see how geometry and angles are related to this technique of perspective drawing!
Still got questions or want to learn more about perspective drawing? No problem! Don’t hesitate to comment with any questions below. Thanks for stopping by and happy calculating! 🙂
Algebra 2/Trig. Common Core Regents Jan.2020 Playlist:
Happy Wednesday math friends! In today’s post, I bring to you the latest complete NYS Regents review playlist for Algebra 2/Trig. for January 2020. This is the perfect time to start reviewing for the NYS Regents test so I hope these videos can provide some help before the test cramming begins. Also, be on the lookout for the Geometry Regents review playlist coming out soon. Thanks so much for stopping by and happy calculating!
Still got questions? No problem! Don’t hesitate to comment with any questions below. Also, if you find you need some motivation, check out my 6 tips and tricks for studying math here! Thanks for stopping by and happy calculating! 🙂
Hi everyone and welcome to MathSux! In this post, we are going to answer the question, what is the discriminant? Before going any further, if you need a review on what the quadratic equation or imaginary numbers are, check out each related link! Also, don’t forget to check out the video and practice questions below. Happy calculating! 🙂
What is the Discriminant?
The discriminant is a formula we can use that tells us more about a quadratic equation including:
The number of solutions a quadratic equation has.
The “nature” of the roots of the solution (rational/irrational or real/imaginary).
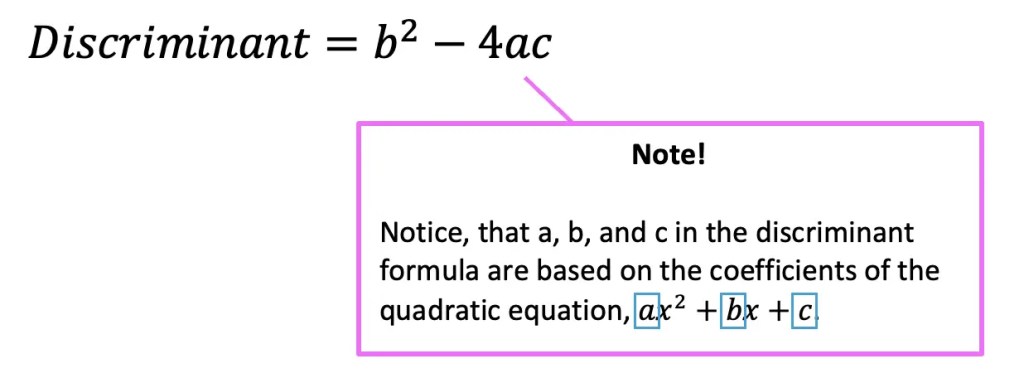
Discriminant Formula:
The discriminant formula may look familiar! It is part of the quadratic formula and we have seen it before, using the very same coefficients a, b, and c from the quadratic equation.
How does it Work?
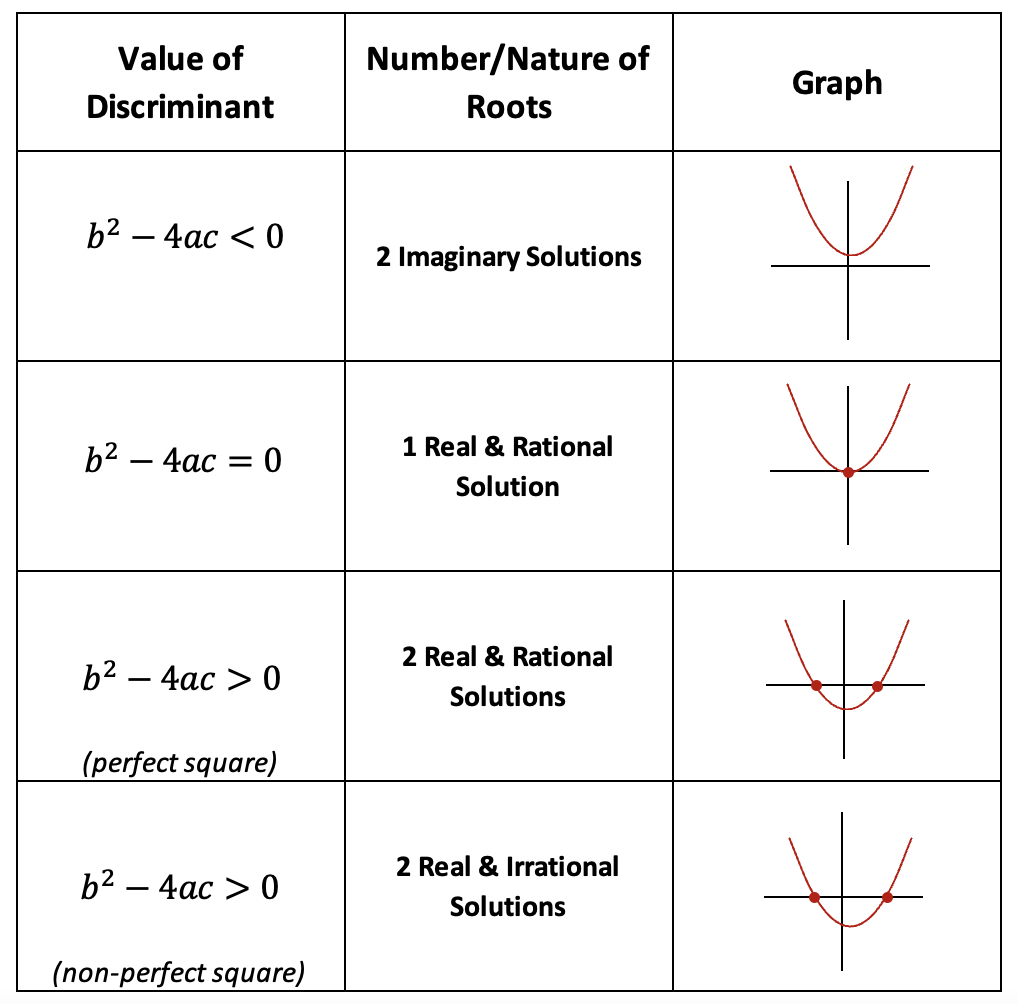
When we find the value of the discriminant of any quadratic equation, it will give us a value that tells us how many solutions (or roots) a quadratic equation has. Remember when we say “roots” what we really mean are the x-value(s) of the quadratic equation that hit the x-axis. This value will also tell us if the solutions to the quadratic equation are rational/irrational or real/imaginary. Take a look at how it all breaks down below:
Now that we are familiar with the rules, let’s take a look at an Example:
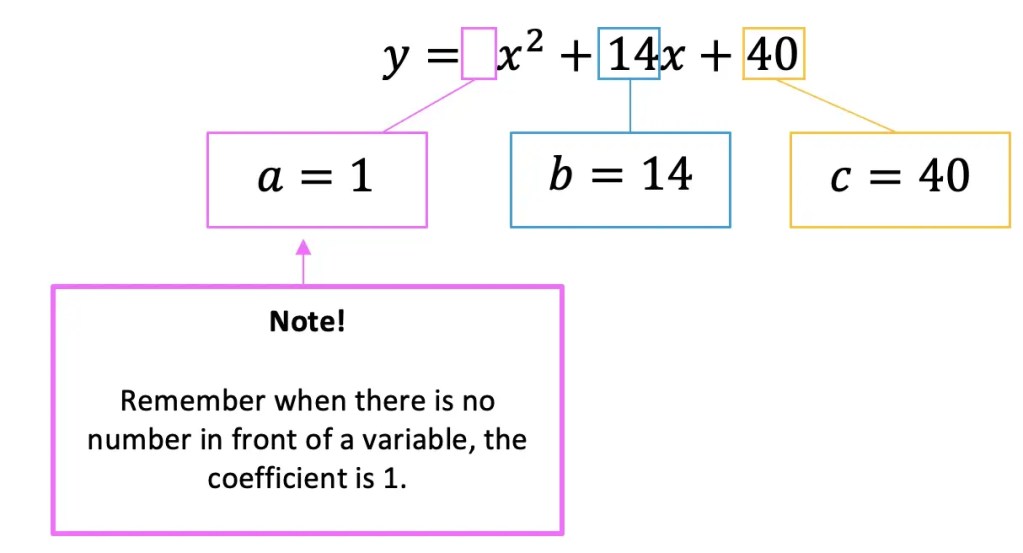
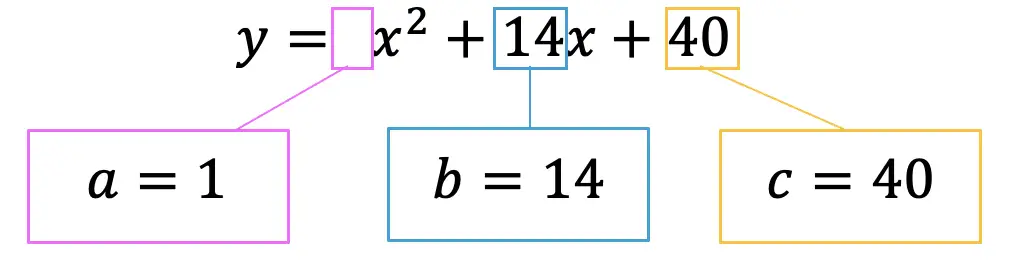
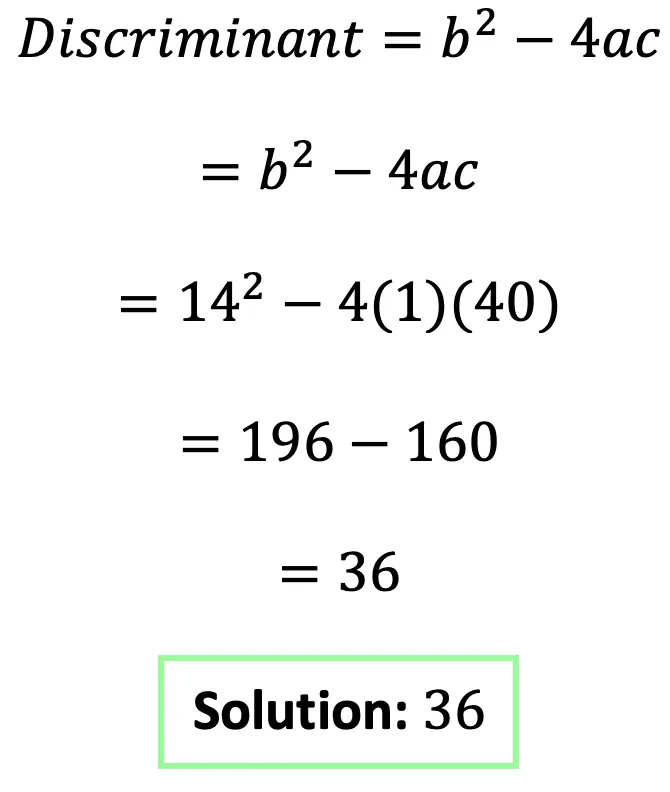
Step 1: First let’s write out our quadratic equation and identify the coefficients a, b, and c so they are ready to be plugged into our discriminant formula.
Step 2: Now let’s write out and fill in our formula using the coefficients and solve.
Step 3: Now let’s analyze our answer! Since, we got a discriminant value of 36, notice that it is a positiveperfect square! If we look back at our discriminant table, this tells us that our quadratic equation is going to have 2 real and rational solutions.
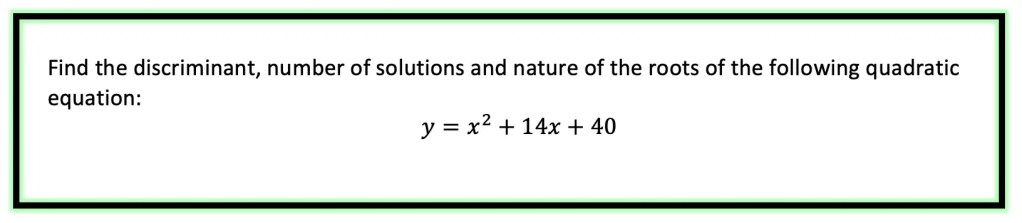
Practice Questions:
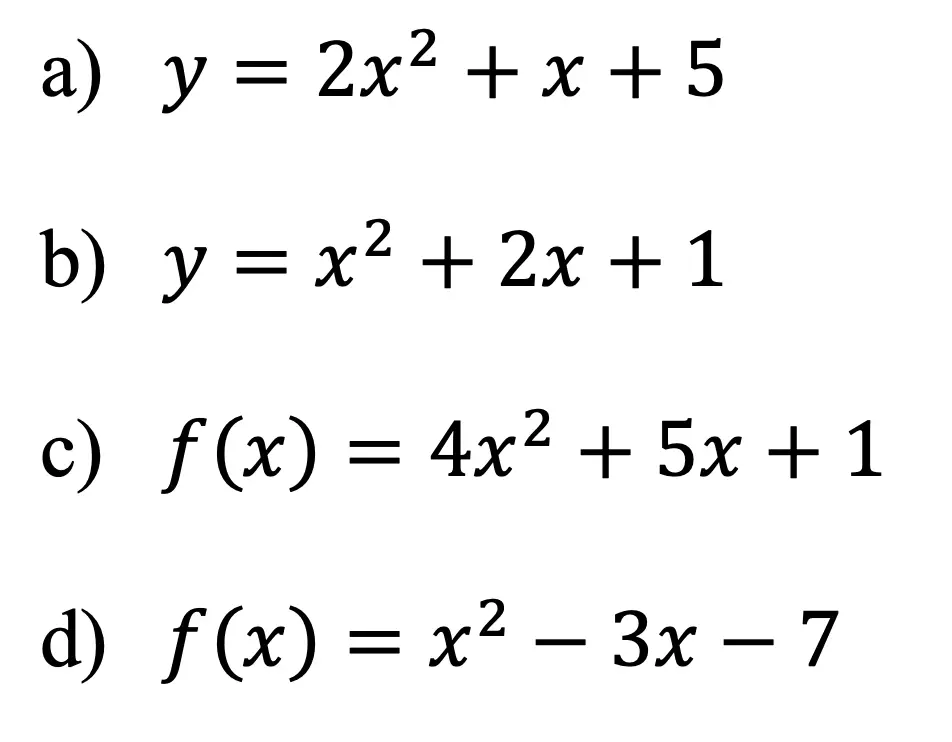
Find the discriminant, number of solutions and nature of the roots of the following quadratic equations:
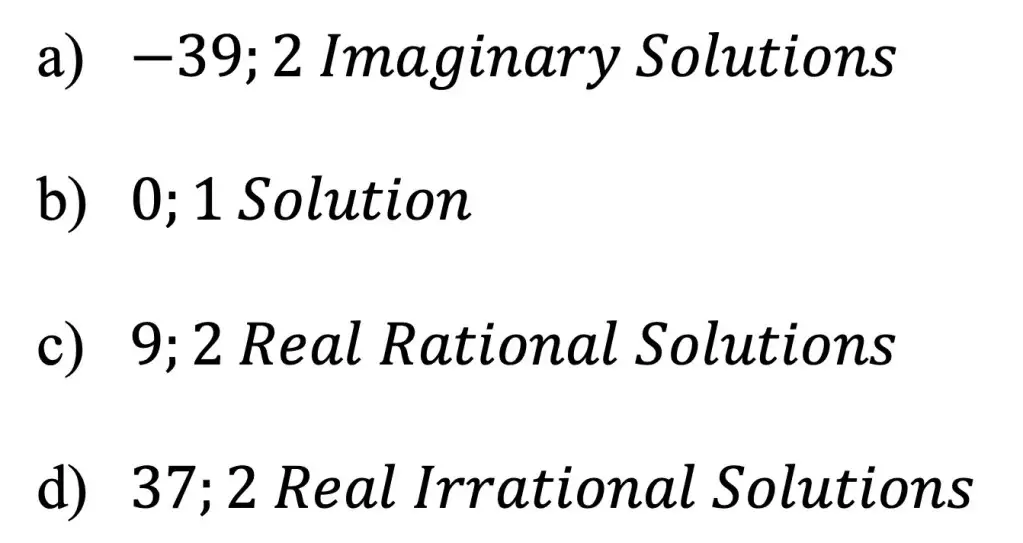
Solutions:
Still got questions? No problem! Don’t hesitate to comment with any questions below or check out the video above. Thanks for stopping by and happy calculating! 🙂
Happy Wednesday math friends! In today’s post, we are going to go over what the phrase, “finding the sum of a finite geometric series” means and then use the finite geometric series formula to solve an example one step at a time! A finite geometric series happens when we add together a finite amount of terms from a geometric sequence together. We will go into more detail below and as always if you have any questions be sure to check out the video and comment with any questions below.
*If you need a refresher on geometric sequences (otherwise known as a geometric progression) before tackling these types of questions, don’t hesitate to check out this post! And, if you’re looking for an infinite geometric series, as opposed to a finite one, also be sure to check that out.
What does it mean to find the “Sum of the Finite Geometric Sequence”?
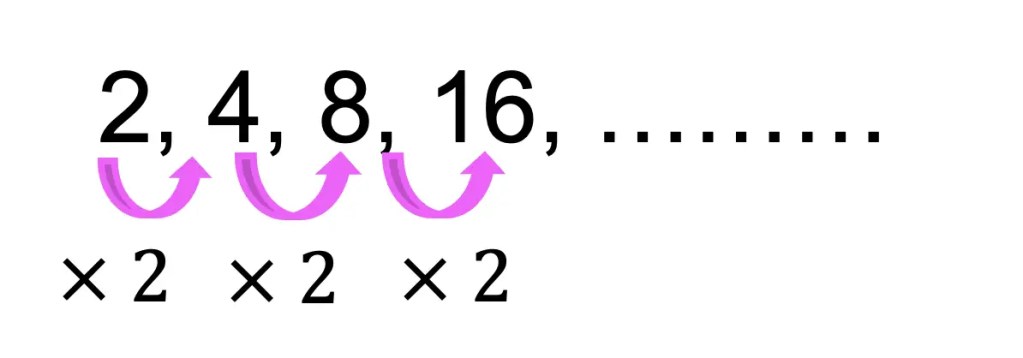
We already know what a geometric sequence is: a sequence of numbers that form a pattern when the same number is multiplied or divided to each subsequent term. In the example below, we can see that each number in the sequence is being multiplied by the common ratio, the number 2.
Geometric Sequence Example:
But what happens if we wanted to sum the first 20 terms of our geometric sequence together? Adding 2+4+8+16+……a20 . Notice I used the notation a20 to represent our unknown 20th term of the finite sequence.
Example:
How would we calculate that? Instead of finding the first 20 terms of our sequence and adding them all together, thankfully there is a better way, which is where our Finite Geometric Series formula comes in handy!
Why is it called “finite”? Adding the first 20 terms of our geometric sequence are considered to be “finite” because the first 20 terms have a definite ending as opposed to a sequence that is infinite and goes on forever. Adding together an infinite geometric series comes with a different formula.
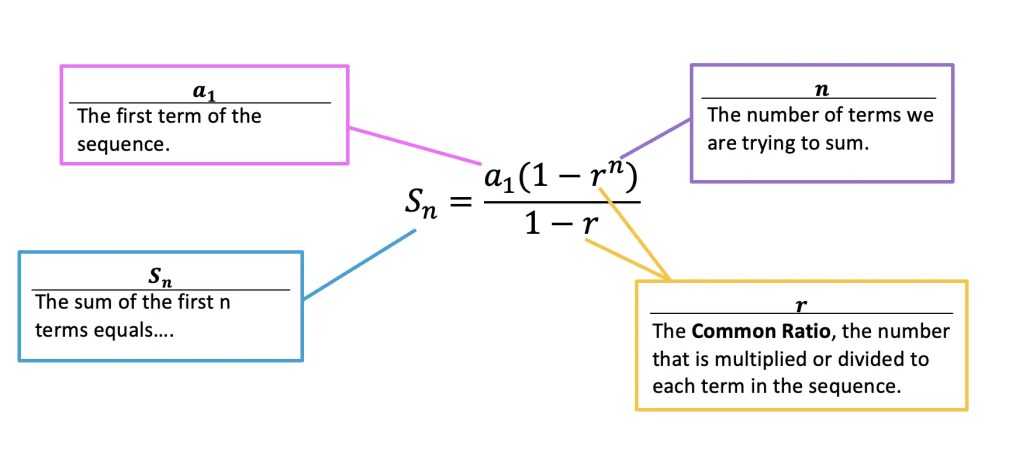
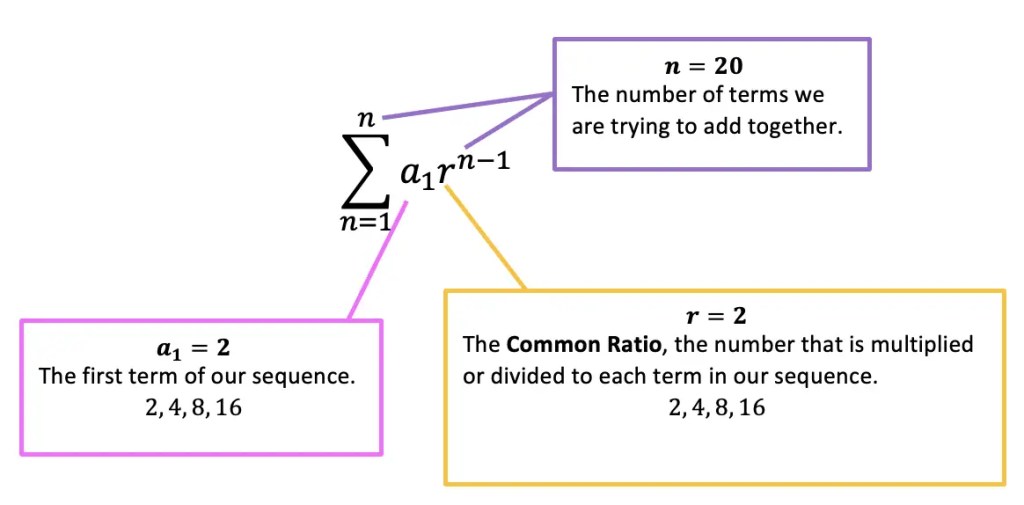
Finite Geometric Series Formula:
a1=The first term of our sequence. In this case, we can see that the first term will be the number 2 in the example above. Therefore, we can say a1=2.
r= The common ratio is the number that is multiplied or divided by each consecutive term within the sequence. In the example above, each number is multiplied by 2, therefore we can say, r=2.
n= The total number of terms we are trying to sum together. In the example mentioned above, we are trying to sum 20 terms in total, so in this case n=20.
Now that we have this finite geometric series equation to work with, let’s take another look at our question and apply our finite geometric series formula to answer the solution:
Finite Geometric Series Example:
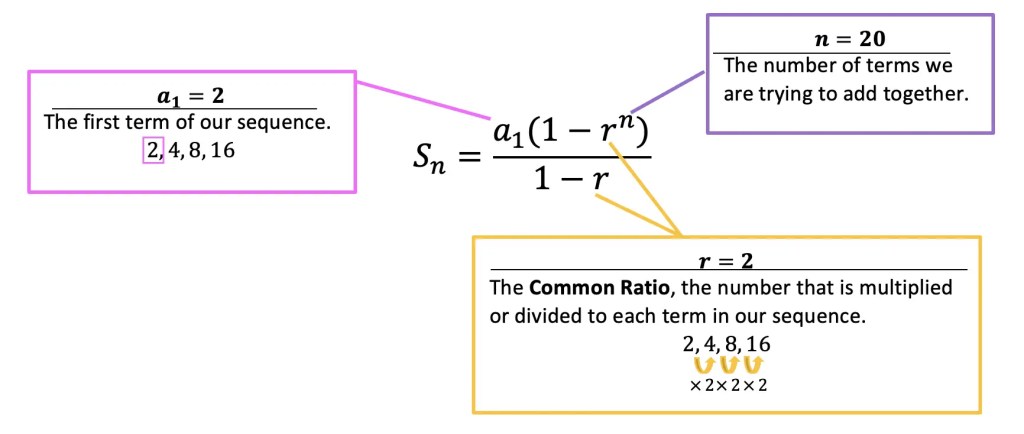
Step 1: First let’s write out the finite geometric series formula and identify what each part represents/what numbers need to be filled in.
a1=2 The first term of our sequence. a1=2.
r= 2 The common ratio is the number that is multiplied or divided by each consecutive term within the sequence.
n= 20 The total number of terms we are trying to sum together.
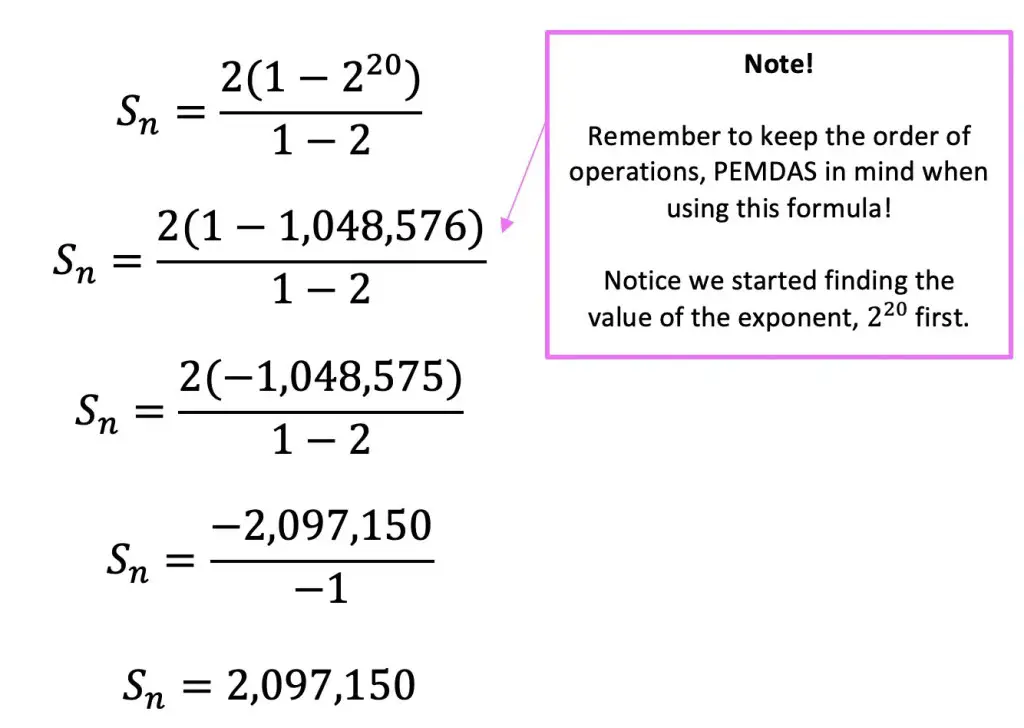
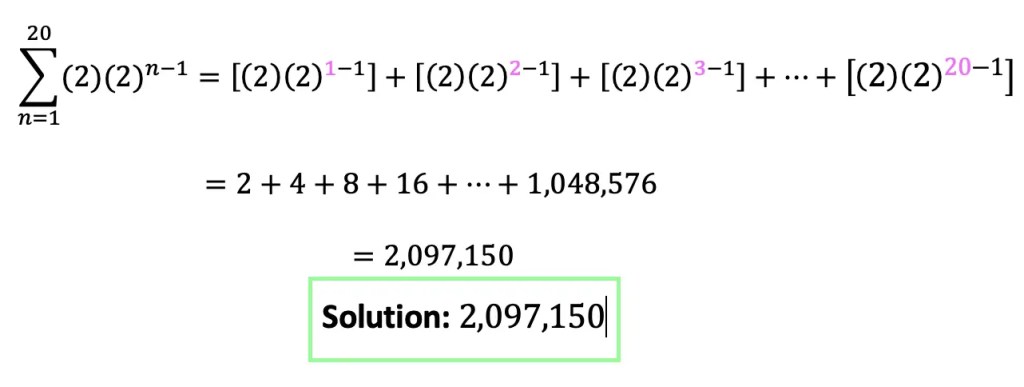
Step 2: Now let’s plug in our numbers into the finite geometric series formula and calculate and solve with the given values.
We have found our solution! Remember the number here, 2,097,150 represents the sum of the first 20 numbers of the geometric sequence given to us 2+4+8+16+……a20=2,097,150.
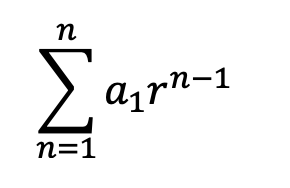
Summation Notation – Finite Geometric Sequence
You may come across the finite geometric series formula in a different format, known as summation notation or sigma notation. Writing in summation notation, we are actually writing the sum of the geometric sequence in a different way, but will still come to the same solution as we did using the formula. Check it out below:
Now that we know what each part of this summation notation looks like, let’s actually identify what each part of this equation means:
Now let us go back and try to solve our original question, finding the sum of the first 20 terms of the sequence 1, 4,8, 16, …. all the way to thew 20th term:
Notice we get the same exact solution as we did in the previous example, mission accomplished!
Note! Does the above summation notation totally freak you out? Fear not! Learn more about how summation notation works here,what it means, and don’t be intimidated by these math symbols anymore!
Think you are ready to try questions on your own? Check out similar practice questions and find the sum of each finite series below!
Practice Questions:
1) Find the sum of the first 15 terms of the following geometric sequence:
4, 12, 36, 108, ….
2) Find the finite sum of the first 12 terms of the following sequence and round to the nearest tenth:
128, 64, 32, 16, ….
3) Find the sum of the first 18 successive term of the following geometric sequence and round to the nearest tenth:
400, 100, 25, 6.25, ….
4) Find the sum of the first 12 consecutive terms of the following geometric sequence:
3, 6, 12, 24, ….
Solutions:
1) 28,697,812
2) 255.9
3) 533.3
4) 12,285
Related Posts:
Looking to learn more about sequences? You’ve come to the right place! Check out these sequence resources and posts below. Personally, I recommend looking at the finite geometric sequence or the geometric infinite series posts next!
Still, got questions? No problem! Don’t hesitate to comment with any questions below or check out the video above. Thanks so much for stopping by and happy calculating! 🙂
Greeting math friends and welcome to another wonderful week of MathSux! In today’s post we are going to break down how to construct a 45 degree angle with a compass. We will take this step by step starting with a simple straight edge, then we will create a 90 degree angle, and finally we will use an angle bisector to bisect that 90 degree angle to get two 45 degree angles. If you have any questions please don’t hesitate to check out the video and step-by-step GIF below. Thanks so much for stopping by and happy calculating! 🙂
How to Construct a 45 Degree Angle with a Compass:
Step 1: Using a straightedge or a ruler, draw a straight line, labeling each end point A and B.
Step 2: Next, using a compass, place the point of the compass on the edge of point A and draw a circle.
Step 3: Keeping the same length of the compass, take the point of the compass to the point where the circle and line AB intersect. Then swing the compass to make a new arc on the circle above line AB.
Step 4: Keeping that same length of the compass, go to the new intersection we just made and mark another arc along the circle.
Step 5: Now, take a new length of the compass (any will do), and bring it to one of the intersections we made on the circle. Then create a new arc above the circle by swinging the compass.
Step 6: Keep the same length of the compass, bring the compass to the other intersection we made on our circle to create a new arc above the circle.
Step 7: Mark a point where these two lines intersect and using a straight edge, connect this intersection to point A. Notice this forms a 90 degree angle (or a right angle).
Step 8: Now to bisect our newly made 90 degree angle, we are going to focus on the pink highlighted points where the original circle intersects with line AB and our newly made line.
Step 9: Using a compass (any length), we are going to take the compass point to one of these hi-lighted points and draw another arc.
Step 10: Keeping that same length of the compass, go to the other highlighted point and make another arc as well.
Step 11: Now with a straight edge, draw a line from point A to the new intersection of arcs we just made.
Step 12: Notice we split or 90 degree angle in half and now have two equal 45 degree angles?!
Still got questions? No problem! Don’t hesitate to comment with any questions below or check out the video above. Thanks for stopping by and happy calculating! 🙂
Constructions and Related Posts:
Looking to construct more than just a square inside a circle? Check out these related posts and step-by-step tutorials on geometry constructions below!
Looking to get the best construction tools? Any compass and straight-edge will do the trick, but personally, I prefer to use my favorite mini math toolbox from Staedler. Stadler has a geometry math set that comes with a mini ruler, compass, protractor, and eraser in a nice travel-sized pack that is perfect for students on the go and for keeping everything organized….did I mention it’s only $7.99 on Amazon?! This is the same set I use for every construction video in this post. Check out the link below and let me know what you think!
Looking for more constructions? Check out how to construct a square inscribed in a circle and an equilateral triangle by clicking on their respective links! And if you’re looking for even more geometry constructions, check out the link here!
Hi everyone and welcome to MathSux! In today’s post we are going to explore the rules for multiplying radicals, mainly focusing on multiplying binomials expressions that contain radicals. We will go over several types of examples in this post starting with the basics and working our way up to expanding radical binomial expressions and simplifying. If you need a quick review on how to expand binomials using the distributive property/box method, check out this post here. Also, be sure to check out the video and practice questions below. Thanks so much for stopping by and happy calculating! 🙂
What Are the Rules for Multiplying Radicals?
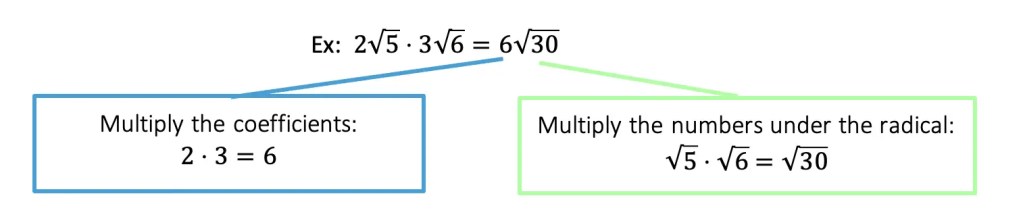
Multiply the coefficients.
Multiply the term or terms under the radical.
Simplify the solution whenever possible.
Check out more completed Examples of multiplying radicals that involve some simplifying below:
The above shows a few simple cases of multiplying radicals but let us take a look at how to multiply radicals that are placed within a binomial within these next Examples.
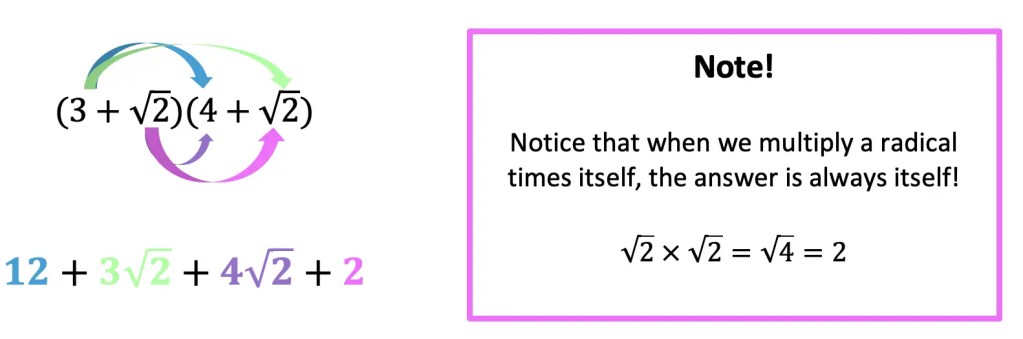
Step 1: To solve this, we are going to use the distributive property to multiply each term by each term, sometimes known as FOIL (for more on the FOIL method, check out this post, here.)
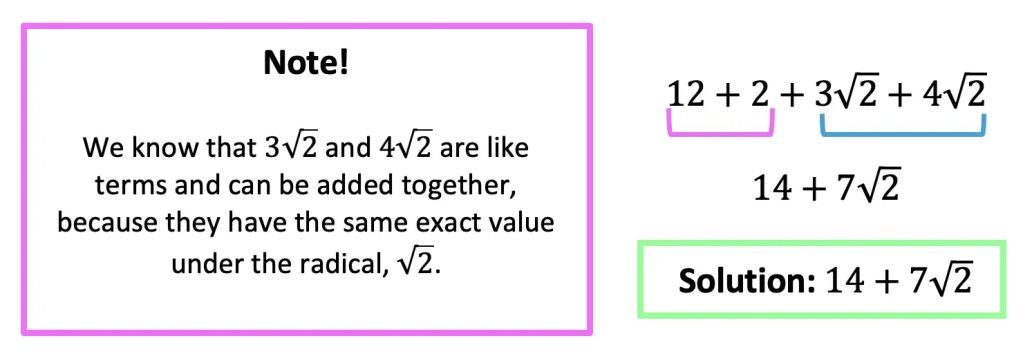
Step 2: Before we say we are done and have a solution, notice that we can simplify this even more by combining like terms, 12+2=14, we can also combine the like radical terms below because they have the same value of 2 under the radical.
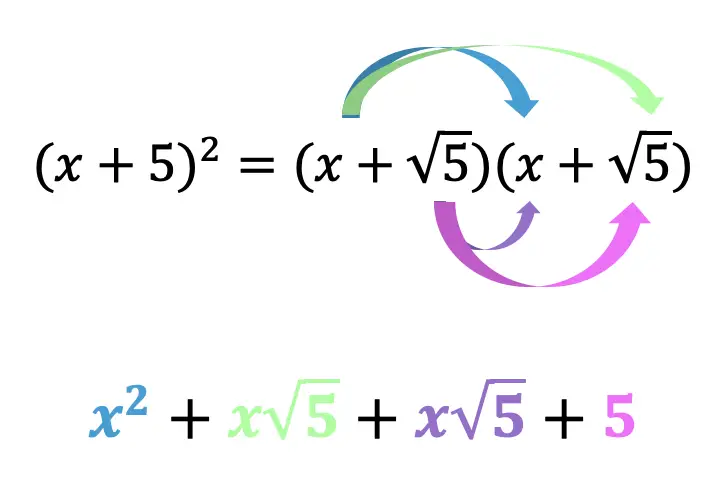
Now, let’s take a look at another type of Example, where we need to first expand binomials that contain radicals.
Step 1: Notice in with this example, we are going to need to expand this binomial and then use the distributive property (or FOIL) to multiply each term by each term.
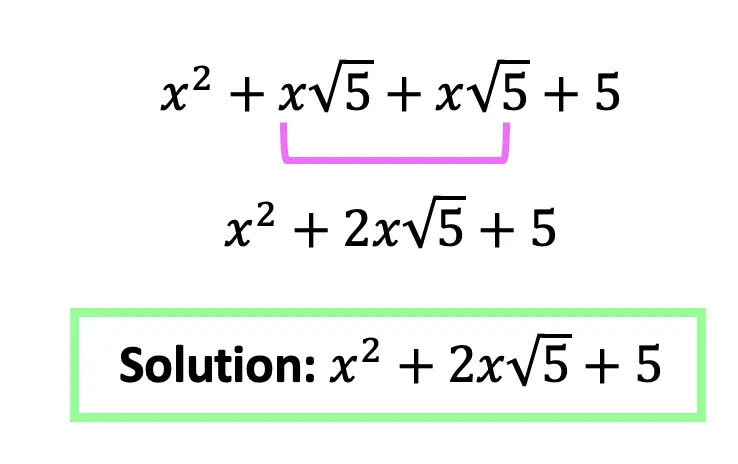
Step 2: In this case, notice that we can simplify our answer even more by combining like terms.
Try the following practice questions on your own to truly master the topic!
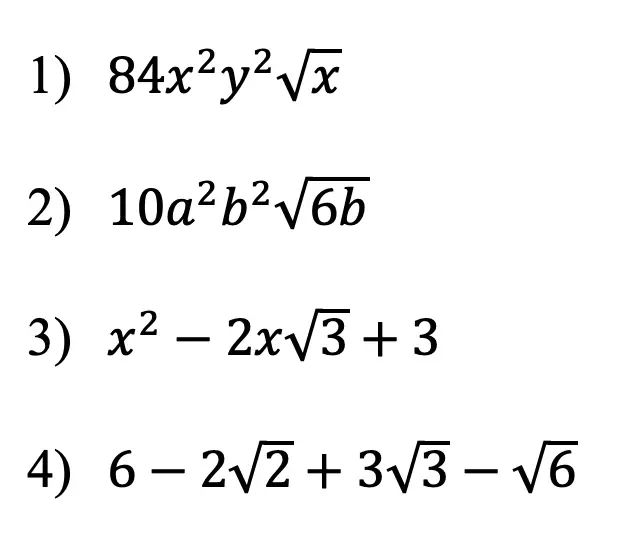
Practice Questions:
Solutions:
Still got questions? No problem! Don’t hesitate to comment with any questions below or check out the video above. Thanks for stopping by and happy calculating! 🙂
Happy Wednesday math friends! In today’s post are going to go over what the focus and directrix of a parabola are and how to find them. We will also take a look at how to find the equation of a parabola when given the focus and directrix. You may already be familiar with parabolas and quadratic equations, but with this post we will dive deeper into the definition of a parabola and understand it on a whole new level! Don’t forget to check out the video and practice questions, below. Thanks for stopping by and happy calculating! 🙂
Parabola? Vertex? Focus? Directrix? What does it all mean?!
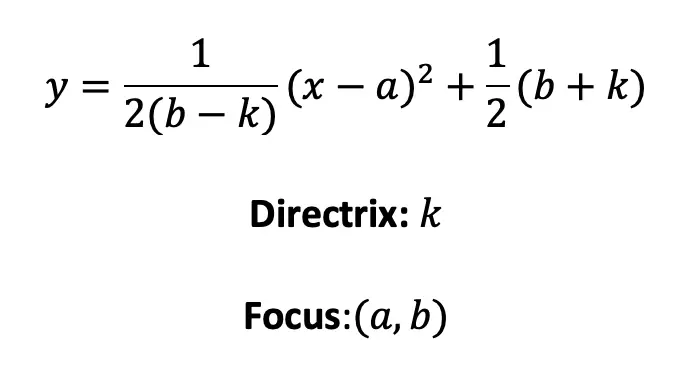
Parabola: A set of all points in a plane that are equidistant from a given point (the focus) and a given line (the directrix). The equation of a parabola in relation to the focus and the directrix is:
Vertex: The maximum or minimum point on a parabola. This coordinate point always lands on the parabola itself. Takes the coordinate form (a,(.5(b+k))) from the parabola equation above.
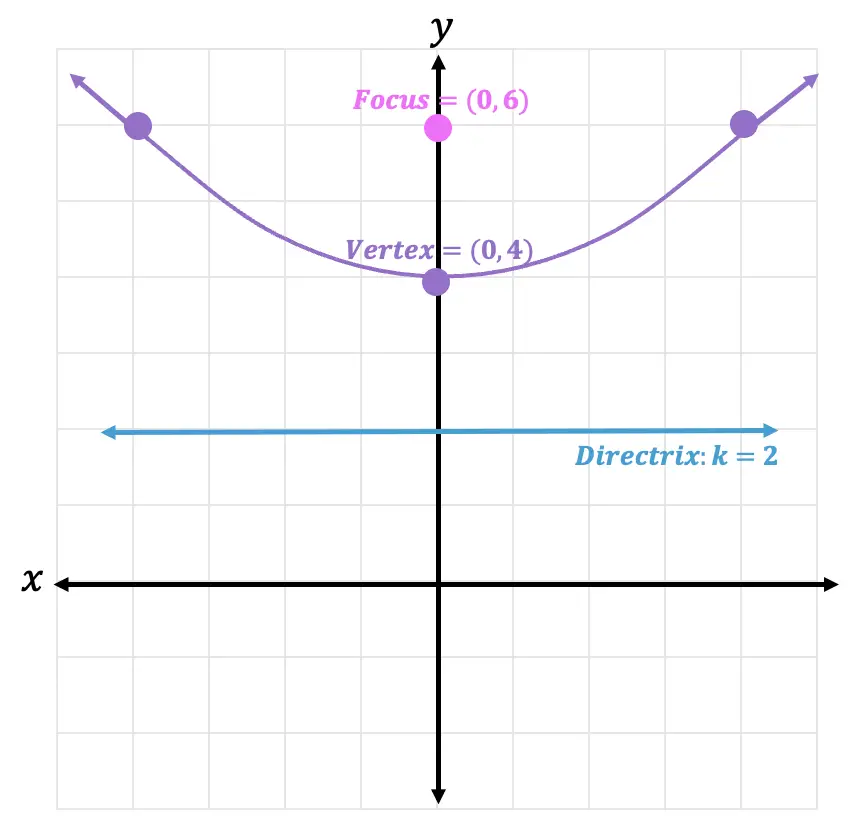
Focus: A coordinate point that is “inside” the parabola that has the same distance from the vertex as it does the distance between the vertex and directrix. Usually denotes as (a,b) within the parabola equation above.
Directrix: A horizontal line denoted as, “y= ” or “k= “, that is the same distance from the vertex when compared to the distance between the vertex and the focus.
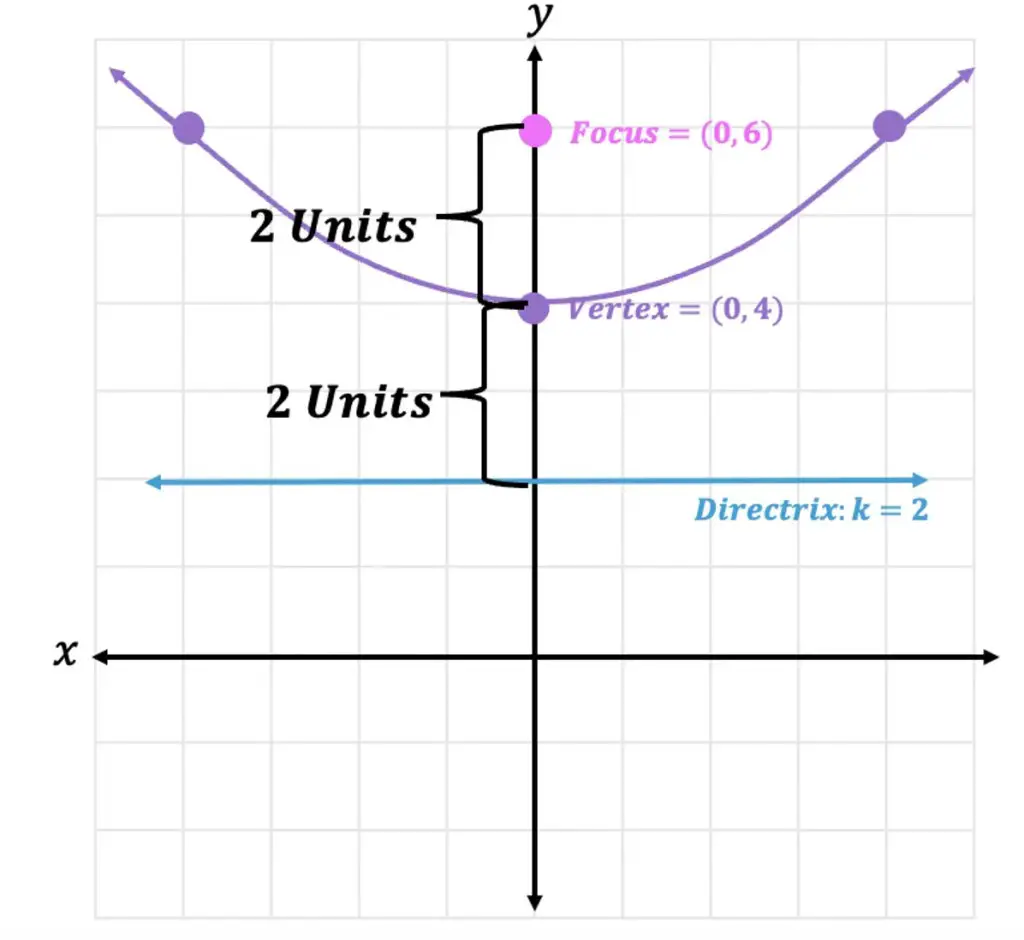
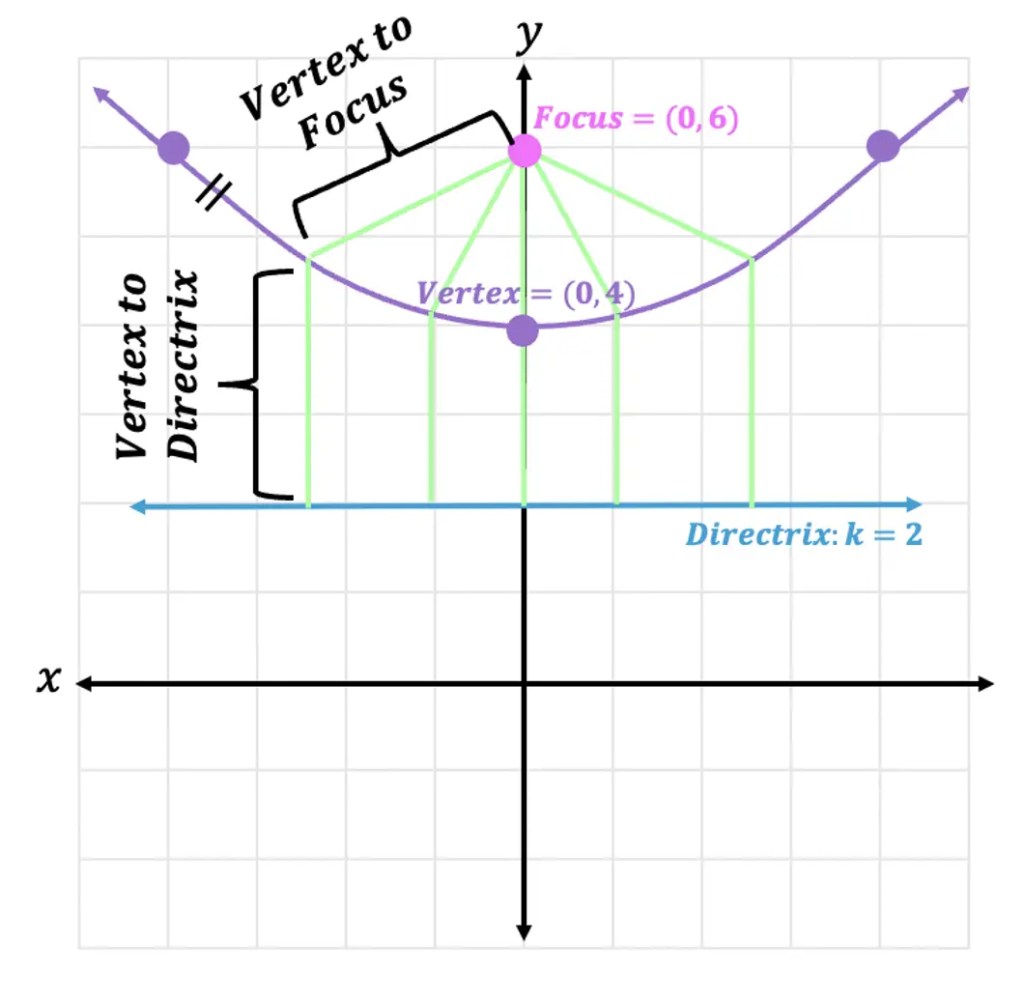
The above definitions explain that every point on a parabola is equidistant from the vertex to the focus as it is to the directrix. In the picture below, we can see that the vertex is 2 units away from the focus and 2 units away from the directrix. They are equidistant:
This phenomenon, works not just the vertex, but for each and every point found on a parabola!
We can see below the equidistance between several points on the parabola that compare the distance between the vertex to the directrix and the distance between the vertex to the focus. Notice that they are all the same!
Ready to test our new knowledge with the following Example?
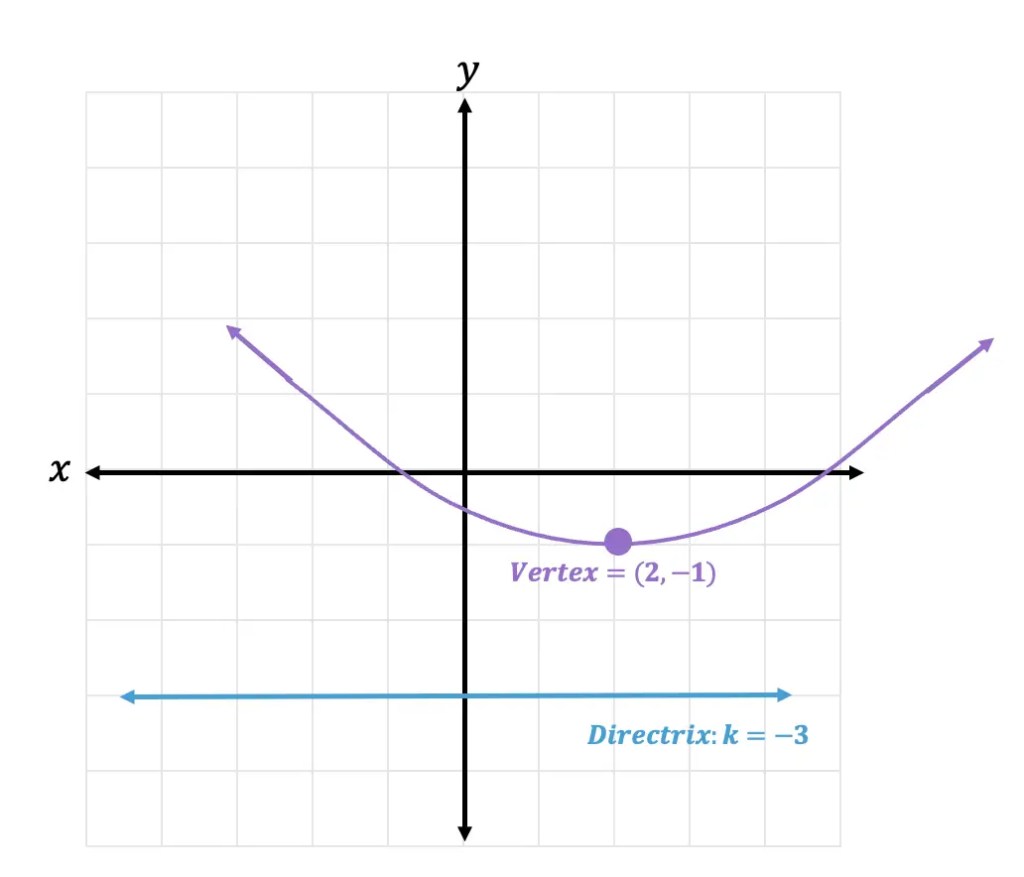
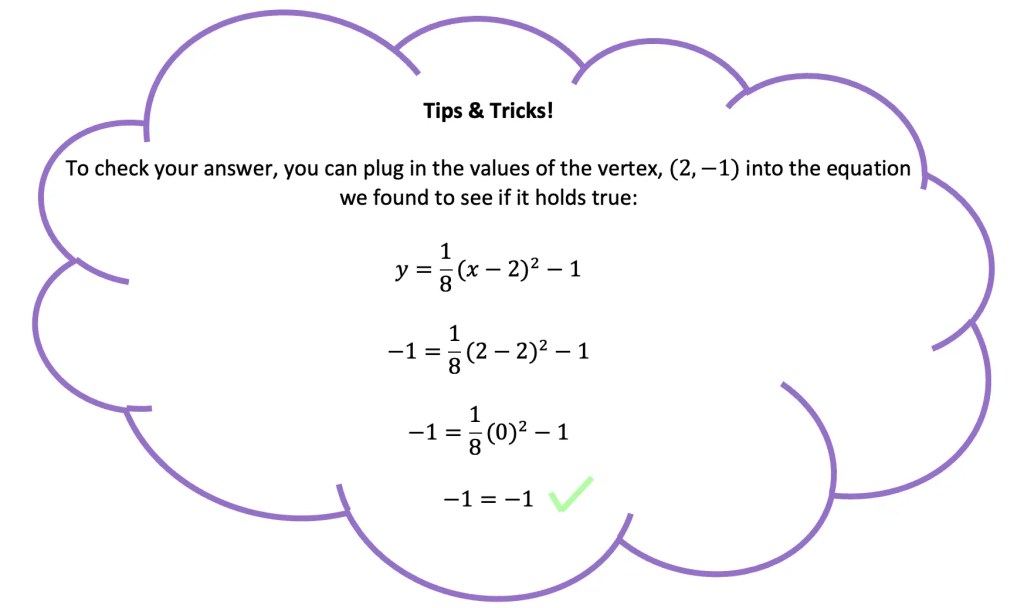
Step 1: First, let’s sketch out our parabola with the given information. We know that the vertex is at point (2,-1) a point that lies on the parabola itself, so let us map that out. We also know that the directrix is k=3 and is represented as a line as y=-3.
Step 2: Next, let us measure the distance between the directrix and the vertex. The distance between the vertex and directrix is 2 units. That means we must also measure the 2 units on the opposite side of the vertex to find the value of the focus. This leads us to the point (2,1).
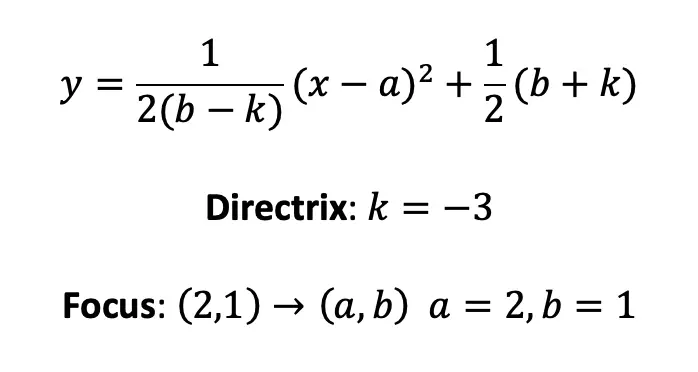
Now for part two of our question, how to find the equation of a parabola now that we have the value of the focus and the given directrix. For this, we will need to use the funky looking equation for a parabola mentioned earlier in this post.
Step 1: First we need to gather all of our information, the formula for the equation of a parabola , the given directrix, k=-3 and the focus we found in the previous example (2,1) which corresponds to the formula as a=2 and b=1.
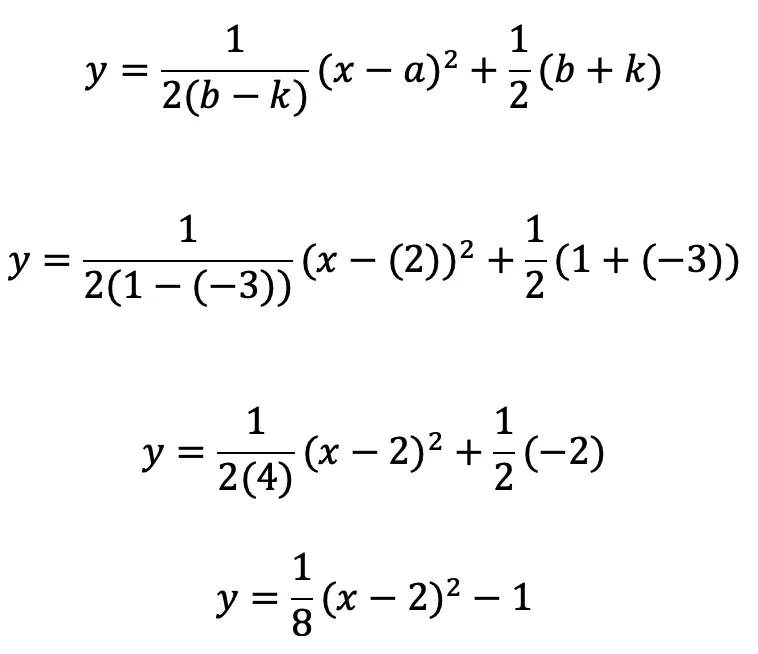
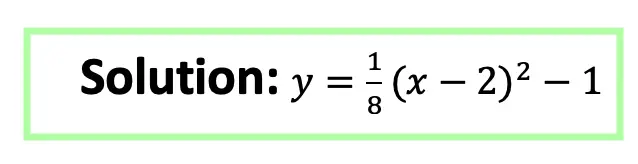
Step 2: Now, let’s plug everything into our formula where a=2, b=1, and k=-3, to find the equation to our parabola:
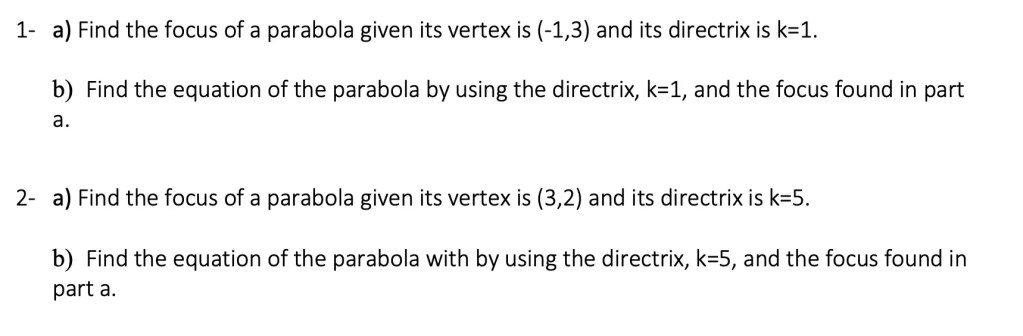
Practice Questions:
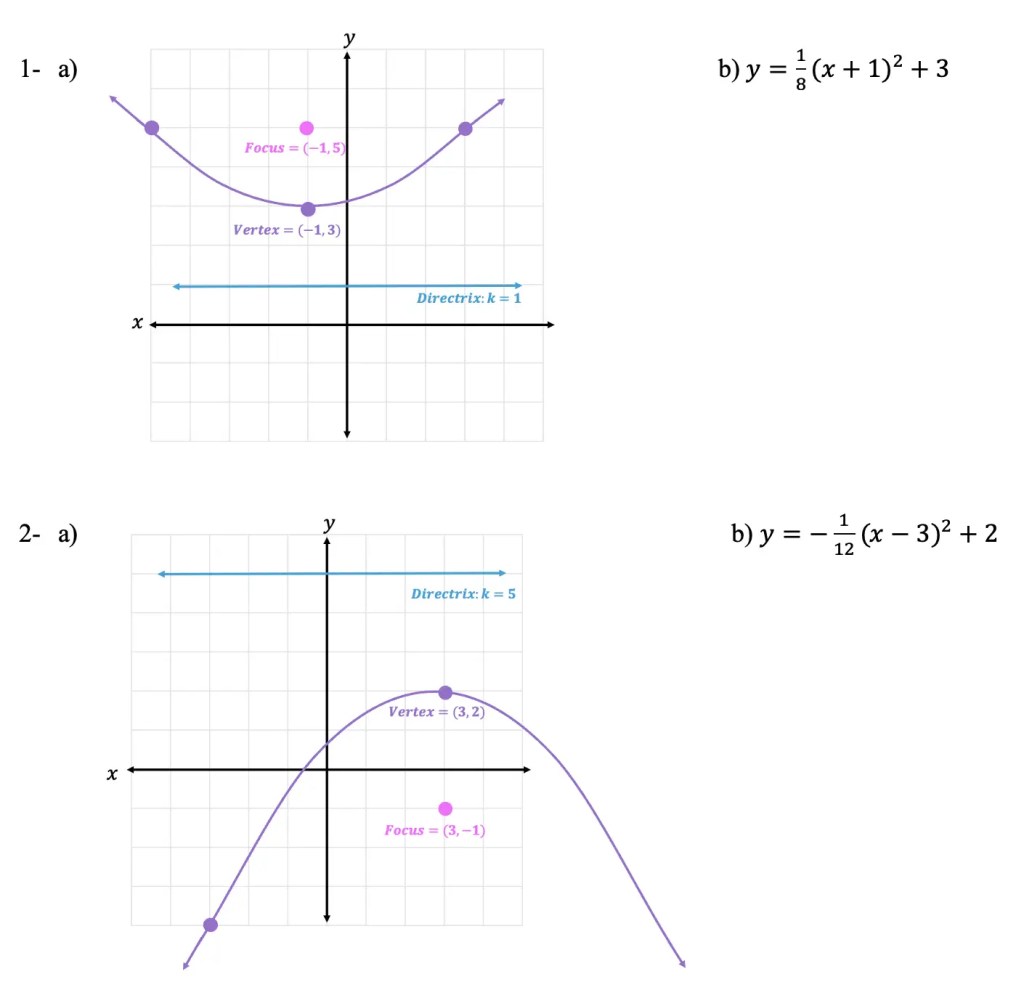
Solutions:
Still got questions? No problem! Don’t hesitate to comment with any questions below. Thanks for stopping by and happy calculating! 🙂
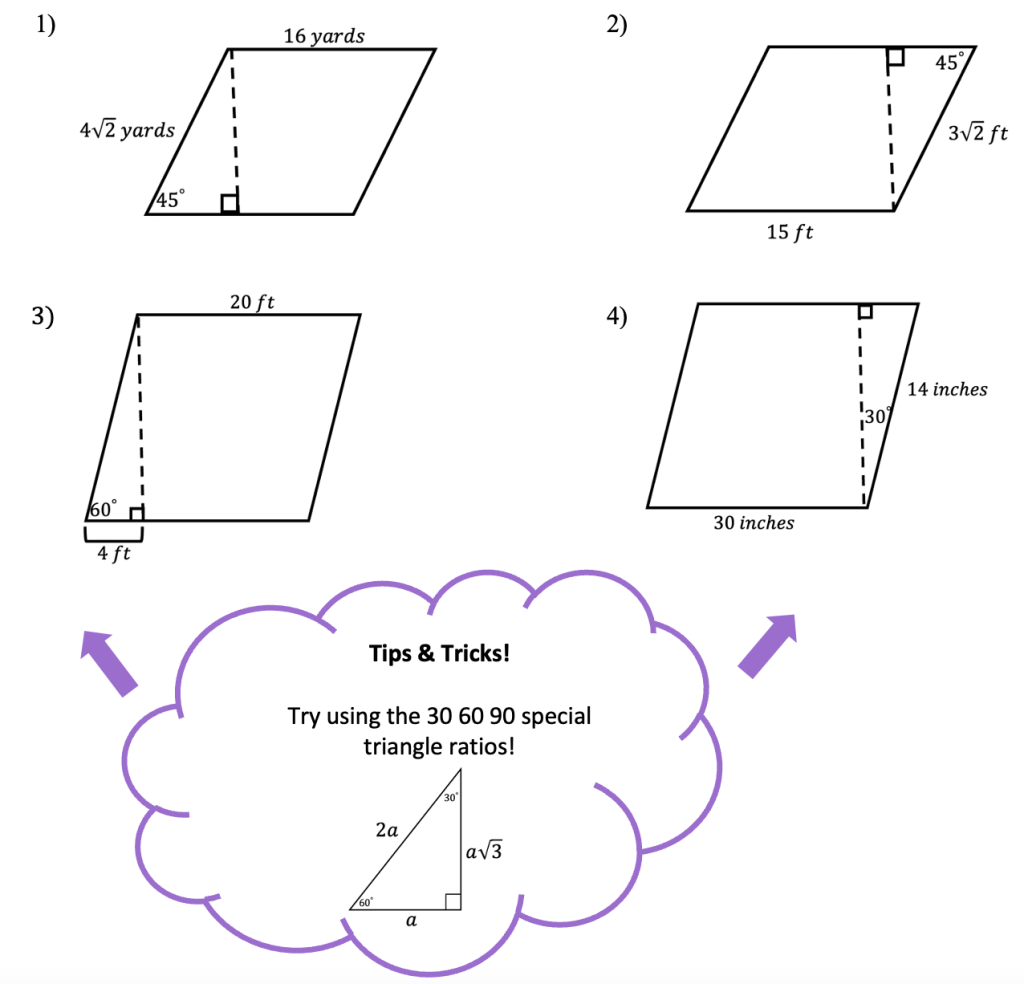
Hey math peeps! In today’s post, we are going to go over how to find the area of a parallelogram. There is an easy formula to remember, A=bh, but we are going to look at why this formula works in the first place and then solve a few examples. Just a quick warning: The following examples do use special triangles and if you are need of a review, check out the posts here for 45 45 90 and 30 60 90 special triangles. Also, don’t forget to watch the video and try the practice problems below. Thanks so much for stopping by and happy calculating!
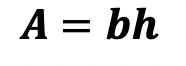
Area of a Parallelogram Formula:
Why does the Formula for Area of a Parallelogram work?
Did you notice that the formula for area of a parallelogram above, base times height, is the same as the area formula for a rectangle? Why?
If we cut off the triangle that naturally forms along the dotted line of our parallelogram, rotated it, and placed it on the other side of our parallelogram, it would naturally fit like a puzzle piece and create a rectangle! Check it out below:
Now that we know where this formula comes from, let’s see it in action in the examples below:
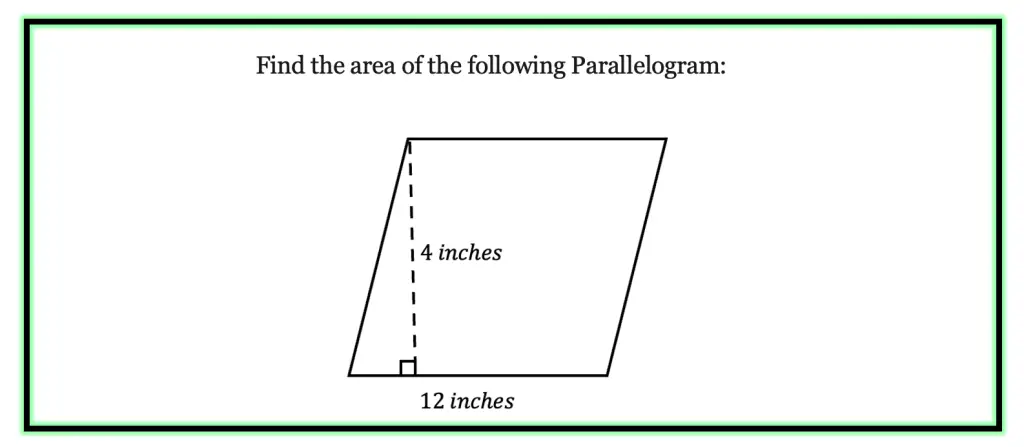
Example #1:
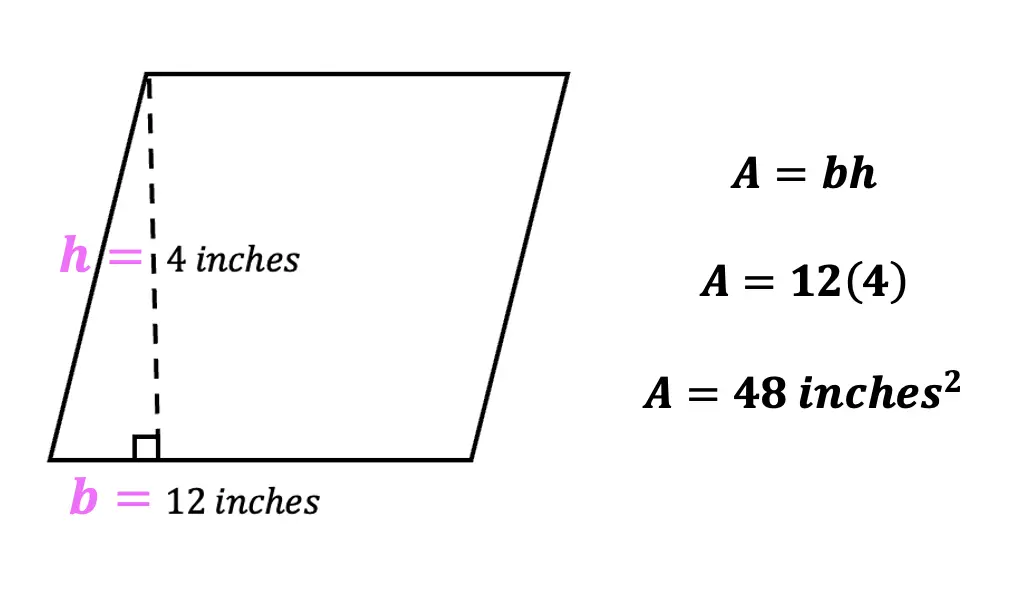
Step 1: Write out the formula:
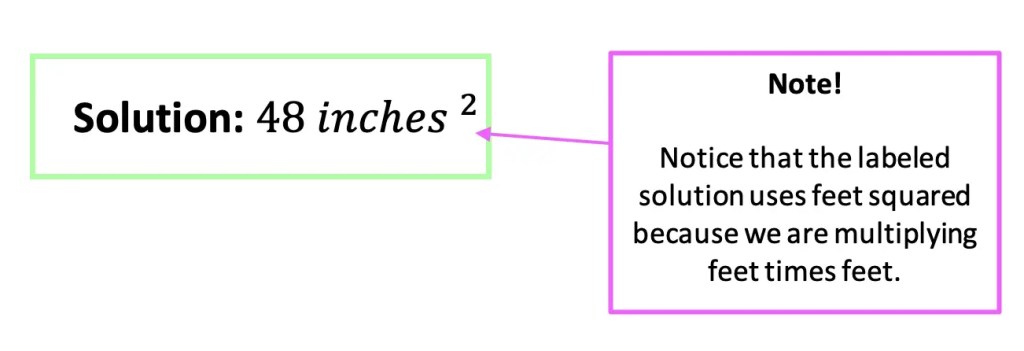
Step 2: Fill in the formula with values found on our parallelogram, b=12 inches h=4 inches, and multiply them together to get 48 inches squared.
That was a simple example, but lets try a harder one that involves special triangles.
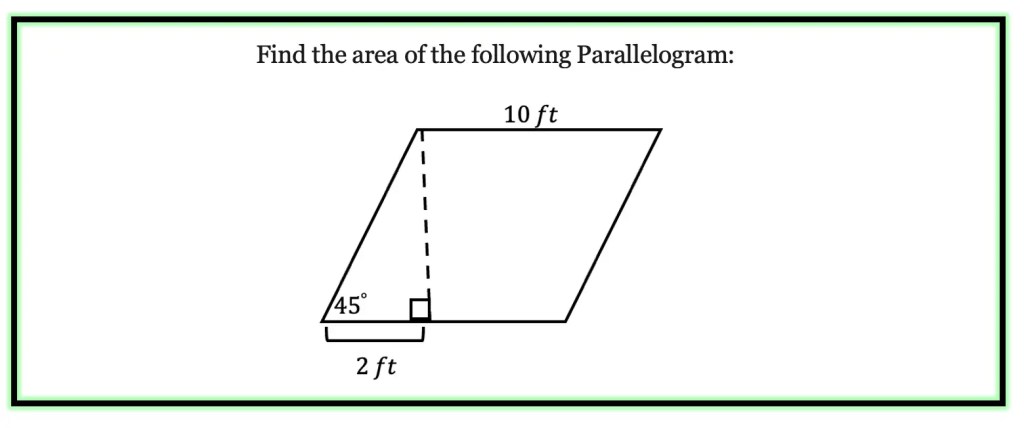
Example #2:
Step 1: Write out the formula:
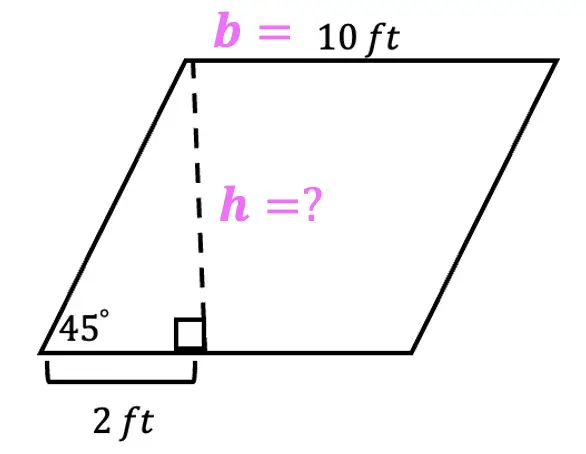
Step 2: Label the values found on our parallelogram, b=10 ft and notice that we are going to need to find the value of the height.
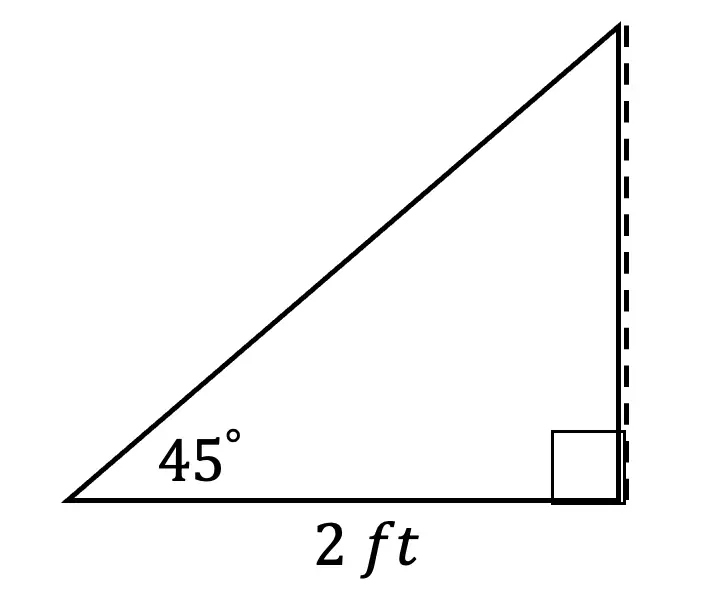
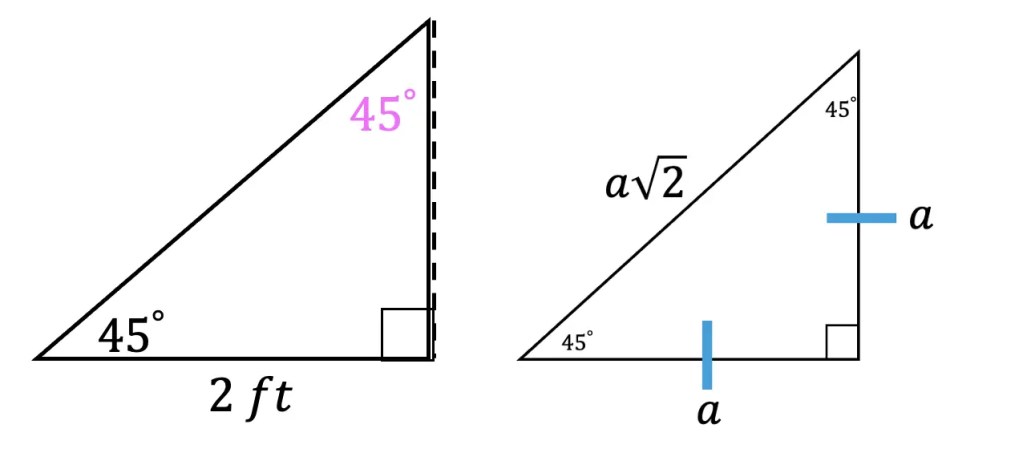
Step 3: In order to find the value of the height, we need to remember our special triangles! We are not given the value of the height, but we are given some value of the triangle that is formed by the dotted line. Let us take a closer look and expand this triangle:
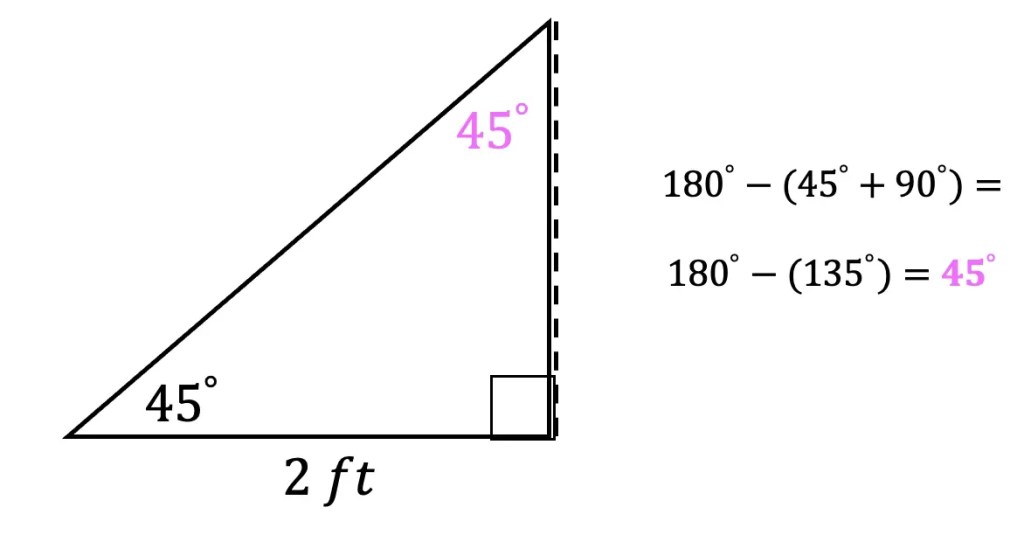
Step 4: We can add in the missing 45º degree value so that our triangle now sums to 180º.
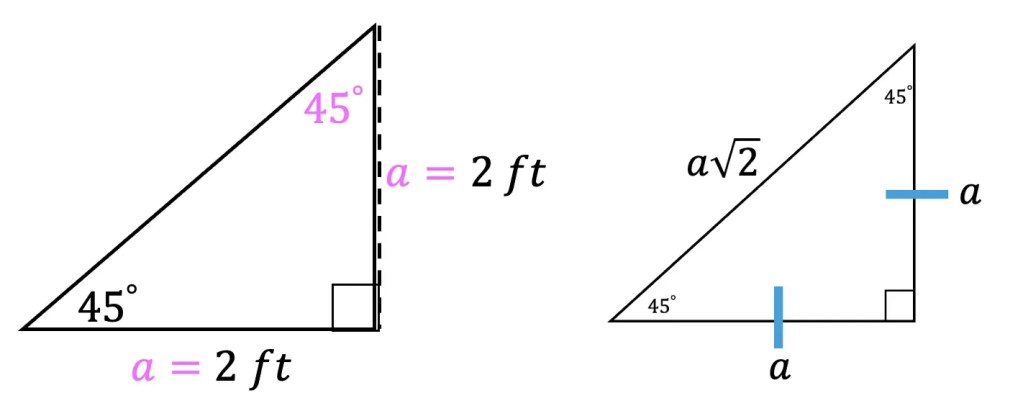
Step 5: Remember 45 45 90 special triangles? (If you need a review click the link). Because that is exactly what we are going to need to find the value of the height! Below is our triangle on the left, and on the right is the 45 45 90 triangle ratios we need to know to find the value of the height.
Based on the above ratios, we can figure out that the height value is the same value as the base of the triangle, 2.
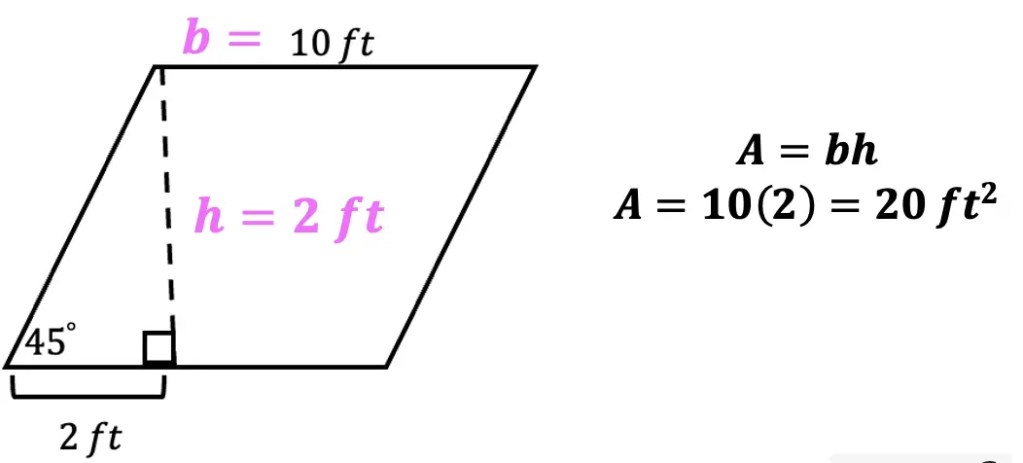
Step 6: If we place our triangle back into the original parallelogram, we can plug in our value for the height, h=2, into our formula to find the area:
When you’re ready, check out the practice questions below!
Practice Questions:
Find the area of each parallelogram:
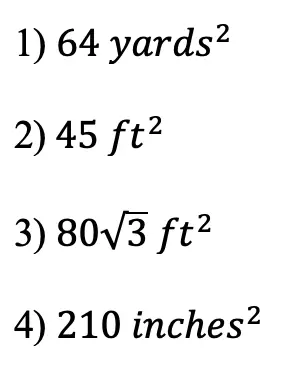
Solutions:
Still got questions? No problem! Don’t hesitate to comment with any questions or check out the video above. Happy calculating! 🙂
Hi everyone and welcome to MathSux! In today’s post we are going to be solving quadratic equations by using the quadratic formula. You may have used the quadratic formula before, but this time we are working with quadratic equations with two imaginary solutions. All this means is that there are negative numbers under the radical that have to be converted into imaginary numbers. If you need a review on imaginary numbers or the quadratic formula before reading this post, check out these links! Thanks so much for stopping by and happy calculating! 🙂
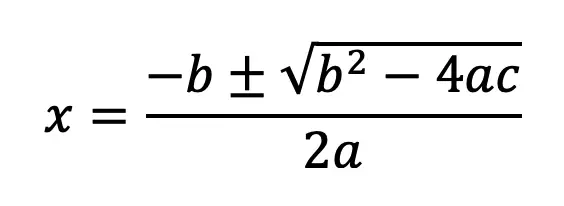
What is the Quadratic Formula?
The Quadratic formula is a formula we use to find the x-values of a quadratic equation. When we find the x-value of a quadratic equation, we are actually finding its x-values on the coordinate plane. Check out the formula below:
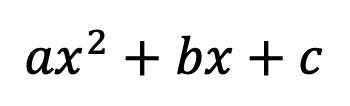
where, a, b, and c are coefficients based on the quadratic equation in standard form:
What does it mean to have “Imaginary Roots”?
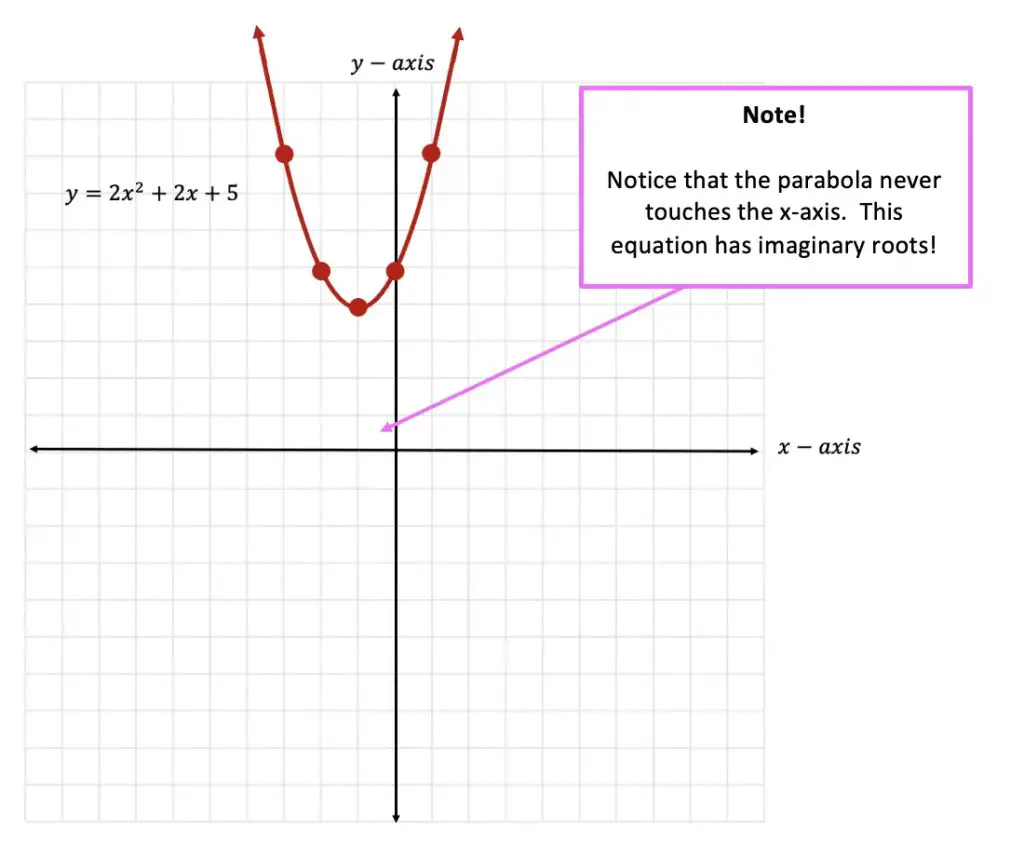
When we solve for the x-values of a quadratic equation, we are always looking for where the equation “hits” the x-axis. But when we have imaginary numbers as roots, the quadratic equation in question, never actually hit the x-axis. Ever. This creates a sort of “floating” quadratic equation with complex numbers as roots. See what it can look like below:
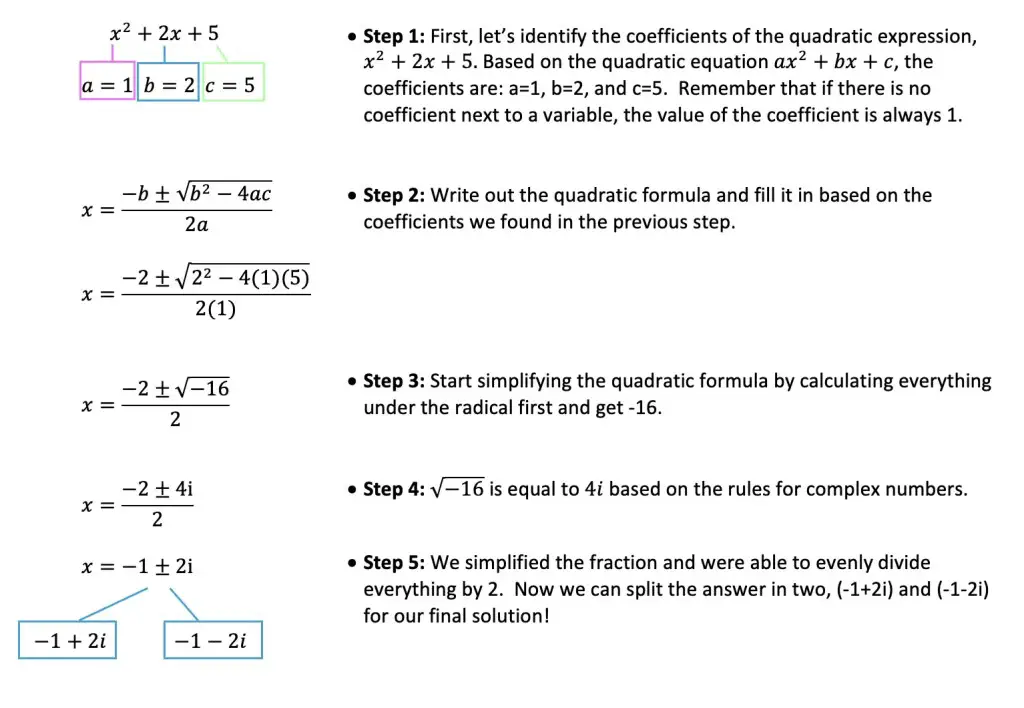
Ready for an Example? Let us see how to use the quadratic formula specifically, quadratic equations with two imaginary solutions:
Think you are ready to try practice questions on your own? Check out the ones below!
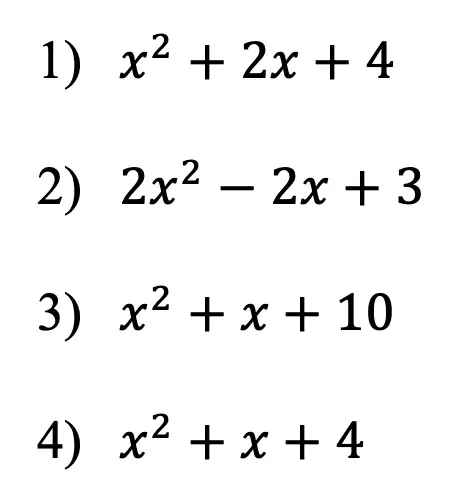
Practice Questions:
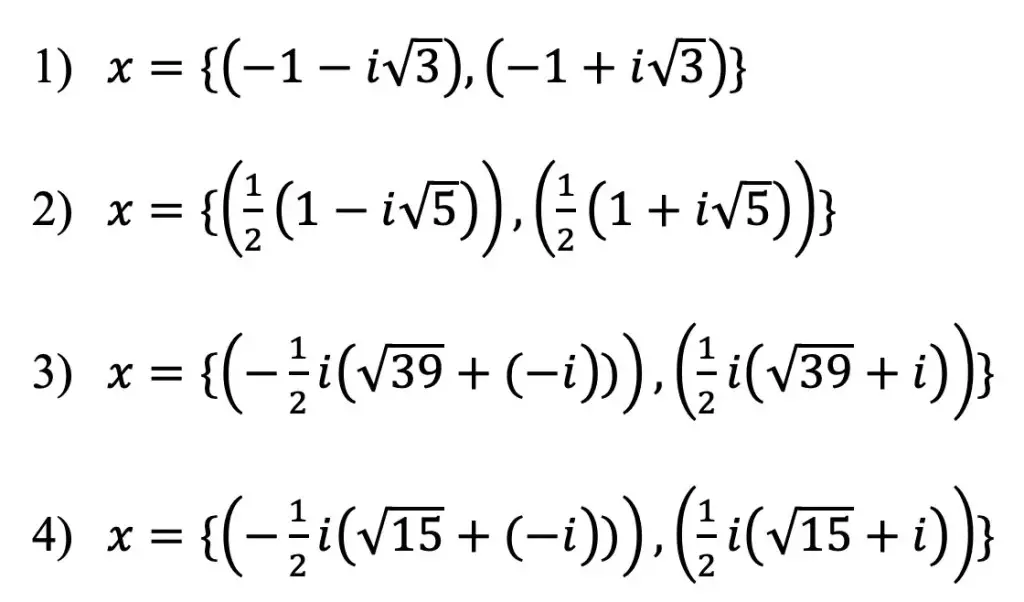
Solutions:
Still got questions? No problem! Don’t hesitate to comment with any questions below or check out the video above. Thanks for stopping by and happy calculating! 🙂