How to Make a Paper Cube Using Origami

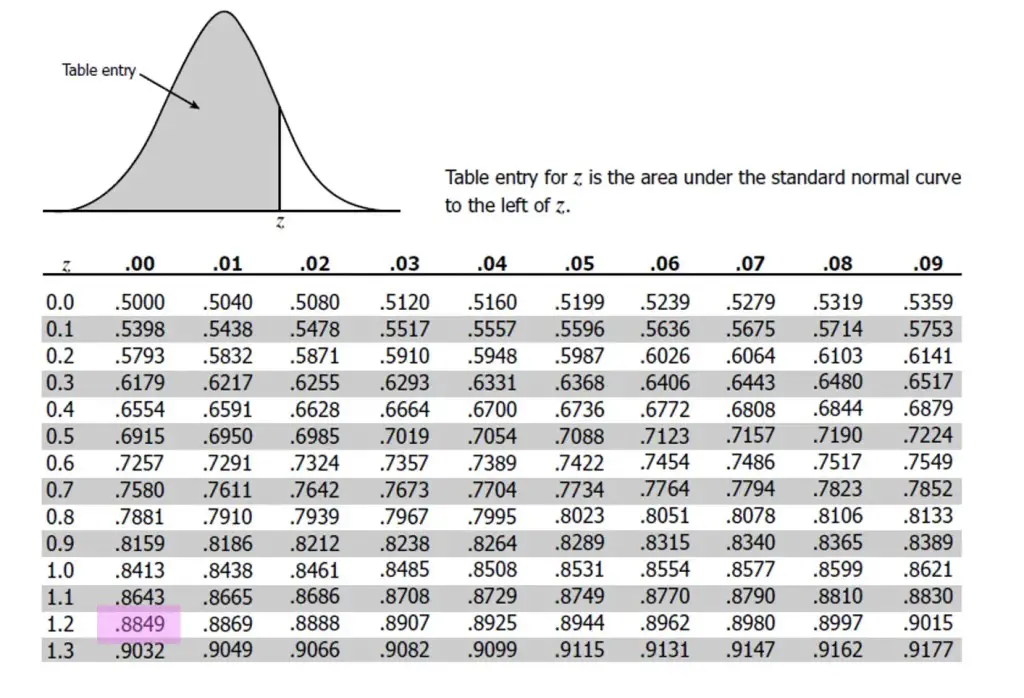
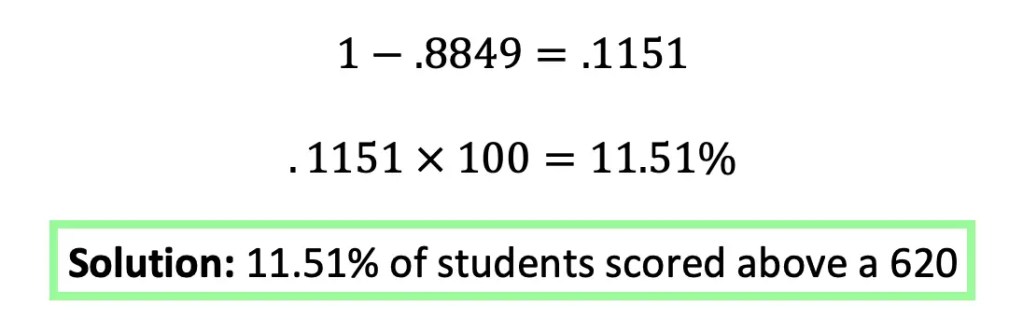
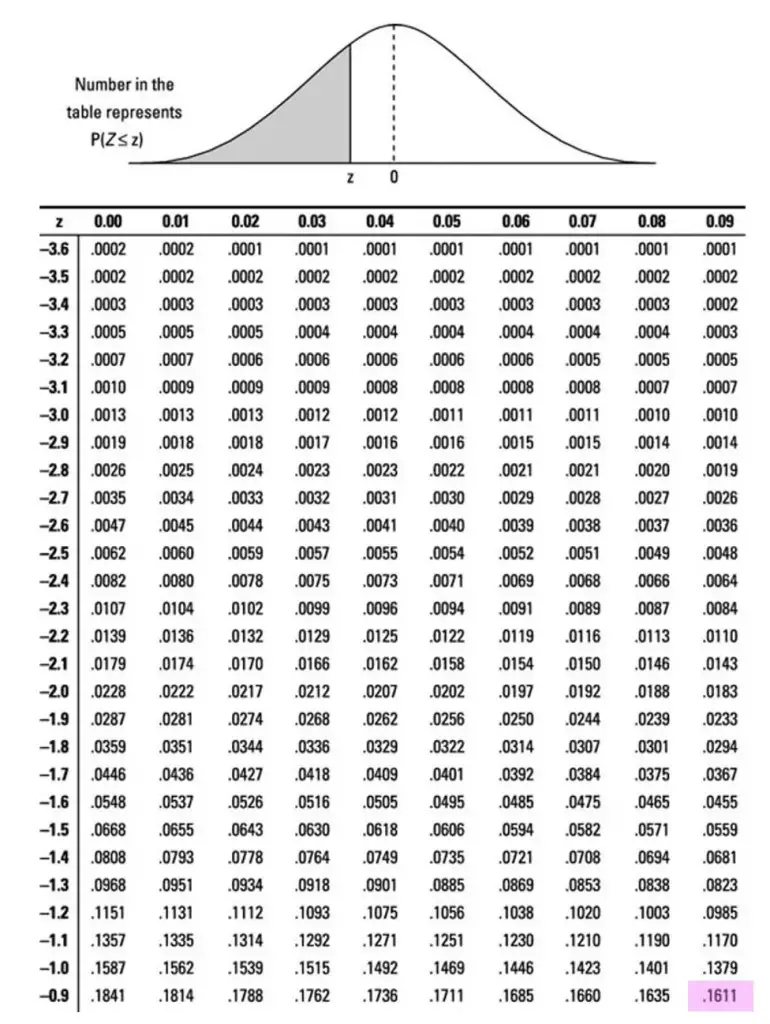
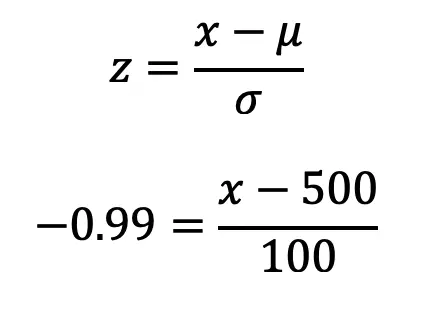
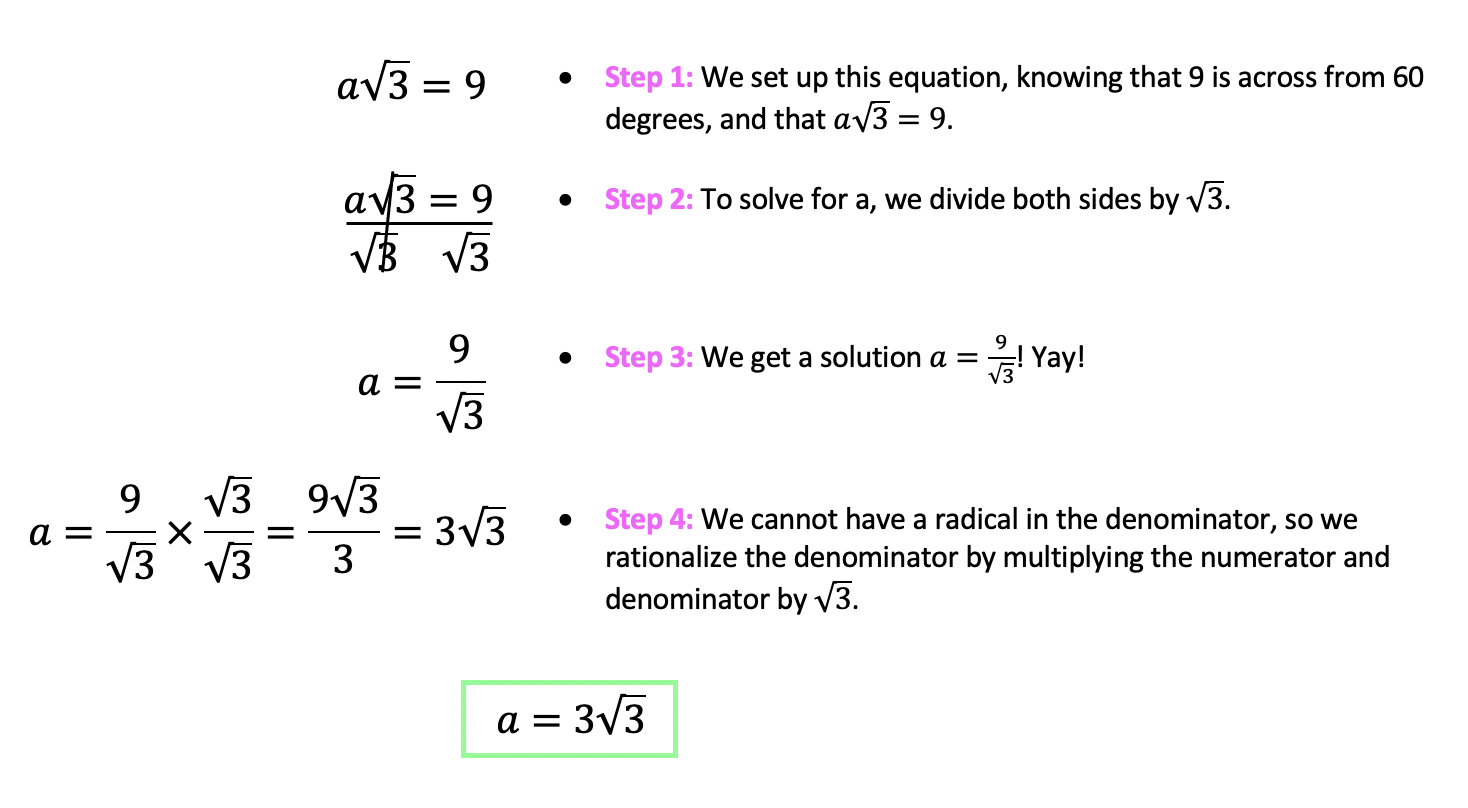
Greeting math peeps and welcome to MathSux! In today’s post, we are going to have a bit of fun when finding the volume of a cube. We’ll start by going over how to make a paper cube using origami, then we will measure the dimensions of our real-world cube and find its volume. Hope you’re all feeling crafty and ready to take on this project with the Japanese art style of origami! If you don’t have any origami paper, please fill free to print out the origami guideline sheets included at the end of this post to follow along! Also, if the below written tutorial isn’t your style, watch the video up on YouTube and shown below. Hope you’re all having a great week and can find some fun in this post! Happy calculating!

How to Make a Paper Cube Using Origami:

How to Make a Paper Cube Using Origami

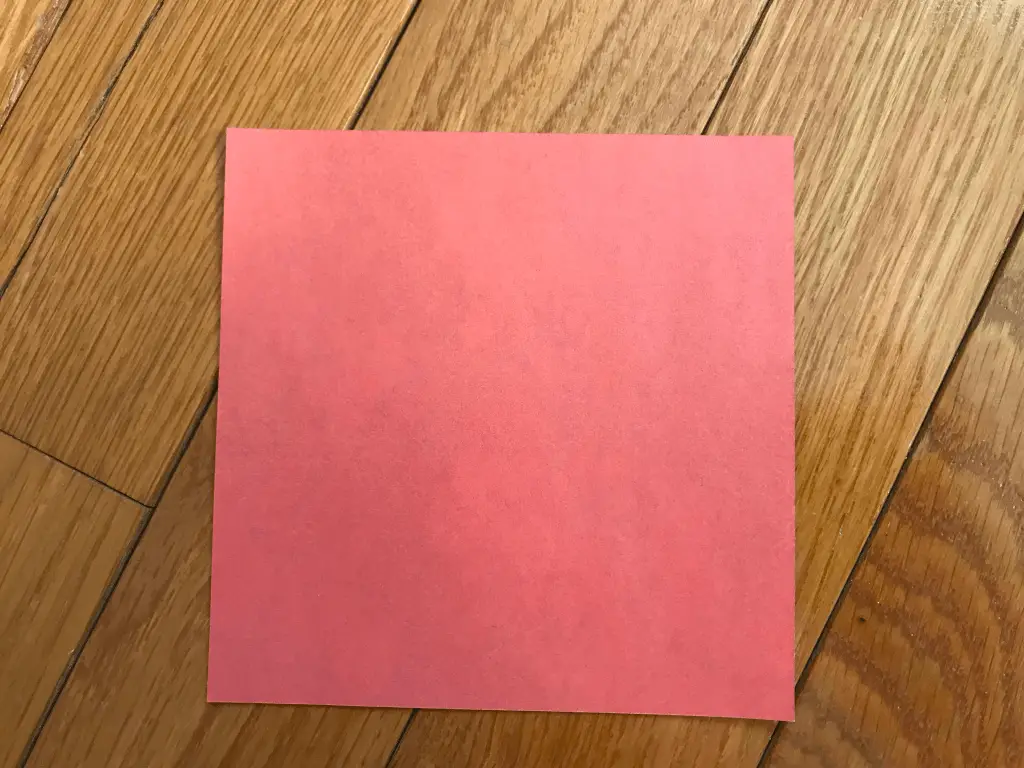
Step 1: Begin with six sheets of square origami paper (or cut out a square from any type of regular computer paper). If you want to really follow along, this paper is 4 inches by 4 inches and I have included a print out below.

How to Make a Paper Cube Using Origami

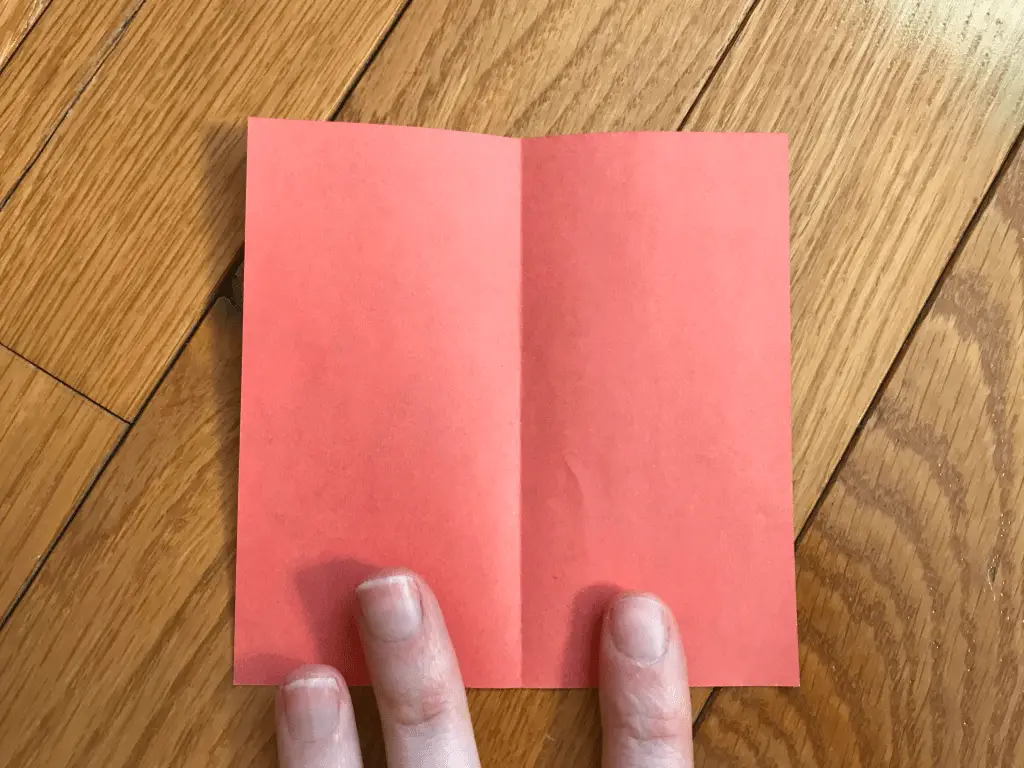
Step 2: Fold the top of the origami paper in half, then unfold.

How to Make a Paper Cube Using Origami

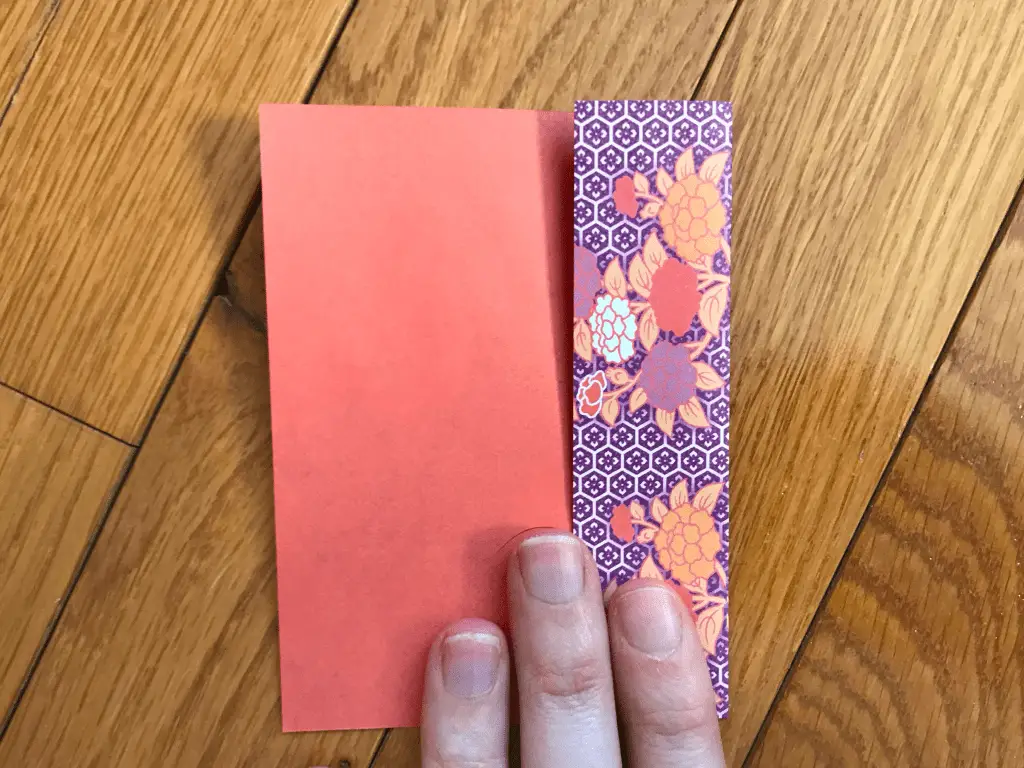
Step 3: Fold one side of the paper halfway to the center.

How to Make a Paper Cube Using Origami

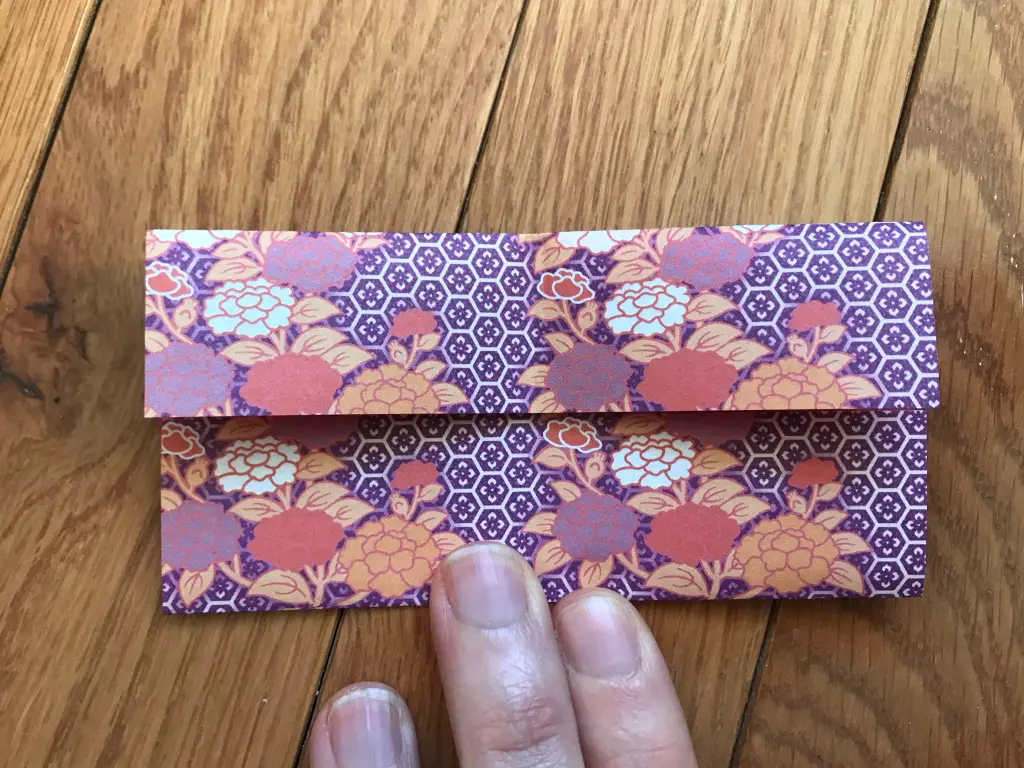
Step 4: Fold the left side to the center of the paper and rotate the paper horizontally.

How to Make a Paper Cube Using Origami

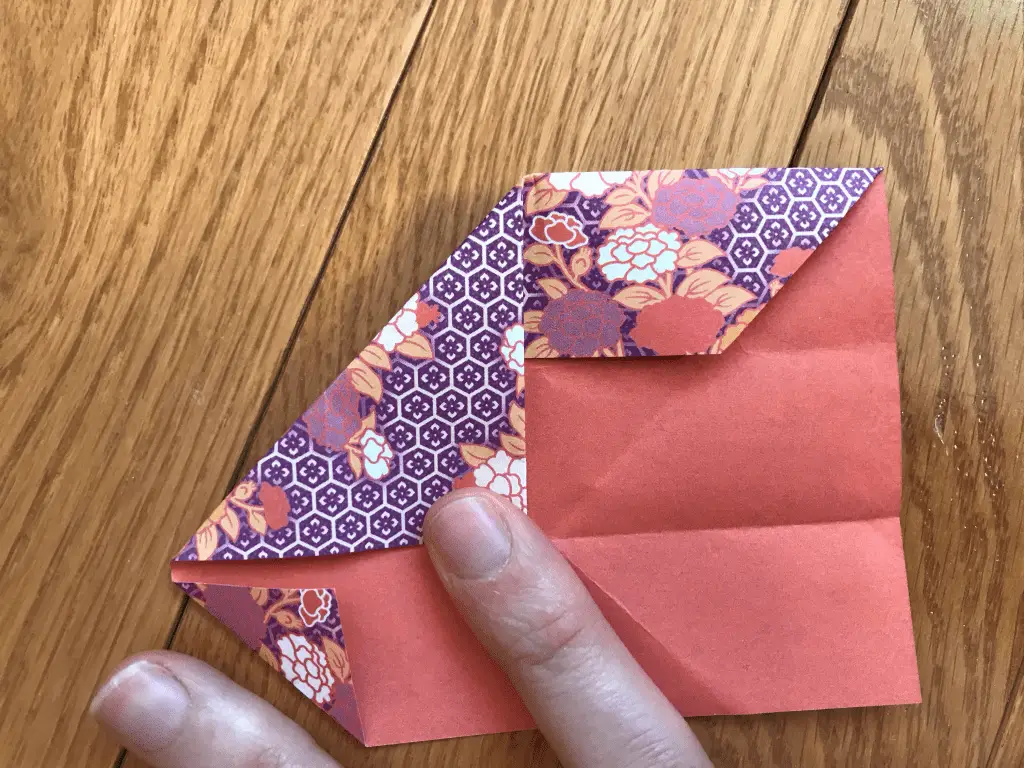
Step 5: Take the bottom right corner and fold it to the top center point of the rectangle.

Math and art

Step 6: Now fold the top left corner and bring it to the bottom edge, so both folds align in the middle.

Math and art

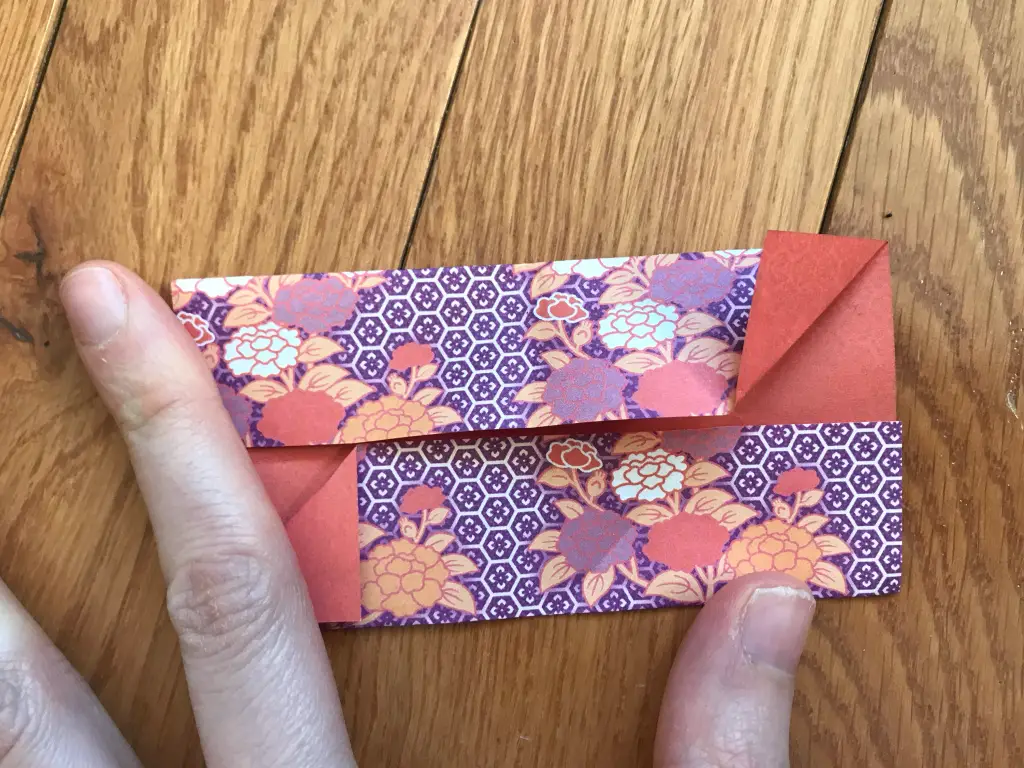
Step 7: Next, Open both folds towards the center, undoing our last two steps.

geometry and origami

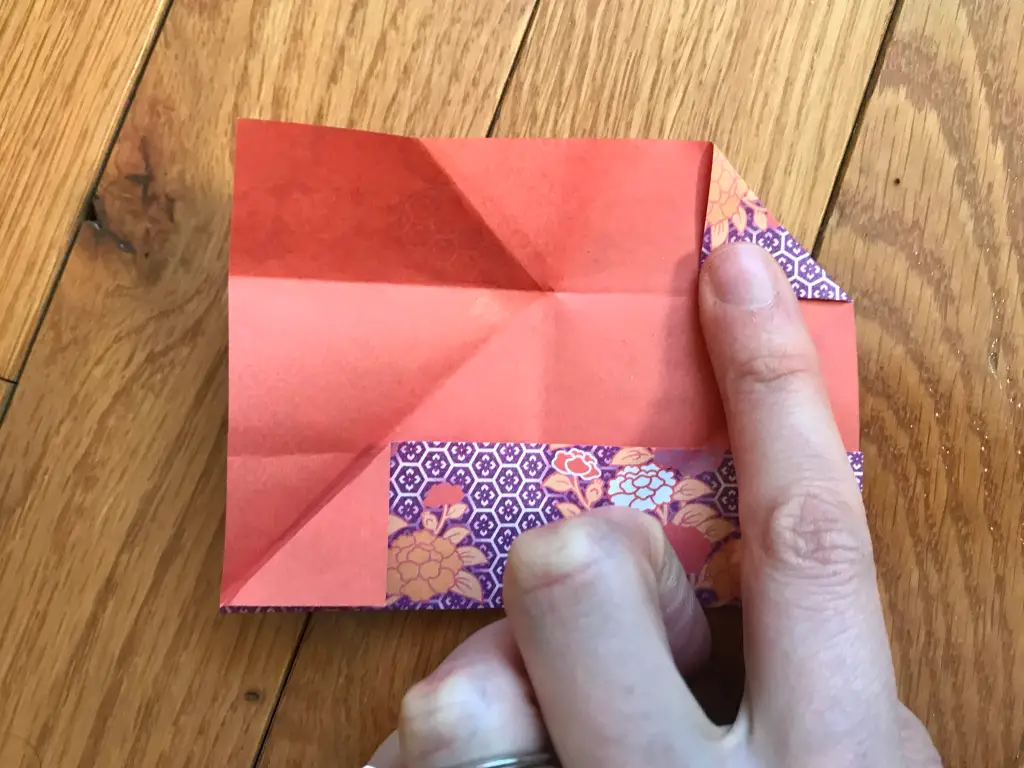
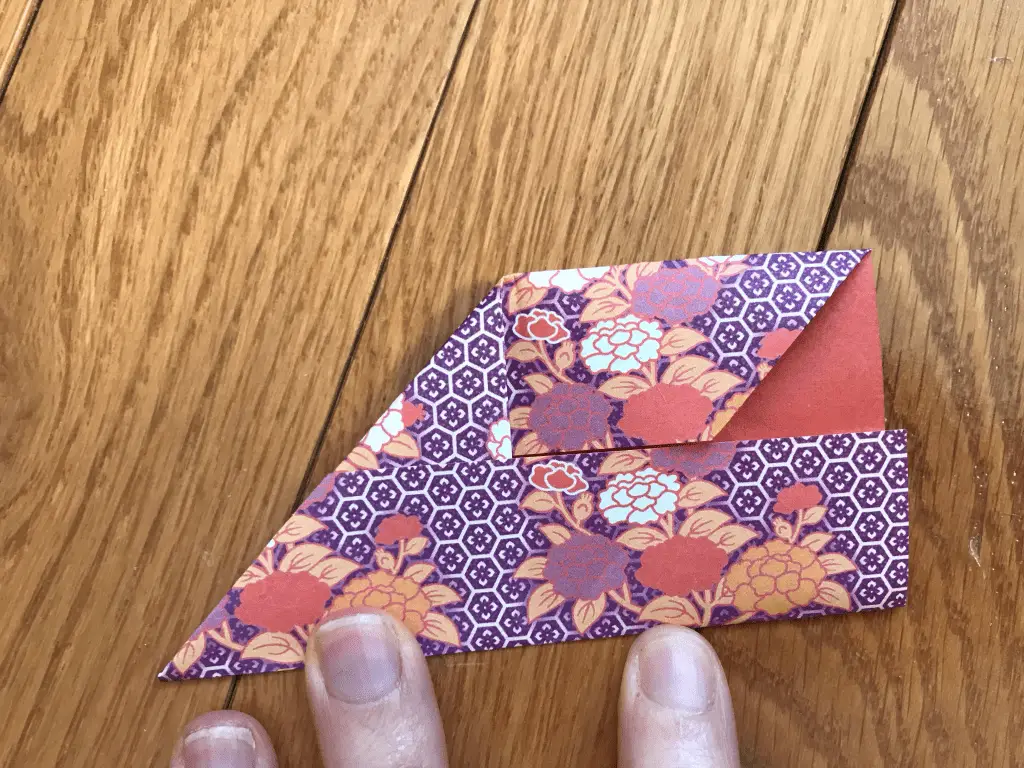
Step 8: Open the first flap on top, and fold in the top right triangle.

Math and art

Step 9: Unfold the bottom flap, and fold in the bottom left triangle.

Geometry and paper folding

Step 10: Now, we are going to fold down the top left corner to the center of the paper (just above the bottom flap).

Origami

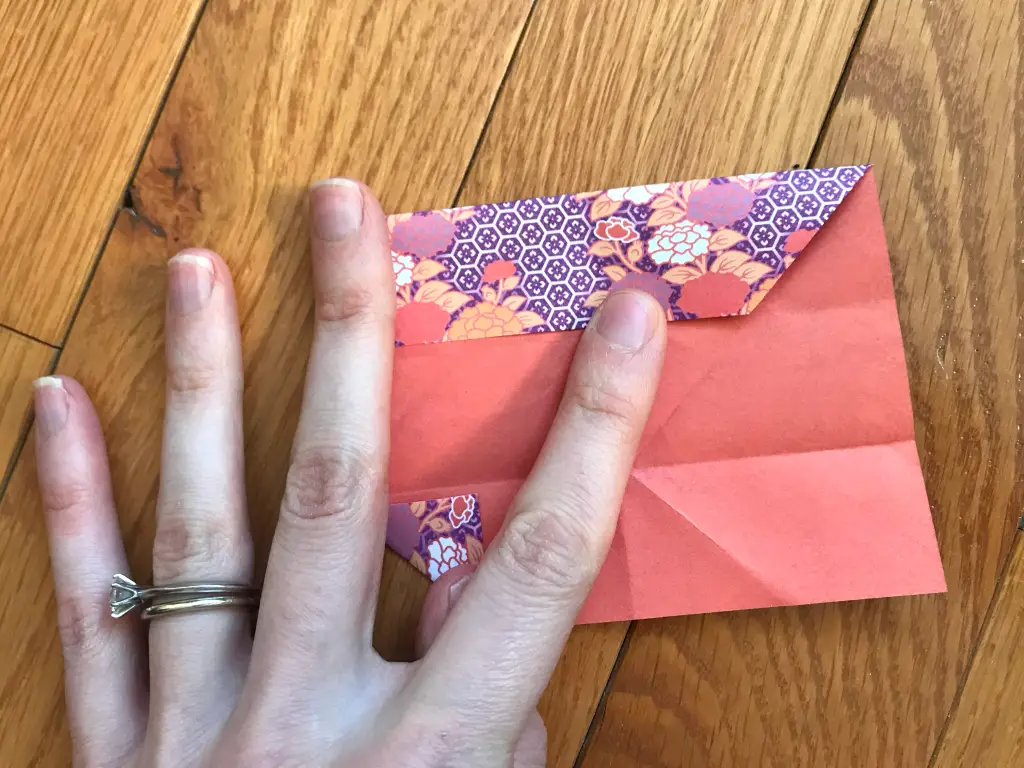
Step 11: Fold up the bottom flap.

Math and Origami

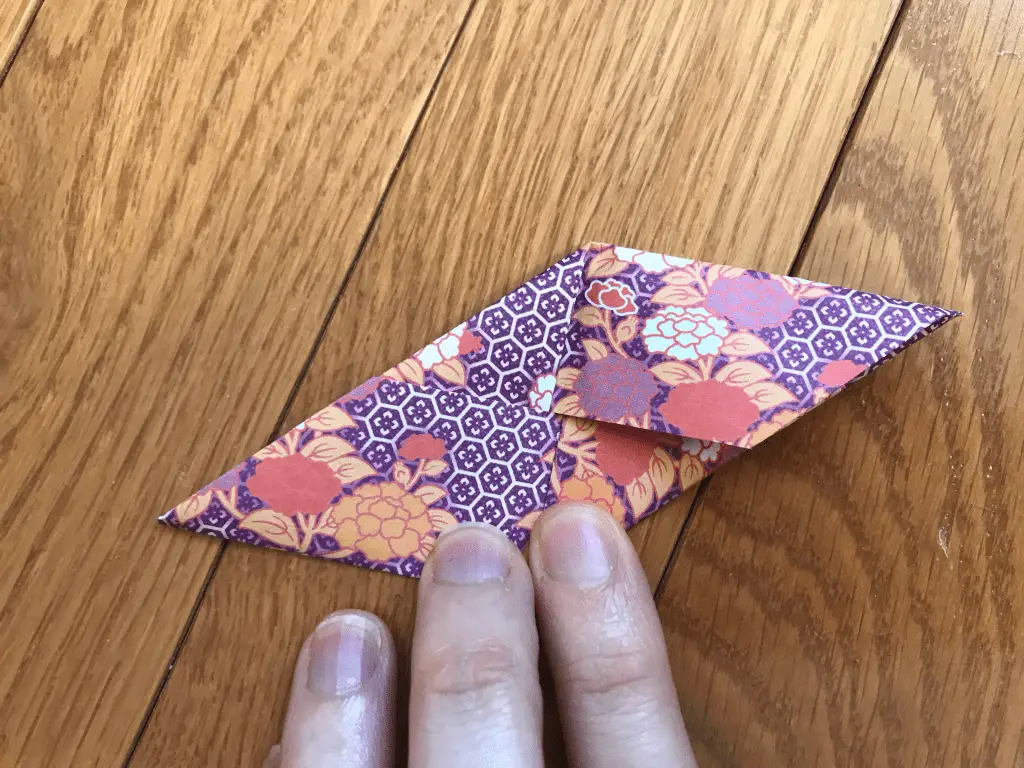
Step 12: Now take the bottom right corner, and tuck it in under the top flap, towards the center.

geometry and origami

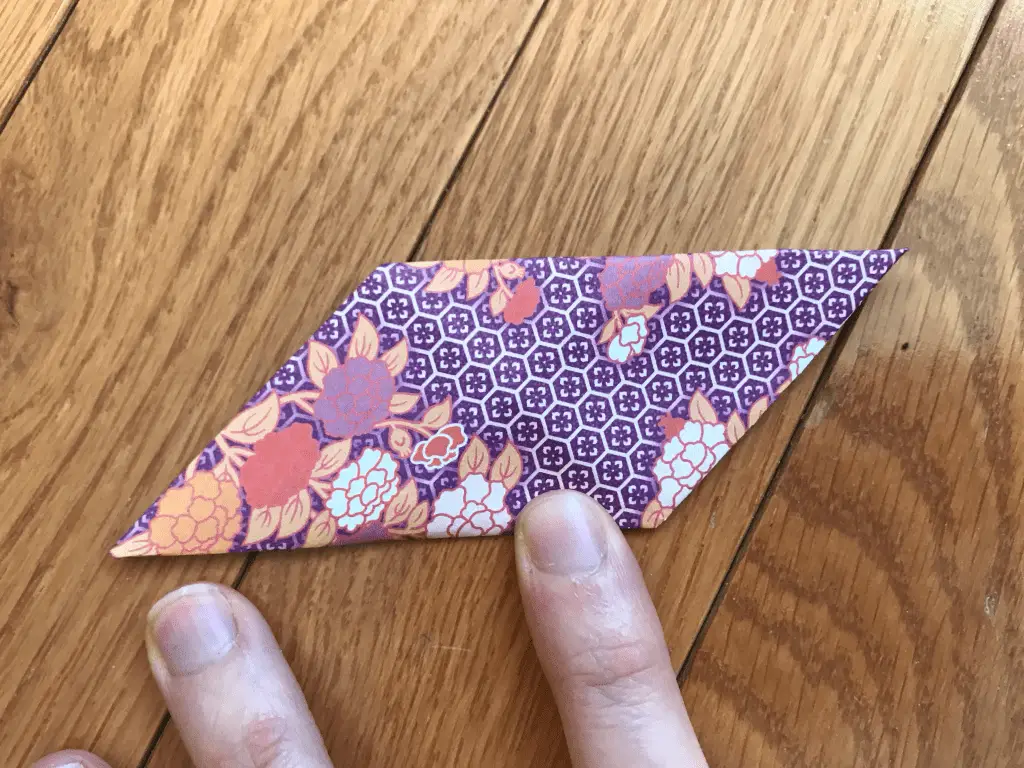
Step 13: Flip your piece of paper around.

How to Make a Paper Cube Using Origami

Step 14: Fold the corner, towards the center.

How to Make a Paper Cube Using Origami

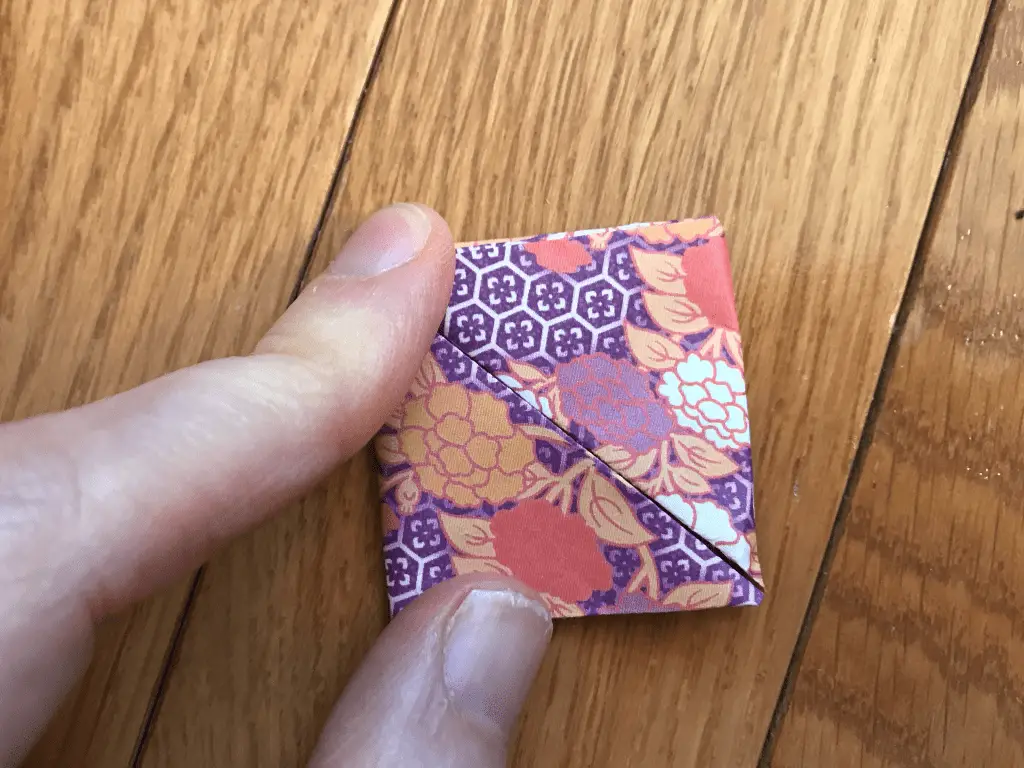
Step 15: Now, fold in the bottom left edge, towards the center, to the top edge.

How to Make a Paper Cube Using Origami

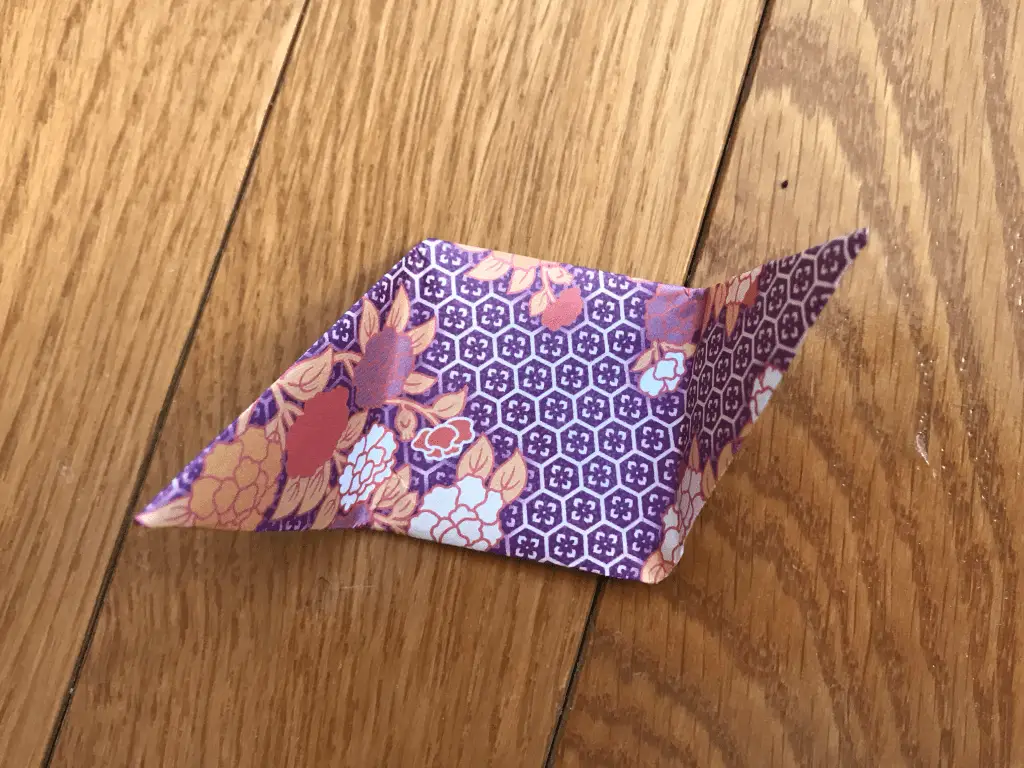
Step 16: Unfold, the left and right edges we made to get a shape like we have above.

How to Make a Paper Cube Using Origami

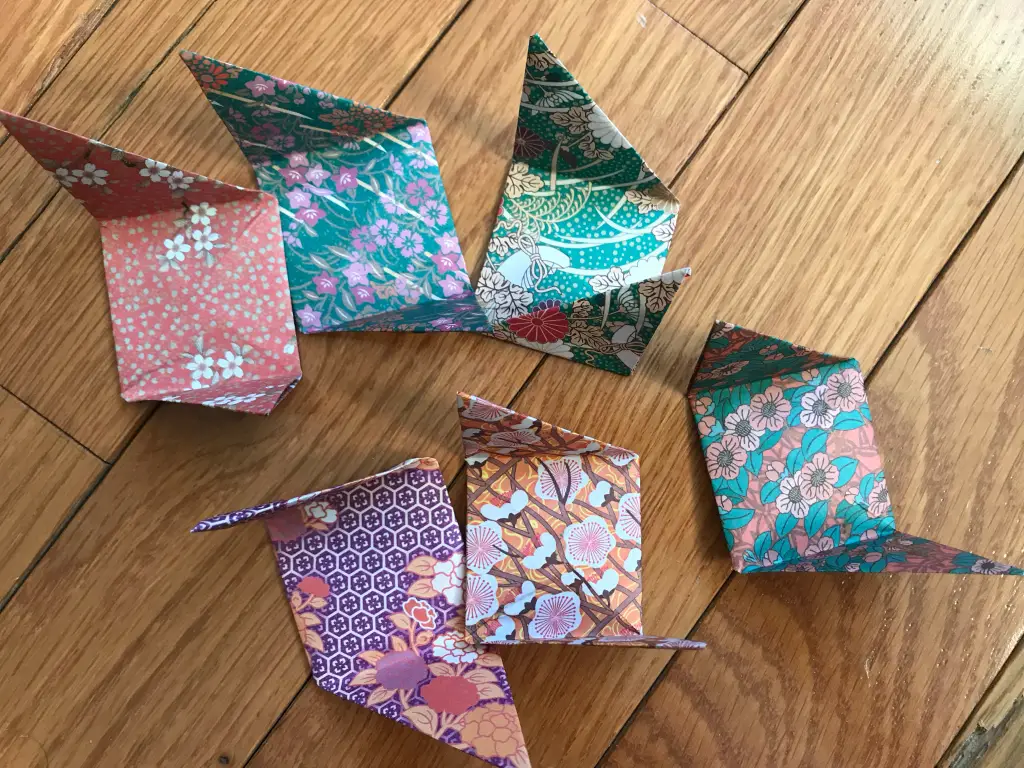
Step 17: Repeat steps 1 through 16 5 more times! To have a total of six of the above shapes. We will need all of them to piece together our origami cube.

How to Make a Paper Cube Using Origami

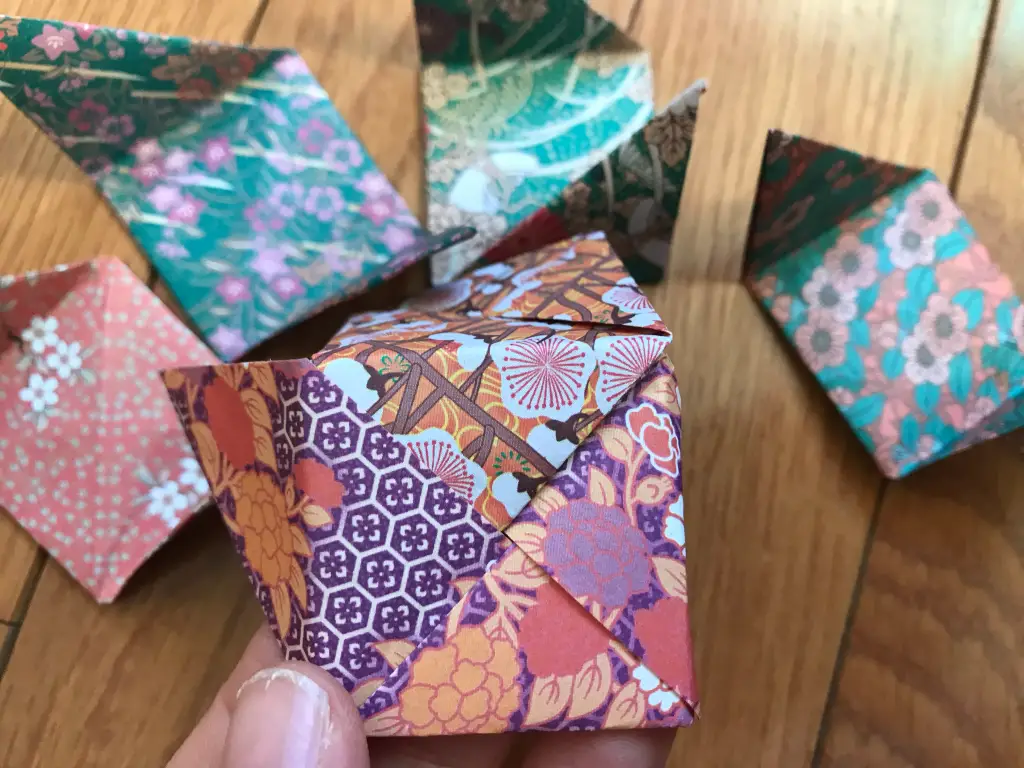
Step 18: Connect each of our shapes, by placing the edge of each in top left the corner “pocket” of each shape.

How to Make a Paper Cube Using Origami

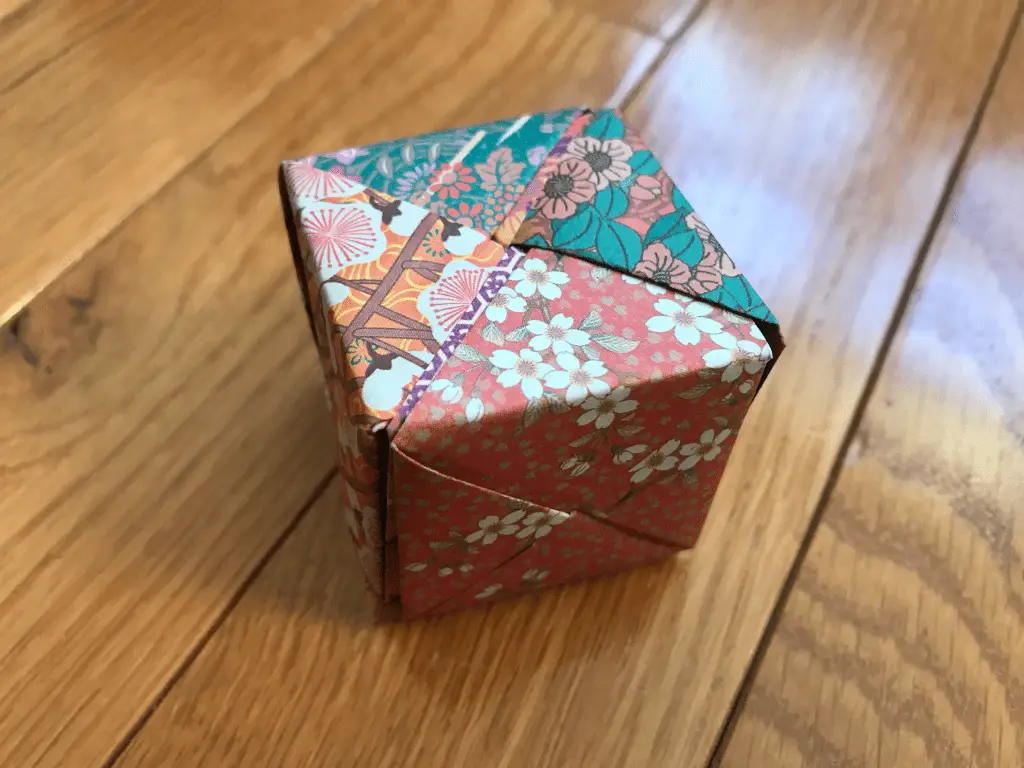
Step 19: Once they are all connected, we finally have created our origami cube!

Want to follow along with everything!? Check out the printable origami paper below to create your very own box!

Volume of a Cube:

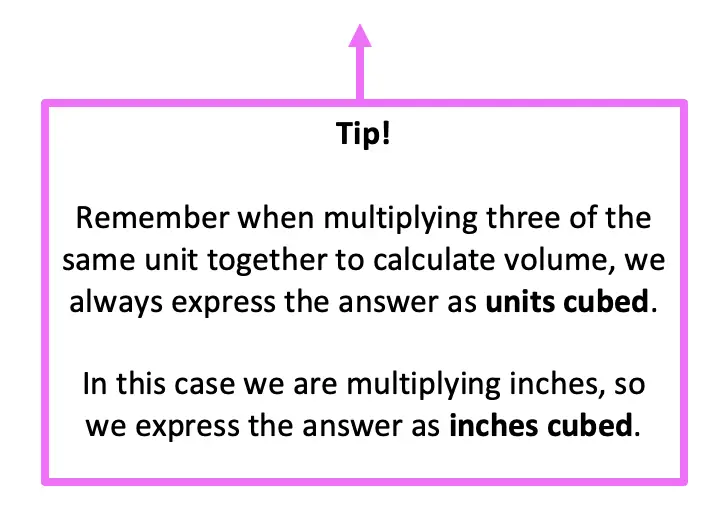
Now that we have made our cube using paper folding, we can measure one side of our cube and find its volume! Please note that these measurements are based on the 4″X 4″ origami paper I used. If you would like to follow along with your own project, just download and print the activity sheet above!

Volume of a Cube

Did you create your origami cube with different-sized origami paper? Let us know what measurement you got for volume in the comments below!

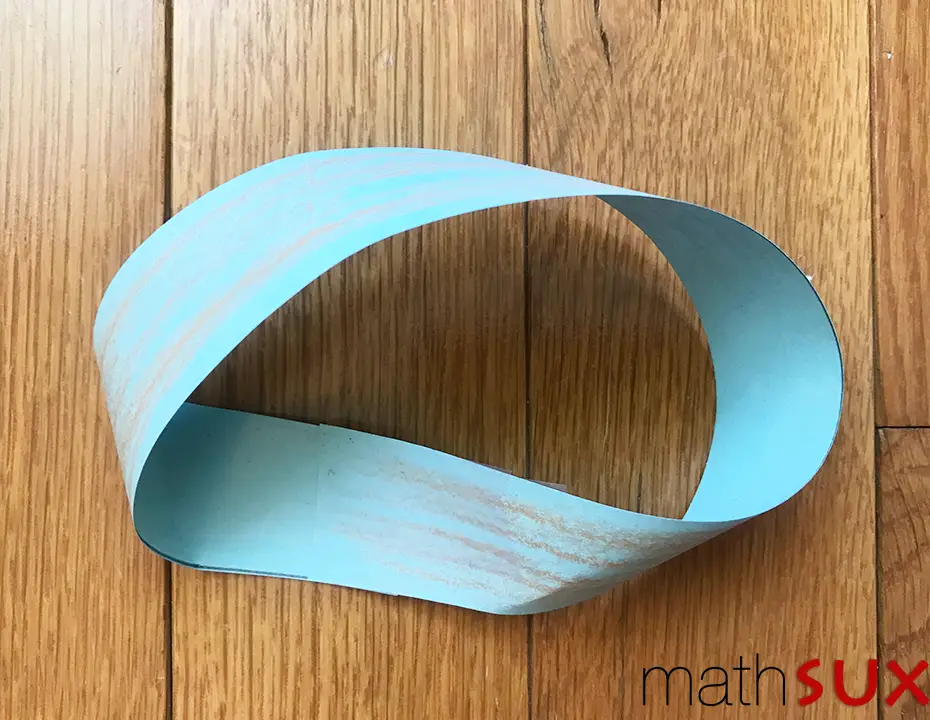
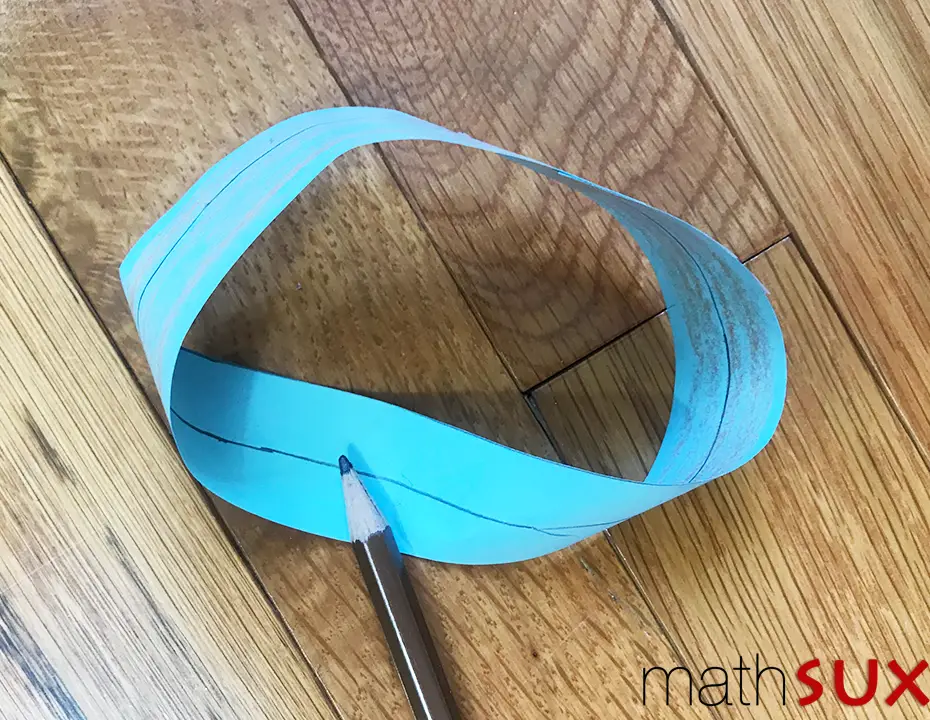
Looking for more Origami + Math? Check out this post here to fold and find the volume of a real-world pyramid and rectangular prism. And for another math + crafty post, learn how to make a Mobius Band here!

What is your favorite way to combine math and the real world? Or math and art in general? Let me know in the comments and happy calculating!

Facebook ~ Twitter ~ TikTok ~ Youtube

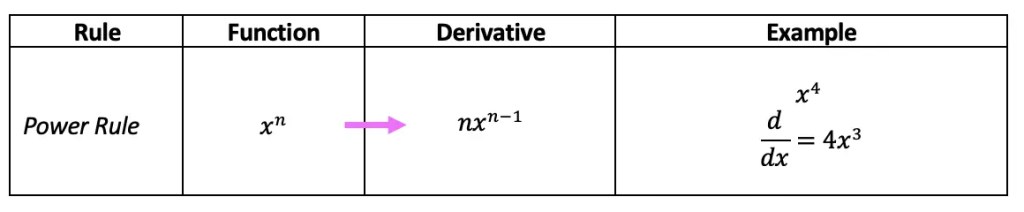
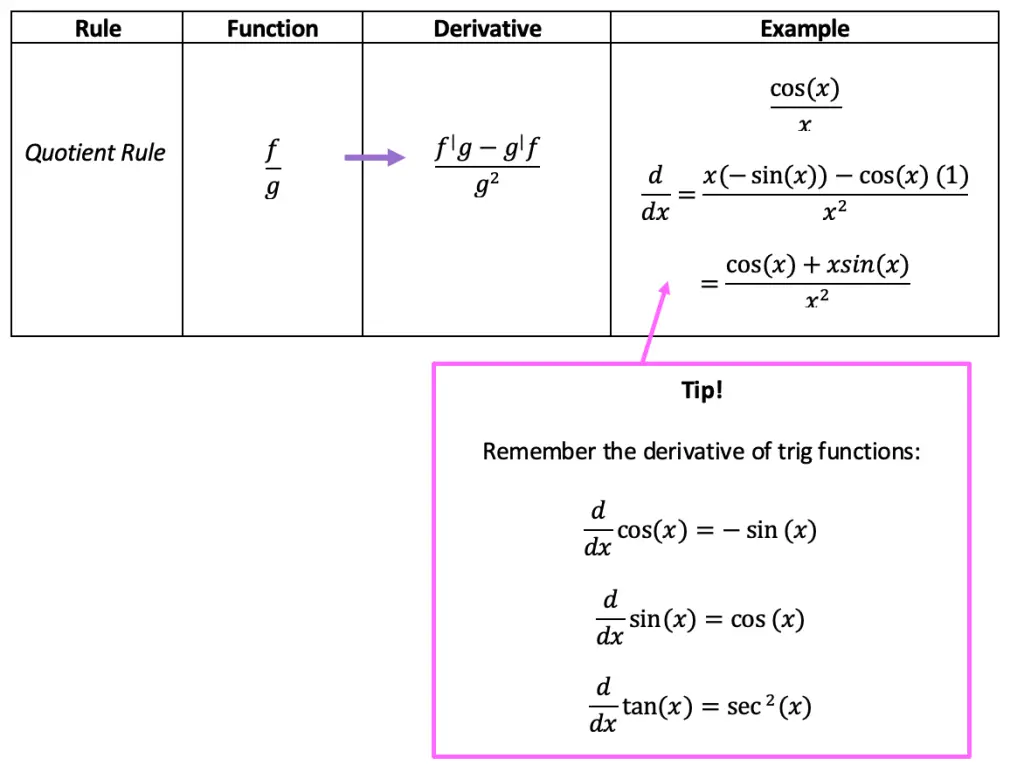
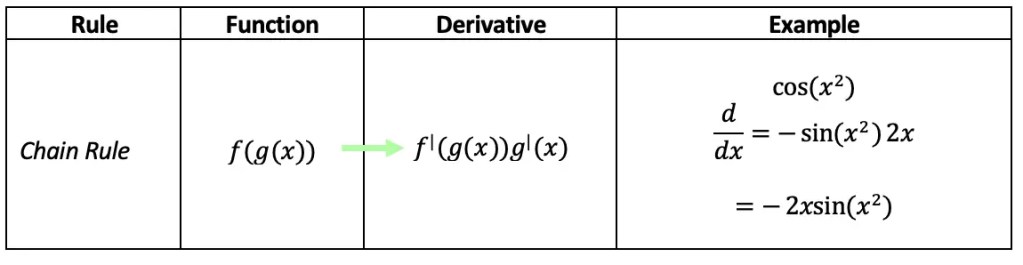
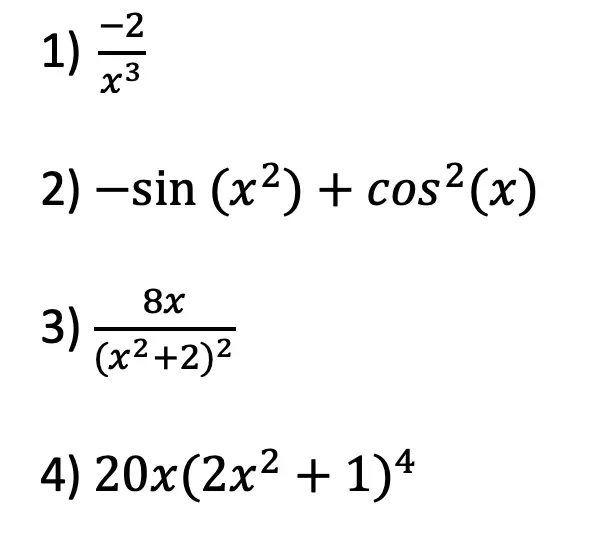
Looking for another math challenge? Check out this post on derivatives here!

3 Equations 3 Unknown

Hi everyone and welcome back to MathSux! This week we are going to explore how to solve 3 equations 3 unknown. This is like the simultaneous equations we learned to love in Algebra, but now, on steroids. Previously, in algebra we only had to solve for two unknown variables and were given two equations. But now, in Algebra 2, we are faced with three simultaneous equations, as well as, three unknown variables (usually x,y, and z) that we must find the values of. These types of problems can look scary, but with the method of elimination and some practice, they are not so bad! Check out the video, step by step tutorial, and practice problems below to master this topic. Good luck and happy calculating!

What are 3 Systems of Equations with 3 Unknown Variables?

Three systems of equations happen when there are three equations (usually with three unknown variables) are graphed or shown algebraically.  The graph can be represented by using the variables x,y,z (one for each of the three missing variables).  We are all used to the 2-dimensional coordinate plane with X going across and Y going up and down.  But now, with a new unknown variable, z, this gives us a new 3-dimensional axis. Instead of graphing lines like we are used to, these equations are going to be graphed as 3-dimensional planes. 

As for finding the solution to a system of three equations, it is the same for any simultaneous equation, as the answer lies where all three planes intersect.  Below is an example of what a three-dimensional plane can look like when graphed. Don’t worry, typically you wont be asked to graph or even interpret anything like the picture below.

Instead of graphing, typically we are asked to find the solution using algebra! There are three equations and three unknown variables. How are we supposed to know and find the value for each variable?  Well, there are more than one way to solve these types of problems, but in this blog post and in the video above, we will be going over the elimination method.  This is the fastest and easiest way to solve for 3 unknown variables by hand.

Solving by Elimination

3 Equations 3 Unknown

The main idea of Elimination is to pick two pairs of equations and add them together with the goal of canceling out the same variable. We do this by lining up both equations one on top of the other and adding them together.  If a variable or variables does not easily cancel out at first,  we then multiply one of the equations by a number so it will cancel out.

For example, adding the first equation (2x+2y+z=20) and second equation (-3x-y-z=-18) will quickly cancel out z. When we pick another pair of equations to add, picking the second equation (-3x-y-z=-18) and the third equation (x+y+2z=16), we will also have to goal of canceling out z. Once z has been eliminated twice, it provides us with an opportunity to add together the two new equations we just found and eliminate even further to find the value of each unknown variable.  If this sounds like a confusing mouthful, do not worry! We’ll go over this process step by step below.

Check out how it’s done step by step below!

Step 1: First, let’s take another look at our equations and number them so we can keep track of which equations we’re using and when.

3 Equations 3 Unknown

Step 2: Now let’s pick two equations and try to eliminate one of the variables.  If we look at the first two equations (labeled 1 and 2) above, notice we can easily cancel out at the unknown variable z.

3 Equations 3 Unknown

Step 3: Ok great, what now?  Now we are going to take a different pair of our original equations and have the same goal of canceling out the same unknown variable z (just like we did in in the previous step).  Let’s pick the last two equations from above, (labeled 2 and 3). Notice that these two equations do not easily cancel out unknown variable z, therefore, we must multiply 2 times the whole of equation 2 so that they do cancel each other out. 

3 Equations 3 Unknown

Step 4: Now, that we’ve canceled unknown variable z from two different pairs of equations, we can use the two new equations we found in steps 2 and 3 (hi-lighted in purple) to cancel out another variable.

3 Equations 3 Unknown

Step 5: Now that we have the value of one variable, x=3, we can plug it into one of our equations that we used in step 4.

Step 6: Last but not least, let’s find the value to our last unknown variable, z, by plugging in x=3 and y=5 into one of our original equations at the beginning of this example.

Was the wording a bit much? Too many things!? Don’t worry, check out the video and see how this questions gets worked through step by step on a piece of paper. And, if you get the example above, please check out the practice questions below!

Practice Questions:

Find the values of each three variables for each system of equations:

Solutions:

Want more MathSux?  Don’t forget to check out our Youtube channel and more below! And if you have any questions, please don’t hesitate to comment below. Happy Calculating!

Facebook ~ Twitter ~ TikTok ~ Youtube

*Bonus* Are 3 equations 3 unknown variables at the same time too much to handle? Check out how to find two simultaneous equations here!

Derivatives Practice Questions

Hi everyone and welcome to MathSux! In this weeks post, we will venture into Calculus for the first time! I won’t get too much into the nitty gritty explanation of what derivative are here, but instead will provide a nice overview of Derivatives Practice Questions. This post includes everything you need to know about finding the derivatives of a function including the Power Rule, Product Rule, Quotient Rule, and the Chain Rule. Below you will see examples, a Derivative Rules Cheat Sheet, and of course practice questions! I hope these quick examples help in the classroom or for that test coming up! Let me know if it helps and you want more Calculus lessons. Happy Calculating!

What is a Derivative?

We use the derivative to find the rate of change of a function with respect to a variable. You can find out more about what a derivative is and its proper notation here at mathisfun.com. Read on below for a derivative rules cheat sheet, examples, and practice problems!

Derivative Rules Cheat Sheet:

Power Rule:

The power rule is used for finding the derivative of functions that contain variables with real exponents.  Note that the derivative of any lone constant number is zero.

derivatives of functions with exponents

Product Rule:

The product rule is used to find the derivative of two functions that are being multiplied together.

derivatives practice questions

Quotient Rule:

Applying the quotient rule, will find the derivative of any two functions set up as a ratio.  Be sure to notice any numbers or variables in the denominator that can be brought to the numerator (if that’s the case, can use the more friendly power rule).

derivatives of trigonometric functions

Chain Rule:

The chain rule allows us to find the derivative of nested functions. This is great for trigonometric functions and entire functions that are raised to an exponent.

calculus chain rule examples

Ready for some practice questions!? Check out the ones below to test your knowledge of derivatives!

Derivatives Practice Questions:

Find the derivatives for each function below.

Derivatives Practice Questions

Solutions:

Still got questions? No problem! Don’t hesitate to comment with any questions or check out the video above. Also, if you find you need some motivation, check out my 6 tips and tricks for studying math here! Happy calculating! 🙂

*Also, if you want to check out Rate of Change basics click this link here!

Facebook ~ Twitter ~ TikTok ~ Youtube

NYS Regents Review – Algebra June 2021

Greetings math friends! Today we are going to break down the NYS Regents, specifically the Algebra NYS Common Core Regents from June 2021, one question at a time. The following video playlist goes over each and every question one step at a time. I’ve been working on this playlist slowly adding new questions and videos every week and now that it is complete, it is time to celebrate (and/or study)! Please enjoy this review along with the study aids and related links that will also help you ace the NYS Regents. Happy calculating!

NYS Regents

NYS Regents – Algebra June 2021 Playlist

Study Resources:

Looking to ace your upcoming NYS Regents!? Don’t forget to check out the resources below, including an Algebra Cheat Sheet, and important topics and videos to review. Good luck and happy calculating!😅

Algebra Cheat Sheet

Combing Like Terms and the Distributive Property

How to Graph an Equation of a Line

Piecewise Functions

NYS Regents – Algebra 2020

How to Study Math?

How is one supposed to study math!? Well, there is usually only one way, and that is to practice, practice, practice! But don’t get too stressed, because you can also make practice fun (or at least more pleasant).

Add some background music to your study session and make a nice cup of tea before diving in for the brain marathon. Another idea is to study only 1 hour at a time and to be sure to take breaks. Can’t seem to get that one question? Take a break and walk a way, or even better find a new study spot! It’s been scientifically proven that studying in different places can boost your memory of the very information you’re trying to understand.

What study habits do you have that have worked for you in the past? Let me know in the comments and good luck on your upcoming test!

Facebook ~ Twitter ~ TikTok ~ Youtube

** Be sure to check out the full list of Algebra lessons and old Regents questions review!**

Mobius Bands

Greeting math friends and welcome to another fabulous week of MathSux! Today we are going to look at how to make a Mobius Strip otherwise known as “mobius bands.” Whatever you call them, they are a one of a kind shape that leads to all sorts of questions and math exploration. So let’s get to it! Let’s start off by explaining what a mobius strip is:

What are Mobius Bands?

A mobius strip (or band) is a two-dimensional shape that only has one surface.  Invented by German mathematician August Ferdinand Mobius and also independently by Johann Benedict Listing in the 1800s, it is considered a mathematical phenomenon! We are going to create our own mobius strip today to understand why this shape is so fascinating!

*Note: You may also see different spelling of the mobius band: including Möbius or Moebius

How to Make a Mobius Strip:

Mobius Bands

Step 1: First, let’s gather out materials. For this activity we will need a piece of paper, scissors, tape, and a pencil.

Mobius Bands

Step 2: Let’s cut out a rectangle. The size of the one shown above is 11 X 1 inches. Once you have your rectangle, take one end of the rectangle and give it a half twist.

Mobius Bands

Step 3: Now take the half twisted piece and attach it to the other end of the rectangle with a piece of tape. Behold the beauty of our mobius strip!

How to make a mobius strip

Step 4: Now we are going to take a pen or pencil and draw a line going all around the mobius strip without lifting the pen. See if you can move he mobius strip along, while the pencil remains where it is.  Notice anything special happen? We created a line around the entire shape without lifting our pencil!

Real-World Mobius:

Have you been pondering where we can find Mobius bands in the real world? I thought so! Take a look at the list below:

  • Printer ink cartridges
  • Serpentine Belt in a car
  • VHS tapes (if anyone remembers or knows what those are)
  • Can you think of anymore? Let me know in the comments below!

Worksheet:

I also made this FREE worksheet to go along with the above video and lesson for anyone interested. Let me know if this is helpful! 🙂

If you’re looking for more fun math projects, check out my “Just for Fun” page here. And if you want to get to see the latest MathSux content, don’t forget to follow along with us and subscribe via the links below. Thanks so much for stopping by and happy calculating! 🙂

Facebook ~ Twitter ~ TikTok ~ Youtube

Angle Bisector Definition & Example

Hi everyone and welcome to another fabulous week of MathSux! I bring to you the first construction of the back-to-school season! In this post, we are going to go over the angle bisector definition and example. First, we will define what an angle bisector is, then we’ll take our handy dandy compass and straight edge to construct an angle bisector that will bisect an angle for any size! Check out the video and GIF below for more and happy calculating! 🙂

What is an Angle Bisector?

An Angle Bisector is a line that evenly cuts an angle into two equal halves, creating two equal angles. For example, if we have a 70-degree acute angle and we create an angle bisector this would create two equal angles of 35 degrees each, dividing 70 by 2. Check out how to do this construction step by step with pictures and explanations below.

Angle Bisector Example:

Angle Bisector Definition & Example

Step 1: First, we start by placing the point of our compass on the point of the angle, which in this case is 70 degrees.

Step 2: Next, we are going to draw an arc that intersects both lines that stem from the angle we want to bisect.

Step 3: Now, take the point of our compass to where the lines and arc intersect, and draw an arc towards the center of the angle.

Step 4: Keeping that same distance on our compass, we are going to take the point of your compass and place it on the other point where both the line and arc intersect, and draw another arc towards the center of the angle.

Step 5: Notice we made an intersection!? Where these two arcs intersect, mark a point and using a straight edge or ruler, connect it to the center of the original angle. 

Step 6: We have officially bisected our angle into two equal 35-degree halves, creating an angle bisector!

*Please note that the above example bisects a 70º angle, but this construction method will work for an angle of any size acute or obtuse!🙂

What do you think of the above angle bisector definition & example? Do you use a different method for construction? Let me know in the comments below! 🙂

Constructions and Related Posts:

Looking to construct more than just an angle bisector? Check out these related posts and step-by-step tutorials on geometry constructions below!

Construct an Equilateral Triangle

Perpendicular Line through a Point

Bisect a Line Segment with Perpendicular Bisector

Construct a 45º angle

Altitudes of a Triangle (Acute, Obtuse, Right)

Construct a Square inscribed in a Circle

Best Geometry Tools!

Looking to get the best construction tools? Any compass and straight-edge will do the trick, but personally, I prefer to use my favorite mini math toolbox from Staedler. Stadler has a geometry math set that comes with a mini ruler, compass, protractor, and eraser in a nice travel-sized pack that is perfect for students on the go and for keeping everything organized….did I mention it’s only $7.99 on Amazon?! This is the same set I use for every construction video in this post. Check out the link below and let me know what you think!

Facebook ~ Twitter ~ TikTok ~ Youtube

Looking for more constructions? Check out how to construct a square inscribed in a circle and an equilateral triangle by clicking on their respective links! And if you’re looking for even more geometry constructions, check out the link here!

AnAngle Bisector Definition & Example

Math + Art: Math Behind Perspective Drawing

Greetings! We are going to do something a little different today and explore Math + Art: Math Behind Perspective Drawing. For all the artists out there who tend to not generally gravitate towards math, this post is for you! There are many ways math can be connected to art, and in this post we will explore the role parallel and perpendicular lines play when it comes to drawing 3-D shapes. And for those who want to learn even more, don’t forget to check out the video below to see how 2-point perspective applies geometry and angles to create 3-D shapes.

What is Perspective Drawing?

Perspective drawing is an art technique that allows us to draw real life objects in 3-D on a flat piece of paper. Notice in the example below that buildings, trees, and power lines get smaller and smaller as we look into the distance just as they would in real life.

Math Behind Perspective Drawing

What are the Basics of Perspective Drawing?

Math Behind Perspective Drawing

There are two main things we need to know about perspective drawing.

1- Horizon Line: A horizontal line that goes across the entire paper. This represents where land and sky meet.

2- Vanishing Point: This is where many of our lines will be directed in order to create that 3-D affect.

Where do I Begin?

Step 1- Now that we have our horizon line and vanishing point, we can start by drawing a road. Use a ruler to draw two lines that lead to the vanishing point, this should resemble a triangle.

Step 2-From here we can start to draw a building by creating two straight lines that are perpendicular to our horizon line.

Math Behind Perspective Drawing

Step 3-Then line up the outermost corner of the building with the vanishing point using a ruler, and draw a line. Do this with each corner of our rectangle for a 3-D effect.

Math Behind Perspective Drawing

Step 3- continued….

Math Behind Perspective Drawing

Step 4- For the remaining lines, use parallel and perpendicular lines to finish off our building.

Math Behind Perspective Drawing

Step 5- Get creative! Add more buildings, windows, antennas, and anything else you might see in a city -scape. Use your imagination! 🙂

This method of perspective drawing is called one-point perspective because there is one vanishing point. But there are also 2-point and 3-point perspectives we can draw!

Want to learn how to do 2-Point Perspective drawing with 2 vanishing points!? Check out the video above to see how geometry and angles are related to this technique of perspective drawing!

Still got questions or want to learn more about perspective drawing? No problem! Don’t hesitate to comment with any questions below. Thanks for stopping by and happy calculating! 🙂

Facebook ~ Twitter ~ TikTok ~ Youtube

For more math + art, check out this post on fractals found in nature here.

Inscribed Angles & Intercepted Arcs: Geometry

Ahoy math friends and welcome to MathSux! In this post, we are going to go over the inscribed angle theorem which dives into inscribed angles and intercepted arcs. We’ll break down the main basic rule for inscribed angle theorem and the three inscribed angle theorems associated with this rule. If you are looking for more circle theorems, check out these posts on the Intersecting Secants Theorem and Central Angles Theorem. Also, don’t forget to check out the video and practice questions to truly master the topic below. Happy calculating! 🙂

Inscribed Angles:

When two chords come together to touch the outline of a circle, they create something called an inscribed angle. Unlike central angles, an inscribed angle is equal to half the measure of the arc length. In the example below, we can see that the inscribed angle ACB is equal to 25º while its corresponding intercepted arc AB is twice the inscribed angle at 50º. Knowing this allows us to find the value of unknown arcs or inscribed angles.

Inscribed Angles & Intercepted Arcs

Inscribed Angle Theorem:

There are three parts to the inscribed angle theorem to know based on the rule stated above, check them out below!

The inscribed angle theorem states that, in a circle when two inscribed angles intercept the same arc, the angles are congruent. Notice below how angle A and angle B both have the same arc CD (hi-lighted in pink). In this theorem, we have two inscribed angles, angle A and angle B, that intercept the same arc, arc CD.

Inscribed Angles & Intercepted Arcs

Theorem #2: In a circle when an angle is inscribed by a semicircle, it forms a  90º angle (or a right angle). If you look at angle BAC below, you’ll notice that the arc it corresponds with is a semicircle and that angle BAC forms a right angle.

Theorem #3: When a quadrilateral is inscribed within a circle, the opposite angles formed are supplementary, meaning that they add to 180º. The proof below shows angles A and C (hi-lighted in green) as supplementary, but this proof would also work for opposite angles B and D (hi-lighted in pink).

Inscribed Angles & Intercepted Arcs

Let’s look at how to apply these rules with an Example:

a) Step 1: To find the value of angle CDB we need to look at our given information. We know that angle CAB=85º, notice that this follows theorem number 3, “When a quadrilateral is inscribed in a circle, opposite angles are supplementary.” Therefore, we must subtract 110º from 180º to find the value of angle CDB.

b) Step 2: For finding angle ABD, we’re going to use the same theorem we used in part a, opposite supplementary angles of an inscribed quadrilateral are supplementary.

c) Step 3: Next, to find the value of arc ABD, we need to use the basic inscribed angle theorem that tells us an inscribed angle is equal to half the measure of its arc. Then use some basic algebra to solve for arc ABD.

d) Step 4: To find arc ACD, we need to use the basic inscribed angle theorem that tells us an inscribed angle is equal to the value of its arc, then use algebra to solve similar to part c.

If this looks confusing, check out the video above! And when you are ready master this topic with the practice questions below!

Practice Questions:

Use the inscribed angle theorem outlined above to answer the following questions.

Solutions:

Still got questions?  No problem! Check out the video above or comment below for any questions and follow for the latest MathSux posts. Happy calculating! 🙂

Facebook ~ Twitter ~ TikTok ~ Youtube

Looking for more posts on Circle Theorems? Check out the posts below!

Circle Theorems & Formulas

Central Angle Theorem

Intersecting Secants Theorem

Area of a Sector

Circle Theorems

How to Calculate Z-Score?: Statistics

Hi there and welcome to MathSux! In this post, we are going to explore how to calculate z-score and the normal distribution. We’ll do this by examining the normal curve and learning how to find probability finding z-score and using the mean, standard deviation, and specific data points. Fore more info and more MathSix don’t forget to check out the video and practice questions below. Happy calculating!

What is a Normal Curve?

A normal curve is a bell shaped curve that shows the distribution of data evenly spread with respect to the mean. If you look at the normal curve below, the area under the curve shows all the possible probabilities of a certain data point occurring, notice the curve is higher towards the center mean, μ, and gets smaller as the distance from μ grows. The distance from μ is measured by the standard deviation, a unique unit of measurement that is specific to each group of data.

Mean: The mean always falls directly in the center of our normal curve. It is the average of our data, and always falls right in the middle.

Standard Deviation:  This value is used as a standard unit of measurement for the data, measuring the distance between each data point in relation to the mean throughout the entire data set. For a review on what standard deviation is and how to calculate it, check out this post here.

Now for our normal curve:

Notice half of the data is below the mean, μ, while the other half is above? The normal curve is symmetrical about the mean, μ!

How to Calculate Z-Score?

Z Score can tell us at what percentile a certain point in the data set falls in relation to the rest of the mean by using the standard deviation as a unit of measurement.  If this sounds confusing, it’s ok! Take a look at the following formula:

How to Calculate Z-Score?

We use the above formula in conjunction with  a z table which tells us the probability under the curve for a certain point.

Solution:

a) What percent of student scored below 500?

Step 1: First, let’s draw out our given information the mean=500, standard deviation=100, and the data point the question is asking for x=500 onto a normal curve. Notice that we want to find the value of the area under the curve shaded in pink.  This will tell us the percent of students that scored below 500.

How to Calculate Z-Score?

Step 2: We need to find the z-score by, using the data point given to us x=500, the mean=500, and the standard deviation, sigma=100.

Step 3: Yes, we have a zero! Now we need to take our z table and line up our chart. Notice that the chart finds the probability for everything at the beginning of the normal curve and on.  This is perfect for answering our question!

How to Calculate Z-Score?

Step 4: The table gives us our solution of .5000.  If we multiply .5000 times 100 it gives us the percent of students who scored below 500 at 50%.

b) What percent of student scored above 620?

Step 1: First, let’s draw out our given information the mean=500, standard deviation=100, and the data point the question is asking for x=620 onto a normal curve. Notice that we want to find the value of the area under the curve shaded in pink.  This will tell us the percent of students that scored above 620.

How to Calculate Z-Score?

Step 2: We need to find the z-score by, using the data point given to us x=620, the mean=500, and the standard deviation, sigma=100.

How to Calculate Z-Score?

Step 3: Yes, we got 1.2! Now we need to take our z table and line up our chart. Notice that the chart finds the probability for everything at the beginning of the normal curve and on.  This is means to find the percent we are looking for, we need to subtract our answer from one since we want the value of probability on the right side of the curve (the z-table only provides the left side).

How to Calculate Z-Score?

Step 4: The table gives us our solution of .8849.  If we subtract this value from 1 then multiply that value times 100 it gives us the percent of students who scored above 620.

How to Calculate Z-Score?

C) What is the highest score a student could receive if the students was in the 16.11th percentile?

Step 1: In this question we have to work backwards by first identifying, where on the z-score table is the number .1611 and then filling in our z score formula to find x, the missing data point (in this case test score).

Search the table for .1611:

How to Calculate Z-Score?

Notice that .1611 can be found on the z-table above with z-score -0.99.  This is what we’ll use to find the unknown data point!

Step 2: We need to find the unknown test score by, using the z score we just found z=-0.99, the mean=500, and the standard deviation, sigma=100.

How to Calculate Z-Score?

Step 3: Solve for x.

How to Calculate Z-Score?

Practice Questions:

The grades on a final English exam are normally distributed with a mean of 75 and a standard deviation of 10.

a) What percent of students scored below a 60?

b) What percent of students scored above an 89?

c) What is the highest possible grade that included in the 4.46th percentile?

d) What percent of students got at least a 77?

Solutions:

a) 6.68%

b) 8.08%

c) 58

d) 42.07%

Want to make math suck just a little bit less? Subscribe to my Youtube channel for free math videos every week! 🙂

Facebook ~ Twitter ~ TikTok ~ Youtube

Looking for more Statistics?

Difference between Bar Graphs and Histograms

Box and Whisker Plots

Variance and Standard Deviation

Expected Value

30 60 90 Triangle

Hi everyone and welcome to MathSux! In this post, we are going to break down 30 60 90 degree special right triangles. What is it? Where did it come from? What are the ratios of its side lengths and how do we use them? You will find all of the answers to these questions about this right angled triangle in this post. Also, don’t forget to check out the video below and practice questions at the end of this post to truly become a 30 60 90 special right triangle master! Happy calculating! 🙂

If you want to learn about the other special triangle, 45 45 90 triangle, check out this post here. And if you’re looking to make math suck just a little bit less? Subscribe to our Youtube channel for free math videos every week! 🙂

Facebook ~ Twitter ~ TikTok ~ Youtube

30 60 90 Triangle Ratio:

30 60 90 triangle side lengths

Notice that the 30 60 90 triangle is made up of one right angle across from the hypotenuse (which is always going to be the longest side), a 60 degree angle with a longer leg on the opposite side, and a 30 degree angle measure across from the shorter leg.

What is a 30 60 90 Triangle and why is it “Special”?

The 30 60 90 triangle is a special right triangle because it forms an equilateral triangle when a mirror image of itself is drawn. This means that all sides are equal when a mirror image of the triangle is drawn which allows us to find the ratio between each of the sides of the triangle by using the Pythagorean Theorem. Check it out below!

30 60 90 Special Triangles

Now let’s draw a mirror image of our triangle to create an equilateral triangle.  Next, we can label the length of the new side opposite 30 degrees (the shorter leg) “a,” and add this new mirror image length with the original we had to get, a total of a+a=2a.

30 60 90 Special Triangles

If we look at our original 30 60 90 triangle, we now have the following values for each side based on our equilateral triangle. Notice we still need to find the length value of the longer leg, opposite angle 60 degrees.

30 60 90 Special Triangles
Pythagorean Theorem Formula
Fill in values from our triangle longer leg
Distribute the exponent and start solving for our “?” by subtracting a^2 from both sides.
Now take the square root of both sides to solve for “?.”	We have found a solution! Our missing side length is equal to a√3.

To sum up, we have applied the Pythagorean Theorem formula, filled in values found in our triangle for each length, distributed the exponent and subtracted a2 from both sides, took the square root, and finally found our solution for our ratio for the longer leg opposite 60 degrees.

Now we can re-label our triangle, knowing the length of the hypotenuse in relation to the two legs. This creates a ratio that applies to all 30 60 90 triangles!

30 60 90 triangle side lengths

How do I use this ratio?

30 60 90 triangle side lengths

Knowing the above ratio, allows us to find any length of any and every 30 60 90 triangle, when given the value of one of its sides. Let’s tsee how this ratio works with some examples.

Example #1:

30 60 90 triangle side lengths

Step 1: First let’s look at our ratio and compare it to our given triangle.

30 60 90 triangle side lengths

Step 2: Notice we are given the value of a, which is equal to 4, knowing this we can now fill in each length of our triangle based on the ratio of a 30 60 90 triangle.

30 60 90 triangle side lengths

Now let’s look at another Example where we are given the length of the hypotenuse and need to find the values of the other two missing sides.

Example #2:

30 60 90 triangle side lengths

Step 1: First let’s look at our ratio and compare it to our given triangle.

30 60 90 triangle side lengths

Step 2: Notice we are given the value of the hypotenuse, 2a=20. Knowing this we can find the value of a by dividing 20 by 2 to get a=10. Once we have the value of a=10, we can easily find the length of the last, longer leg based on the 30 60 90 ratio:

30 60 90 triangle side lengths

Now for our last Example, we will see how to find the value of the shorter leg and hypotenuse, when we are given the side length of the longer leg across from 60º and need to find the other two missing sides.

Example #3:

30 60 90 triangle side lengths

Step 1: First let’s look at our ratio and compare it to our given triangle.

30 60 90 triangle side lengths

Step 2: In this case, we need to use little algebra to find the value of a, using the ratio for 30 60 90 triangles.

30 60 90 triangle side lengths
We set up this equation, knowing that 9 is across from 60 degrees, and that a√3=9. 	To solve for a, we divide square root both sides by √3. 	We get a solution a=9/√3! Yay! We cannot have a radical in the denominator, so we rationalize the denominator by multiplying the numerator and denominator by √3.

Now that we have one piece of the puzzle, the value of a, let’s fill in the value of the shorter leg of our triangle below:

Finally, let’s find the value of the length of the hypotenuse, which is equal to 2a in our ratio. Knowing the length of all sides, we can fill in the lengths of each side of our triangle for our solution.

Think you are ready to master these types of questions on your own? Try the practice problems below!

Practice Questions:

Find the value of the missing sides of each 30 60 90 degree triangle.

Solutions:

Still got questions? No problem! Don’t hesitate to comment with any questions or check out the video above. Happy calculating! 🙂

Facebook ~ Twitter ~ TikTok ~ Youtube

Related Trigonometry Posts:

The Unit Circle

Basic Right Triangle Trigonometric Ratios (SOH CAH TOA)

4545 90 Special Triangles

Factoring Trigonometric Functions

Graphing Trigonometric Functions

Trig Identities

Transforming Trig Functions

Law of Cosines

Law of Sines