Greetings math friends! Today we are going to go over a question I get asked a lot, which is “How Do You Study Math?” How to study math, what a question! There is really only one way that I’ve ever known and that is to practice questions, over and over again. That is the basic advice I usually give because it is a quick and easy answer (and it’s true), but of course, there is more to the story! There are tips and tricks to practicing questions to master not just math, but any subject when preparing for a test. In this post, there is no holding back, and I’m going to unleash all my test prep secrets! Hopefully, this article will come in handy for when it is crunch time and hopefully, maybe, just possibly this study guide on studying can make math just a bit more fun (you never know)! Either way, I hope it helps when you need it most, good luck and happy calculating!
Solving Math Problems:
Math is an active learning subject and the key to mastering any math topic is to solve similar math problems over and over again.
So in order to do this, of course, we are going to need practice questions. But what practice questions? How do I know which questions to look at?
That’s where we are going to gather and find every question we can on the topic som places to start might include:
1) MathClass Notes – Re-do and test yourself with questions from math class.
2) Homework Assignment Problems – Re-do homework problems, pay attention to those harder questions that you were unable to get the first time around. See how you do on them now, checking if you get the correct answer.
3) Quiz Questions – Were you already quizzed before the big test? How did you do? Review and learn if you got a wrong answer. Review and learn if you got the right answer!
Now that we are equipped with all of our questions, let’s see what we should do next!
Cheat Sheet:
What am I forgetting? Do I have to memorize any formulas and what they mean? What does that notation represent again? Put it all on the cheat sheet!
Some math class teachers even allow you to bring a cheat sheet, if so you’re in luck! If not it is still a great tool that can be used for studying alone.
Here are some things you might want to include on your cheat sheet:
1) MathFormulas – We never want to say the word “memorize” in math class, but when there are going to be formulas on your math test, we know that’s exactly what we’ll need to do!
2) Math Vocabulary – Any new words you can’t seem to remember? Put them here with the definition for each new word.
3) Practice Questions – Sometimes we can forget how to do a certain type of question, if that happens, place the question fully solved here so we can remember how it’s done.
Now that we have done all we can on our own, let’s see I still have some math questions, what should I do now?
Study with Friends!
Forming a study group with friends is a great way to fill in any gaps you may have with math. What your friends know may be exactly what you’re missing when it comes to learning math and vice versa.
Study groups are also great for explaining topics you already know as this will increase your understanding even further! So even if you know more than your friends do in math class, you can teach and get even stronger in the topic, and become a math topic superhero!
Learning math can be fun with a group of friends as you can be more relaxed than you would be in a classroom and be more open to asking questions.
Listen to Music:
Are you studying alone? A great way to study math concepts on your own while doing practice questions is to have some low relaxing music on in the background. This can help with concentration and allow some headspace for problem-solving and mathematical thinking. It can also help us relax and leave out any unnecessary chatter in our heads.
Stay Positive!
A positive attitude to any math problem is so important for studying math. Make sure to know you can do it, you are capable of understanding the concepts and are capable of mastering the math course. If you have any questions you can always reach out to the resources available to you.
Explore Math Resources:
1) Math Class – Email or speak with a math teacher or tutor for any specific questions before your test.
2) Classmates / Friends – As mentioned before, use your circle of friends to fill any gaps in understanding!
3) MathSux / YouTubeand other online math resources – Free and fast!
Math tests can be hard, but studying for them doesn’t have to be! Once you get in the flow of studying, the learning process of mathematics will come much easier. Do you have different study tips or a different method of studying math than the ones listed here? What works for you? Let me know in the comments and happy calculating!
Hi everyone and welcome to another week of MathSux! In today’s post, we are going to go over all the different types of shape transformations in math that we’ll come across in Geometry! Specifically, we’ll see how to translate, reflect, rotate, or dilate a shape, a line, or a point. There are also specific coordinate rules that apply to each type of transformation, but do not worry because each rule can also be easily derived (except for those tricky rotations, keep an eye out for those guys!). If you like art or drawing, this is a great topic where we’ll have to use our artistic eye and our imagination for finding the right answer. We’ll also take a look at where you might use and see transformations in your everyday life! Hope you are ready, take a look below and happy calculating! 🙂
What is a Transformation in Math?
Mathematical Transformations, include a wide range of “things.” And by “things” I mean reflections, translations, rotations, and dilations; Each fall under the umbrella known as “transformations.” Alone any one of these is not difficult to master but mix them together and add a test and a quiz or two and it can get confusing. Even the words “transformation “and “translation” can get confusing to us humans, as they sound very similar. But these are two different things. A translation is a type of transformation. Let’s break down each of our new words before our brains explode:
Transformations: When we take a shape or line and we flip it, rotate it, slide it, or make it bigger or smaller. Basically, when we have a shape or line and we mess around with it a bit, it is a transformation. The shape or line in question is usually graphed on a coordinate plane. Transformations include:
(1) Translations(slide it)
(2) Reflections(flip it)
(3) Rotations(rotate it)
(4) Dilations(make it bigger or smaller)
Shape Transformation:
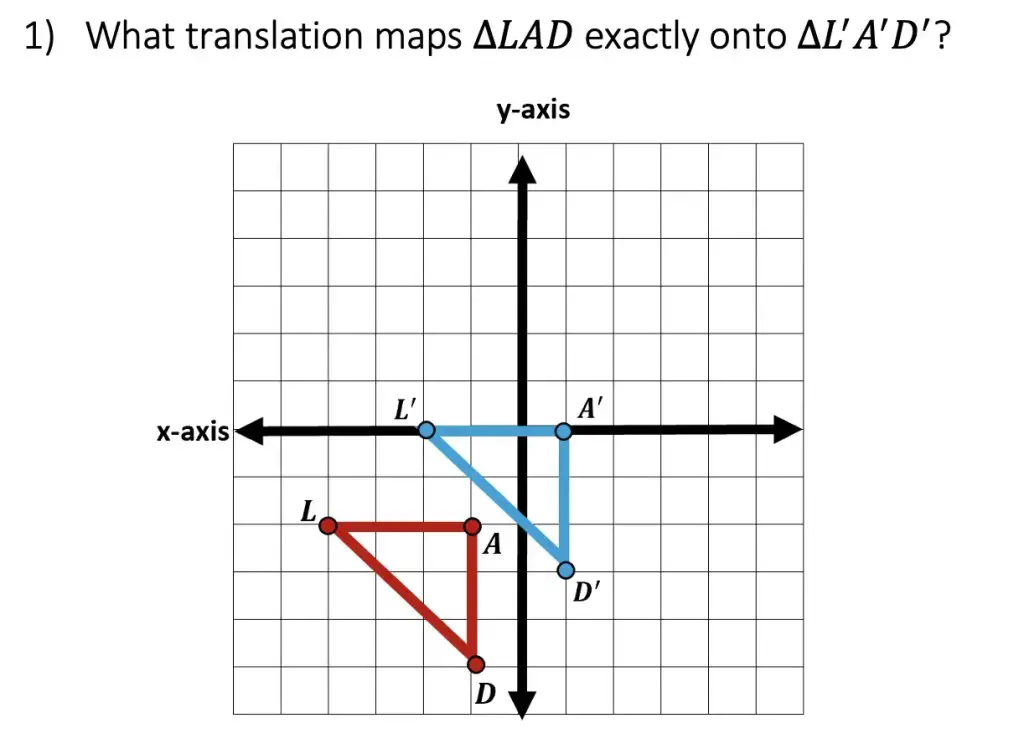
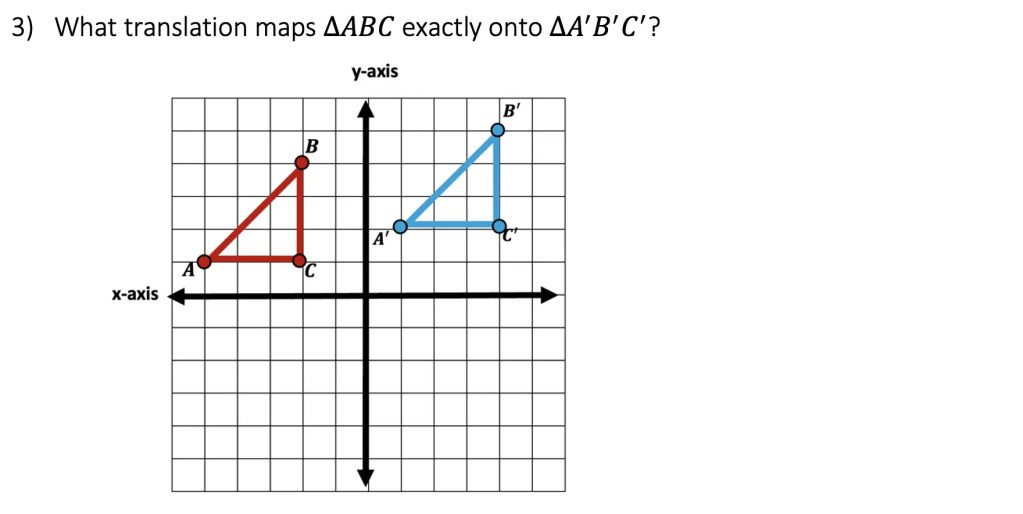
1) Translations – When we take a shape, line, or point and we move it up, down, left, or right.
2) Reflections – When a point, a line segment, or a shape is reflected over a line it creates a mirror image.
3) Rotations – When we take a point, line, or shape and rotate it clockwise or counterclockwise, usually by 90º,180º, 270º, -90º, -180º, or -270º.
4) Dilations – When we take a point, line, or shape and make it bigger or smaller, depending on the Scale Factor.
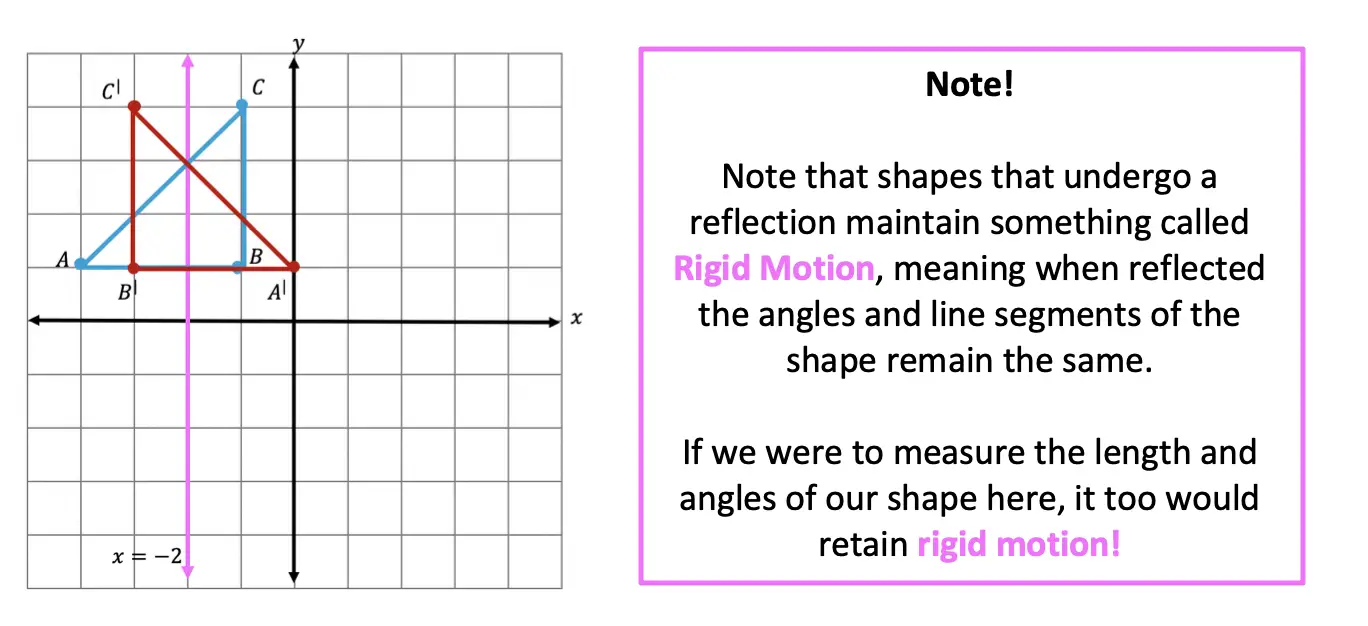
Rigid Transformations:
Before we dive into our first type of transformation, let’s first define and explore what it means when a transformation maintains Rigid Motion. When a line or shape is transformed and the length, area and angles of the line and/or shape are unaffected by the transformation, it is considered to have Rigid Motion. Rigid transformations include Translations, Reflections, and Rotations (but not Dilations).
Now that we know which types of transformations mainatin rigid motion, let’s explore each type of transformation in more detail!
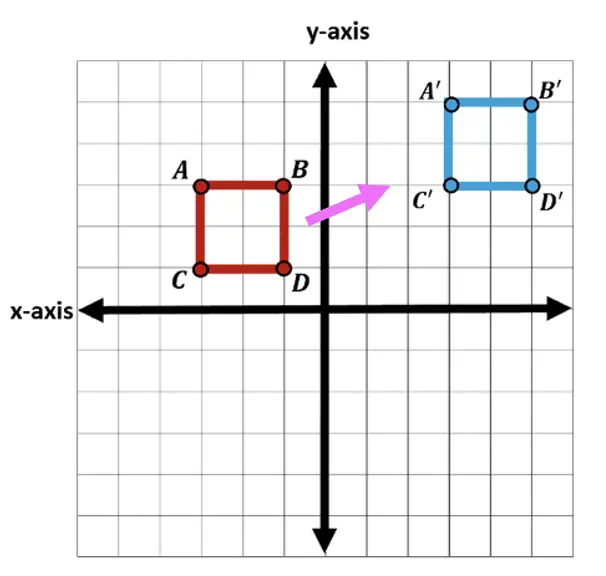
Translations:
Translations: When we take a shape, line, or point and we move it up, down, left, or right. Remember that this type of transformation is a rigid transformation, meaning the line or shape is translated, the length, area and angles of the line and/or shape are unaffected by the transformation.
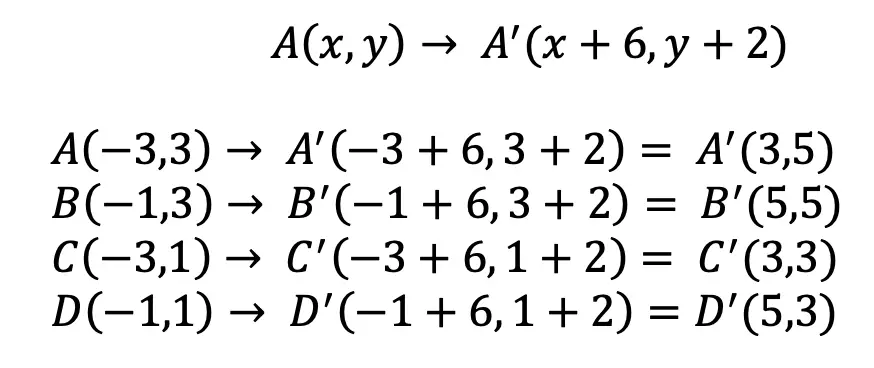
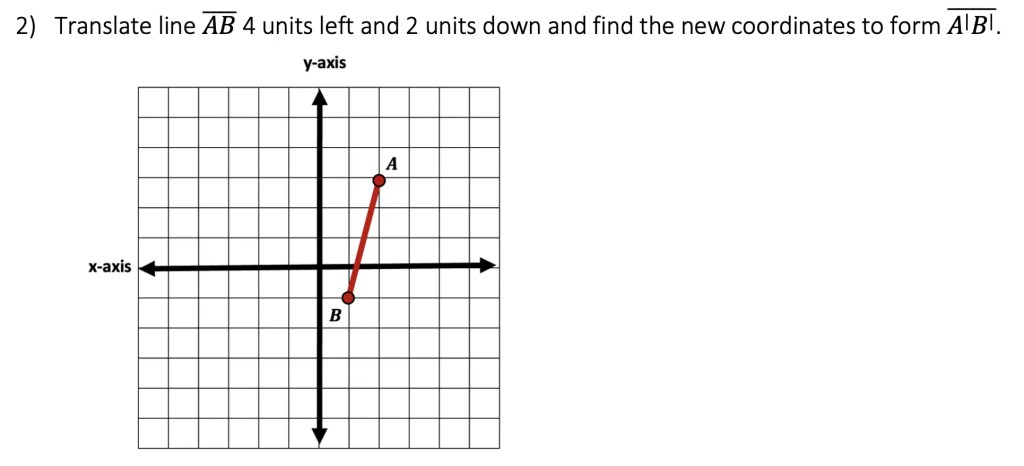
In the translation example above, we go start at square ABCD and translate each coordinate of the original square ABCD 6 units to the right and 2 units up to get our new transformed image square A|B|C|D| .
Translations Formula:
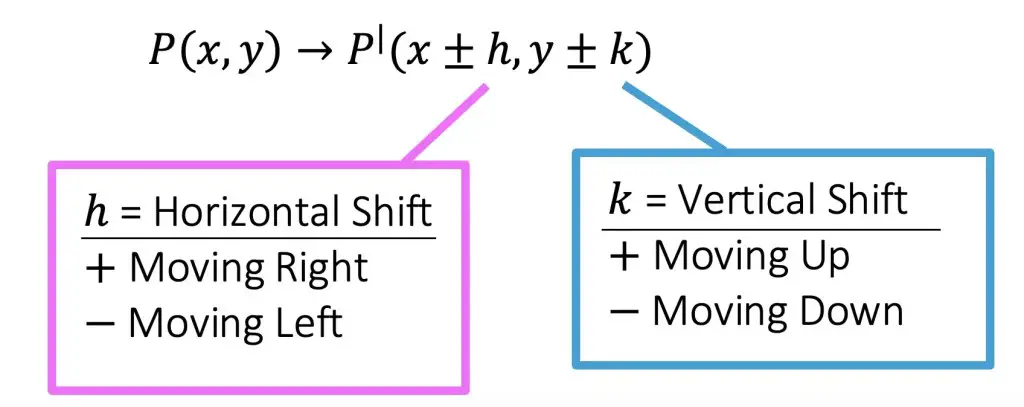
P(x,y) -> P| (x+h, y+k)
where….
h=Horizontal Shift (add (+) when moving right, subtract (-) when moving left)
k= Vertical Shift (add (+) when moving up, subtract (-) when moving down)
Horizontal Translation:
When we translate a point, line, or shape left or right, it is undergoing a horizontal translation along the x-axis. Any type of left or right movement on a coordinate plane is a horizontal translation.
How does this affect the x-coordinate? If the shape is being translated to the right, then we are adding units to the x-coordinate, and if the shape is shifting left then we are subtracting units from the x-coordinate.
Vertical Translation:
When we translate a point, line, or shape up or down, it is undergoing a vertical translation along the y-axis. Any type of up and down movement on a coordinate plane is a vertical translation.
How does this affect the y-coordinate? If the shape is being translated up, then we are adding units to the y-coordinate, and if the shape is being shifted down then we subtract from the y-coordinate.
Even though a horizontal shift or a vertical shift can happen when we move a shape, line, or point, many translations have a combo of the two!
How do Coordinates Change after a Translation?
The truth is there is no one unique rule for translations, but numbers will always be added or subtracted from the x and/or y coordinate values. If something is translated to the right, then we add units to the x-value. On the other had if something is translated to the left, we subtract units from the x-value. The same can be said for moving a shape up, we then add units to the y-value, and if a shape is translated down, we subtract units from the y-value. This gives us the following translation formula below:
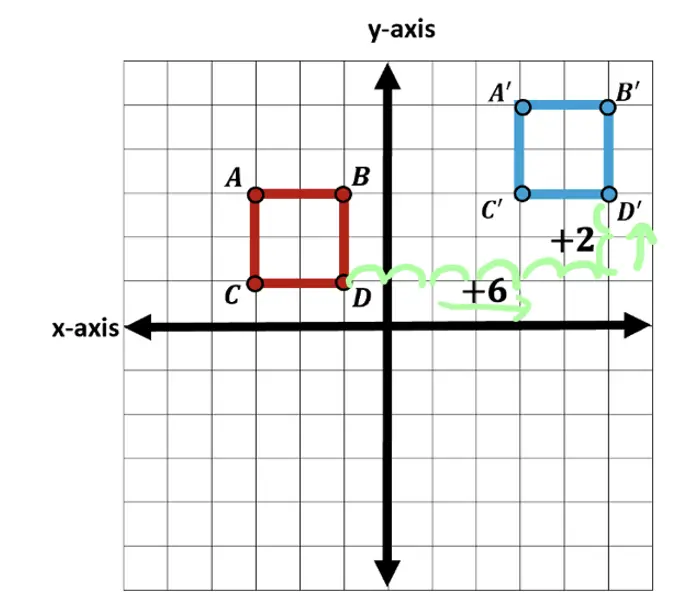
If we look at our example, when we translate original square ABCD to square A|B|C|D| we end up translating each coordinate of original square ABCD 6 units to the right and 2 units up. What we are really doing when we translate is adding 6 units to each x-coordinate as well as adding 2 units to each y-coordinate of the original figure square ABCD. Check it out below:
For more on translations, check out the video below and practice questions here.
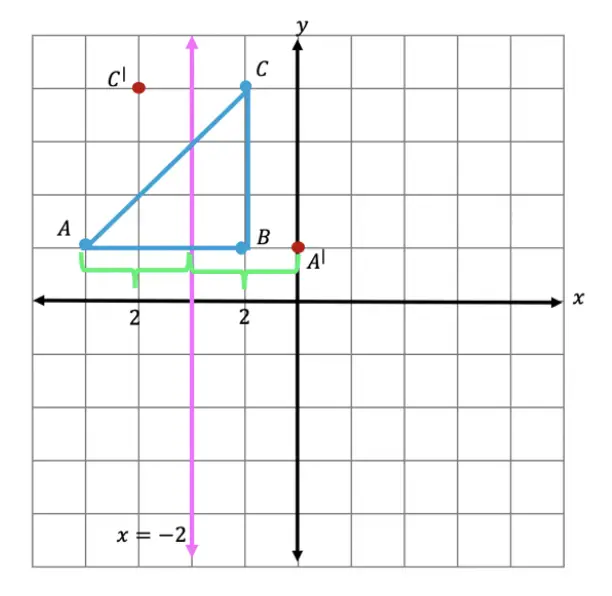
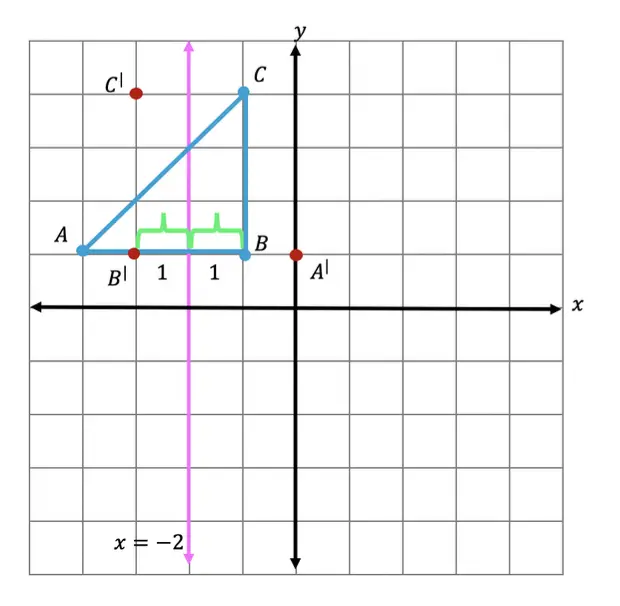
Reflections:
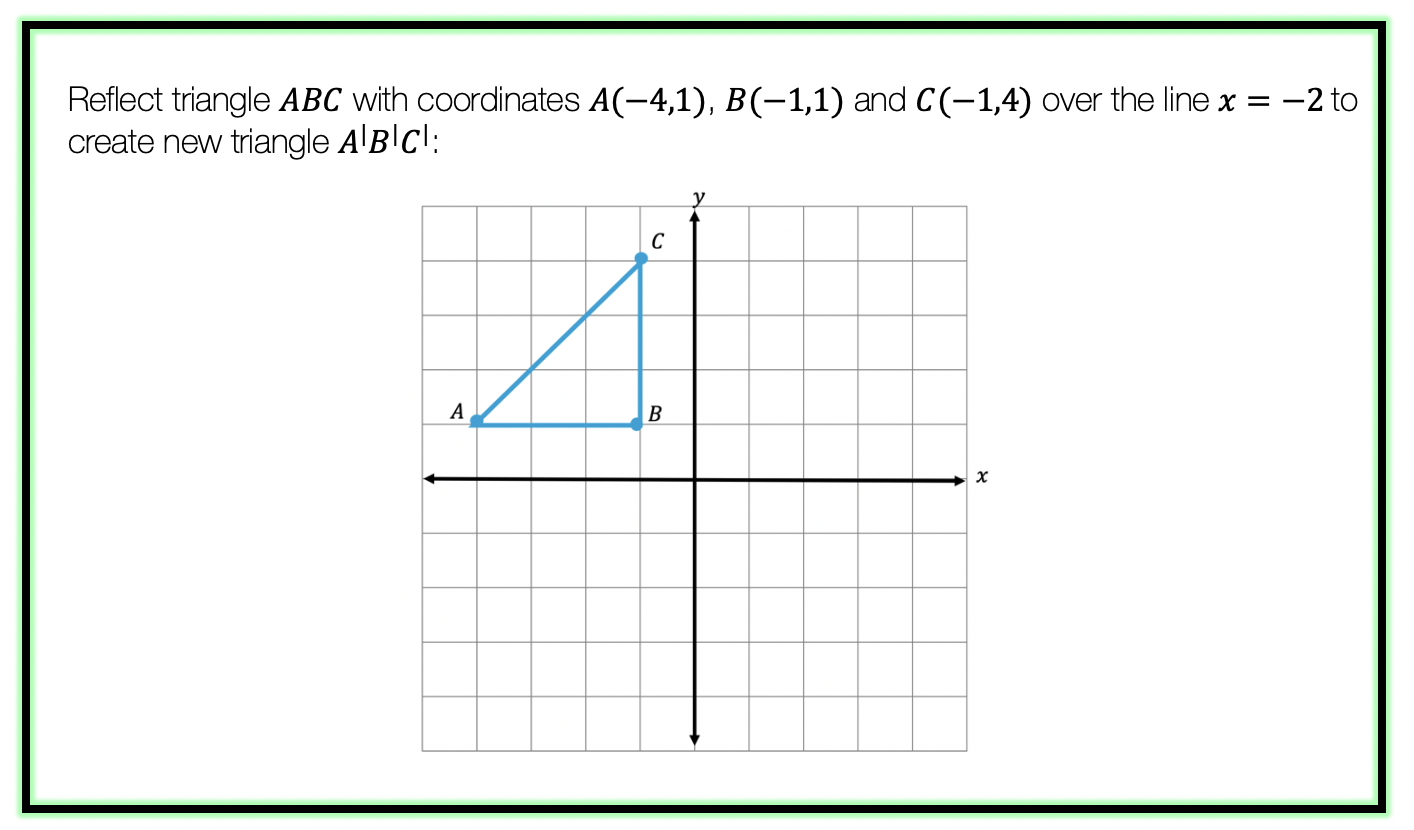
Reflections on a coordinate plane are exactly what you think! When a point, a line segment, or a shape is reflected over a line it creates a mirror image. Think the wings of a butterfly, a page being folded in half, or anywhere else where there is perfect symmetry. Check out how we solve the reflections example below one step at a time!
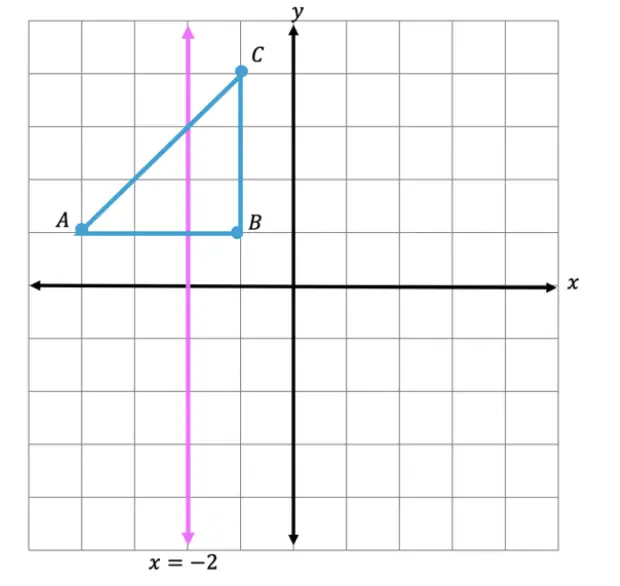
Step 1: First, let’s draw in line x=-2.
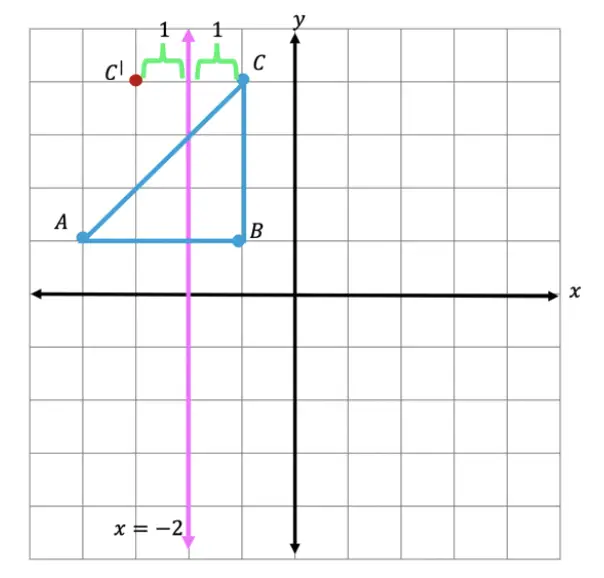
Step 2: Find the distance each point is from the line x=-2 and reflect it on the other side, measuring the same distance or mirror image of each point. First, let’s look at point C, notice it’s 1 unit away from the line x=-2, to reflect it we are going to count 1 unit (the same distance) to the left of the line x=-2 and label our new point, C|.
Step 3: Next we reflect point A in much the same way! Notice that point A is 2 units away on the left of line x=-2, we then measure 2 units to the right of our line and mark our new point, A|.
Step 4: Lastly, we reflect point B. This time, point B is 1 unit away on the right side of the line x=-2, we then measure 1 unit to the opposite side of our line and mark our new point, B|.
Step 5: Finally, we can now connect all of our new points, for our fully reflected triangle A|B|C|.
If you’re looking for more on reflections, check out the videos below and the practice questions right here.
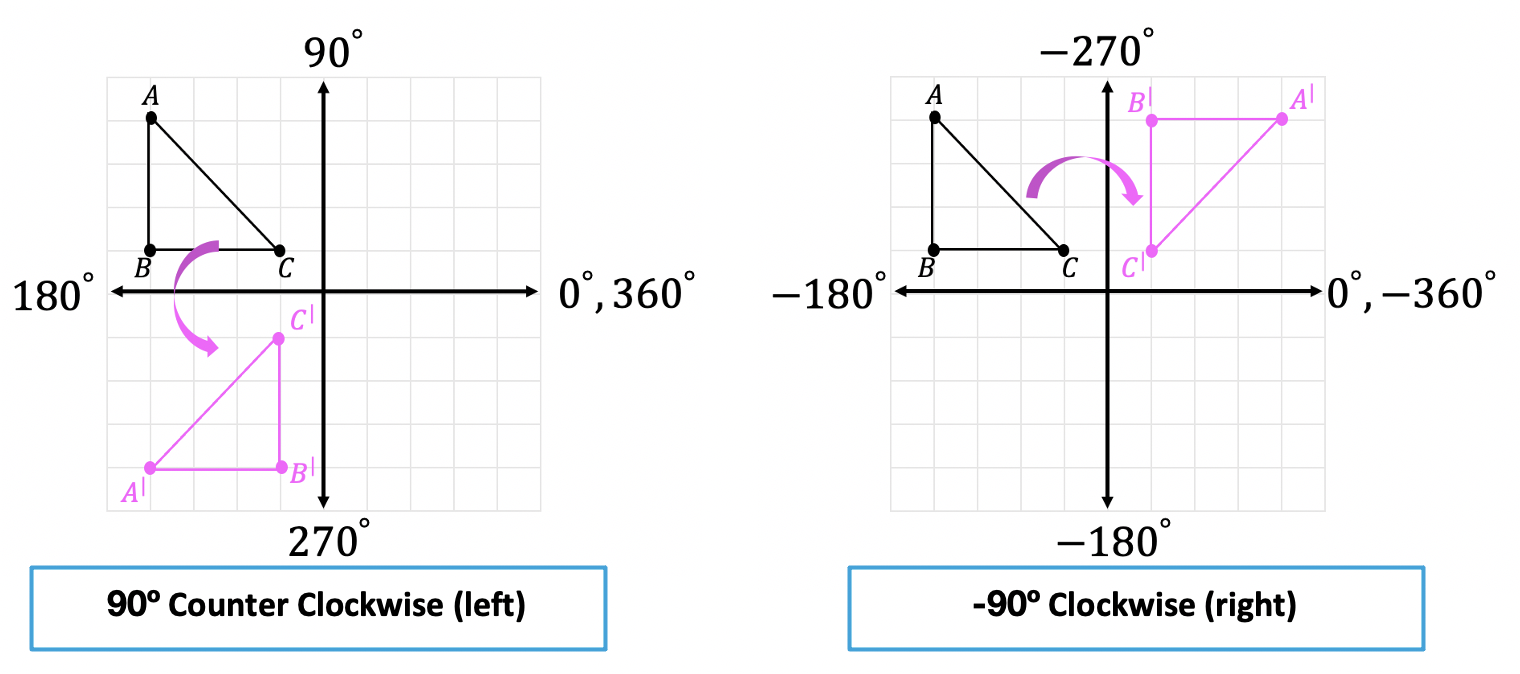
Rotations:
Rotations are a type of transformation in geometry where we take a point, line, or shape and rotate it clockwise or counterclockwise, usually by 90º,180º, 270º, -90º, -180º, or -270º.
A positive degree rotation runs counter clockwise and a negative degree rotation runs clockwise. Let’s take a look at the difference in rotation types below and notice the different directions each rotation goes:
How do we rotate a shape?
There are a couple of ways to do this take a look at our choices below:
We can visualize the rotation or use tracing paper to map it out and rotate by hand.
Use a protractor and measure out the needed rotation.
Know the rotation rules mapped out below. Yes, it’s memorizing but if you need more options check out numbers 1 and 2 above!
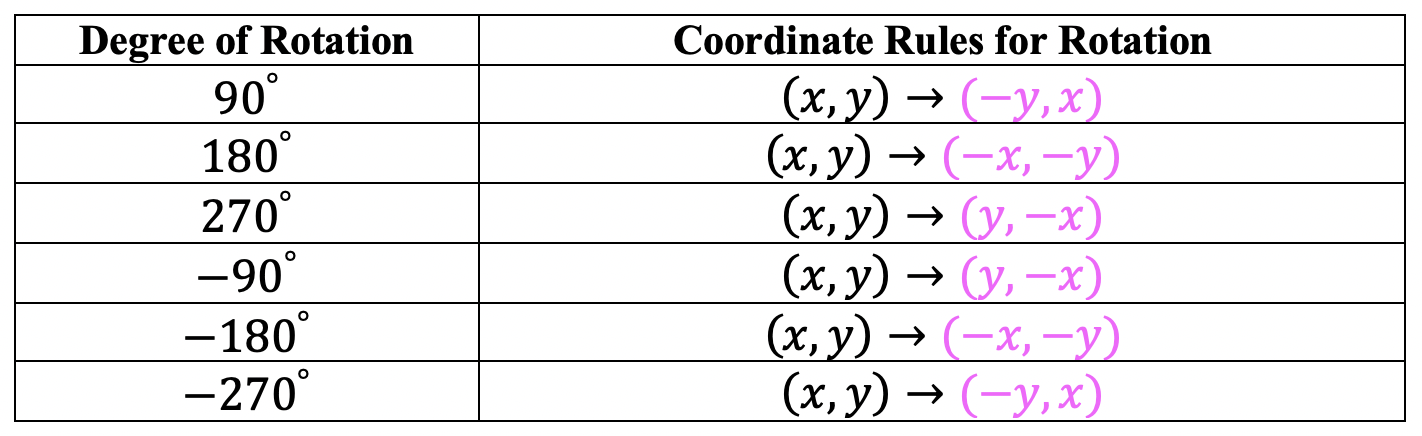
Rotation Rules:
Where did these rules come from?
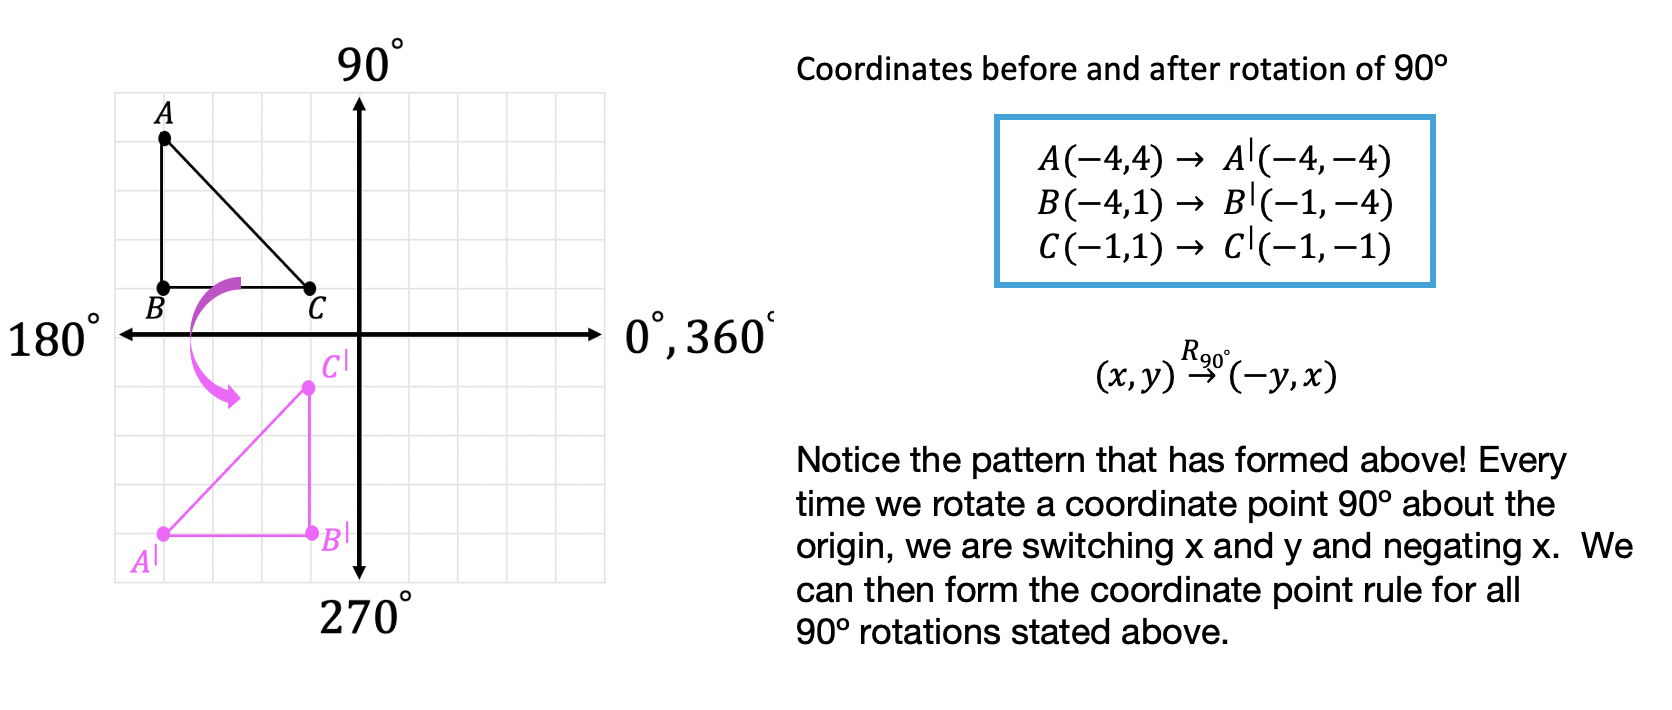
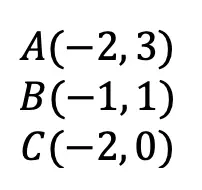
To derive our rotation rules, we can take a look at our first example, when we rotated triangle ABC 90º counterclockwise about the origin. If we compare our coordinate point for triangle ABC before and after the rotation we can see a pattern, check it out below:
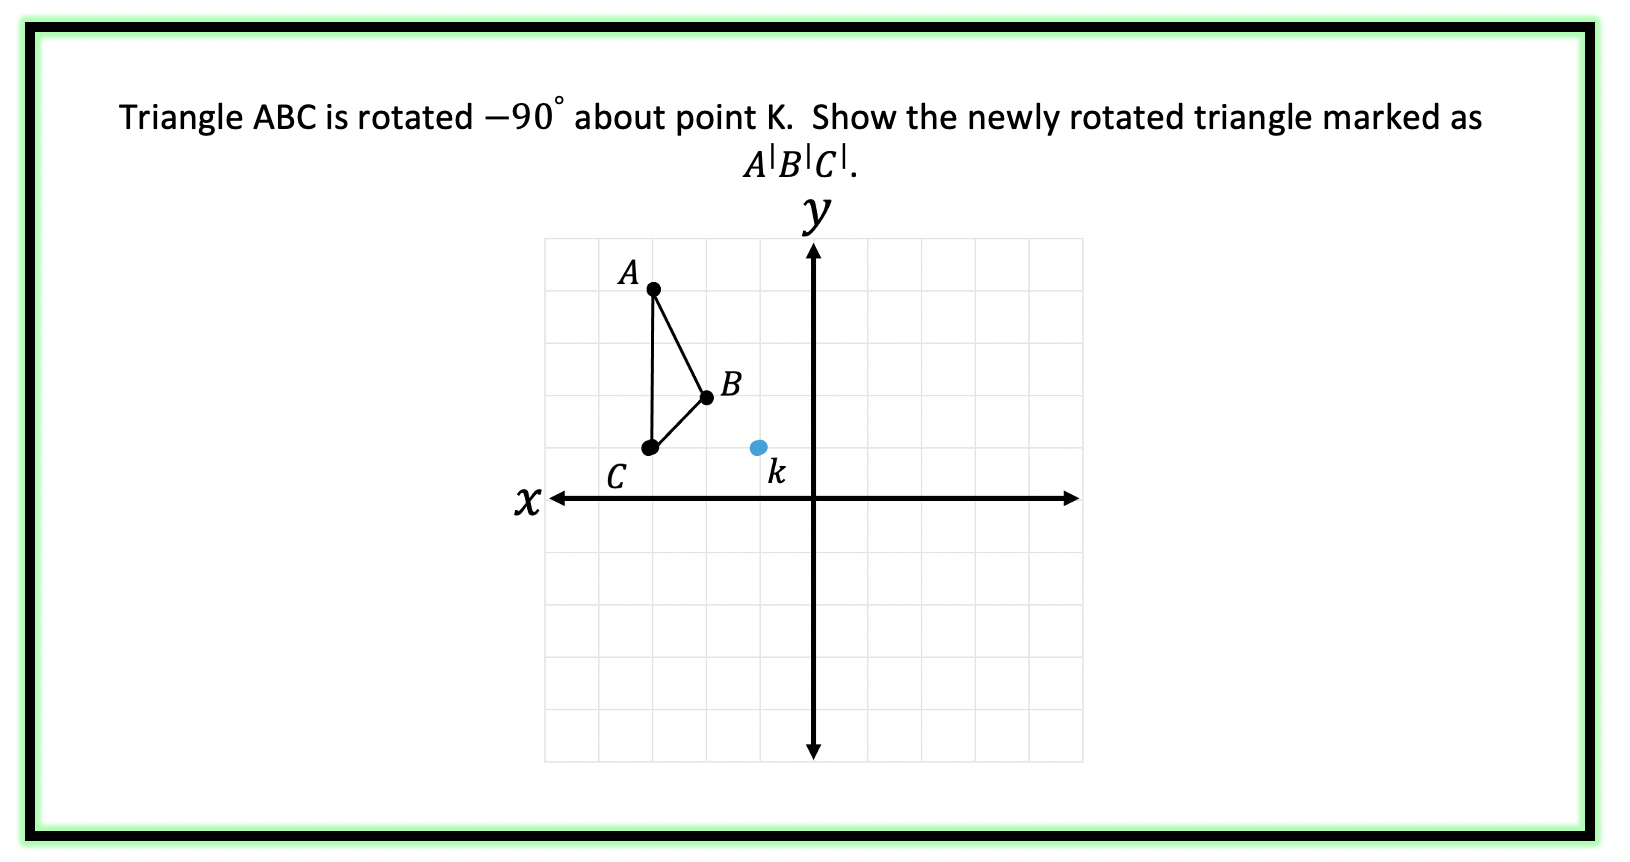
The rotation rules above only apply to those being rotated about the origin (the point (0,0)) on the coordinate plane. But points, lines, and shapes can be rotates by any point (not just the origin)! When that happens, we need to use our protractor and/or knowledge of rotations to help us find the answer. Let’s take a look at the Example below:
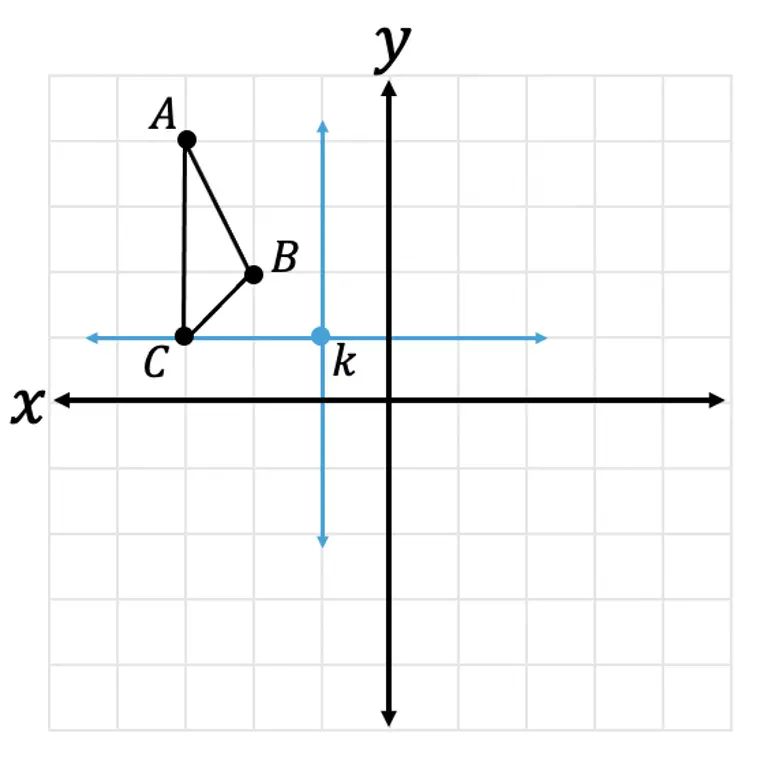
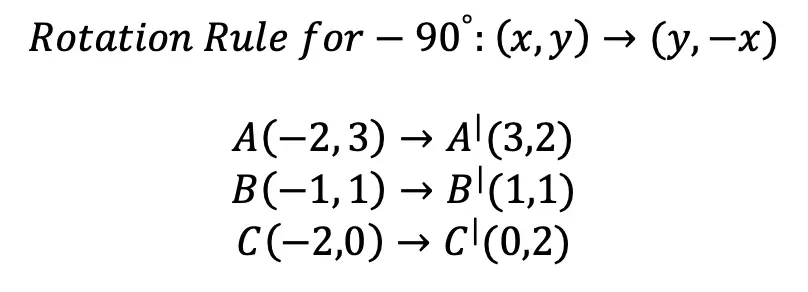
Step 1: First, let’s look at our point of rotation, notice it is not the origin we rotating about but point k! To understand where our triangle is in relation to point k, let’s draw an x and y axes starting at this point:
Step 2: Now let’s look at the coordinate point of our triangle, using our new axes that start at point k.
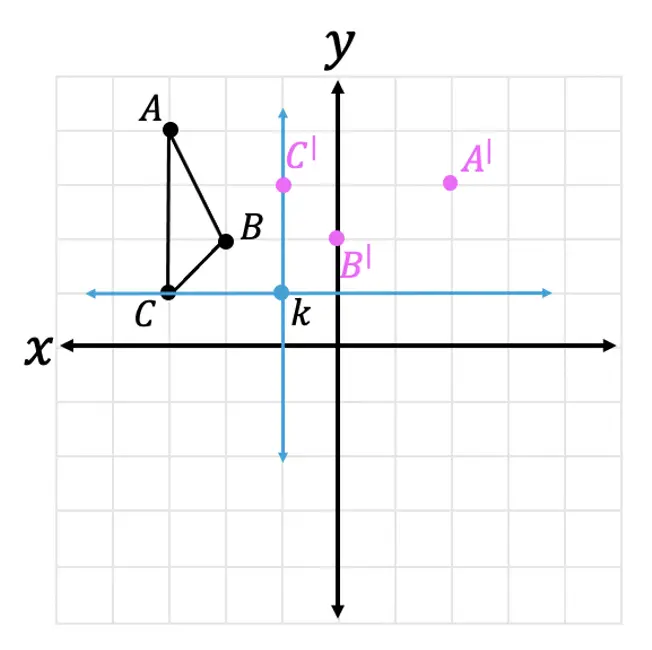
Step 2: Next, let’s take a look at our rule for rotating a coordinate -90º and apply it to our newly rotated triangles coordinates:
Step 3: Now let’s graph our newly found coordinate points for our new triangle .
Step 4: Finally let’s connect all our new coordinates to form our solution:
For more examples and practice questions, check out the video below and link here.
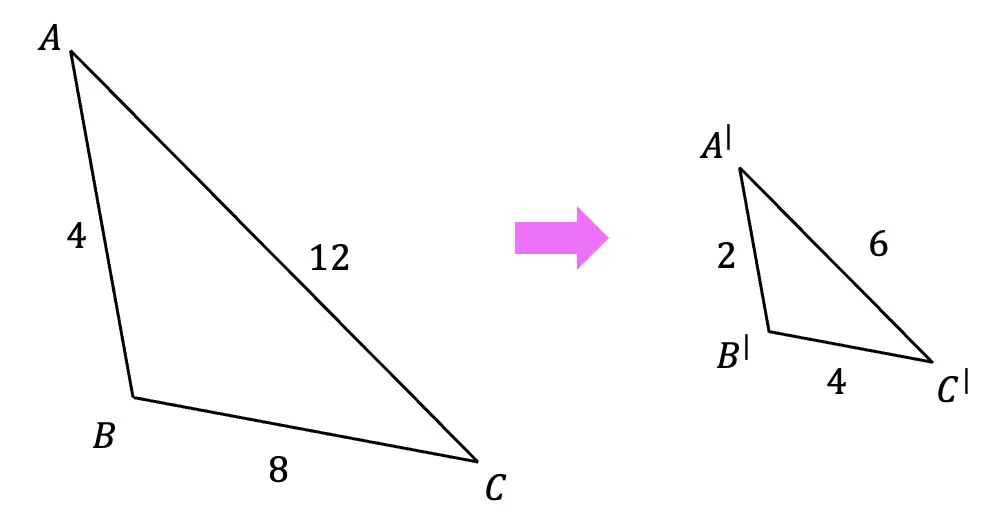
Dilations:
Dilations are a type of transformation in geometry where we take a point, line, or shape and make it bigger or smaller, depending on the Scale Factor.
We always multiply the value of the scale factor by the original shape’s length or coordinate point(s) to get the dilated image of the shape. A scale factor greater than one makes a shape bigger, and a scale factor less than one makes a shape smaller. Let’s take a look at how different values of scale factors affect the dilation below:
Scale Factor >1 Bigger
Scale Factor <1 Smaller
Scale Factor=2
In the below diagram the original triangle ABC gets dilated by a scale factor of 2. Notice that the triangle gets bigger, and that each length of the original triangle is multiplied by 2.
Scale Factor=1/2
Here, the original triangle ABC gets dilated by a scale factor of 1/2. Notice that the triangle gets smaller, and that each length of the original triangle is multiplied by 1/2 (or divided by 2).
Properties of Dilations:
There are few things that happen when a shape and/or line undergoes a dilation. Let’s take a look at each property of a dilation below:
1. Angle values remain the same.
2. Parallel and perpendicular lines remain the same.
3. Length, area, and perimeter do not remain the same.
*Notice Dilations are a non rigid transformation!
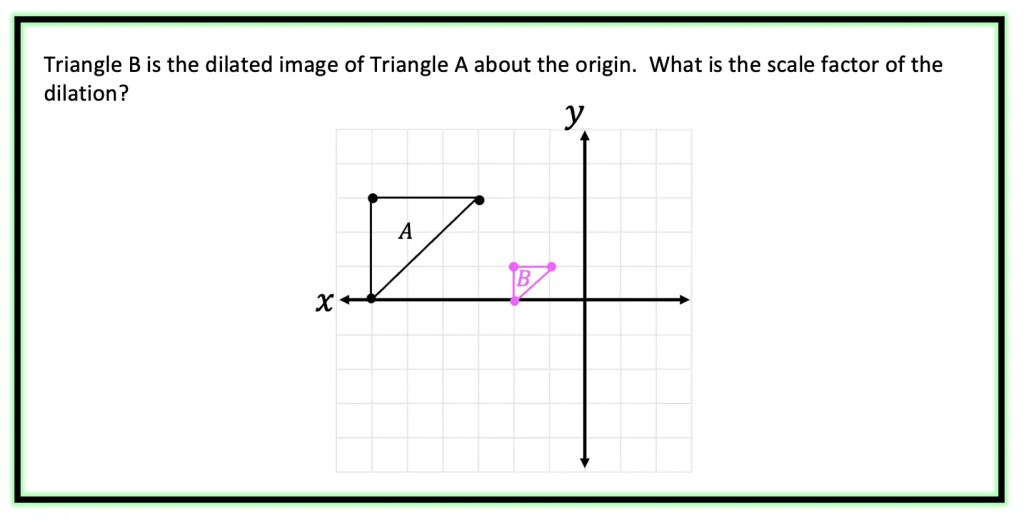
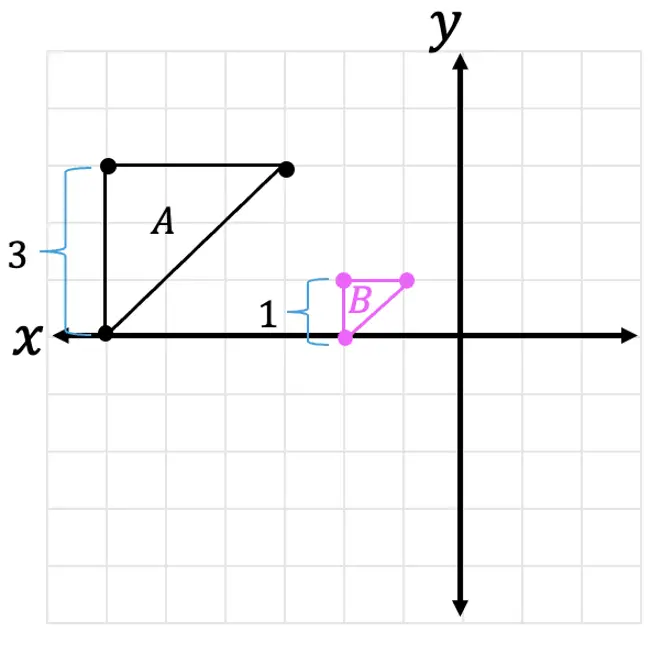
Now that we a bit more familiar with how dilations work, let’s look at some examples on the coordinate plane:
Step 1: First, let’s look at two corresponding sides of our triangle and measure their length.
Step 2: Now, let’s look at the difference between the two lengths and ask ourselves, how did we go from 3 units to 1 unit?
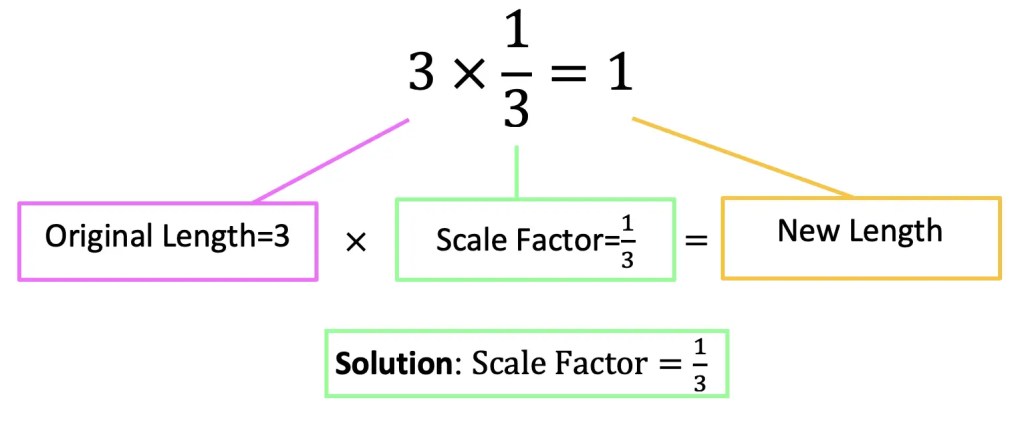
Remember, we are always multiplying the scale factor by the original length values in order to dilate an image. Therefore, we know we must have multiplied the original length by 1/3 to get the new length of 1.
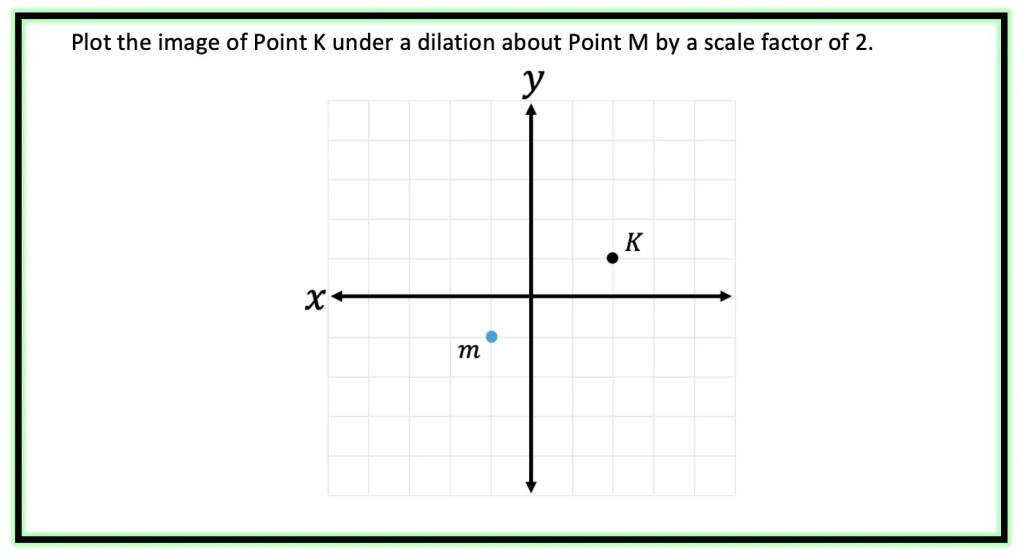
Dilating about a Point other than the Origin
Step 1: First, let’s look at our point of dilation, notice it is not at the origin! In this question, we are dilating about point m! To understand where our triangle is in relation to point m, let’s draw a new x and y axes originating from this point in blue below.
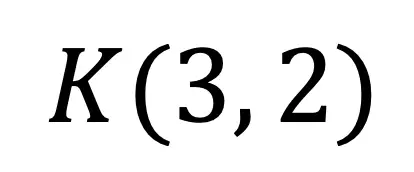
Step 2: Now, let’s look at coordinate point K, in relation to our new axes.
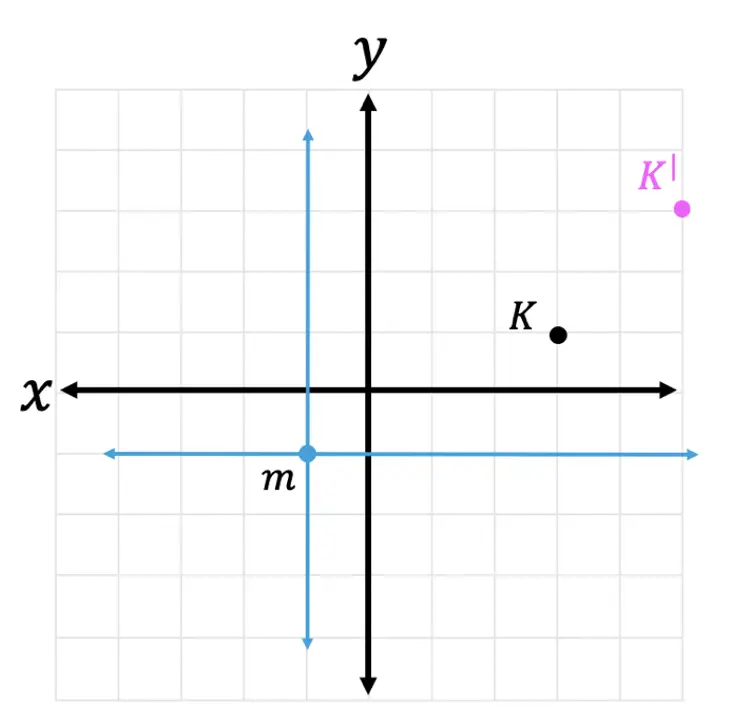
Step 3: Let’s use the scale factor of 2 and the transformation rule for dilation, to find the value of its new coordinate point. Remember, in order to perform a dilation, we multiply each coordinate point by the scale factor.
Step 4: Finally, let’s graph the dilated image of coordinate point K. Remember we are graphing the point (6,4) in relation to the x and y-axis that stems from point m.
If you’re looking for more on dilations, check out the video below and practice questions right here!
Transformations in the Real World?
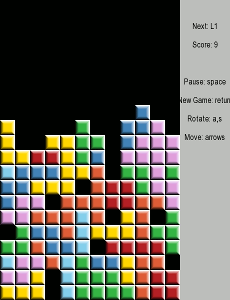
If you think that you’ll never see real world use of transformations, think again! When playing the lovable game of Tetris, we are rotating shapes to clear lines, transforming each shape as we go.
Besides playing Tetris, Transformations in math can be found within the game itself, within its code. Game developers will need to be familiar with coordinate rules for how to flip and rotate a shape within their code for Tetris or any other game out there!
You can also think of real-life objects to transform (as opposed to just the digital ones mentioned above). This can be anything from parking a car to building a house, to landing an airplane. Can you think of transformations you use in your everyday life? Let us know in the comments!
Still got questions about math transformations? No problem! Don’t hesitate to comment with any questions below. Want more math transformations? Don’t forget to check out the videos and practice questions for each linked throughout this article. Thanks for stopping by and happy calculating! 🙂
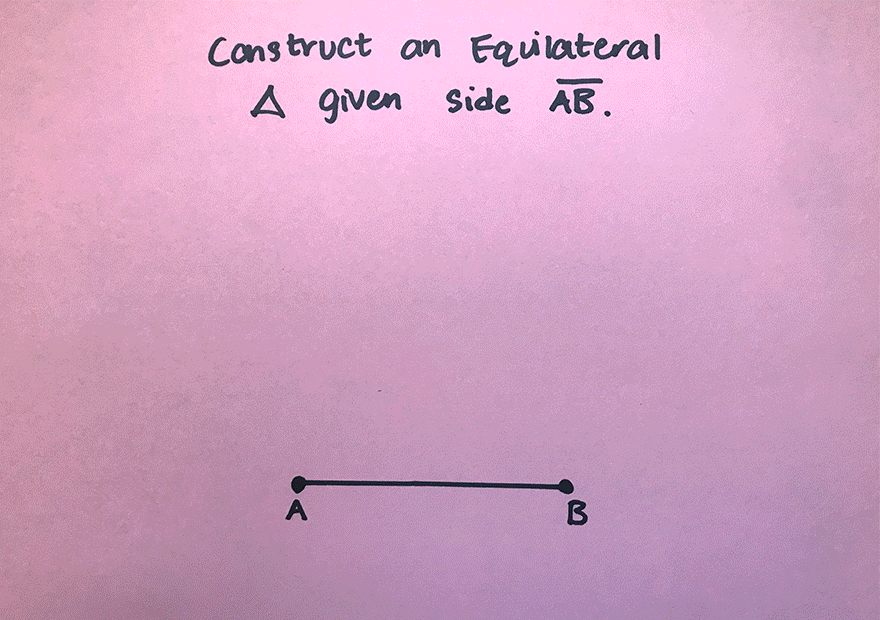
Greetings math friends! In today’s post we are going to go over several geometric constructions you’ll need to know in order to pass Geometry! We’ll go over each kind of geometric construction one step at a time with compass and straightedge. Geometry constructions can be a lot of fun and a great part of math you may have never known about! Hope you are ready to get your math and artistic skills flowing, so have your compass and straightedge handy as we tackle the following Geometry Constructions.
Geometric Constructions:
Bisect a Line Segment
Perpendicular Line Through a Point
Angle Bisector
Steps of Construction of 45 degree Angle
Equilateral Triangle
Altitudes of a Triangle (Acute, Obtuse, Right)
Square Inscribed in a Circle
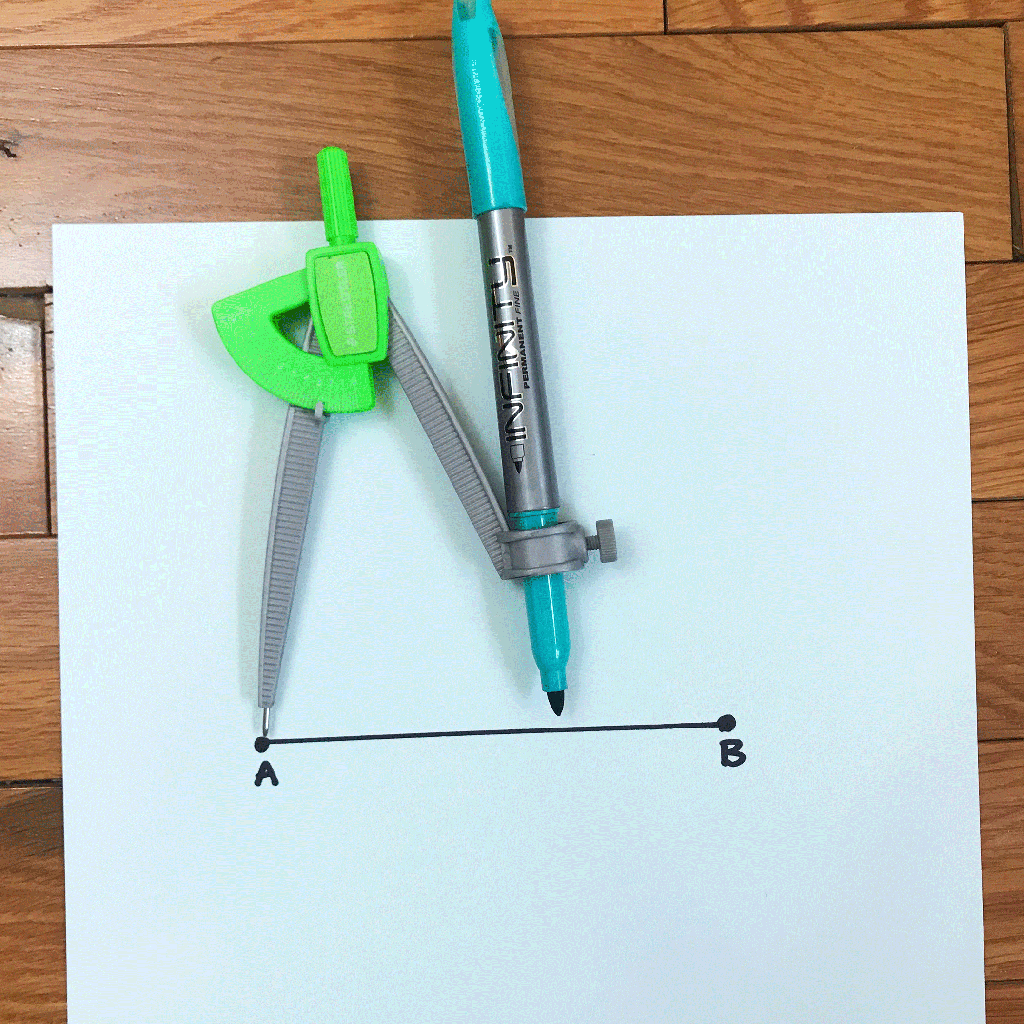
Bisect a Line Segment (Using a Compass & Straightedge):
A Perpendicular Bisector does cuts a line in half at its midpoint, creating two equal halves. This will creates four 90º angles about the line.
How to Bisect a Line Segment Step by Step:
Step 1: First, we are going to measure out a little more than halfway across the line AB by using a compass.
Step 2: Next we are going to place the compass on point A and swing above and below line AB to make a half circle.
Step 3: Keeping the same distance on our compass, we are then going to place the point of the compass onto Point B and repeat the same step we did on point A, drawing a semi circle.
Step 4: Notice the intersections above and below line AB!? Now, we want to connect these two points by drawing a line with a ruler or straightedge.
Step 5: Yay! We now have a perpendicular bisector! This cuts line AB right at its midpoint, dividing line AB into two equal halves. It also creates four 90º angles.
Check out the full video with explanation below and original post here.
Perpendicular Line Through a Point Construction:
A Perpendicular Line Through a Point is very similar to a perpendicular bisector, but this time instead of “slicing” a line segment right down the middle, we are creating a perpendicular line through any point on our line segment. A perpendicular line in this case will also create four 90º angles. Take a look at how it works below:
Step 1: First, we are going to gather materials, for this construction we will need a compass, straightedge, and markers.
Step 2: Notice that we need to make a perpendicular line going through point B that is given on our line.
Step 3: Open up our compass to any distance (something preferably short though to fit around our point and on the line).
Step 4: Place the compass end-point on Point B, and draw a semi-circle around our point, making sure to intersect the given line.
Step 5: Open up the compass (any size) and take the point of the compass to the intersection of our semi-circle and given line. Then swing our compass above the line.
Step 6: Keeping that same length of the compass, go to the other side of our point, where the given line and semi-circle connect. Swing the compass above the line so it intersects with the arc we made in the previous step.
Step 7: Mark the point of intersection created by these two intersecting arcs we just made and draw a perpendicular line going through Point B!
Check out the full video with explanation below and original post here.
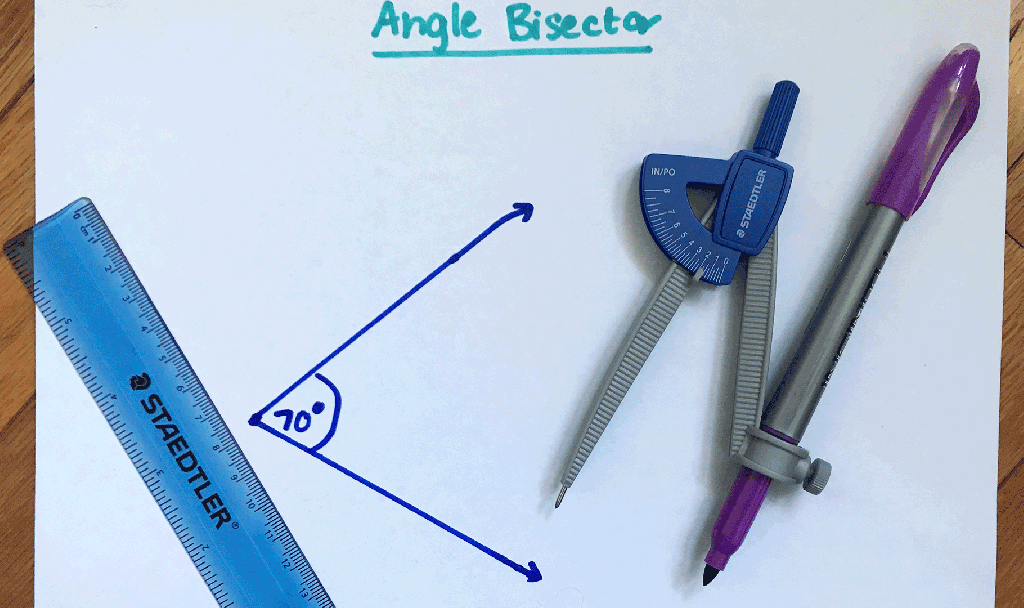
Angle Bisector Construction:
An Angle Bisector is a line that evenly cuts an angle into two equal halves, creating two equal angles. Angle Bisectors are great because they cut any and every angle in half every time! Take a look at the construction process below:
Step 1: Place the point of your compass on the point of the angle.
Step 2: Draw an arc that intersects both lines that stem form the angle you want to bisect.
Step 3: Take the point of your compass to where the lines and arc intersect, then draw an arc towards the center of the angle.
Step 4: Now keeping the same distance on your compass, take the point of your compass and place it on the other point where both the line and arc intersect, and draw another arc towards the center of the angle.
Step 5: Notice we made an intersection!? Where these two arcs intersect, mark a point and using a straightedge, connect it to the center of the original angle.
Step 6: We have officially bisected our angle into two equal 35º halves.
Check out the full video with explanation below and original post here.
Steps of Construction of 45 Degree Angle:
Time to construct a 45º angle! The key to getting this construction right is knowing that 45º is half of 90º. Let take a look at how this construction is done with compass and straightedge step by step below!
Step 1: Using a straightedge, draw a straight line, labeling each point A and B.
Step 2: Using a compass, place the point of the compass on the edge of point A and draw a circle.
Step 3: Keeping the same length of the compass, take the point of the compass to the point where the circle and line AB intersect. Then swing compass and make a new arc on the circle.
Step 4: Keeping that same length of the compass, go to the new intersection we just made and mark another arc along the circle.
Step 5: Now, take a new length of the compass (any will do), and bring it to one of the intersections we made on the circle. Then create a new arc above the circle by swinging the compass.
Step 6: Keep the same length of the compass and bring it to the other intersection we made on our circle. Then create a new arc above the circle.
Step 7: Mark a point where these two lines intersect and using a straightedge, connect this intersection to point A. Notice this forms a 90º angle.
Step 8: Now to bisect our newly made 90º angle, we are going to focus on the pink hi-lighted points where the original circle intersects with line AB and our newly made line.
Step 9: Using a compass (any length), take the compass point to one of these hi-lighted points and make an arc.
Step 10: Keeping that same length of the compass, go to the other hi-lighted point and make another arc.
Step 11: Now with a straightedge, draw a line from point A to the new intersection of arcs we just made.
Step 12: Notice we split or 90º angle in half and now have two equal 45º angles?!
Check out the full video with explanation below and original post here.
Equilateral Triangle Construction:
Equilateral Triangle: A triangle with three equal sides. Not an easy one to forget, the equilateral triangle is super easy to construct given the right tools (compass+ ruler). Take a look below:
1. Using a compass, measure out the distance of line segment .
2. With the compass on point A, draw an arc that has the same distance as .
3. With the compass on point B, draw an arc that has the same distance as .
4. Notice where the arcs intersect? Using a ruler, connect points A and B to the new point of intersection. This will create two new equal sides of our triangle!
Check out the full video with explanation below and original post here.
Constructing Altitudes of a Triangle (Acute, Obtuse, Right):
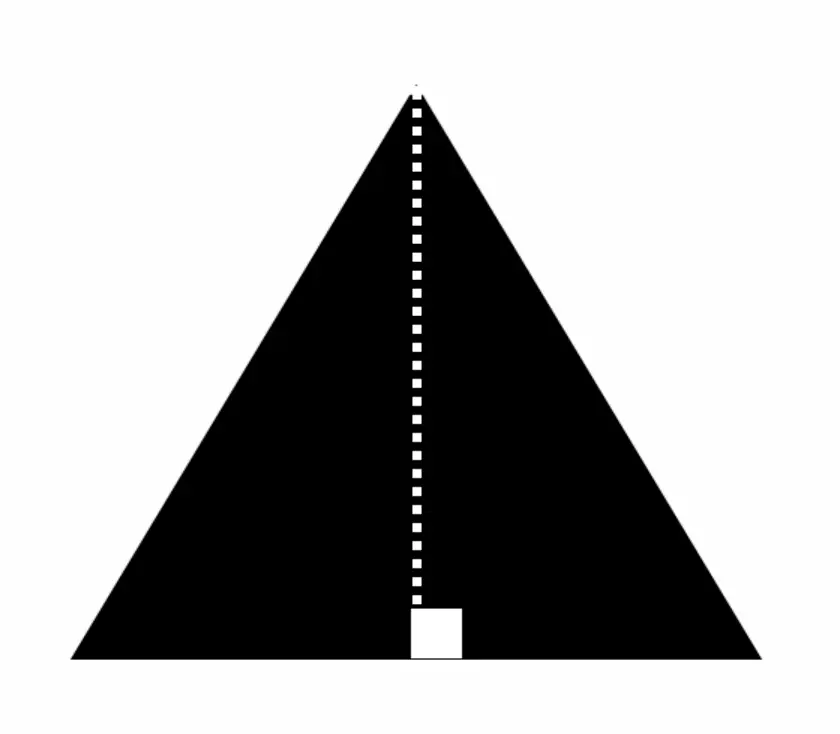
An Altitude is a perpendicular line drawn from the vertex of a triangle to the opposite side, creating a 90º angle.
Check out how to find the Altitudes of an acute, obtuse and right triangle in the video below and post here.
In the video above, we will look at how to find the altitude of an acute obtuse, and right triangle. We will also find something called the orthocenter which is explained below.
How to Find the Orthocenter of Triangle with a Compass:
The Orthocenter is a point where all three altitudes meet within a triangle.
In order to find the orthocenter using a compass, all we need to do is find the altitude of each vertex. The point at which they meet is the orthocenter. Check out the video above to see how this works step by step.
Square Inscribed in a Circle Construction:
Step 1: Draw a circle using a compass.
Step 2: Using a ruler, draw a diameter across the length of the circle, going through its midpoint.
Step 3: Open up the compass across the circle. Then take the point of the compass to one end of the diameter and swing the compass above the circle, making a mark.
Step 4: Keeping that same length of the compass, go to the other side of the diameter and swing above the circle again making another mark until the two arcs intersect.
Step 5: Repeat steps 3 and 4, this time creating marks below the circle.
Step 6: Connect the point of intersection above and below the circle using a ruler. This creates a perpendicular bisector, cutting the diameter in half and forming 90º angles.
Step 7: Lastly, use a ruler to connect each corner point to one another creating a square.
Check out the full video with explanation below and original post here.
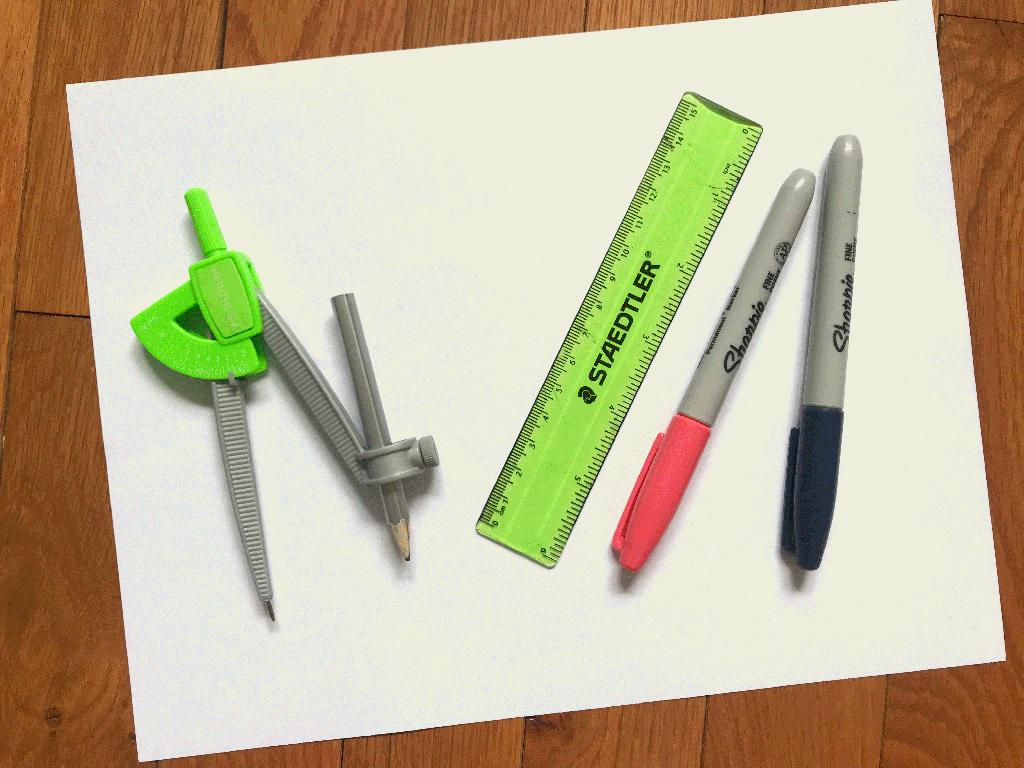
Best Geometry Tools!
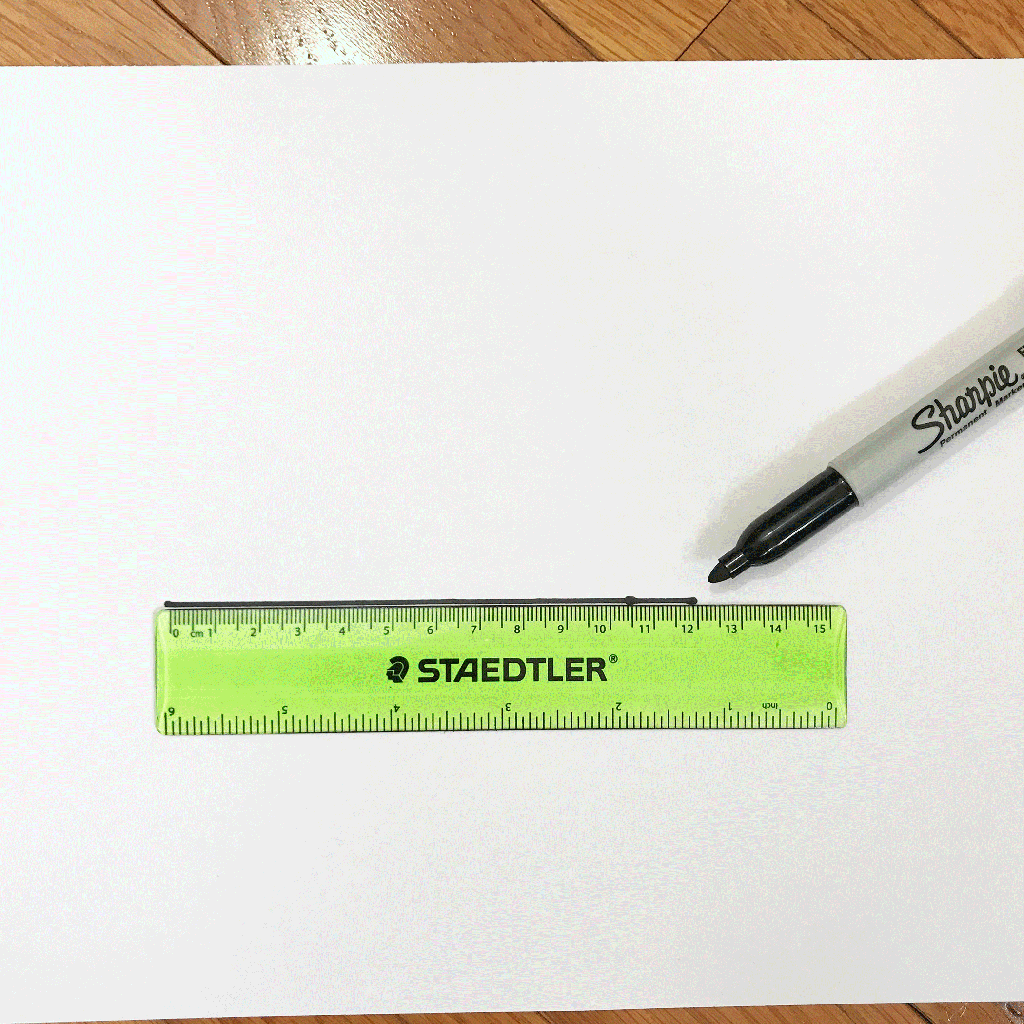
Looking to get the best construction tools? Any compass and straight-edge will do the trick, but personally, I prefer to use my favorite mini math toolbox from Staedler. Stadler has a geometry math set that comes with a mini ruler, compass, protractor, and eraser in a nice travel-sized pack that is perfect for students on the go and for keeping everything organized….did I mention it’s only $7.99 on Amazon?! This is the same set I use for every construction video in this post. Check out the link below and let me know what you think!
Still got questions? Looking for more constructions that you don’t see here? No problem! Don’t hesitate to comment with any questions and comments below. Happy calculating! 🙂
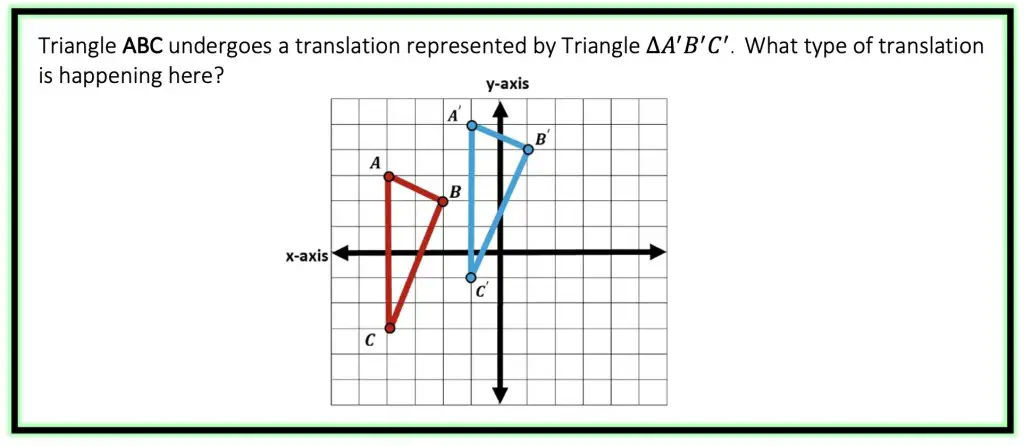
Greeting math peeps! Today we are going to talk about translation math in reference to transformations and geometry! Translationsare a type of transformation where we take a point, line, or shape and move it up, down, left, or right on a coordinate plane. A shape retains its angles, lengths, and direction after a translation, all we are doing is simply moving it around the coordinate plane. Think you are ready to master the topic!? Keep reading for more explanation, video lesson, and step by step examples. Happy calculating!
Translations Math Formula:
P(x,y) -> P| (x+h, y+k)
where….
h=Horizontal Shift (add (+) when moving right, subtract (-) when moving left)
k= Vertical Shift (add (+) when moving up, subtract (-) when moving down)
What are Translations?
Translations are a type of transformation in geometry where we take a point, line, or shape and move it up, down, left, or right on a coordinate plane. Let’s take a look at what a translation looks like below.
In the translation example above, we go from square ABCD to square A|B|C|D| translating each coordinate of the original square 6 units to the right and 2 units up.
Properties of a Translation + Rigid Motion:
When a shape, line, or point is translated, the shape retains Rigid Motion, meaning its length, area, and angles are unaffected by the transformation, as well as, maintaining its same direction.
Angle values remain the same.
Parallel and perpendicular lines remain the same. (shape/line maintains same direction)
Length, area, and perimeter remain the same.
There are two main types of translations: horizontal translations and verticaltranslations, let’s take a look at what each mean below.
Horizontal Translation:
When we translate a point, line, or shape left or right, it is undergoing a horizontal translation along the x-axis. Any type of left or right movement on a coordinate plane is a horizontal translation.
How does this affect the x-coordinate? If the shape is being translated to the right, then we are adding units to the x-coordinate, and if the shape is shifting left then we are subtracting units from the x-coordinate.
Vertical Translation:
When we translate a point, line, or shape up or down, it is undergoing a vertical translation along the y-axis. Any type of up and down movement on a coordinate plane is a vertical translation.
How does this affect the y-coordinate? If the shape is being translated up, then we are adding units to the y-coordinate, and if the shape is being shifted down then we subtract from the y-coordinate.
Even though a horizontal shift or a vertical shift can happen when we move a shape, line, or point, many translations have a combo of the two!
How do Coordinates Change after a Translation?
The truth is there is no one unique rule for translations, but numbers will always be added or subtracted from the x and/or y coordinate values. If something is translated to the right, then we add units to the x-value. On the other had if something is translated to the left, we subtract units from the x-value. The same can be said for moving a shape up, we then add units to the y-value, and if a shape is translated down, we subtract units from the y-value. This gives us the following translation formula below:
If we look at our example, when we translate original square ABCD to square A|B|C|D| we end up translating each coordinate of original square ABCD 6 units to the right and 2 units up. What we are really doing when we translate is adding 6 units to each x-coordinate as well as adding 2 units to each y-coordinate of the original figure square ABCD. Check it out below:
Now that we understand more about translations, let’s jump into some examples!
Translation Math Examples
Example #1: Translating Triangles
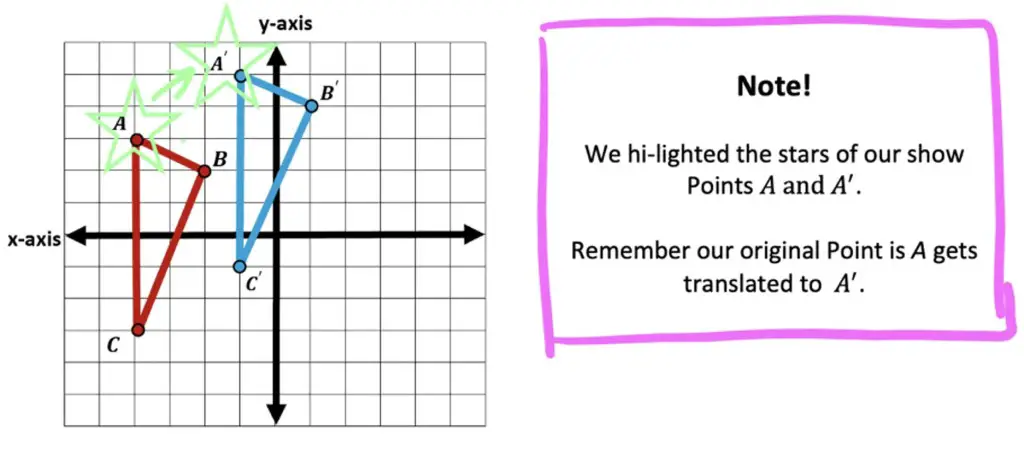
The Game Plan: To solve this problem, we’re going to need to compare two corresponding coordinate points before and after the translation. We can look at any of the following pairs to find our answer A & A|, B & B|, C & C|. Still confused? If so, no worries, because we will take this step by step!
Step 1: Identify a pair of coordinates to compare before and after the translation. In this case we compare Points A and A|.
Step 2: Now we need to measure how many units to the right and how many units up Point A| is from Point A.
We’ve gone over translating shapes, alas, shapes aren’t the only things that can be translated. Fun surprise: lines can be translated too! The same rules apply to translating lines as they do to shapes. The nice thing about translating a line vs. a shape is that we now have even less work to do (as there are less points to translate).
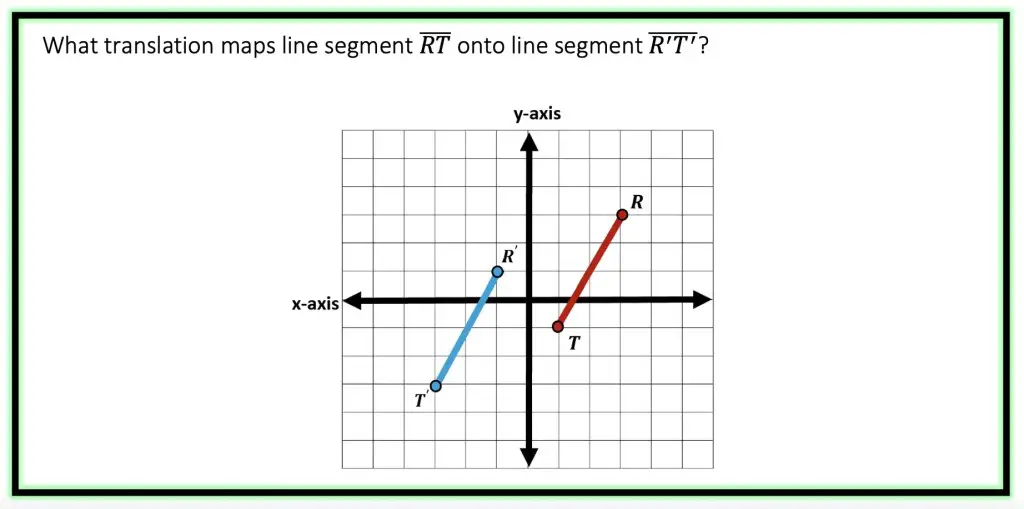
Example #2: Translating Lines
The Game Plan: This question is asking us to find the translation from line RT to line R|T| . We’re going to need to compare corresponding coordinate points before and after the translation. We can look at a set of points before and after the translation including Point R & R| or Point T & T|. Nothing we can’t handle! Let’s do this!
Step 1: Identify a pair of corresponding points before and after the translation, for this problem let’s focus on Point R and Point R|.
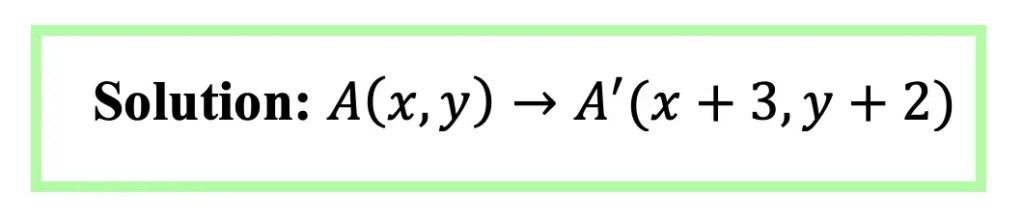
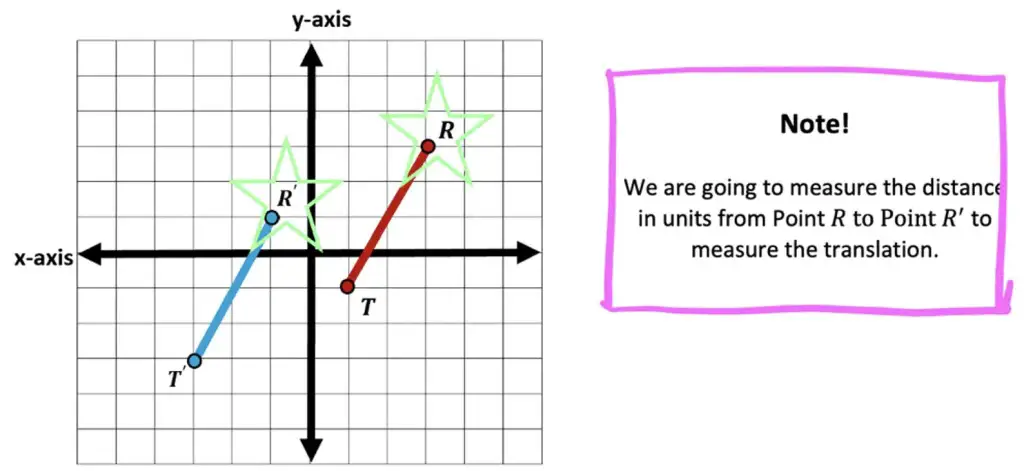
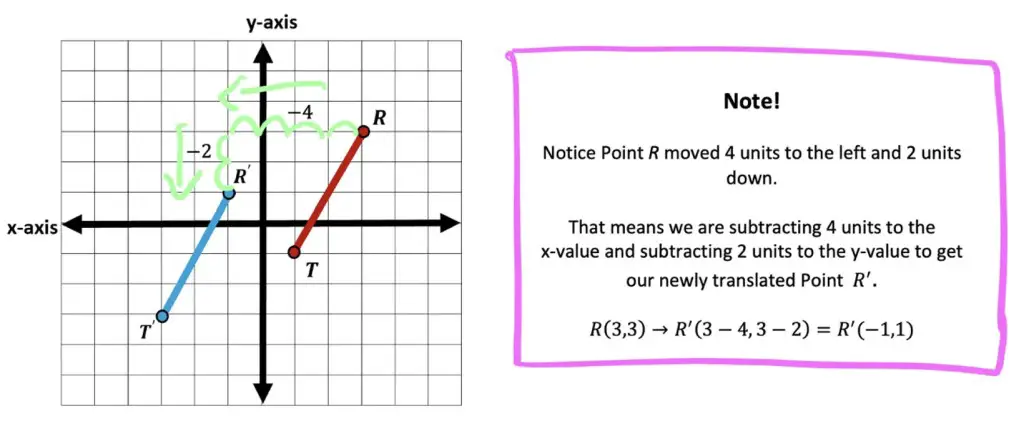
Step 2: Now we measure how many units to the left and how many units down Point R| is from Point R.
Practice Questions:
Solution:
Other Transformations:
If you’re looking for more Transformations other than on the translation math you see here, check out these lessons below! Or, click this link here!
Can you find the particular pattern to each of the sequences below? See if you can guess the number that comes next for each set of numbers below!
a) 1, 1, 1, 1, 1, ? b) 1, 2, 3, 4, 5, ? c) 2, 4, 6, 8, 10, ? d) 5, 10, 15, 20, ?
Easy to recognize what comes next, right? But how did you know? What pattern did each example make? That’s what we’ll be talking about in this post, sequences!
What is a Sequence?
Let’s start with a formal definition. A sequence is a list of numbers or objects that are in a particular order and form a pattern. Each example above is a different type of sequence that follows a specific pattern! That’s why we were able to easily find the successive term of each sequence (solution to each example below).
The above examples of sequences are just a snippet of what a sequence can look like, but there are so many sequences that exist! There is even a website that compiles every sequence in the world possible, called The On-Line Encyclopedia of Integer Sequences (OEIS), it’s like a kind of dictionary but for sequences! They also accept new sequences to their website. After reading this post, see if you can come up with your own sequence to add to their encyclopedia!
Types of Sequences:
There are so many different types of sequences! Sequences can take so many different forms, they can be infinite sequence where they can go on forever, or they can be finite sequence where they have an end. A sequence can be based on addition, subtraction, multiplication, division, or even based on the value of the previous term! Let’s take a look at each type of sequence one step at a time with an example for each:
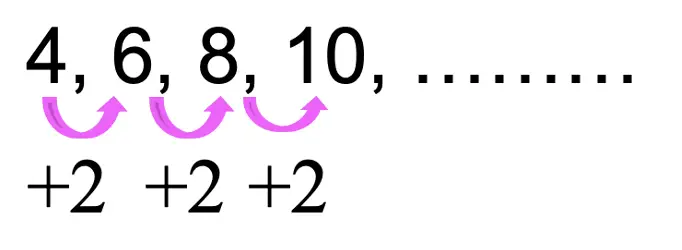
Arithmetic sequences are a sequence of numbers that form a pattern when the same number is either added or subtracted to each successive term. Take a look at the example of the of the arithmetic sequence below. Notice we are adding 2 to each term in the sequence 4, 6, 8, 10, … below. The number we add to each term in this sequence (in this case 2), is called the common difference. If we were to find the next term in the example of the sequence below, the next term of the sequence would be 12 (10+2=12).
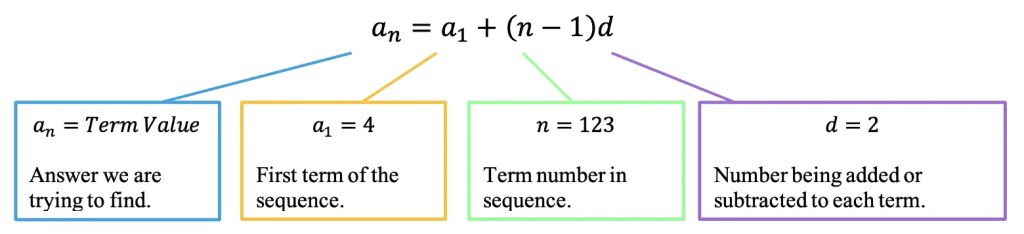
Sometimes, we are asked to find not just the next term, but a term further down the line in the sequence. For example, what if we were asked to find the value of the 123rd term? That’s where the arithmetic sequence formula would come in! Check out the explicit formula below:
an=a1+(n-1)d
a1=First Term n=Term Number in Sequence d=Common Difference (Number Added/Subtracted to each Term in Sequence)
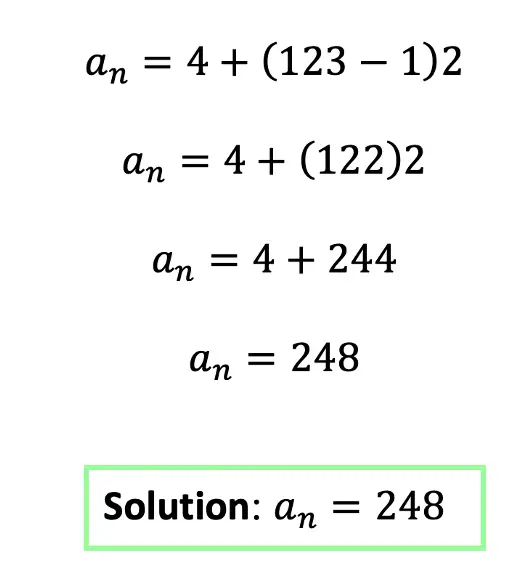
Now, to find the 123rd term of the above sequence, we would plug in the following values into our formula to solve. Notice the common difference here is still 2, because it is the number we are adding to all the terms in our sequence.
Notice the above arithmetic sequence is a an example of an infinite sequence! This means that we can continue finding terms for this sequence forever!
Want another example? For more examples and a step-by-step video on arithmetic sequences, check out the resources here and below:
Geometric Sequence:
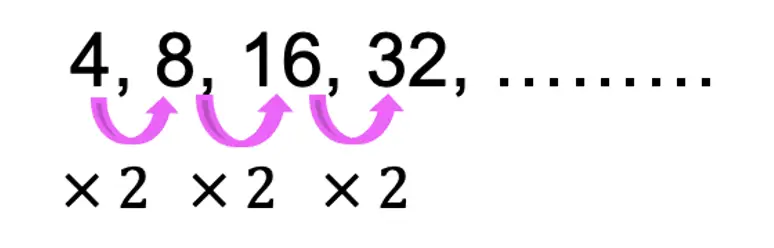
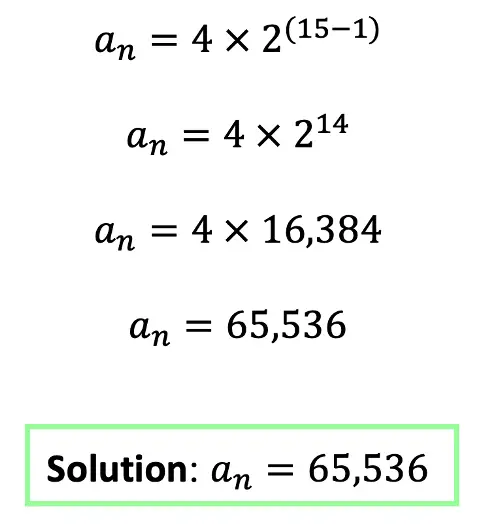
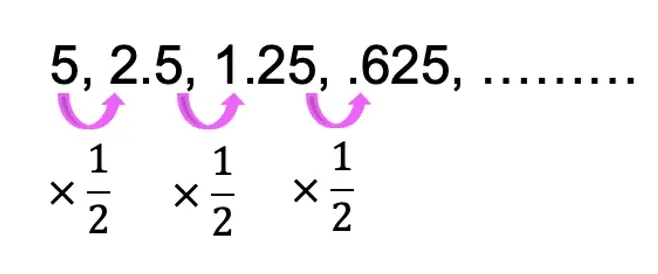
Geometric sequences are a sequence of numbers that form a pattern when the same number is either multiplied or divided to each subsequent term. Take a look at the example of a geometric sequence 4, 8, 16, 32, … below. Notice we are multiplying 2 to each term in the sequence below. The number that is multiplied to each term in the sequence is called the common ratio, which in the case of the geometric sequence below is 2. If the pattern were to continue, the next term of the sequence above would be 64, since 32 x 2=64.
Sometimes, we are asked to find not just the next term, but a term far down the line in the sequence, for example, what if we were asked to find the value of the 15th term? That’s where the geometric sequence formula would come in!
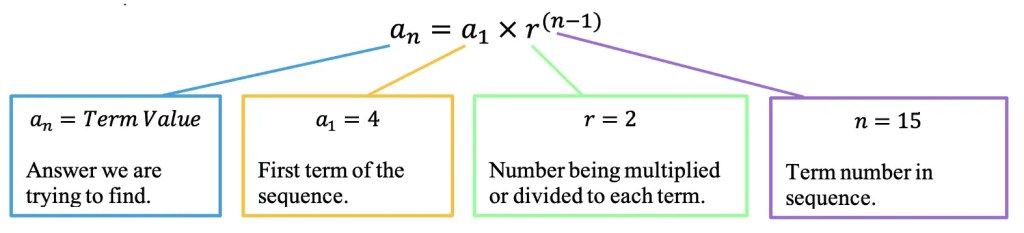
an=a1r(n-1)
a1 = First Term r=Common Ratio (Number Multiplied/Divided to each Term in Sequence) n= Term Number in Sequence
To find the 15th term of the above sequence, we would need to plug in the following values into our formula to solve:
Notice the above geometric sequence is a type of infinite sequence! This means that we can continue finding terms for this sequence, forever!
Want another example? For more examples and a step-by-step video on geometric sequences, check out the resources here and below:
Recursive Sequences:
A Recursive Formula is a type of formula that forms a sequence based on the previous term value. These can be based on arithmetic sequences or a geometric sequences, the sequence type does not really matter, as long as each successive term is based on the previous term. What does that mean? Check out the example below for a clearer picture:
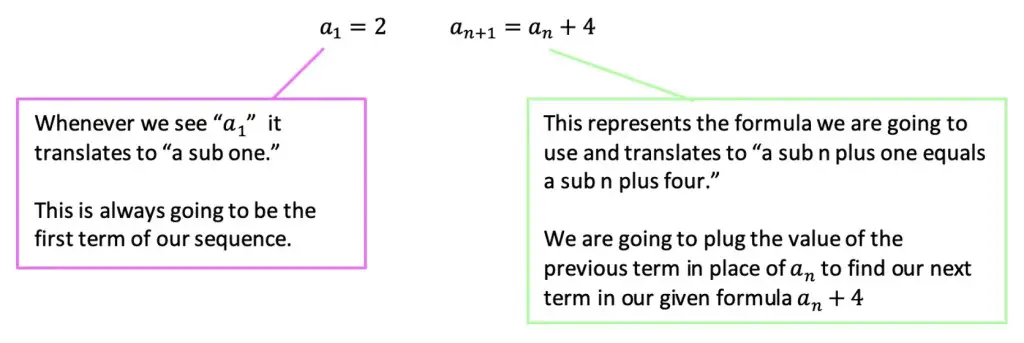
What are the first 5 terms of a recursive sequence given the following recursive formula:
First, let’s decode what this says:
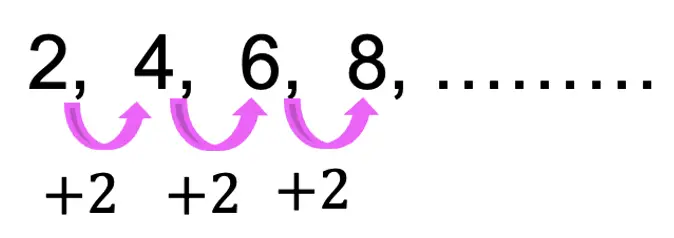
Now, let’s see our formula in action! Notice below, we start with the first term, a1=2. Then we use 2 to plug into our formula for the second term to get 2+4=6, and we continue the pattern all the way through for the first five terms, to get our answer.
Recursive Sequence: Now that have used our recursive formula, notice it gave us this nice, beautiful sequence represented by each term circled in pink above, 2, 6, 10, 14, 18. That is our recursive sequence, and the answer to our question! Notice in this example, we have an infinite sequence that we can keep finding terms for, but since our question asked for the first 5 terms, we stopped here.
Want another example? For more examples and a step-by-step video on recursive sequences, check out the resources here and below:
Finite Sequence and Series:
Now that we have gone over infinite sequences (Arithmetic, Geometric, Recursive), let’s dive into finite sequence and series!
What’s the difference between a sequence and a series? We know what sequences are, but what is this new word “series” all about? Well, what if we had the first 5 terms of a sequence, but now, we want to add them all together? That is a series, more specifically a finite series since we only want to add the first five terms! Another term you might see that describes a finite sequence is “Partial Sum” or “Partial Sums” because we are summing only part of the sequence.
Finite Arithmetic Series:
A finite arithmetic series happens when we take the terms of an arithmetic sequence and we sum a finite number of them together. Basically, we know that the arithmetic sequence gives us the following terms:
But now we want to sum all these terms together:
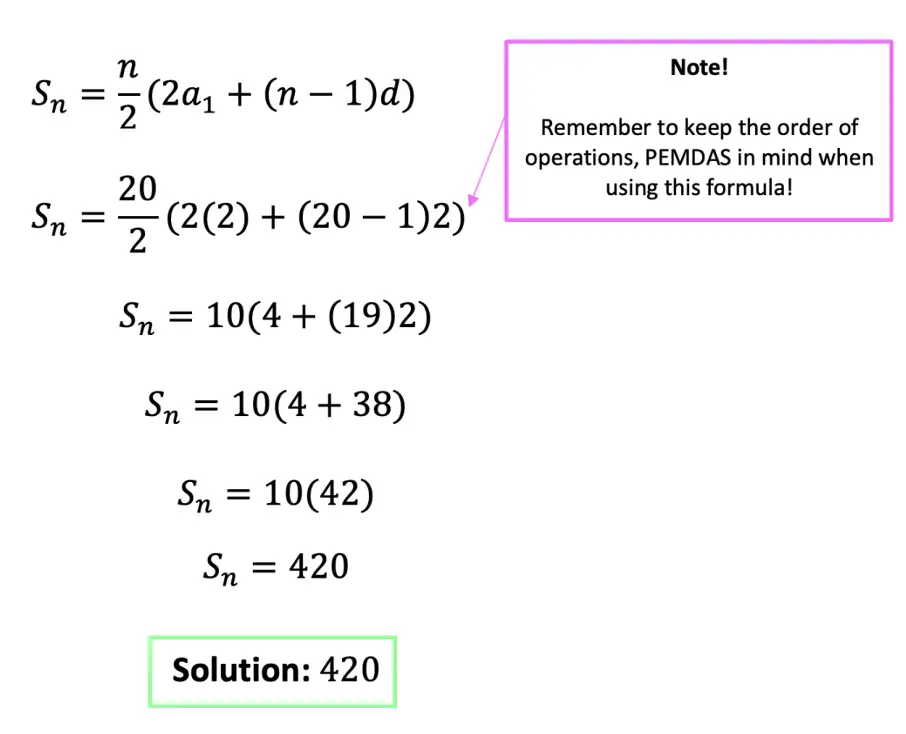
How would we be able to find the partial sum of the first 20 terms of an arithmetic sequence? Well, we could sit there and crunch our numbers one by one on a calculator, or we could plug them into the arithmetic finite sequence formula below:
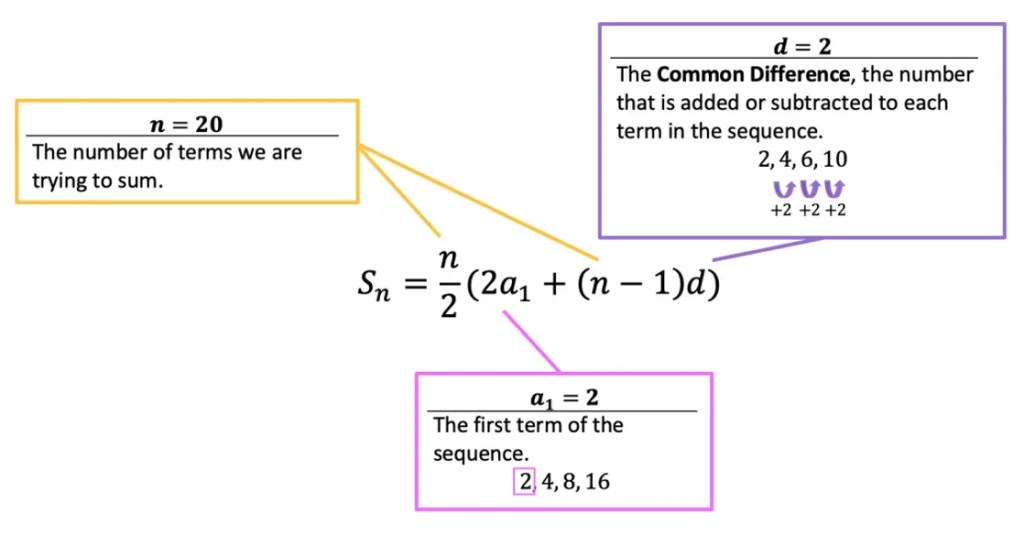
Sn=(n/2)(2a1+(n-1)d)
n=Number of Terms we want to Sum
d=Common Difference
a1=First Term
To find the sum of the first 20 terms of the above sequence, we would need to plug in the following values into our formula to solve. Notice that in this case, the common difference is 2, since each subsequent term is being added by 2.
For more examples and a step-by-step video on how to find the finite length of a Finite Arithmetic Series, check out the resources here and below:
Finite Geometric Series:
A finite geometric series happens when we take the terms of a geometric sequence, and we sum them together. Basically, we know that the geometric series gives us the following terms:
But now we want to sum all these terms together:
How would we be able to find the partial sums of the first 20 terms of a geometric sequence? Well, we could sit there and crunch our numbers one by one on a calculator, or we could plug them into the formula below:
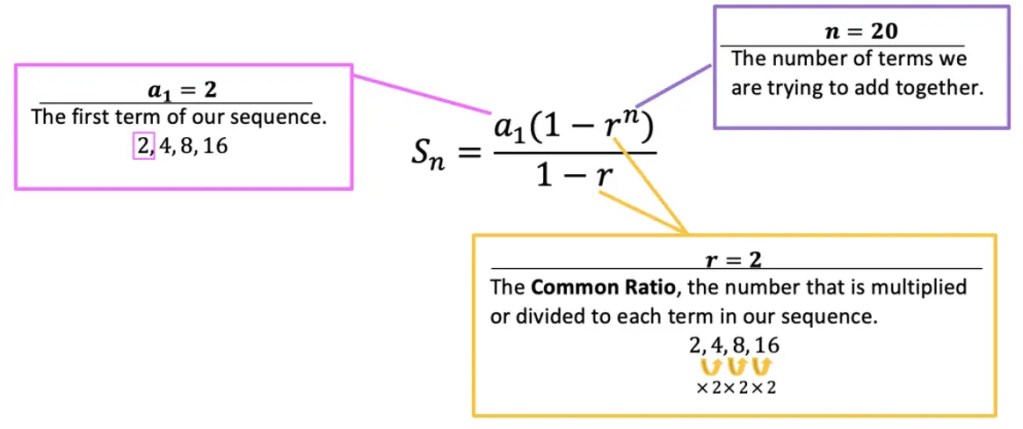
Sn=a1 (1-rn)/(1-r)
a1=First Term
n=Number of Terms we are Summing together
r=Common Ratio
For more examples and a step-by-step video on finite sequences and Geometric Series, check out the resources here and below:
Infinite Sequences:
An infinite sequence is one in which the sequence just keeps going and going infinitely with no end. We have already seen examples of this earlier in this post when looking at an arithmetic sequence or geometric sequence. But now, we want to ask ourselves, what would happen if we were to add an entire infinite sequence, by adding together each term within the sequence?
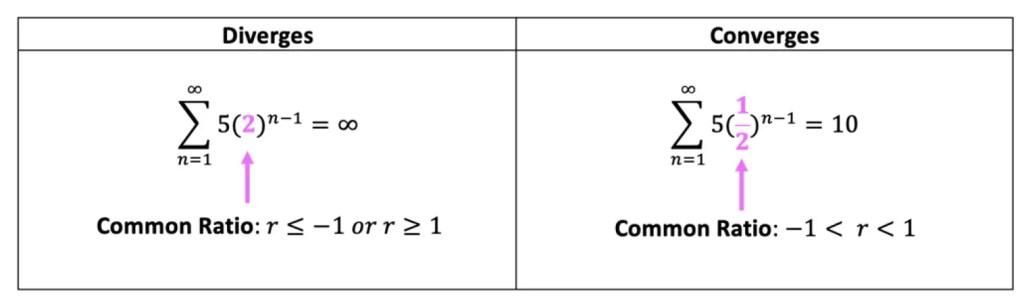
When it comes to adding an infinite arithmetic sequence together, the arithmetic sequence always diverges to infinity. On the other hand, an infinite sequence that is also a geometric sequence, can either diverge to infinity, or converge to a number. If the idea of converging or diverging to infinity, doesn’t make sense yet, that’s ok, keep reading and we’ll go over everything!
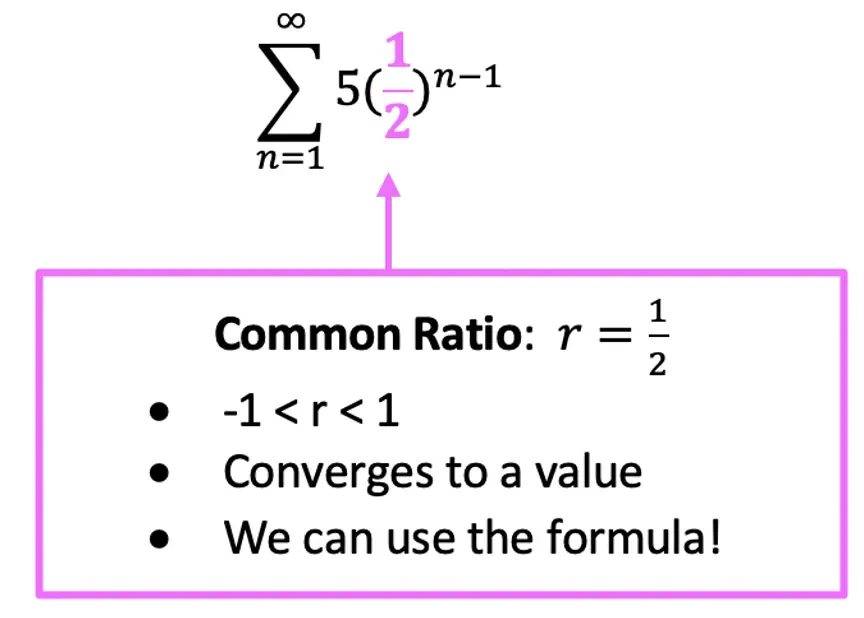
Infinite Geometric Series:
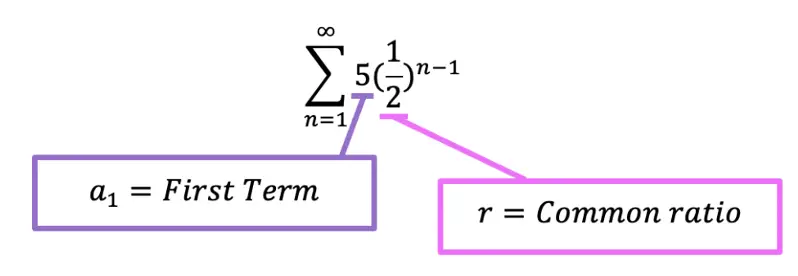
An infinite geometric series happens when we take the terms of a geometric sequence, and we sum them together, all of them together, starting with the first term, going all the way to infinity. Basically, we know that the geometric series gives us the following terms:
But now we want to sum all these terms together, from the first term all the way to infinity.
But wait, how do we know if it is even possible to sum together a geometric sequence starting with the first term and adding until infinity? Well, it all depends on divergence vs. convergence. If the common ratio is between -1 and 1, that means that the sum to infinity will converge and we can find the value of the sum of an infinite geometric sequence. If the common ratio has any other value otherwise it will diverge to infinity.
* If you need a review on how to use Summation Notation, check out this link here!
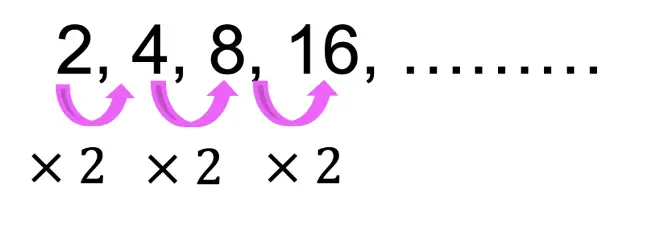
*Also here is a reminder of what a geometric sequence looks like, for anyone who needs it!
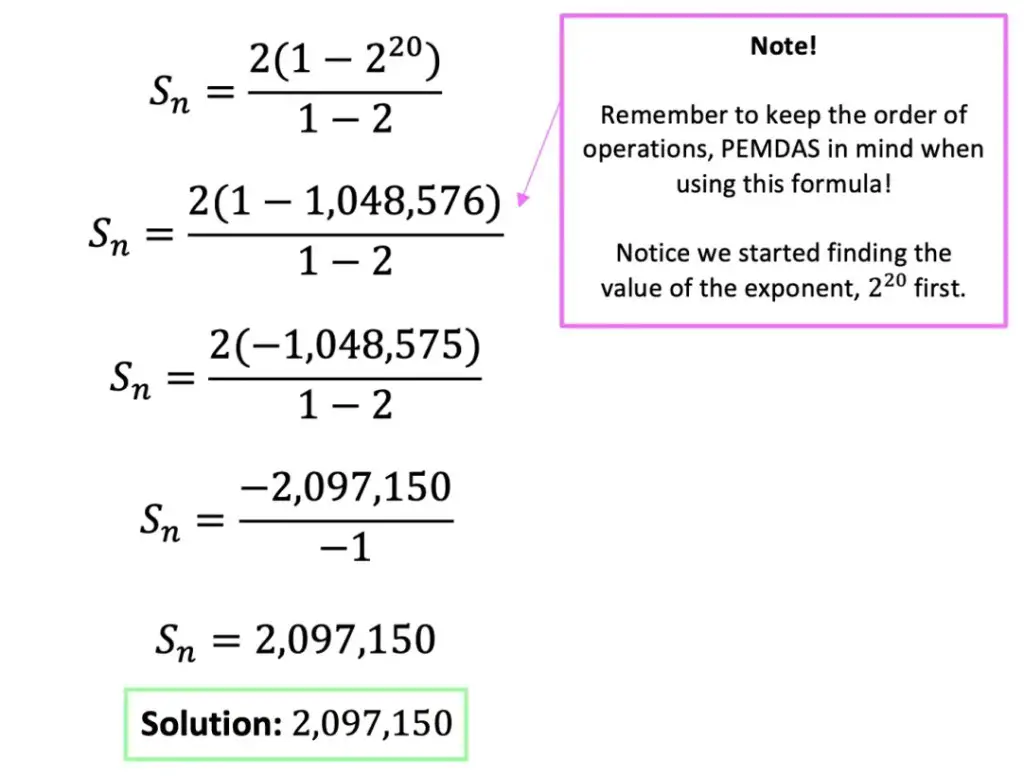
Now, let’s see if the following geometric series converges or diverges:
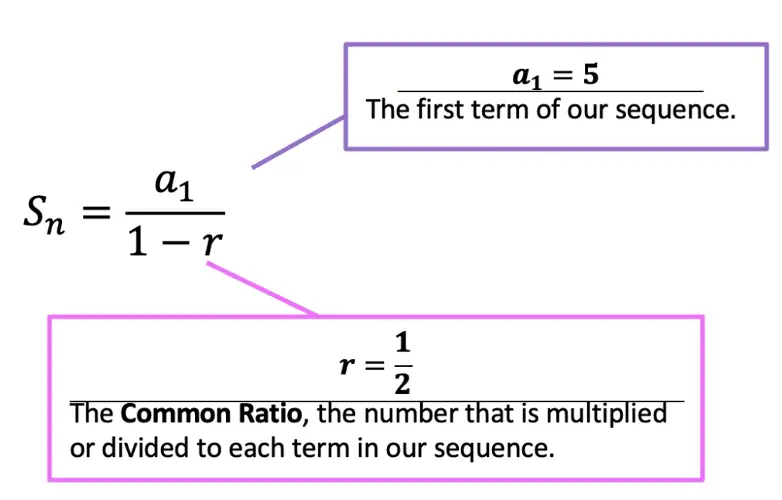
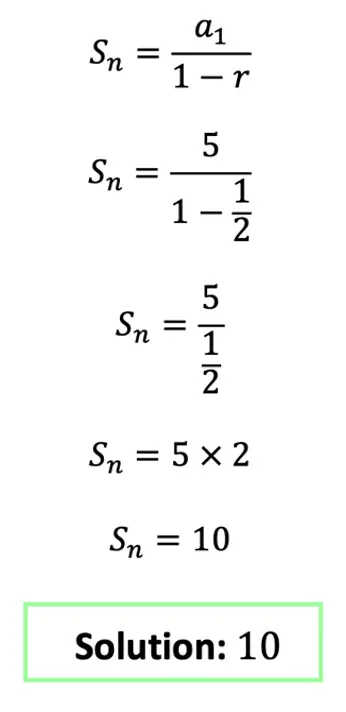
Since, we know it converges based on the common ratio, we know we can find the value of the infinite sum! Let’s use the formula below:
Sn=a1/(1-r)
a1=First Term
r=Common ratio
Next, let’s plug in our value into the formula:
For more examples and a step-by-step video on Infinite Geometric Series, check out the resources here and below:
Special Sequences
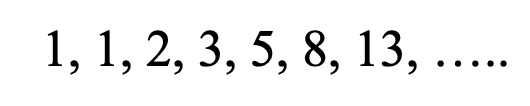
Fibonacci Sequence – The Most Famous Sequence!
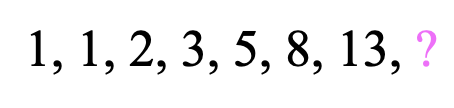
The above sequence, known as the “Fibonacci Sequence,” is the most famous sequence in the world! How can a sequence be so famous? Why is it so special? Well, we’ll get to that in a minute, but before we do, can you see how the Fibonacci Sequence forms a pattern? What would be the next term?
Take your time, trying to figure out the next term of the sequence before taking a peak at the answer below:
Why!? Solution Explained
The next term of the Fibonacci sequence is 21! The pattern of this famous sequence is all about adding the two previous terms together. That’s how we get 1+1=2, 1+2=3, 2+3=5, 3+5=8, 5+8=13, which brings us to get our missing term, 8+13=21. Take a look at how this sequence works below:
Why is the Fibonacci Sequence Famous?
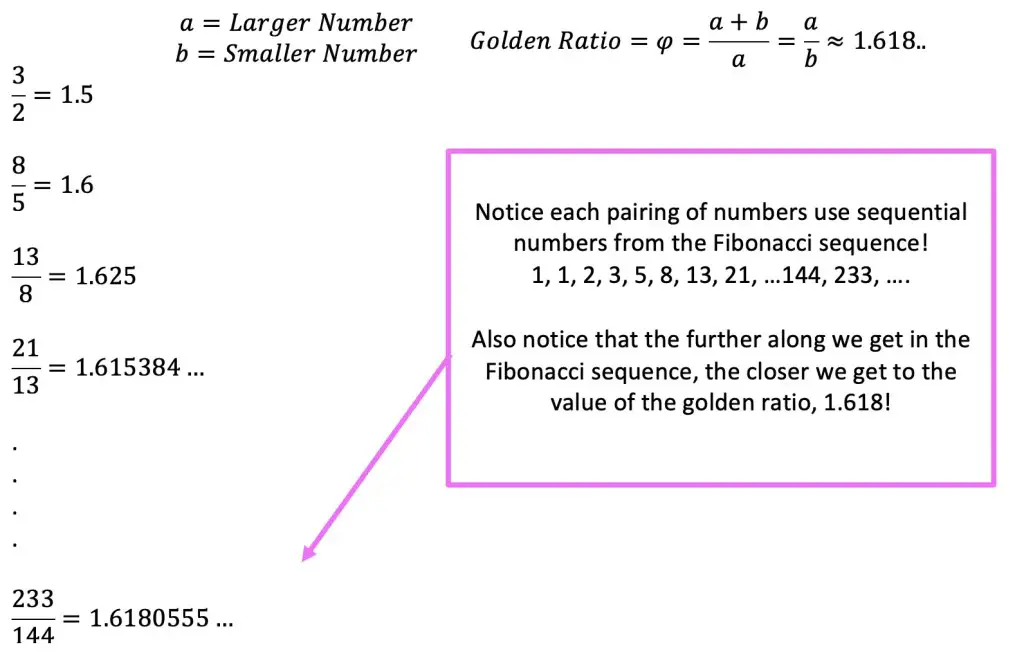
Now that we know the secret pattern behind this sequence, let’s look at why the Fibonacci sequence is so special! The Fibonacci sequence’s main claim to fame is that it is found throughout art, architecture and even in nature via the golden ratio.
The Golden Ratio is a proportion that is considered to be the most pleasing ratio to the human eye! You may also know the Golden Ratio as the golden mean, the divine proportion, phi, or the Greek letter ϕ. It is an infinite and irrational number that approximates to 1.618 and is found by adding two numbers together and then dividing by the larger number and if these same two numbers are then set equal to the larger number divided by the smaller number successfully, then the two numbers are a golden ratio equal to 1.618! If this sounds too confusing to imagine, just take a look at the formula below:
Is it a Golden Ratio?
If the following formula holds true, then yes!
What is amazing about this ratio, is that it can be related back to the Fibonacci Sequence!
The Golden Ration + Fibonacci Sequence:
If we were to take the sequential numbers found within the Fibonacci sequence (1,1,2,3,5..), and plug them into the golden ratio formula above, it would approximate to the golden ratio value, 1.618, the further along in the sequence we go.
The Golden Ratio + Art + Architecture + Nature:
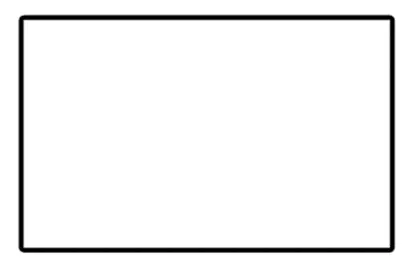
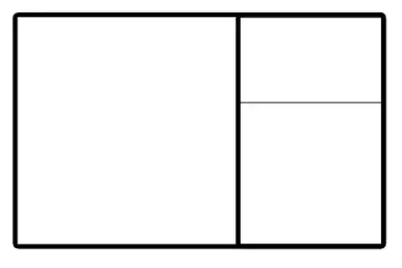
If we were to draw a rectangle that has golden ratio proportions, we would get the golden rectangle below.
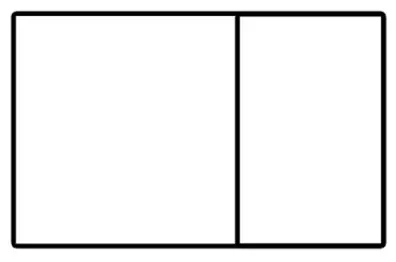
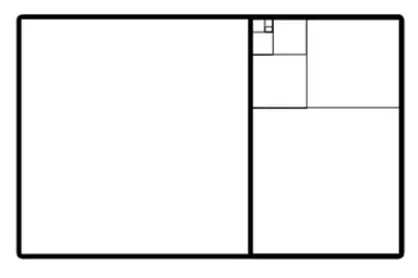
Let’s draw a golden rectangle, within our golden rectangle to see what happens:
What happens if we continue this specific pattern and keep drawing in golden rectangles within itself?
Until eventually we get something like this….
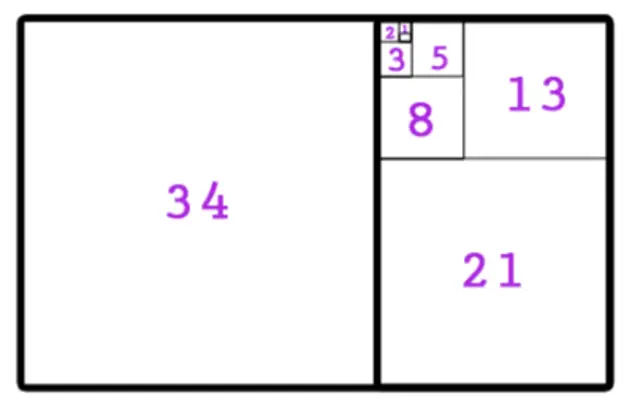
The proportion between the width and height of these rectangles is 1.618 and can also be shown as the proportion between any two numbers in the Fibonacci sequence as the sequence approaches infinity.
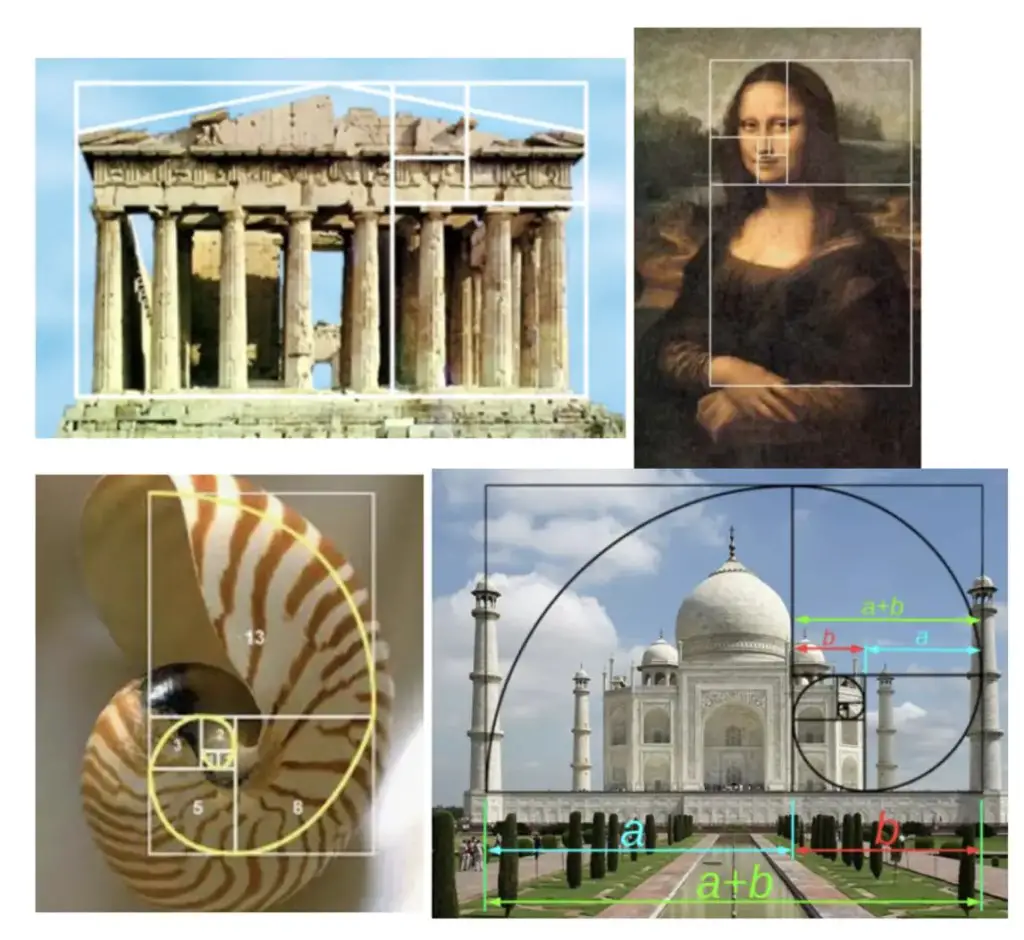
The above pattern, when all lines are connected form a spiral that can be found within art, architecture, and nature itself! Below we have a picture of the Parthenon, the Mona Lisa, a shell, and the Taj Mahal.
The Golden Ratio + YOU:
Want to know if you yourself has a face that fits the golden ratio?! Try measuring your face horizontally and vertically and plug in those values into the golden ratio formula, dividing the larger number by the smaller number. What did you get? Something close to 1.6 maybe!?
The Golden Ratio + Resources:
If you’re looking to learn more about the Golden Ratio, be sure to check out these resources here.
Now that we’ve discussed the most famous sequence, let’s talk about the most well-known sequence, which are just plain old-fashioned natural numbers, starting at 1 and counting to infinity! The sequence we all grew up with and learned to love, yes, natural numbers:
1,2,3,4,5, ….100, …..
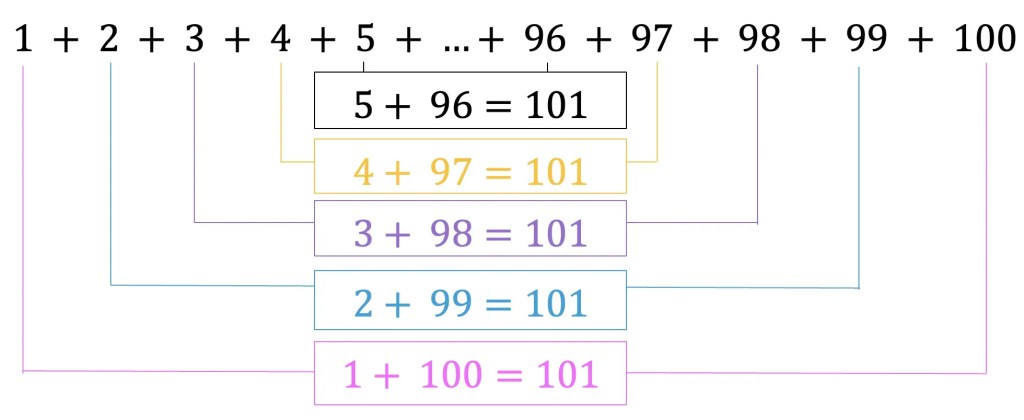
What if we were tasked with summing all the numbers from 1 to 100? How would we do that? Well, believe or not, there is a formula to adding all of these numbers together, that was discovered by a famous mathematician named Johann Karl Friedrich Gauss. Apparently, he came up with this pattern after being assigned to add all the numbers from 1 to 100 as an elementary school student! The teacher thinking this would be perfect “busy” work for her class did not see it coming!
How to Sum 1 to 100:
Gauss found a pattern, when adding together the numbers 1 to 100. He looked at the big picture, recognizing that the sum between pairs of numbers from the beginning of the sequence and at the end of the sequence were the same throughout the entire list of numbers! For example, 1+100=101, 2+99=101, 3+98=101, and this pattern continues between all the numbers from 1 to 100! Take a look:
Formula and Solution:
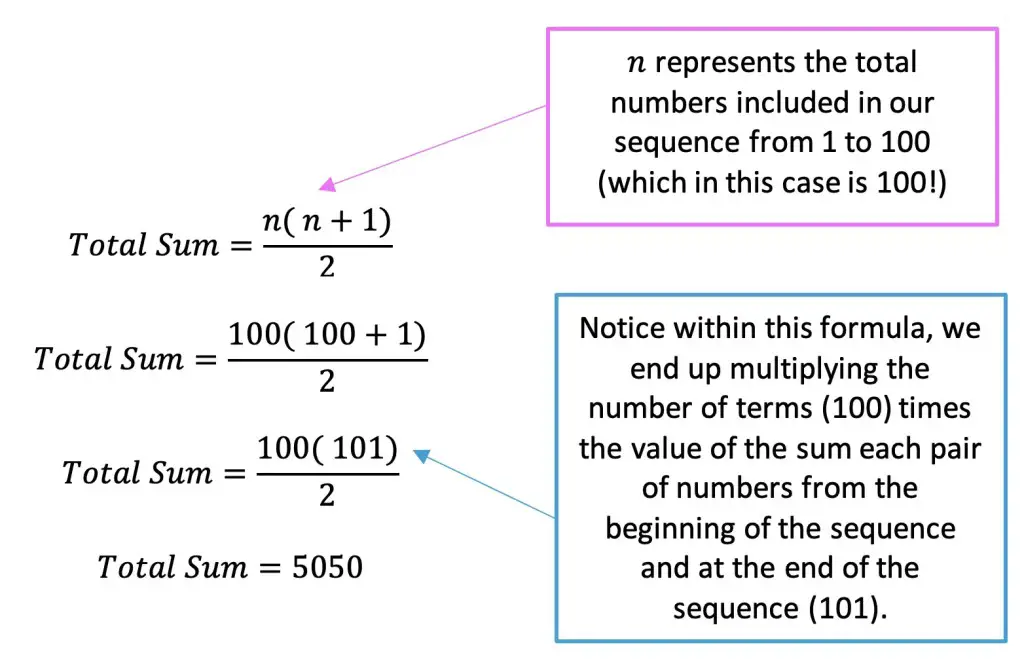
Noticing this pattern, lead Gauss to come up with the following formula to sum every number from 1 to 100:
Above we use the formula to sum every number from 1 to 100 but it can be used to find other sums as well! If you’re wondering where in the world the above formula even came from, try testing it out with a smaller sum, summing numbers from 1 to 10 and see what happens!
Just like we find the sum in an arithmetic or geometric series, we can find the sum of other types of sequences, as we see here with natural numbers! We can even realize that summing numbers 1 to 100 is like summing an arithmetic sequence with a common difference of 1. Hidden patterns and formulas are used to solve all different types of sequences we haven’t even gone over in this post. But let this post guide you with the basics! See if you can find the pattern of any sequences that you find (in this post, in class, or in the street walking around, as sequences are found there too).
If you’re looking for more resources, check out this website that connects Gauss’s Summation formula to arithmetic sequences found in the real world here.
I hope you find this overview of sequences helpful! If there is anything you’d like me to go over more or if you have any questions, please let me know in the comments. Also, please check us out on social media for the latest MathSux videos, lessons, practice, questions, cheat sheets, and more! Happy calculating!
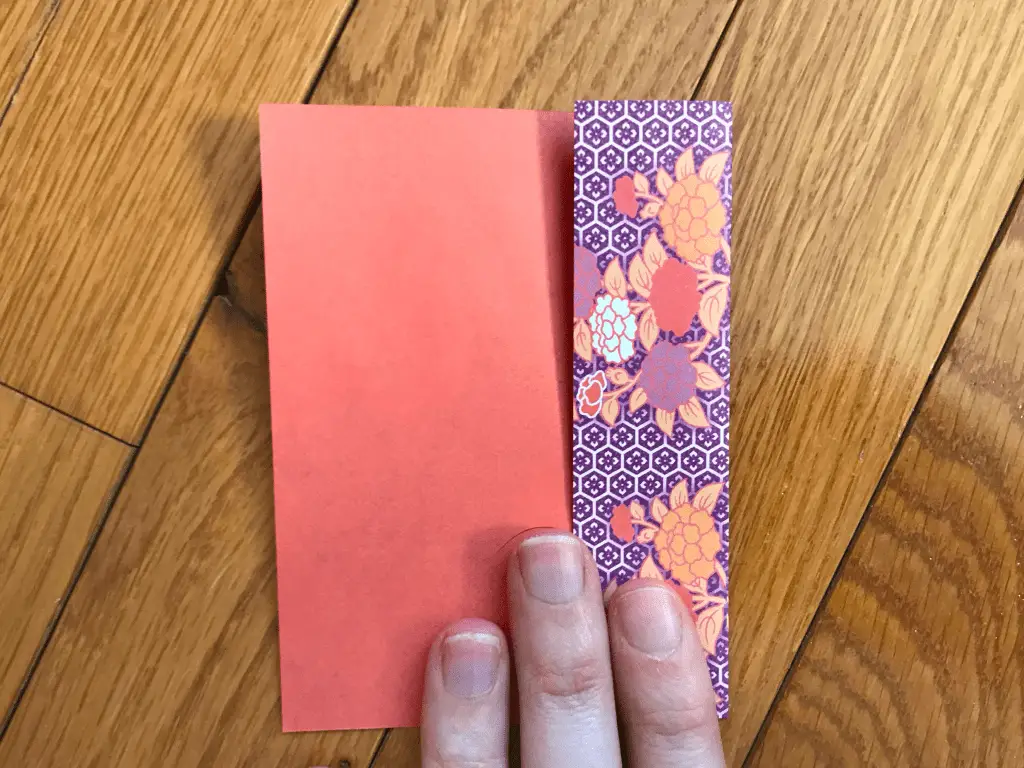
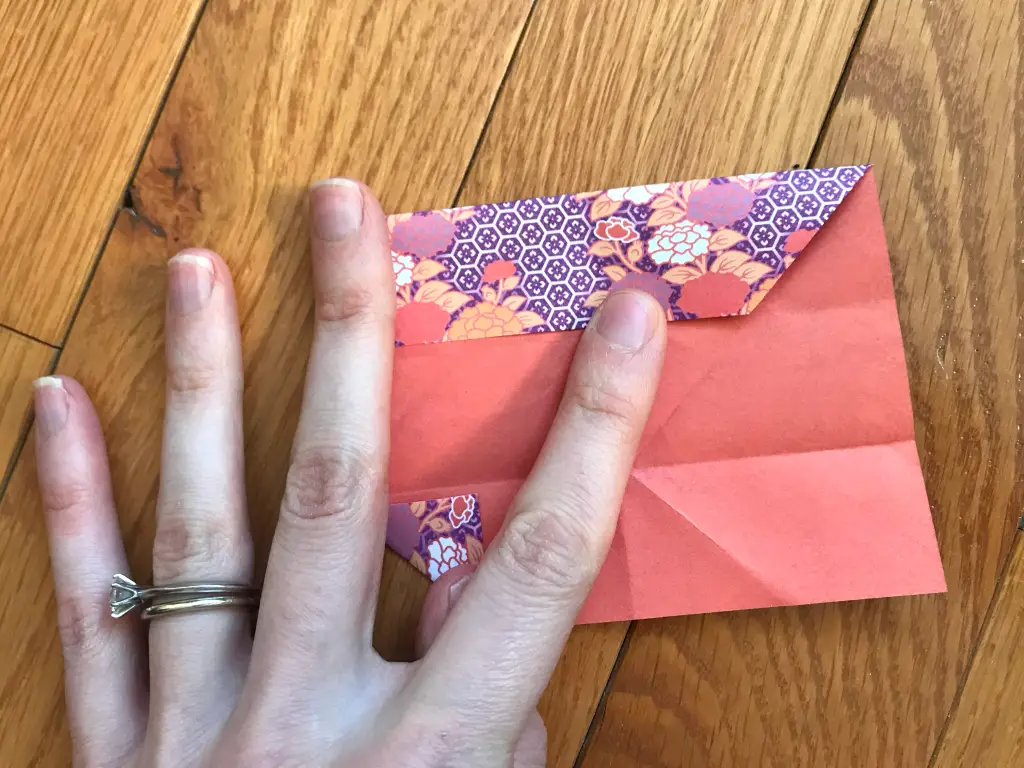
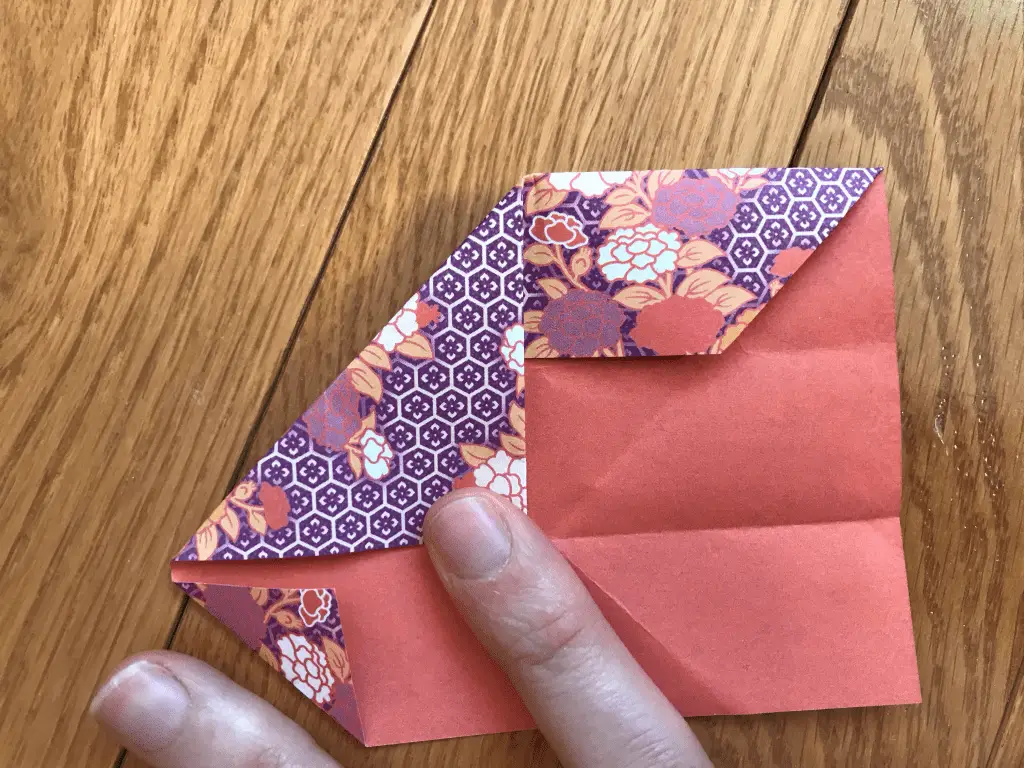
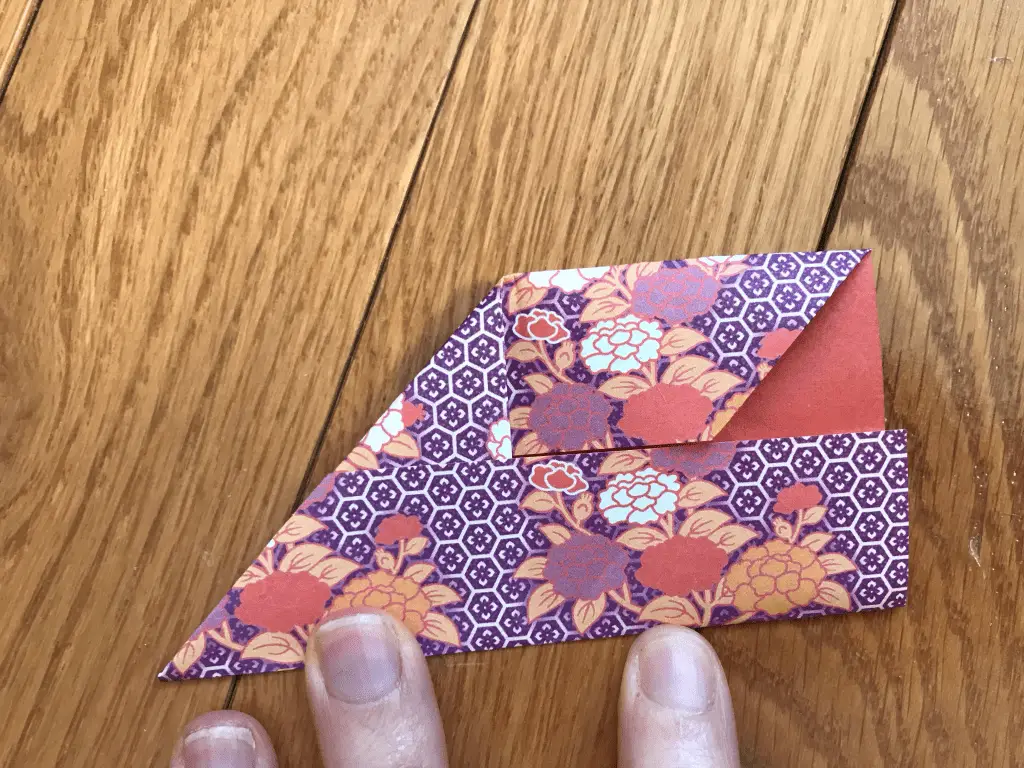
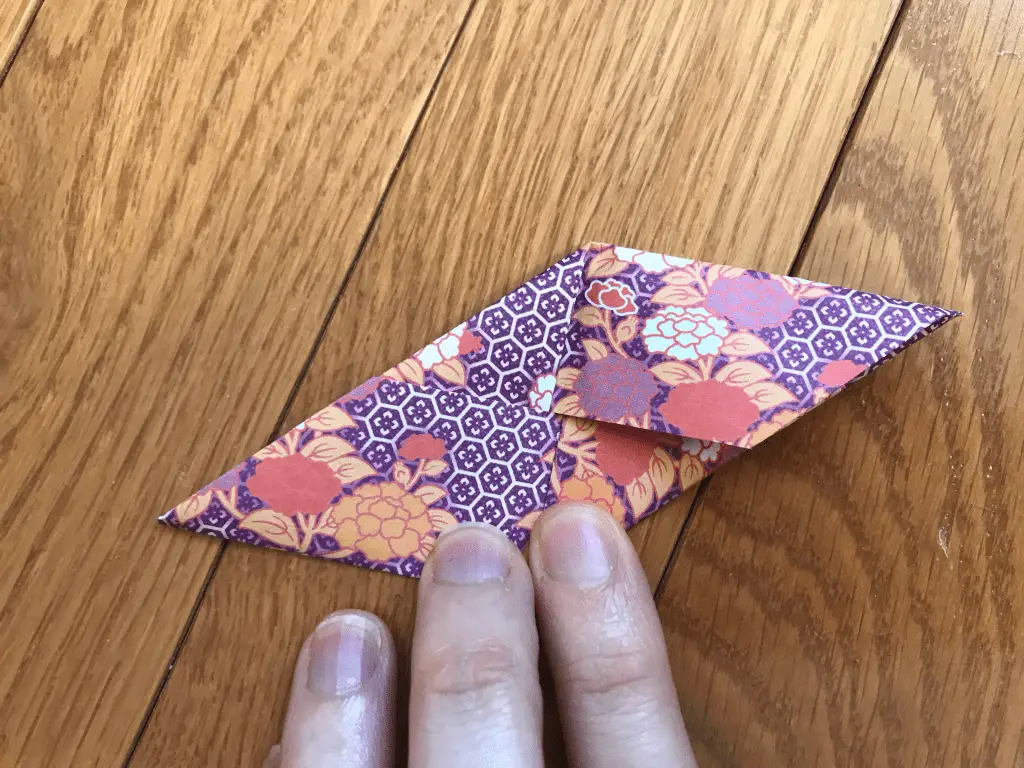
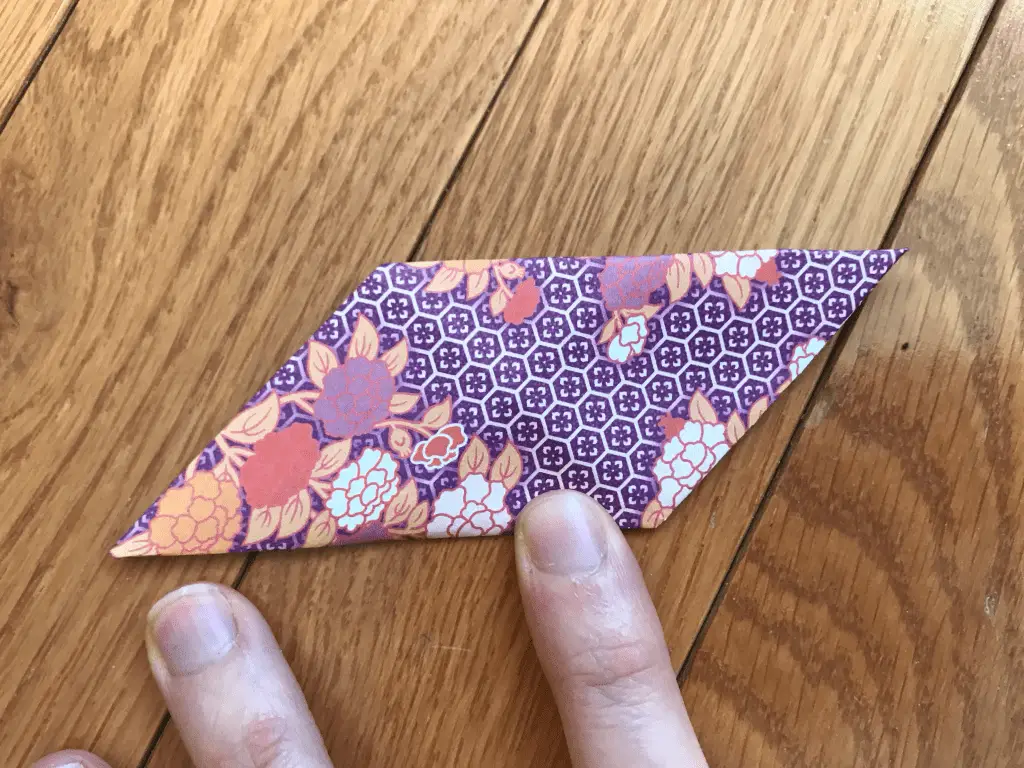
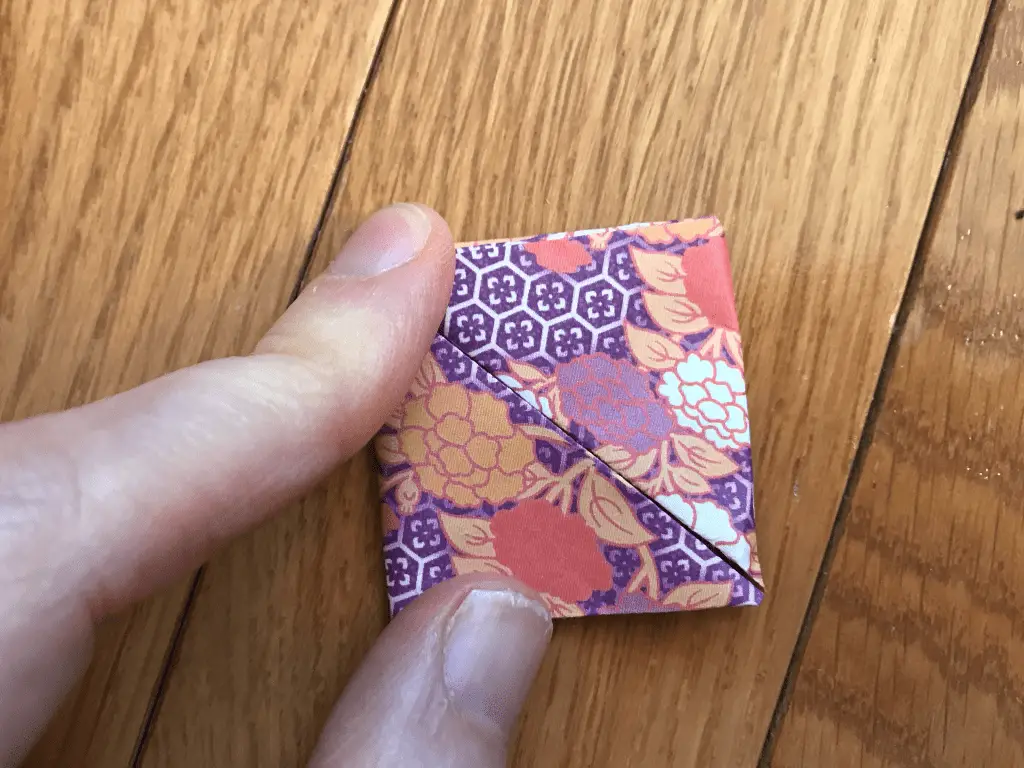
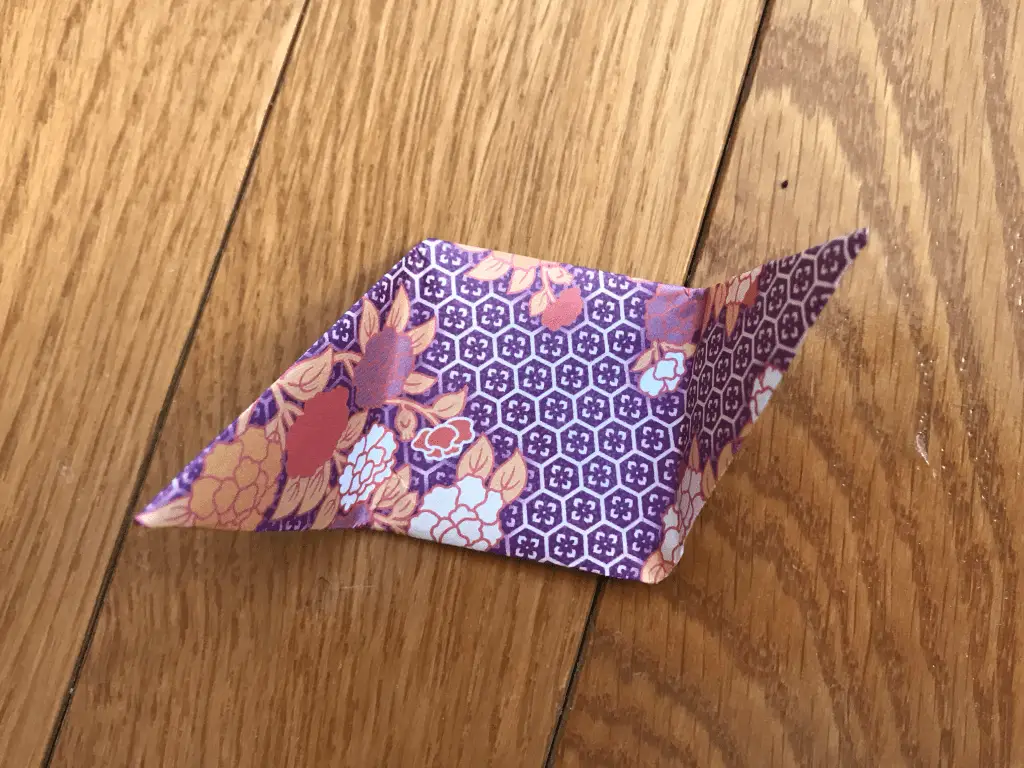
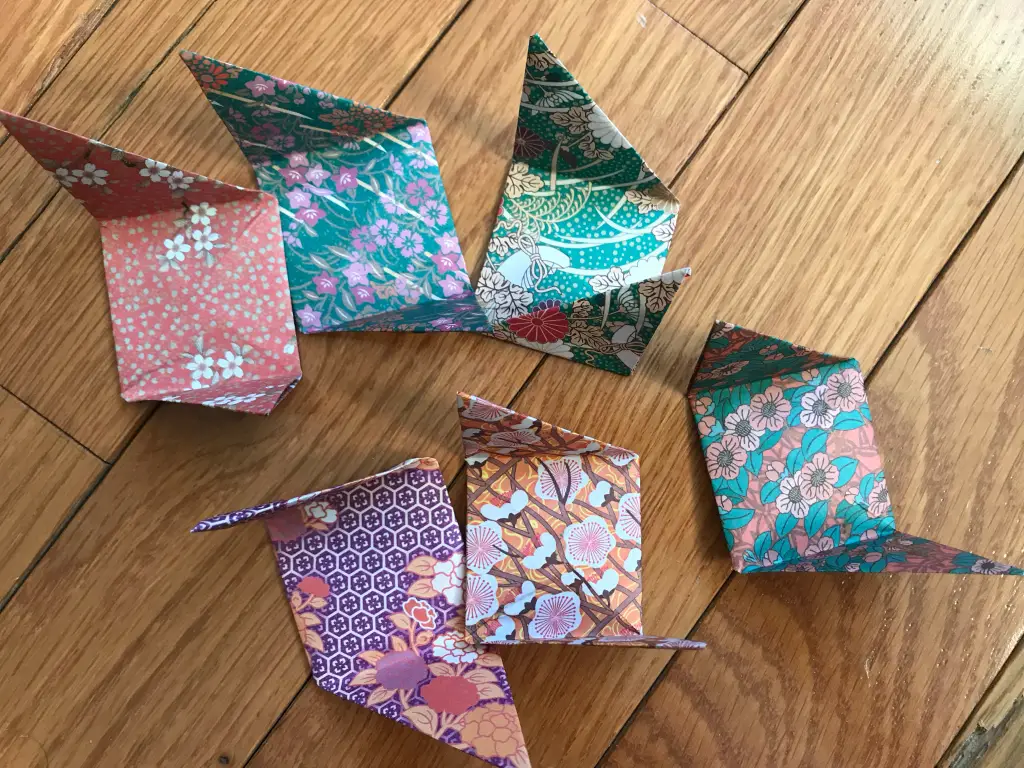
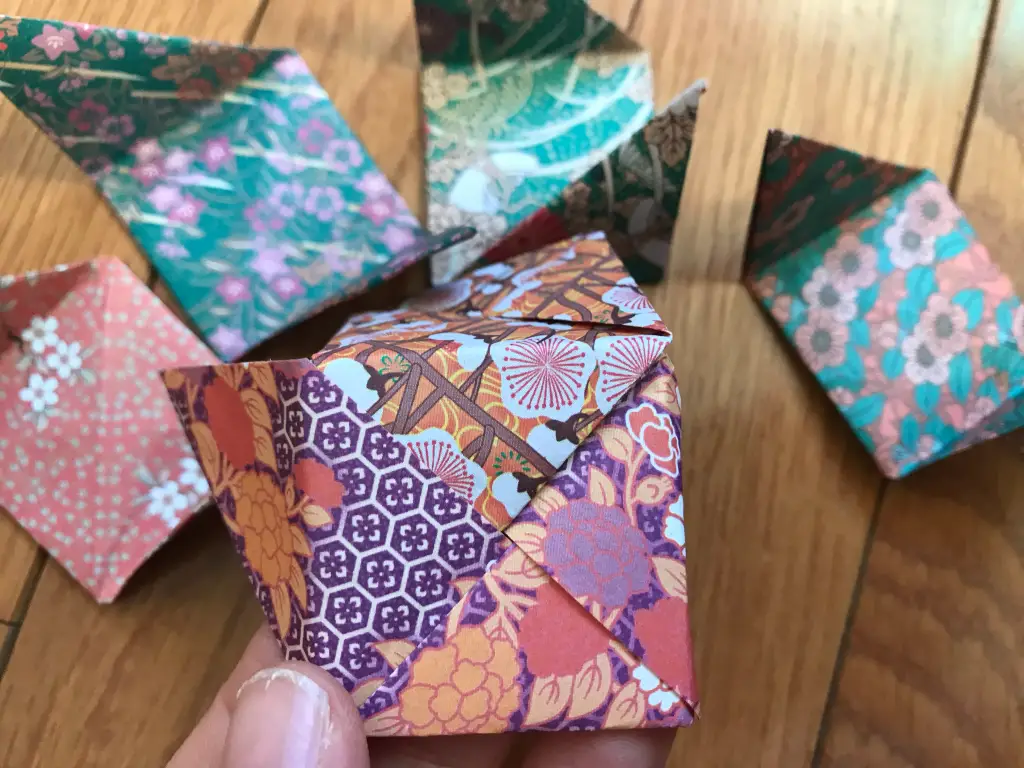
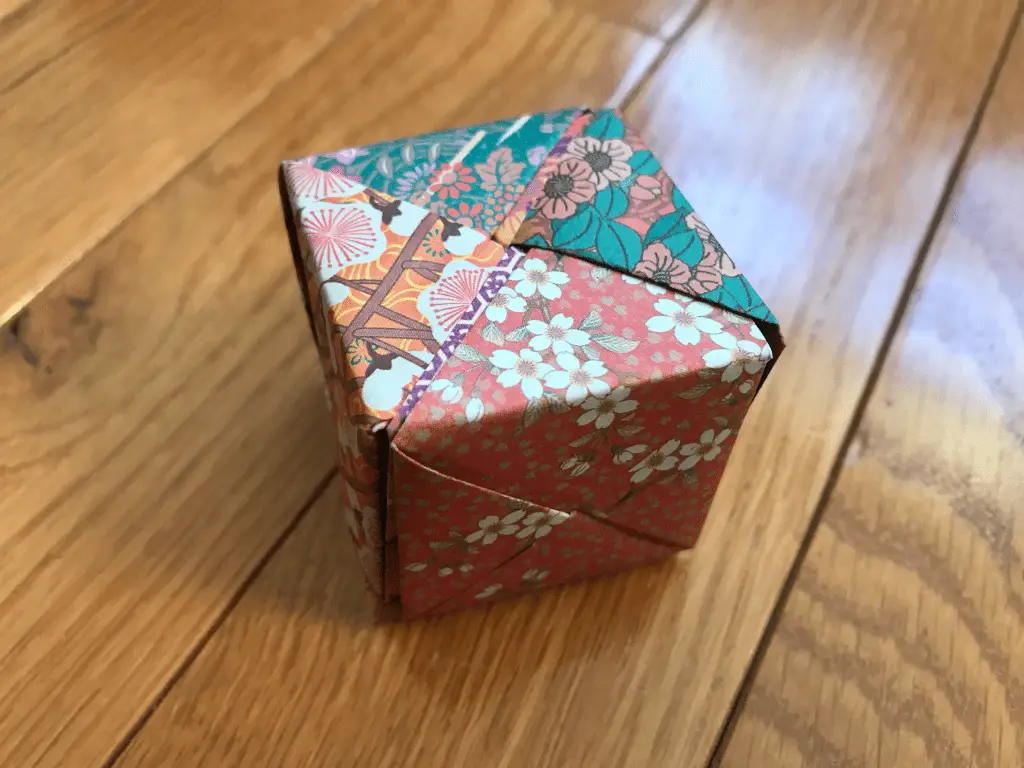
Greeting math peeps and welcome to MathSux! In today’s post, we are going to have a bit of fun when finding the volume of a cube. We’ll start by going over how to make a paper cube using origami, then we will measure the dimensions of our real-world cube and find its volume. Hope you’re all feeling crafty and ready to take on this project with the Japanese art style of origami! If you don’t have any origami paper, please fill free to print out the origami guideline sheets included at the end of this post to follow along! Also, if the below written tutorial isn’t your style, watch the video up on YouTube and shown below. Hope you’re all having a great week and can find some fun in this post! Happy calculating!
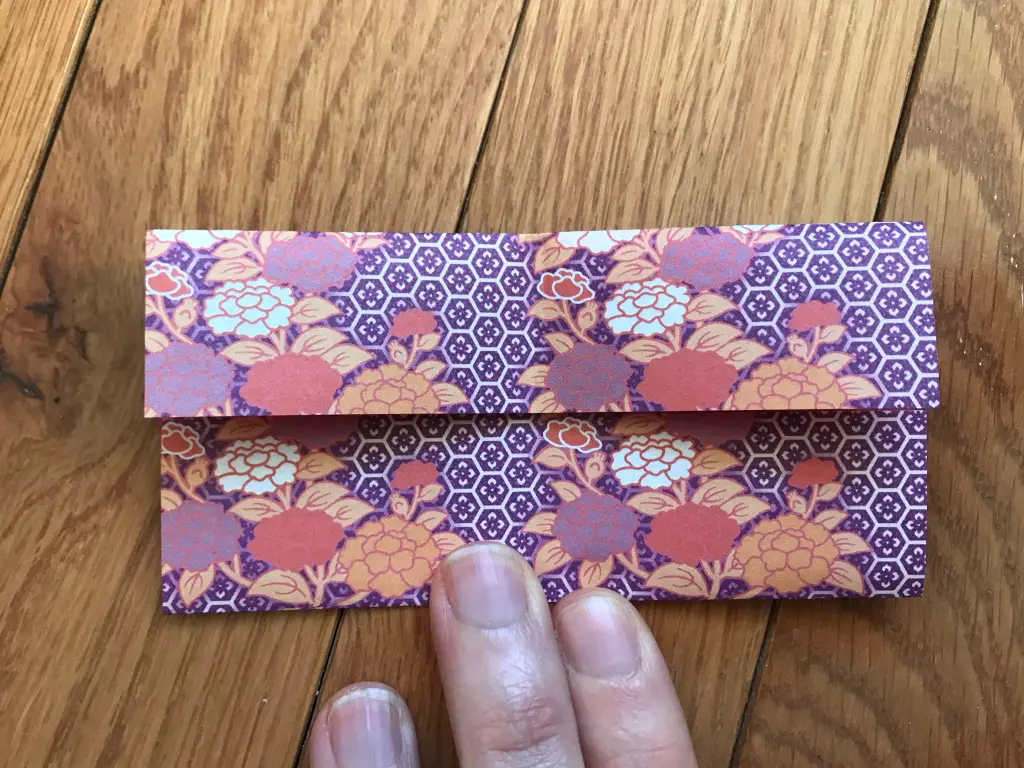
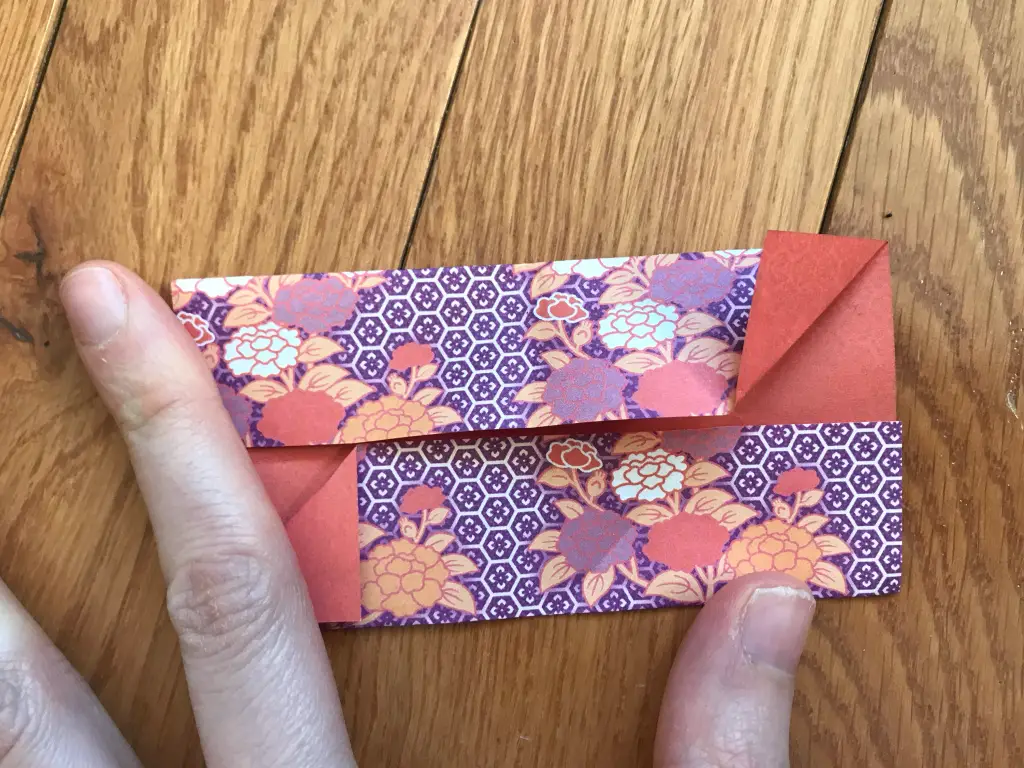
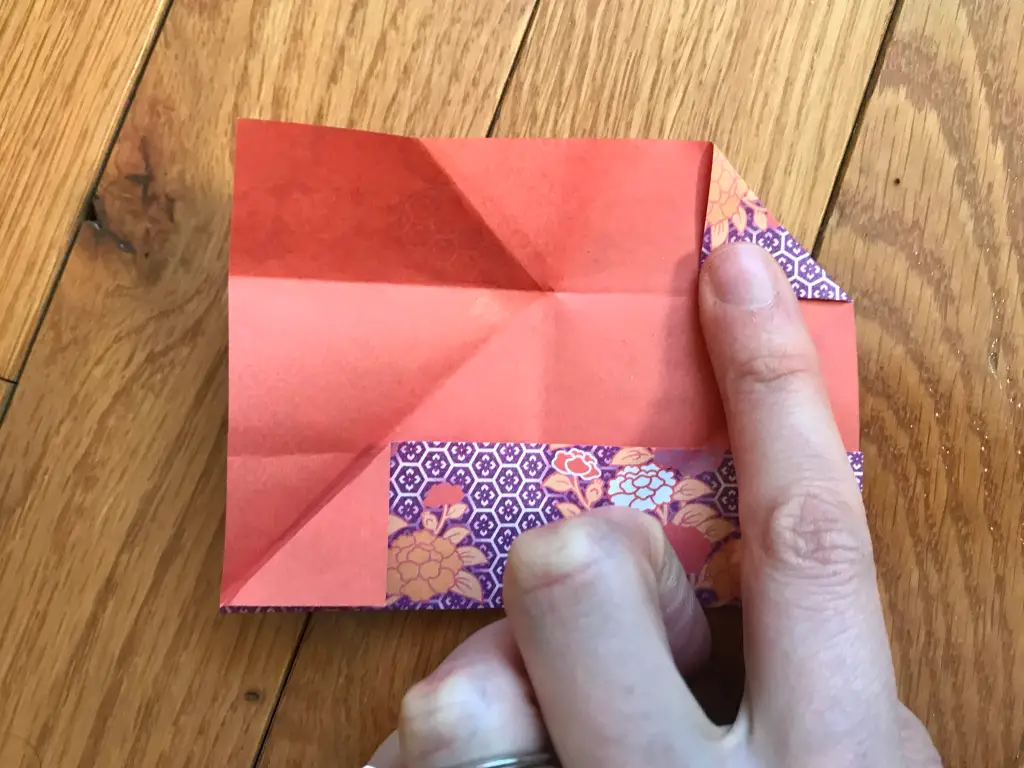
How to Make a Paper Cube Using Origami:
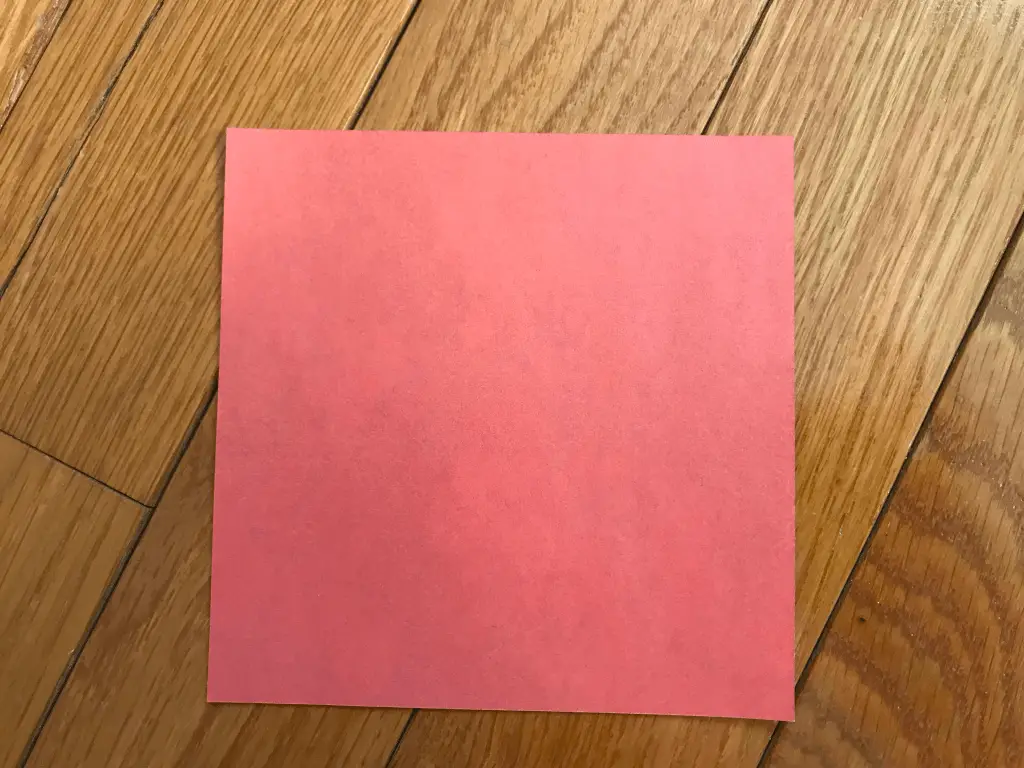
Step 1: Begin with six sheets of square origami paper (or cut out a square from any type of regular computer paper). If you want to really follow along, this paper is 4 inches by 4 inches and I have included a print out below.
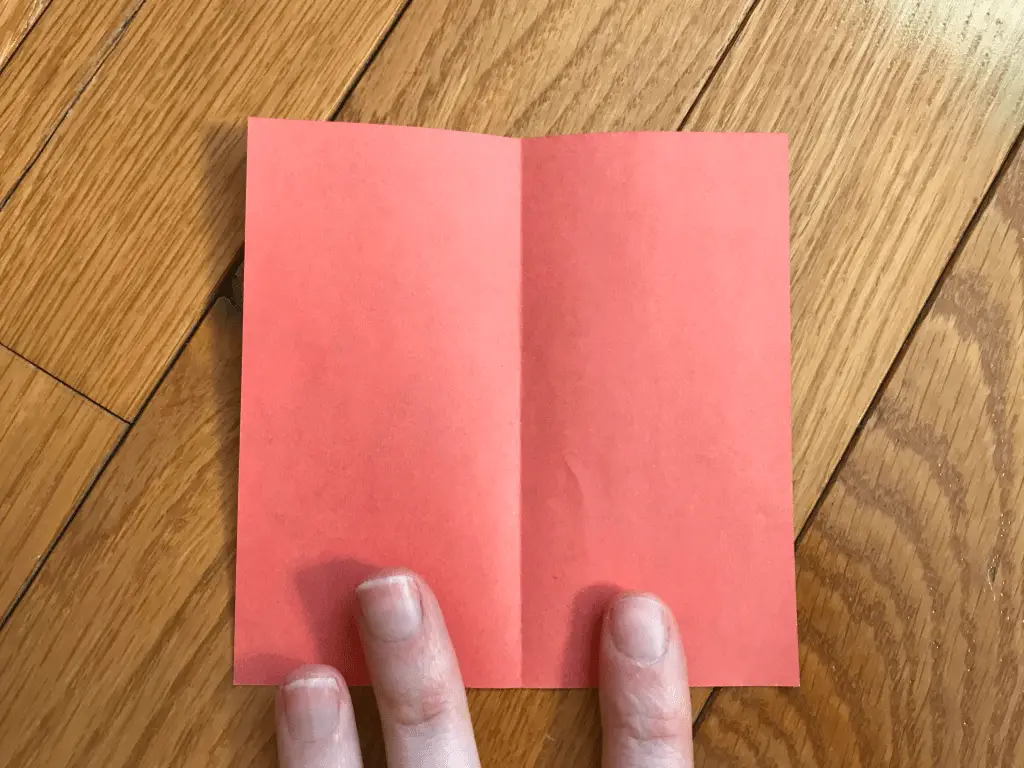
Step 2: Fold the top of the origami paper in half, then unfold.
Step 3: Fold one side of the paper halfway to the center.
Step 4: Fold the left side to the center of the paper and rotate the paper horizontally.
Step 5: Take the bottom right corner and fold it to the top center point of the rectangle.
Step 6: Now fold the top left corner and bring it to the bottom edge, so both folds align in the middle.
Step 7: Next, Open both folds towards the center, undoing our last two steps.
Step 8: Open the first flap on top, and fold in the top right triangle.
Step 9: Unfold the bottom flap, and fold in the bottom left triangle.
Step 10: Now, we are going to fold down the top left corner to the center of the paper (just above the bottom flap).
Step 11: Fold up the bottom flap.
Step 12: Now take the bottom right corner, and tuck it in under the top flap, towards the center.
Step 13: Flip your piece of paper around.
Step 14: Fold the corner, towards the center.
Step 15: Now, fold in the bottom left edge, towards the center, to the top edge.
Step 16: Unfold, the left and right edges we made to get a shape like we have above.
Step 17: Repeat steps 1 through 16 5 more times! To have a total of six of the above shapes. We will need all of them to piece together our origami cube.
Step 18: Connect each of our shapes, by placing the edge of each in top left the corner “pocket” of each shape.
Step 19: Once they are all connected, we finally have created our origami cube!
Print out Origami Paper:
Want to follow along with everything!? Check out the printable origami paper below to create your very own box!
Now that we have made our cube using paper folding, we can measure one side of our cube and find its volume! Please note that these measurements are based on the 4″X 4″ origami paper I used. If you would like to follow along with your own project, just download and print the activity sheet above!
Did you create your origami cube with different-sized origami paper? Let us know what measurement you got for volume in the comments below!
Looking for more Origami + Math? Check out this post here to fold and find the volume of a real-world pyramid and rectangular prism. And for another math + crafty post, learn how to make a Mobius Band here!
What is your favorite way to combine math and the real world? Or math and art in general? Let me know in the comments and happy calculating!
Hi everyone and welcome back to MathSux! This week we are going to explore how to solve 3 equations 3 unknown. This is like the simultaneous equations we learned to love in Algebra, but now, on steroids. Previously, in algebra we only had to solve for two unknown variables and were given two equations. But now, in Algebra 2, we are faced with three simultaneous equations, as well as, three unknown variables (usually x,y, and z) that we must find the values of. These types of problems can look scary, but with the method of elimination and some practice, they are not so bad! Check out the video, step by step tutorial, and practice problems below to master this topic. Good luck and happy calculating!
What are 3 Systems of Equations with 3 Unknown Variables?
Three systems of equations happen when there are three equations (usually with three unknown variables) are graphed or shown algebraically. The graph can be represented by using the variables x,y,z (one for each of the three missing variables). We are all used to the 2-dimensional coordinate plane with X going across and Y going up and down. But now, with a new unknown variable, z, this gives us a new 3-dimensional axis. Instead of graphing lines like we are used to, these equations are going to be graphed as 3-dimensional planes.
As for finding the solution to a system of three equations, it is the same for any simultaneous equation, as the answer lies where all three planes intersect. Below is an example of what a three-dimensional plane can look like when graphed. Don’t worry, typically you wont be asked to graph or even interpret anything like the picture below.
Instead of graphing, typically we are asked to find the solution using algebra! There are three equations and three unknown variables. How are we supposed to know and find the value for each variable? Well, there are more than one way to solve these types of problems, but in this blog post and in the video above, we will be going over the elimination method. This is the fastest and easiest way to solve for 3 unknown variables by hand.
Solving by Elimination
The main idea of Elimination is to pick two pairs of equations and add them together with thegoal of canceling out the same variable. We do this by lining up both equations one on top of the other and adding them together. If a variable or variables does not easily cancel out at first, we then multiply one of the equations by a number so it will cancel out.
For example, adding the first equation (2x+2y+z=20) and second equation (-3x-y-z=-18) will quickly cancel out z. When we pick another pair of equations to add, picking the second equation (-3x-y-z=-18) and the third equation (x+y+2z=16), we will also have to goal of canceling out z. Once z has been eliminated twice, it provides us with an opportunity to add together the two new equations we just found and eliminate even further to find the value of each unknown variable. If this sounds like a confusing mouthful, do not worry! We’ll go over this process step by step below.
Check out how it’s done step by step below!
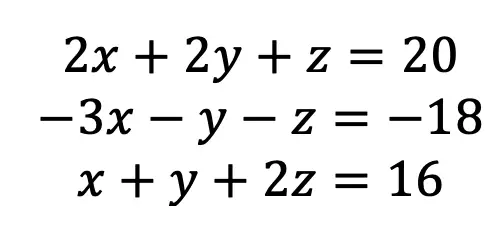
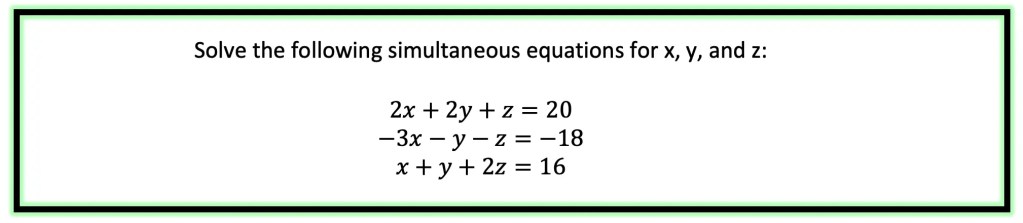
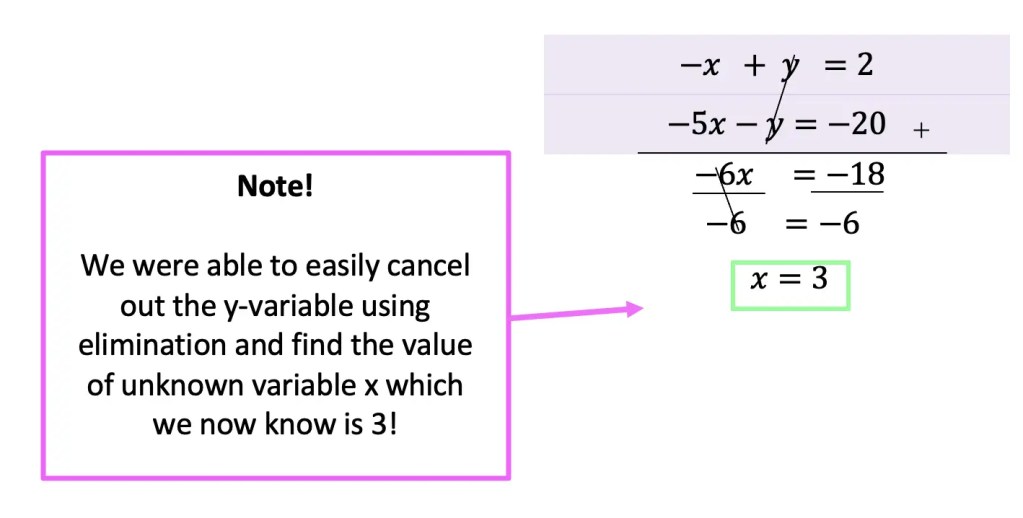
Step 1: First, let’s take another look at our equations and number them so we can keep track of which equations we’re using and when.
Step 2: Now let’s pick two equations and try to eliminate one of the variables. If we look at the first two equations (labeled 1 and 2) above, notice we can easily cancel out at the unknown variable z.
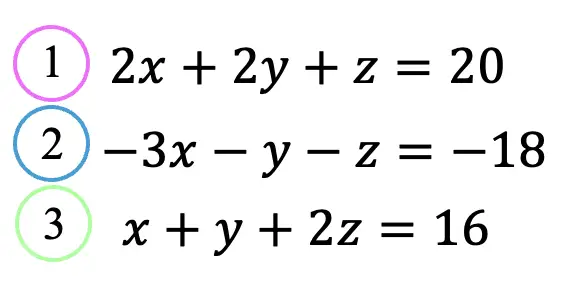
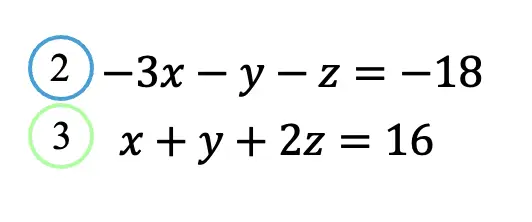
Step 3: Ok great, what now? Now we are going to take a different pair of our original equations and have the same goal of canceling out the same unknown variable z (just like we did in in the previous step). Let’s pick the last two equations from above, (labeled 2 and 3). Notice that these two equations do not easily cancel out unknown variable z, therefore, we must multiply 2 times the whole of equation 2 so that they do cancel each other out.
Step 4: Now, that we’ve canceled unknown variable z from two different pairs of equations, we can use the two new equations we found in steps 2 and 3 (hi-lighted in purple) to cancel out another variable.
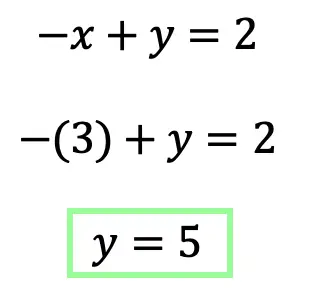
Step 5: Now that we have the value of one variable, x=3, we can plug it into one of our equations that we used in step 4.
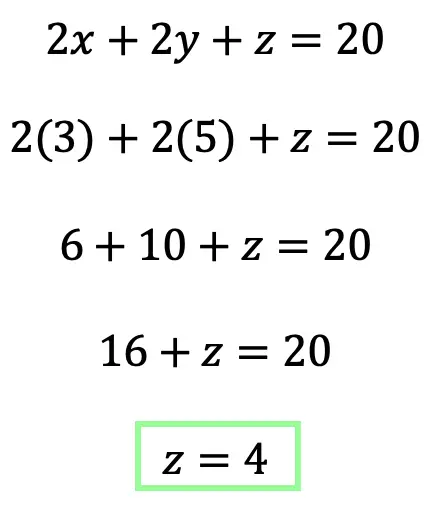
Step 6: Last but not least, let’s find the value to our last unknown variable, z, by plugging in x=3 and y=5 into one of our original equations at the beginning of this example.
Was the wording a bit much? Too many things!? Don’t worry, check out the video and see how this questions gets worked through step by step on a piece of paper. And, if you get the example above, please check out the practice questions below!
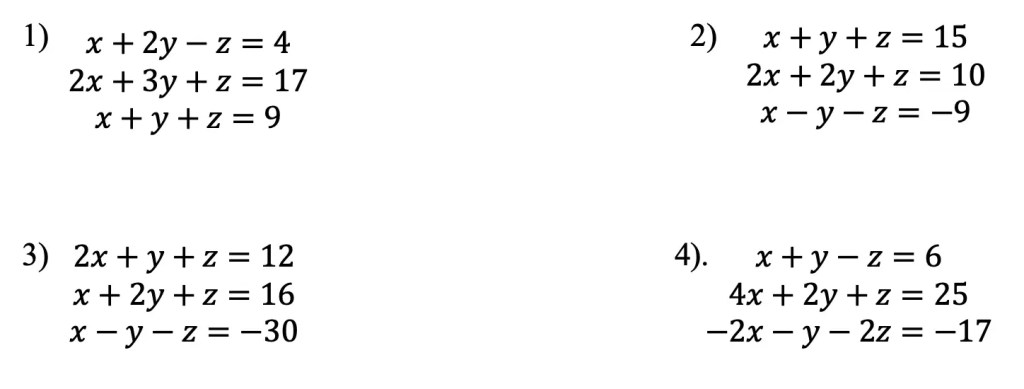
Practice Questions:
Find the values of each three variables for each system of equations:
Solutions:
Want more MathSux? Don’t forget to check out our Youtube channel and more below! And if you have any questions, please don’t hesitate to comment below. Happy Calculating!
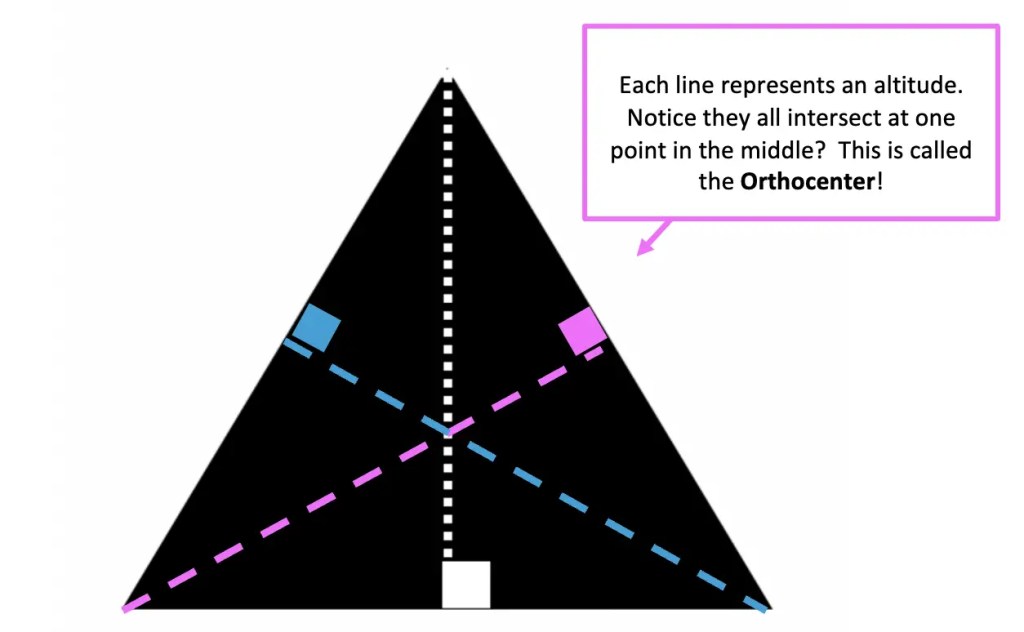
Hi everyone and welcome back to another week of MathSux! For this week’s math lesson, I bring to you four constructions in one in How to Construct Altitudes of a Triangle using a compass and straight edge. In the video and post below we will define what an altitude is, find the altitude of an acute triangle, an obtuse triangle, and a right triangle. Just a reminder that an acute angle is an angle that is less than 90 degrees, an obtuse angle is an angle that is greater than 90 degrees and a right angle is an angle equivalent to 90 degrees. And lastly, within this post, we will use our construction to define and discover the orthocenter of a triangle, which is the point at which the altitude of each part of the triangle intersects.
I hope you find the below video helpful and interesting! Please let me know in the comments below if you have any questions. Good luck and happy calculating!
How to Construct Altitudes of a Triangle:
What is an Altitude of a Triangle?
An Altitude is a perpendicular line drawn from the vertex of a triangle to the opposite side, creating a 90º angle (or right angle). Check out the example in the picture below, where the white dotted line drops down from the vertex of the triangle to the opposite side and how it forms a 90-degree angle represented by the white square. This is an altitude!
In the video above, we will look at how to find the altitude of an acute triangle, an obtuse triangle, and a right triangle step by step. Please watch the video above before reading the next part of this post about the orthocenter. This will makes things a bit clearer!
How to Find the Orthocenter of Triangle with a Compass:
Now that we have found the altitudes of an acute triangle, obtuse triangle, and right triangle (in the video above), we can easily use our tools and knowledge of constructions and altitudes to find the orthocenter of a triangle.
The Orthocenter is a point where all three altitudes meet within a triangle. We can see in the example below, each dotted line represents an altitude to each vertex of the triangle.
In order to find the orthocenter using a compass, all we need to do is find the altitude of each vertex. The point at which they meet in the middle is known as the orthocenter. Check out the video above to see how this works step by step using a compass and straight edge or ruler.
Constructions and Related Posts:
Looking to construct more than just the altitude of a triangle? Check out these related posts and step-by-step tutorials on geometry constructions below!
Looking to get the best construction tools? Any compass and straight-edge will do the trick, but personally, I prefer to use my favorite mini math toolbox from Staedler. Stadler has a geometry math set that comes with a mini ruler, compass, protractor, and eraser in a nice travel-sized pack that is perfect for students on the go and for keeping everything organized….did I mention it’s only $7.99 on Amazon?! This is the same set I use for every construction video in this post. Check out the link below and let me know what you think!
Hi everyone and welcome to MathSux! In this weeks post, we will venture into Calculus for the first time! I won’t get too much into the nitty gritty explanation of what derivative are here, but instead will provide a nice overview of Derivatives Practice Questions. This post includes everything you need to know about finding the derivatives of a function including the Power Rule, Product Rule, Quotient Rule, and the Chain Rule. Below you will see examples, a Derivative Rules Cheat Sheet, and of course practice questions! I hope these quick examples help in the classroom or for that test coming up! Let me know if it helps and you want more Calculus lessons. Happy Calculating!
What is a Derivative?
We use the derivative to find the rate of change of a function with respect to a variable. You can find out more about what a derivative is and its proper notation here at mathisfun.com. Read on below for a derivative rules cheat sheet, examples, and practice problems!
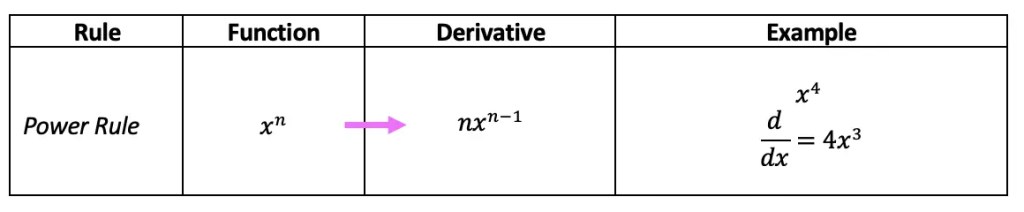
The power rule is used for finding the derivative of functions that contain variables with real exponents. Note that the derivative of any lone constant number is zero.
Product Rule:
The product rule is used to find the derivative of two functions that are being multiplied together.
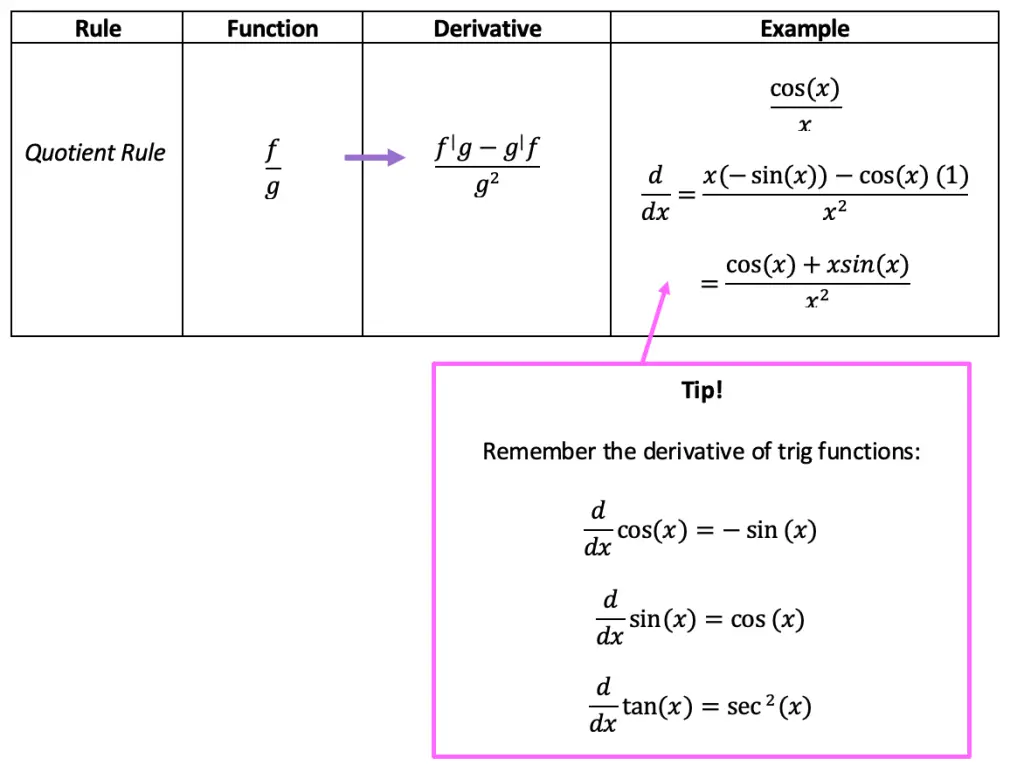
Quotient Rule:
Applying the quotient rule, will find the derivative of any two functions set up as a ratio. Be sure to notice any numbers or variables in the denominator that can be brought to the numerator (if that’s the case, can use the more friendly power rule).
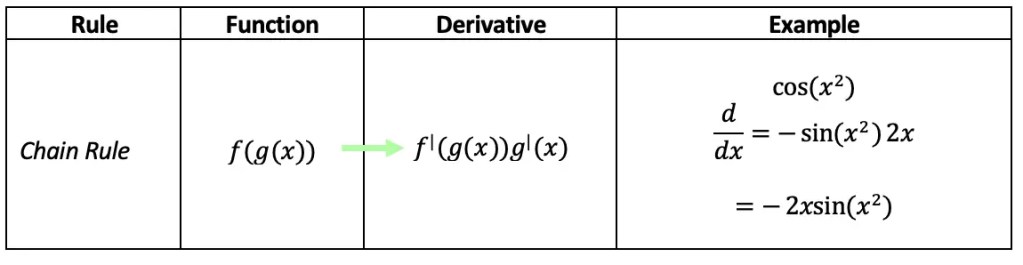
Chain Rule:
The chain rule allows us to find the derivative of nested functions. This is great for trigonometric functions and entire functions that are raised to an exponent.
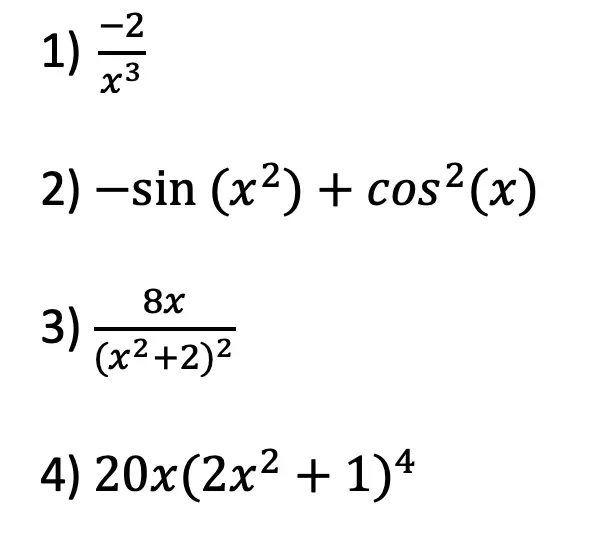
Ready for some practice questions!? Check out the ones below to test your knowledge of derivatives!
Derivatives Practice Questions:
Find the derivatives for each function below.
Solutions:
Still got questions? No problem! Don’t hesitate to comment with any questions or check out the video above. Also, if you find you need some motivation, check out my 6 tips and tricks for studying math here! Happy calculating! 🙂
*Also, if you want to check out Rate of Change basics click this link here!
Seasons greetings math friends! Tis’ the season of giving, celebrating, and of course, glitter! And in honor of the holiday season, I’m here to take a break from providing math lessons this week, to instead, provide a holiday discount at the Math Shop! Did you know we have an exclusive math shop, just for us MathSux nerds? Check out the one-of-a-kind MathSux merchandise designs located in the Math Shop, found in the link below. Don’t forget to use the discount code, ‘CHEERSMATH‘ for a whopping 20% off! Also, check out my my top 3 favorite picks below for a quick preview of what you’ll find in the store. Does anyone else have nerdy math gear that they use in their lives and in their classroom? Let me know in the comments below!
The Math Shop has one-of-a-kind math themed designs on t-shirts, stickers, and posters in a variety of colors for all the math nerds in your life. These items are perfect for math fans, teachers, and students to keep studying the subject light and positive! This can be perfect for those frustrated learning moments, for example, quotes like “Keep Calm and Calculate on” will carry any math learner through to the more enlightened side of math. Although this was hard to do, check out my personal top 3 favorites from the Math Shop:
1) Peace, Love, Pi T-Shirt in Pink:
2) MathSux Stickers
3) Keep Calm and Calculate on Stickers
Hoping you’re all having a wonderful holiday season and a Happy New Year! Last but not least, of course I also want to wish you happy calculating! Be back with more math lessons in 2022!