Hi Everyone and welcome to MathSux! Today, I wanted to answer a question I get a lot which is why name your Blog and YouTube channel, “MathSux”? Clearly, I love math, but with the name “MathSux” I wanted to show that it can also be hard and even I can think that it suck sometimes. When we don’t understand something it can be frustrating whether its related to math or really anything! The point is we’ve all gotten frustrated when learning something new at some time, but that’s ok, and that’s exactly what MathSux stands for! 🙂
Check out the video below to hear why I chose the name “MathSux” while doodling math art . I hope you enjoy it and happy calculating! 🙂
Why is it called “MathSux”?
*New lessons will be coming your way starting next Wednesday. Also be on the lookout for Regents review questions up on YouTube tomorrow and Friday! 🙂
If you are a teacher or student, have you ever thought math sucked at some time in your life? Let me know in the comments below!
Hey math friends and welcome back to MathSux! Back to school season is upon us which means most students (and teachers) will need to review a bit before diving into a completely new subject. In order to alleviate some of the back to school whoas, I bring to you, this back to school review! Check out the videos below to get the math juices flowing whether you’re new to Algebra, Geometry, or Algebra 2/Trig! I hope you find these videos helpful and wish everyone the best of luck in their first days at school! Happy calculating! 🙂
How to Prepare for Algebra:
Calling all incoming algebra students, Combining Like Terms is a great place to start! You most likely have combined like terms before, but there’s nothing like sharpening your skills before getting the intense Algebra questions that are coming your way. Check out the video below and try the practice questionshere!
Geometry students, you have the world of shapes ahead of you! It’s an exciting time to review basic Area, Perimeter, Circumference, and Pythagorean Theorem rules before moving ahead with this subject. Review the Pythagorean Theorem below from Khan Academy and check out the last page of the review sheet here to review area and perimeter.
How to Prepare for Algebra 2:
Relieve the fond memories of algebra by reviewing all the different ways to Factor and Solve Quadratic Equations! This is a great way to prepare for rational expressions and the harder algebra 2 problems that are right around the corner. Check out the video below and related practice questions here to reinforce these hopefully not yet forgotten algebra skills!
Hope you find this quick review helpful before diving in for the real deal! Besides brushing up on these math topics, what type of new school year routines do like to practice in your classroom or at home? Let me know in the comments and happy calculating! 🙂
Greetings math peeps and welcome to another week of MathSux! In this post, we will learn how to construct a perpendicular line through a point on the line step by step. In the past, we learned how to bisect a line by constructing a perpendicular bisector right down the middle of a line segment, but in this case, we will learn how to create a perpendicular line through a given point on the line (which is not always in the middle). As always, please follow along with the GIF and step-by-step tutorial below or check out the video. Thanks for stopping by and happy calculating! 🙂
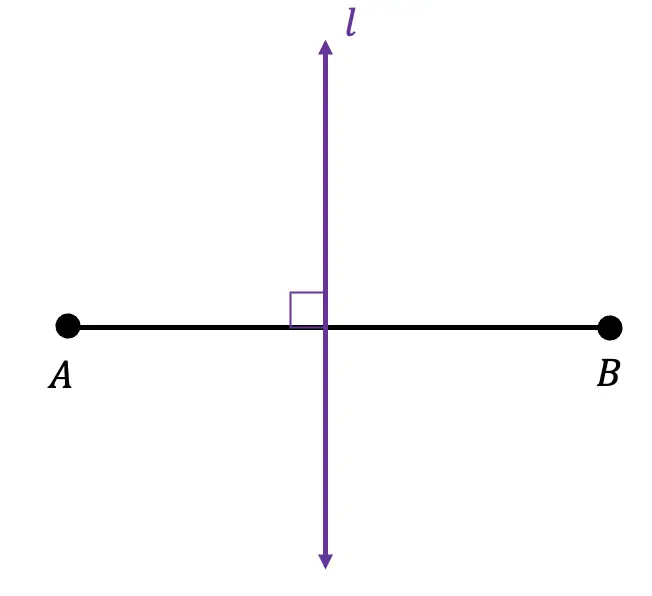
What are Perpendicular Lines?
Perpendicular lines are lines that intersect to create four 90º angles (or right angles) about the two line segments. In the example below, line l is perpendicular to line segment AB, which forms a right angle.
Line l is perpendicular to line segment AB
Note! When we construct a Perpendicular Bisector, the line we create forms a 90-degree angle and splits the line segment in half. In the construction below, however, we are creating a perpendicular line through a point already on the line segment. Note that the point given to us, will not always be splitting the line into two equal halves the way a segment bisector does. See for yourself below!
How to Construct a Perpendicular Line through a Point on the Line?:
What is happening in this GIF?
Step 1: First, notice we are given line segment AC with point B, not in the middle, but along our line. We are going to need a compass and a straightedge or ruler to complete our construction.
Step 2: Our goal is to make a perpendicular line going through point B that is given on our line segment AC.
Step 3: First, let’s open up our compass to any distance (something preferably short enough to fit around our point and on line segment AC).
Step 4: Place the compass end-point on Point B, and draw a semi-circle around our point, making sure to intersect the given line segment.
Step 5: Next, open up the compass at any size and take the point of the compass to the intersection of our semi-circle and given line segment. Then swing our compass above line segment AC.
Step 6: Keeping that same length of the compass, go to the other side of our point, where the given line and semi-circle connect. Swing the compass above the line so it intersects with the arc we made in the previous step.
Step 7: Now we can mark the point of intersection created by these two intersecting arcs we just made and draw a perpendicular line using a straight edge going through Point B and we have created our perpendicular line!
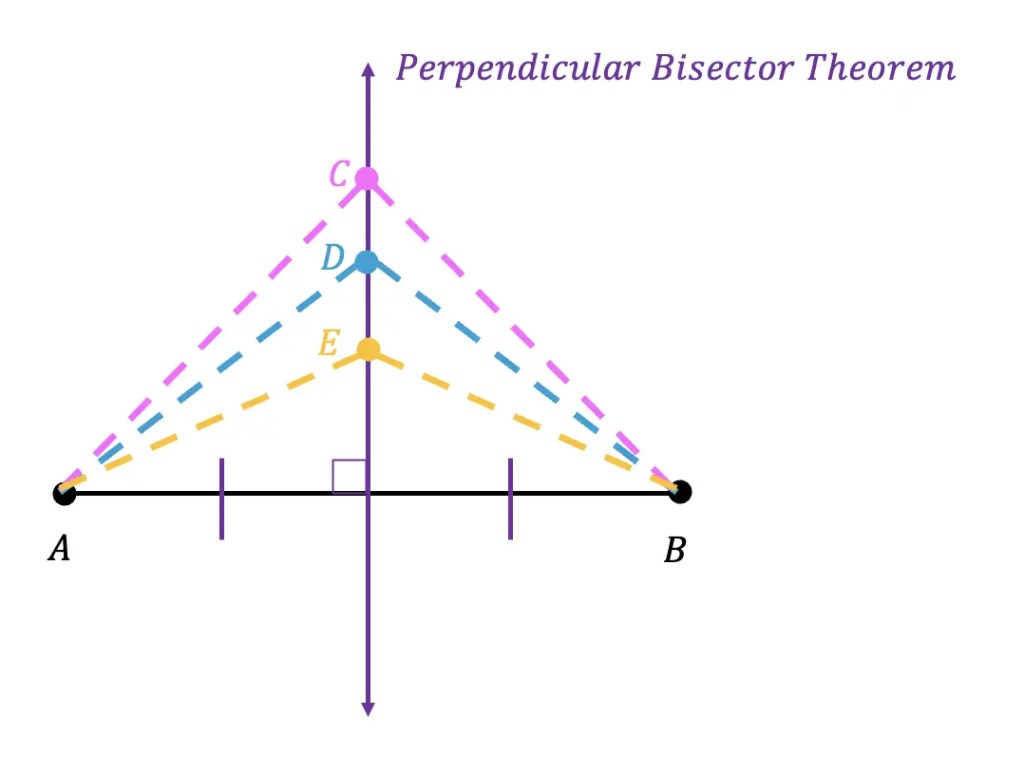
Perpendicular Bisector Theorem:
The Perpendicular Bisector Theorem explains that any point along the perpendicular bisector line we just create is equidistant to each end point of the original line segment (in this case line segment AB).
Therefore, if we were to draw points C,D, and E along the perpendicular bisector, then draw imaginary lines stemming from these points to each end point, we’d get something like the image below:
AC = CB
AD = DB
AE = EB
Constructions and Related Posts:
Looking to construct more than just a perpendicular bisector? Check out these related posts and step-by-step tutorials on geometry constructions below!
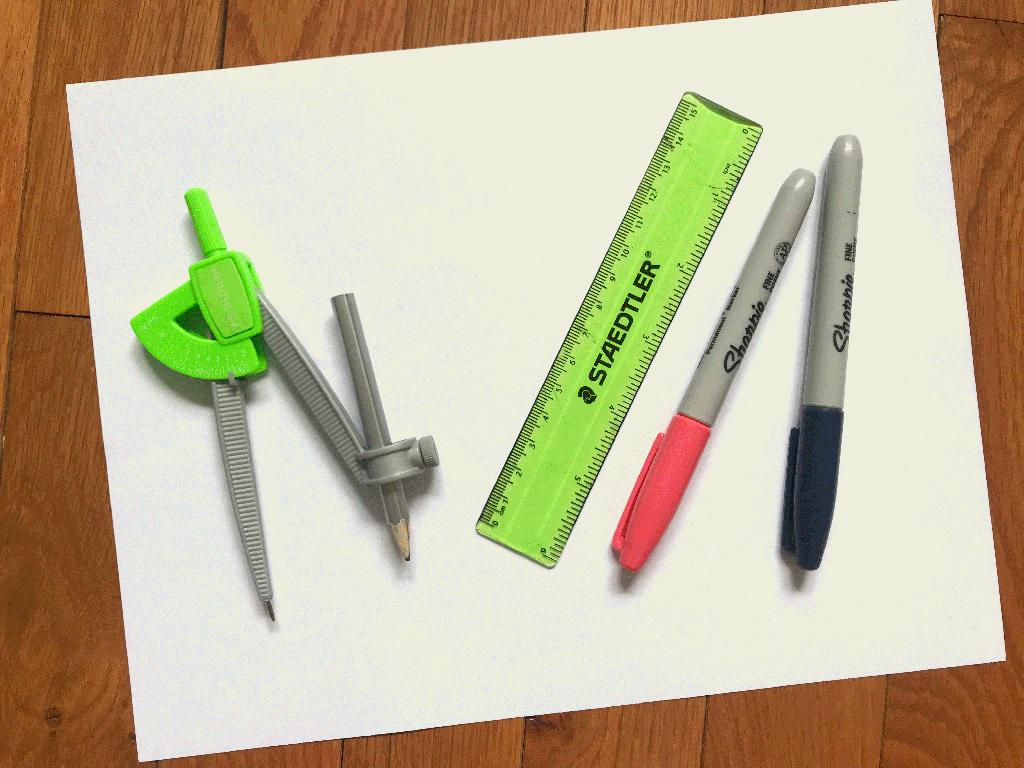
Looking to get the best construction tools? Any compass and straight-edge will do the trick, but personally, I prefer to use my favorite mini math toolbox from Staedler. Stadler has a geometry math set that comes with a mini ruler, compass, protractor, and eraser in a nice travel-sized pack that is perfect for students on the go and for keeping everything organized….did I mention it’s only $7.99 on Amazon?! This is the same set I use for every construction video in this post. Check out the link below and let me know what you think!
Still got questions? No problem! Don’t hesitate to comment with any questions below or check out the video above. Thanks for stopping by and happy calculating! 🙂
Want to see how to construct a square inscribed in a circle? Or maybe you want to construct an equilateral triangle? Click on each link to view each construction! And if you’re looking for even more geometry constructions, check out the link here!
Greetings and happy summer math peeps! In honor of the warm weather and lack of school, I thought we’d have a bit of fun with origami and volume! In this post, we will find the volume of a box and the volume of a square base pyramid. We will also be creating each shape by using origami and following along with the video below. For anyone who wants to follow along with paper folding tutorial, please note that we will need one piece of printer paper that is 8.5″ x 11″and one piece of square origami paper that is 8″ x 8″. If you’re interested in more math and art projects check out this link here. Stay cool and happy calculating! 🙂
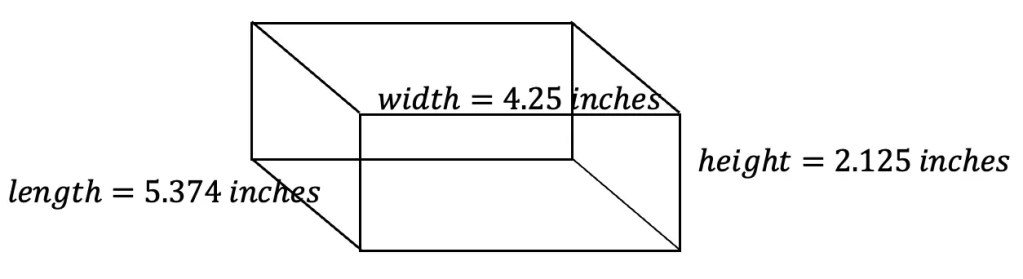
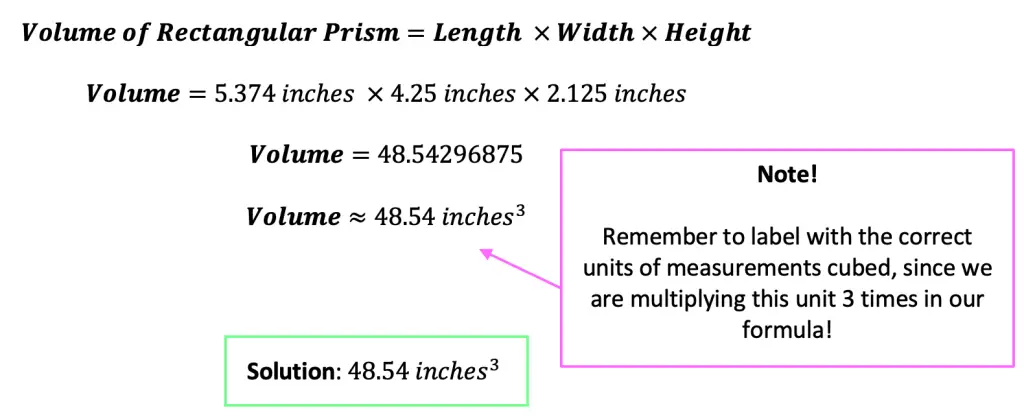
Volume of Box (or Rectangular Prism):
To get the volume of our origami box (video tutorial above), we are going to multiply the length times the width times the height. All the values and units of measurement were found by measuring the box we made in inches in the video above with 8.5 x 11 inch computer paper.
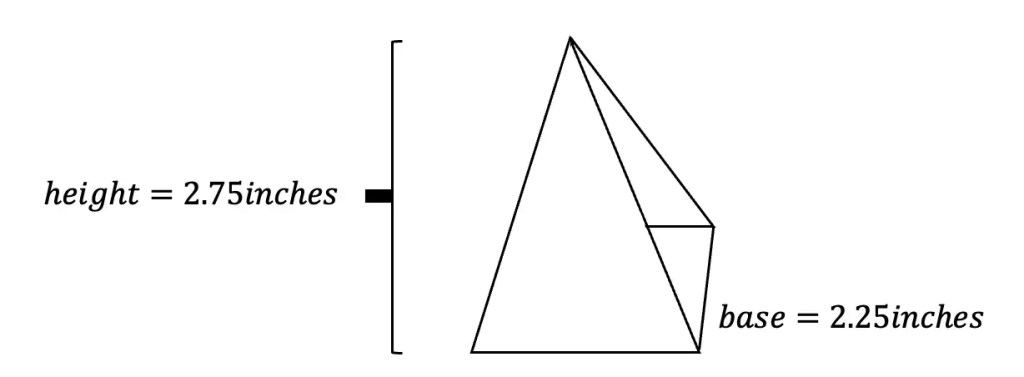
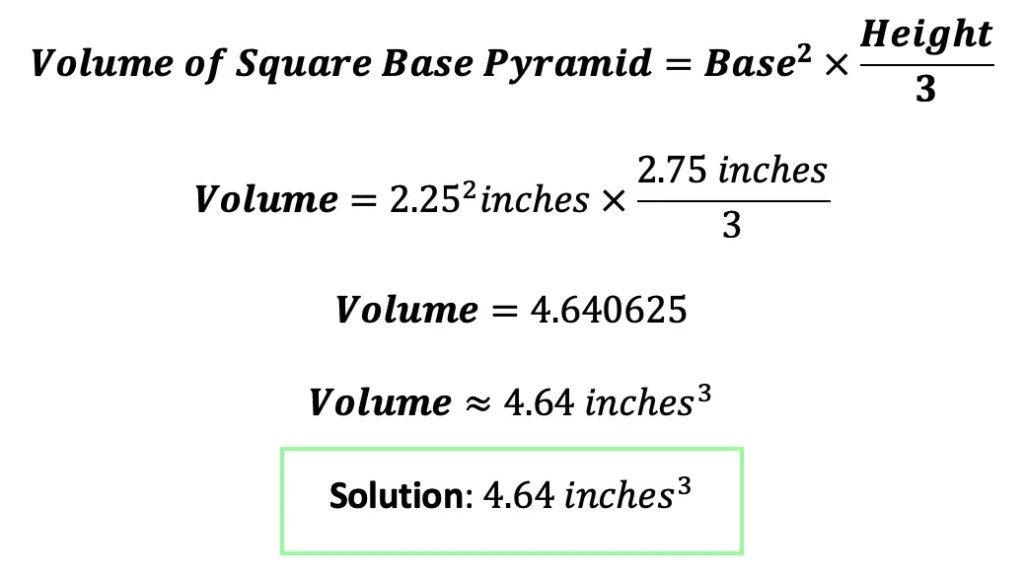
Volume of Square Base Pyramid:
Below is a diagram of the square base pyramid we created via paper folding (watch video tutorial above to follow along!). Please note that if you used a different sized paper (other than 8 X 8 inches), you will get a different value for measurements and for volume.
For step by step instruction, don’t forget to check out the video above to see how to paper fold a box and square base pyramid. I hope this post made math suck just a little bit less and finding volume a bit more fun. Still got questions or want to learn more about Math+ Art? No problem! Don’t hesitate to comment with any questions below. Thanks for stopping by and happy calculating! 🙂
For more Math + Art, check out this post on Perspective Drawing here. And for more Volume + Origami, check out this post on how to find the volume of a cube using origami here and below! If you’re looking for more math and crafts, learn how to make a Mobius Band here!
Hi there and welcome to MathSux! Today we are going to break down dilations; what they are, how to find the scale factor, and how to dilate about a point other than the origin. Dilations are a type of transformation that are a bit different when compared to other types of transformations out there (translations, rotations, reflections). Once a shape is dilated, the length, area, and perimeter of the shape change, keep on reading to see how! And if you’re looking for more transformations, check out these posts on reflections and rotations. Thanks so much for stopping by and happy calculating! 🙂
What are Dilations?
Dilations are a type of transformation in geometry where we take a point, line, or shape and make it bigger or smaller, depending on the Scale Factor.
We always multiply the value of the scale factor by the original shape’s length or coordinate point(s) to get the dilated image of the shape. A scale factor greater than one makes a shape bigger, and a scale factor less than one makes a shape smaller. Let’s take a look at how different values of scale factors affect the dilation below:
Scale Factor >1 Bigger
Scale Factor <1 Smaller
Scale Factor=2
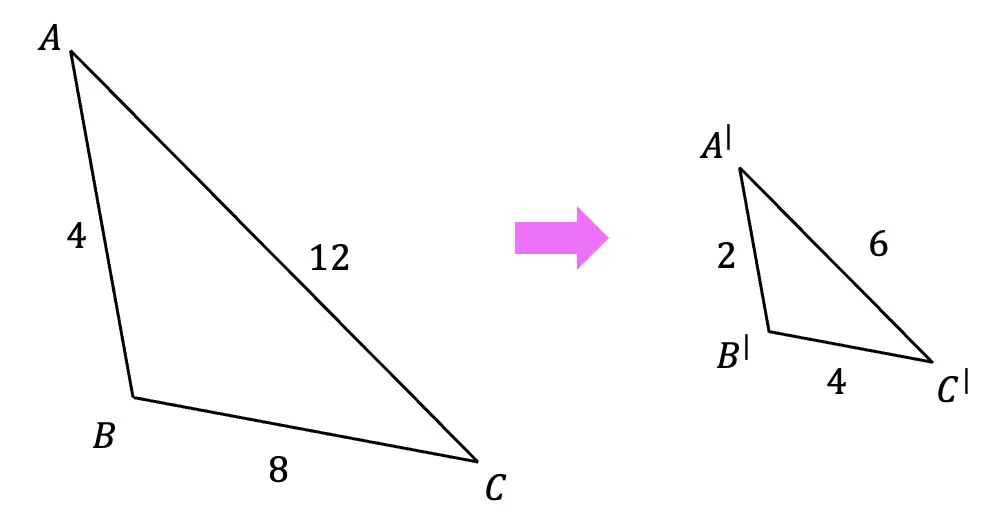
In the below diagram the original triangle ABC gets dilated by a scale factor of 2. Notice that the triangle gets bigger, and that each length of the original triangle is multiplied by 2.
Scale Factor=1/2
Here, the original triangle ABC gets dilated by a scale factor of 1/2. Notice that the triangle gets smaller, and that each length of the original triangle is multiplied by 1/2 (or divided by 2).
Properties of Dilations:
There are few things that happen when a shape and/or line undergoes a dilation. Let’s take a look at each property of a dilation below:
3. Length, area, and perimeter do not remain the same.
Now that we a bit more familiar with how dilations work, let’s look at some examples on the coordinate plane:
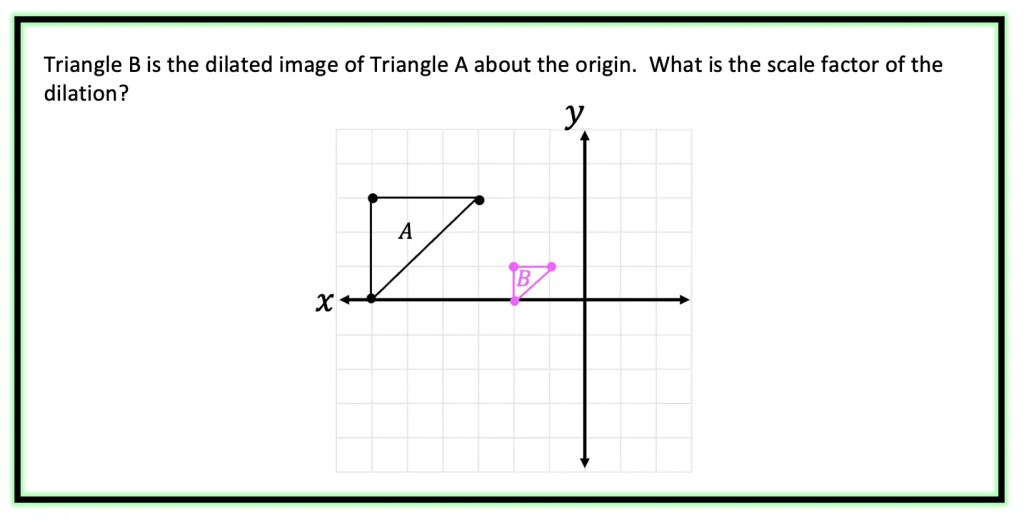
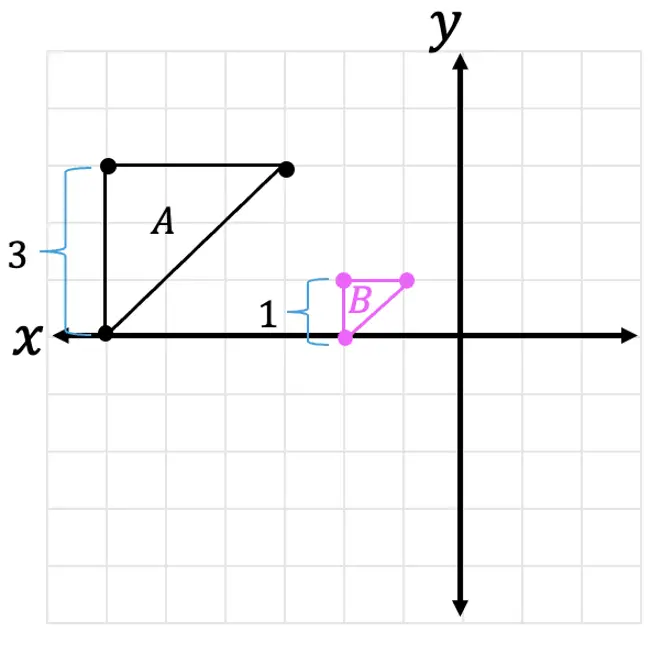
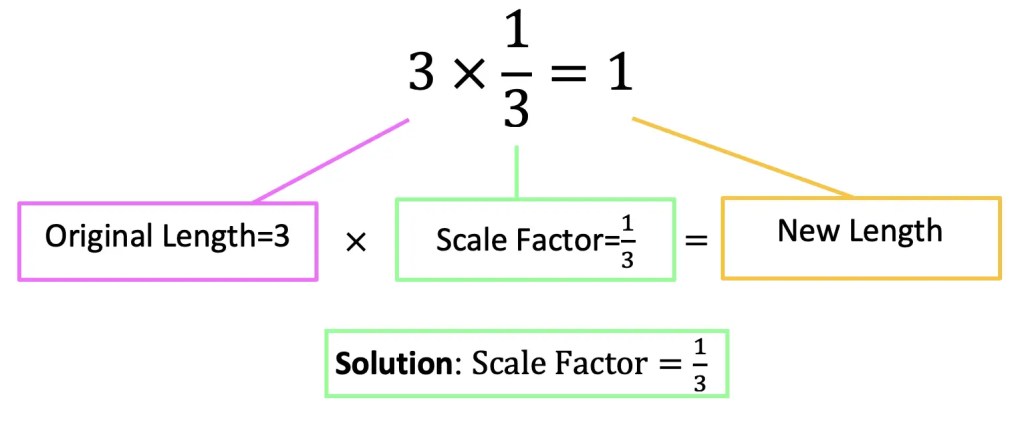
Example #1: Finding the Scale Factor
Step 1: First, let’s look at two corresponding sides of our triangle and measure their length.
Step 2: Now, let’s look at the difference between the two lengths and ask ourselves, how did we go from 3 units to 1 unit?
Remember, we are always multiplying the scale factor by the original length values in order to dilate an image. Therefore, we know we must have multiplied the original length by 1/3 to get the new length of 1.
When it comes to dilations, there are different types of questions we may be faced with. In the last question, the triangle dilated was done so about the origin, but this won’t always be the case. Let’s see how to dilate a point about a point other than the origin with this next example.
Example #2: Dilating about a Point other than the Origin
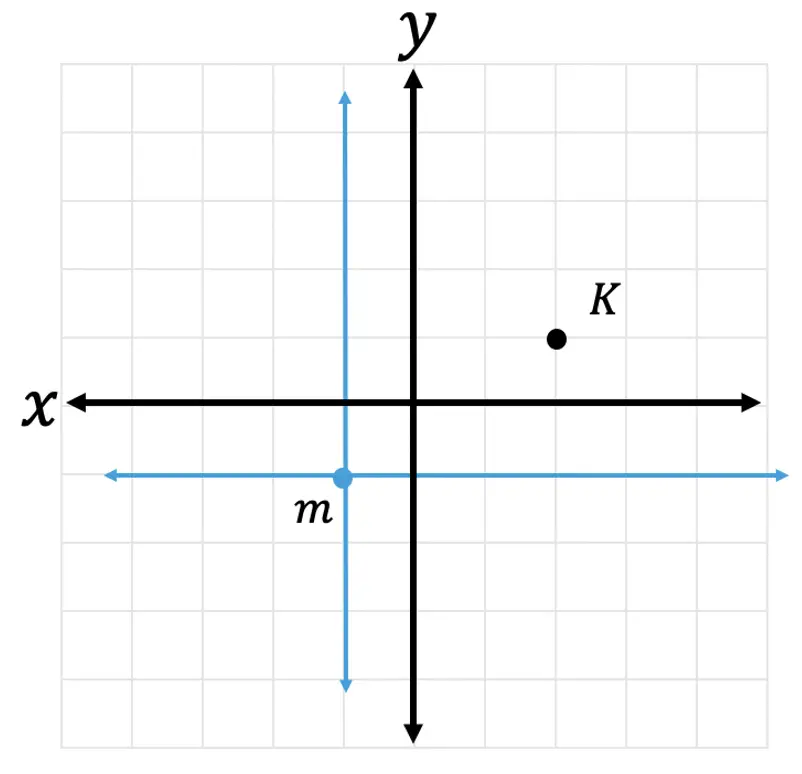
Step 1: First, let’s look at our point of dilation, notice it is not at the origin! In this question, we are dilating about point m! To understand where our triangle is in relation to point m, let’s draw a new x and y axes originating from this point in blue below.
Step 2: Now, let’s look at coordinate point K, in relation to our new axes.
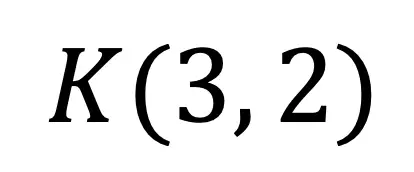
Step 3: Let’s use the scale factor of 2 and the transformation rule for dilation, to find the value of its new coordinate point. Remember, in order to perform a dilation, we multiply each coordinate point by the scale factor.
Step 4: Finally, let’s graph the dilated image of coordinate point K. Remember we are graphing the point (6,4) in relation to the x and y-axis that stems from point m.
Check out these dilation questions below!
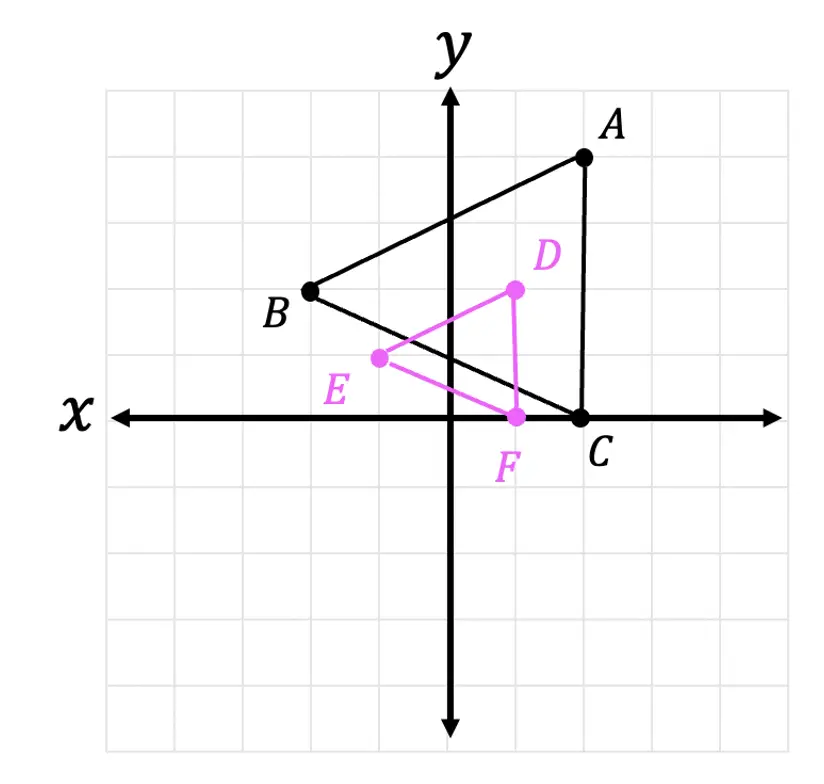
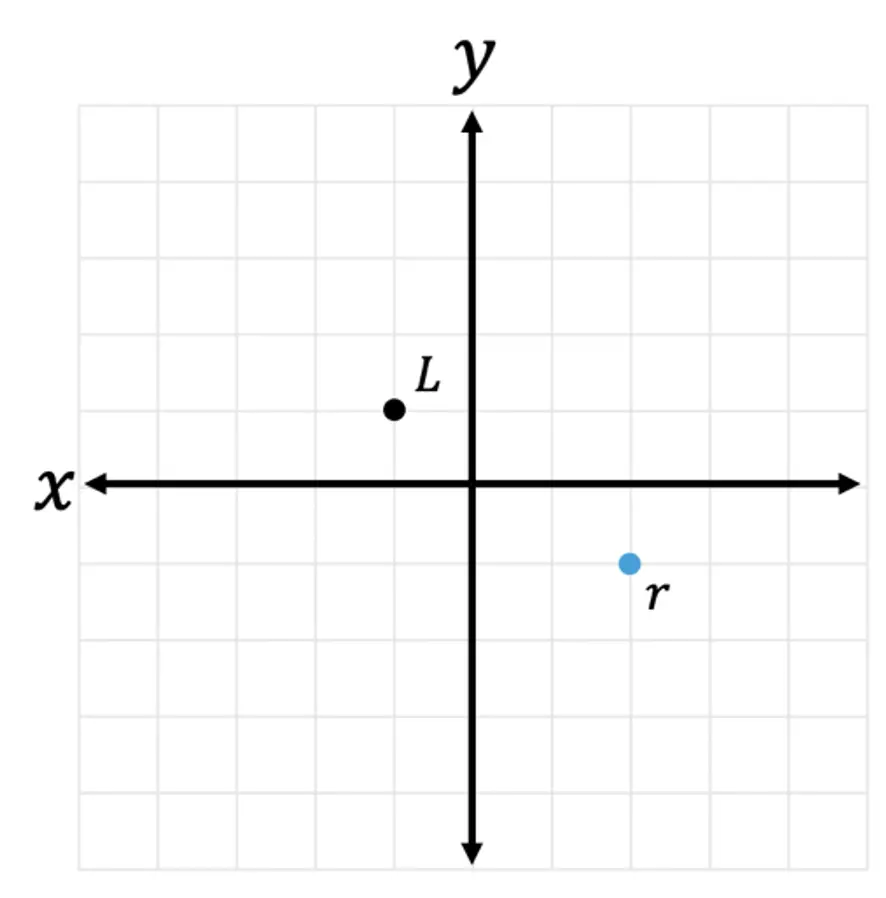
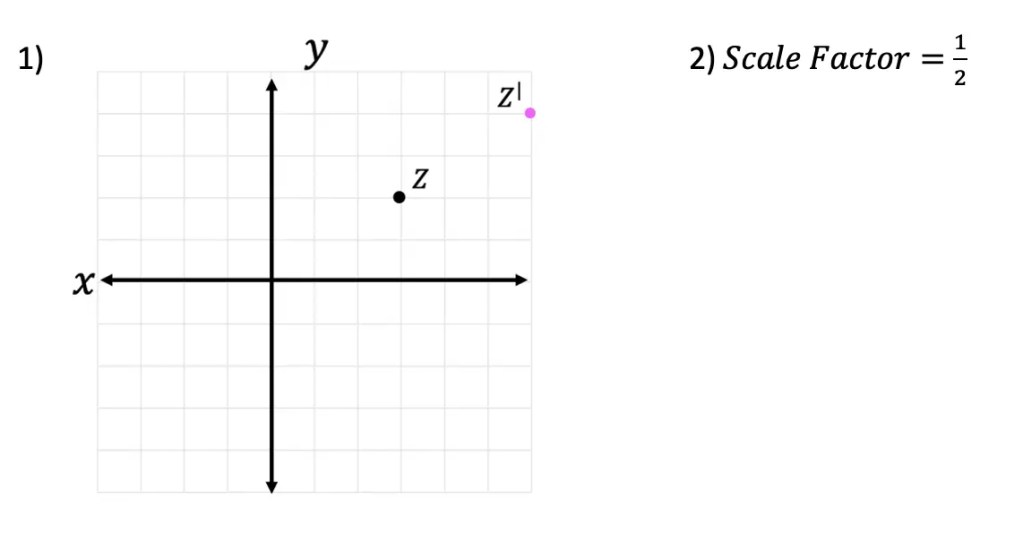
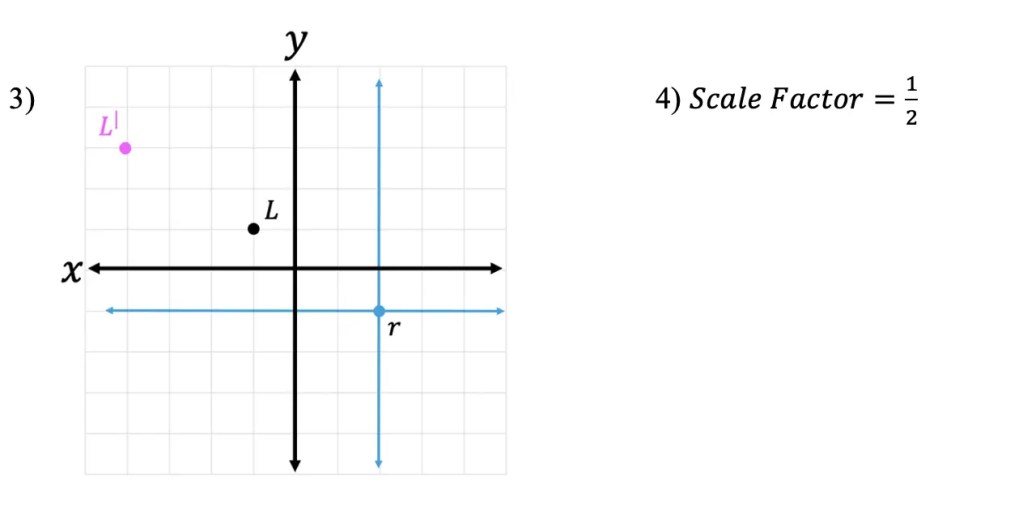
Practice Questions:
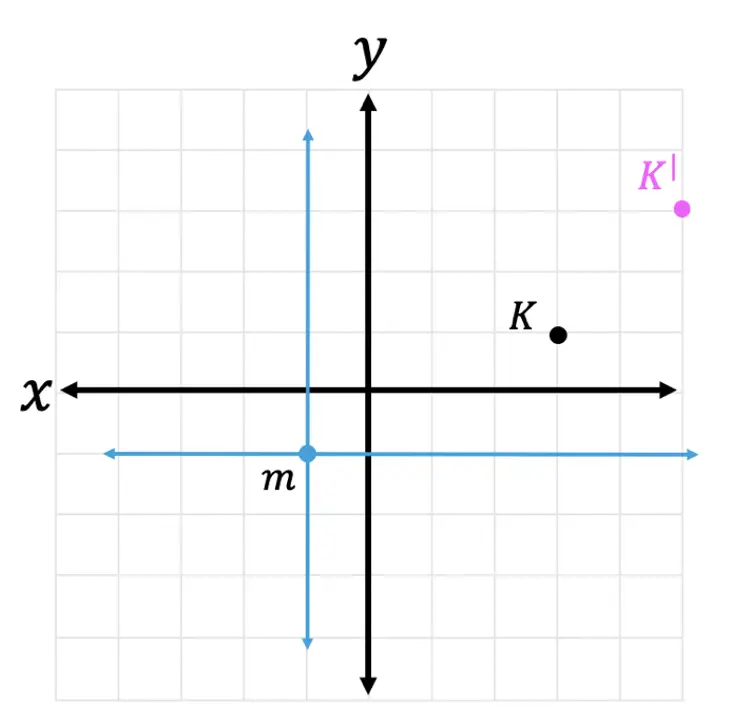
1) Plot the image of Point Z under a dilation about the origin by a scale factor of 2.
2) Triangle DEF is the image of triangle ABC after a dilation about the origin. What is the scale factor of the dilation?
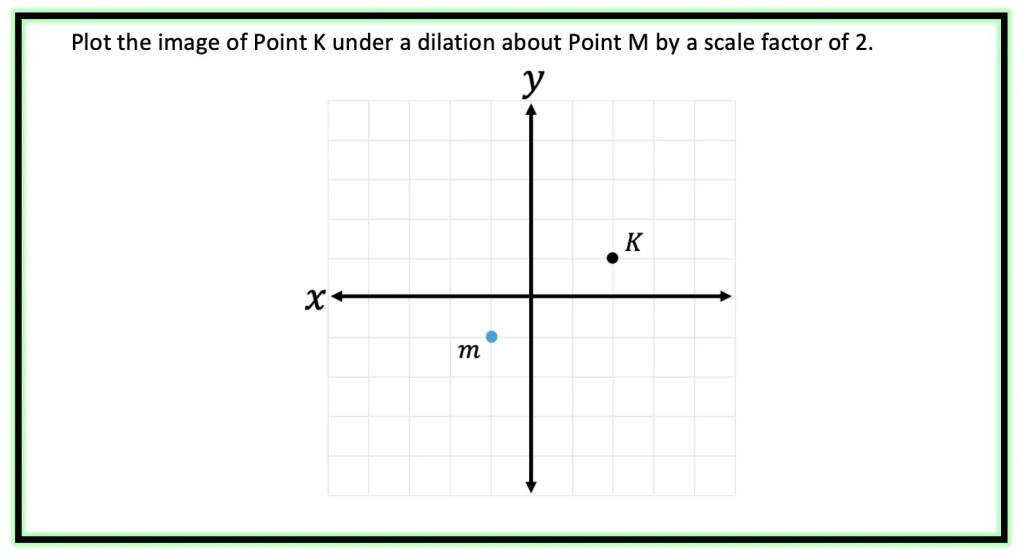
3) Point L is dilated by a scale factor of 2 about point r. Draw the dilated image of point L.
4) Line DE is the dilated image of line AB. What is the scale factor of the dilation?
Solutions:
Still got questions? No problem! Don’t hesitate to comment with any questions below. Thanks for stopping by and happy calculating! 🙂
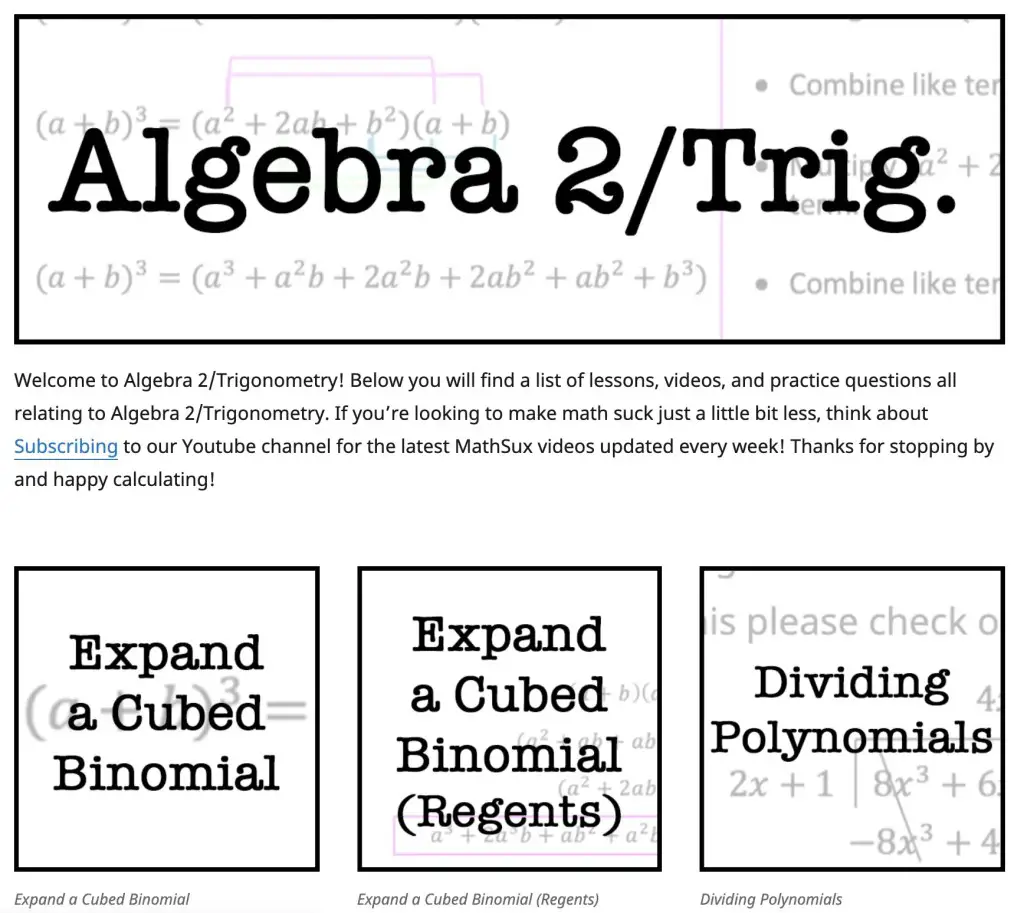
Ahoy and welcome math friends! For the latest installment, here is the Algebra 2 Cheat Sheet & Review made just for you to prepare for finals. On this page, you’ll also find links to the come math friends! For the latest installment, here is the Algebra 2 lesson playlist, the NYS Algebra 2 Common Core Regent’s Playlist, and the library of Geometry blog posts. Hope you find these resources helpful as the end of the school year approaches. Good luck on finals and happy calculating! 🙂
Algebra 2 Cheat Sheet:
Download and print the below .pdf for a quick and easy guide of everything you need to know for finals; From formulas to graphs, it’s on here.
Looking for a more detailed review? Check out the Youtube playlist for Algebra 2 below. It includes every MathSux video related to Algebra 2 and will be sure to help you ace the test!
Algebra 2 Common Core Regents Review:
This playlist is made especially for New York State dwellers as it goes over each and every question of the NYS Common Core Regents. Perfect if you are stuck on that one question! You will surely find the answer here.
Algebra 2 Blog Posts:
For anyone in search of blog posts and practice questions, check out MathSux’s entire Algebra 2 library organized by topic here.
Still got questions? No problem! Don’t hesitate to comment with any questions below. Also, if you find you need some motivation, check out my 6 tips and tricks for studying math here! Thanks for stopping by and happy calculating! 🙂
Get everything you need to know with this Algebra 2 Cheat Sheet and Review! Download and print the pdf for reviewing Algebra 2 or check out the video playlists for a more in-depth review of each topic. If you are living in NYS, you also might want to check out the NYS Regents Common Core Video as needed!
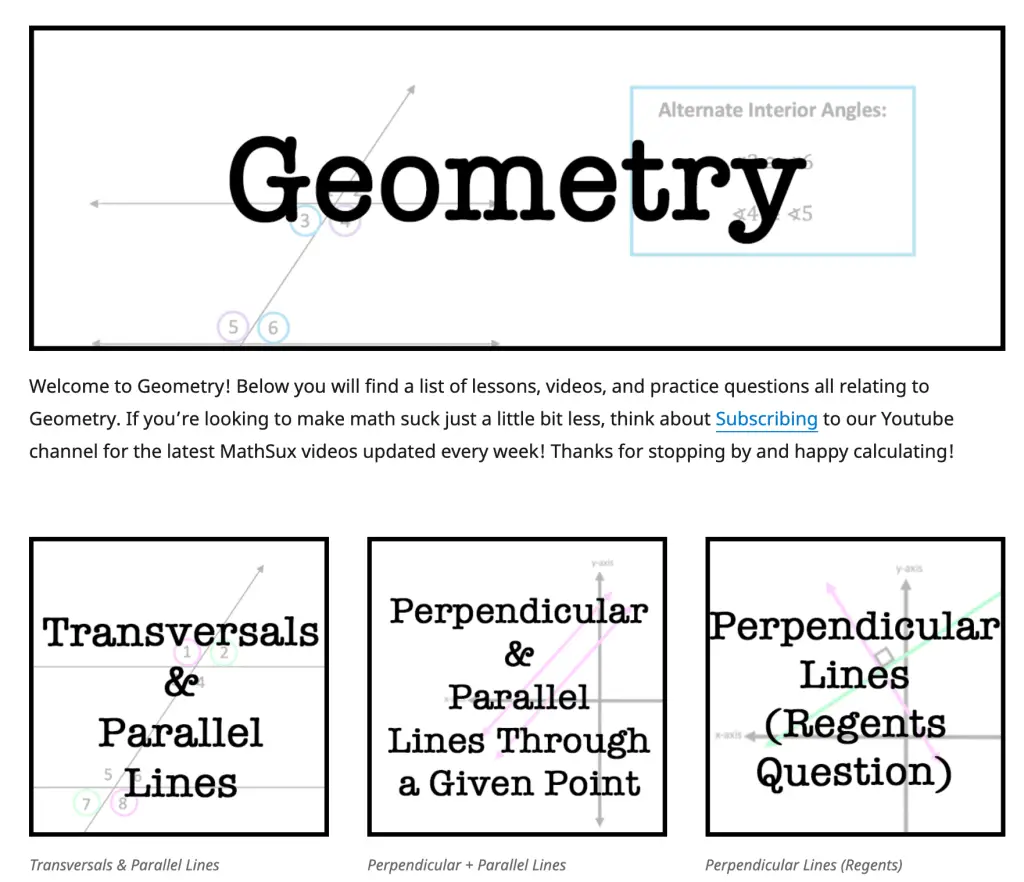
Greeting math peeps! As promised here is the Geometry Cheat Sheet and Review made just for you to prepare for finals. On this page, you’ll also find links to the Geometry lesson playlist, the NYS Geometry Common Core Regent’s Playlist, and the library of Geometry blog posts. Hope you find these resources helpful as the end of the school year approaches. Good luck on finals and happy calculating! 🙂
Geometry Cheat Sheet:
Download and print the below .pdf for a quick and easy guide of everything you need to know for finals; From formulas to shapes, it’s on here.
Looking for a more detailed review? Check out the Youtube playlist for Geometry below. It includes every MathSux video related to Geometry and will be sure to help you ace the test!
Geometry Common Core Regents Review:
This playlist is made especially for New York State dwellers as it goes over each and every question of the NYS Common Core Regents. Perfect if you are stuck on that one question! You will surely find the answer here.
Geometry Math Lessons for Review:
For anyone in search of blog posts and practice questions, check out MathSux’s entire Geometry library organized by topic here.
Still got questions? No problem! Don’t hesitate to comment with any questions below. Also, if you find you need some motivation, check out my 6 tips and tricks for studying math here! Thanks for stopping by and happy calculating! 🙂
Get everything you need to know with this Geometry Cheat Sheet and Review! Download and print the pdf for reviewing Geometry or check out the video playlists for a more in-depth review of each topic. If you are living in NYS, you also might want to check out the NYS Regents Common Core Video as needed!
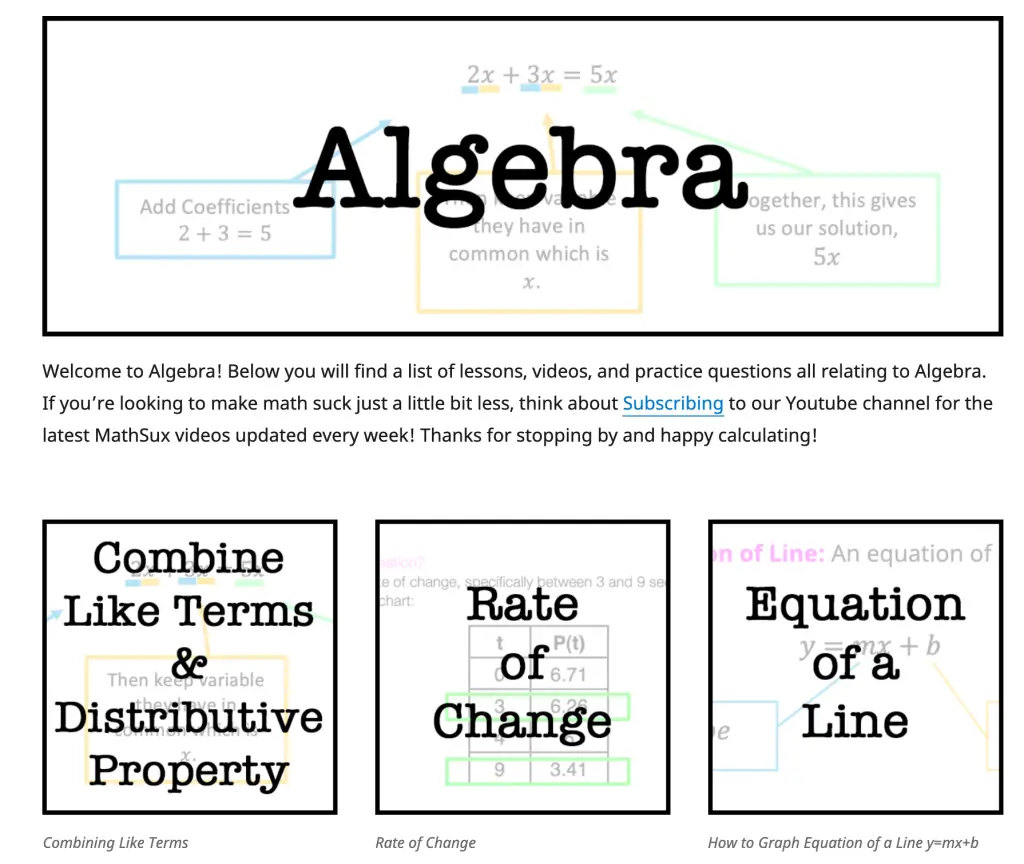
It’s that time of year again, summer is coming, the vacation vibes are calling, but so, unfortunately, are the test cramming and non-stop class reviewing that is coming our way. Nothing like going over topics mentioned at the beginning of the school year to bring us down. How is one supposed to remember everything? Fear not, because I have made a special cheat sheet and review for Algebra, (with Geometry and Algebra 2/Trig. soon to be on the way). I hope you’re staying safe, cool, and calm as the end of the year approaches. Good luck on finals and tests and happy calculating! 🙂
Algebra Cheat Sheet:
Download and print the below .pdf for a quick and easy guide of everything you need to know for finals; From formulas to parabolas, it’s on here.
Looking for a more detailed review? Check out the Youtube playlist for Algebra below. It includes every MathSux video related to Algebra and will be sure to help you ace the test!
Algebra Common Core Regents Review:
This playlist is made especially for New York State dwellers as it goes over each and every question of the NYS Common Core Regents. Perfect if you are stuck on that one question! You will surely find the answer here.
Algebra Blog Posts:
For anyone in search of blog posts and practice questions, check out MathSux’s entire Algebra library organized by topic here.
Still got questions? No problem! Don’t hesitate to comment with any questions below. Thanks for stopping by and happy calculating! 🙂
Get everything you need to know with this Algebra Cheat Sheet and Review! Download and print the pdf for reviewing Algebra or check out the video playlists for a more in-depth review of each topic. If you are living in NYS, you also might want to check out the NYS Regents Common Core Video as needed!
Happy Wednesday math peeps! In today’s post, we are going to go over Proving Similar Triangles, by going over:
1) What it means when two triangles are similar?
2) How to prove two triangles similar?
3) How to find missing side lengths given triangles are similar?
For even more practice, don’t forget to check out the video and practice problems below. Happy calculating! 🙂
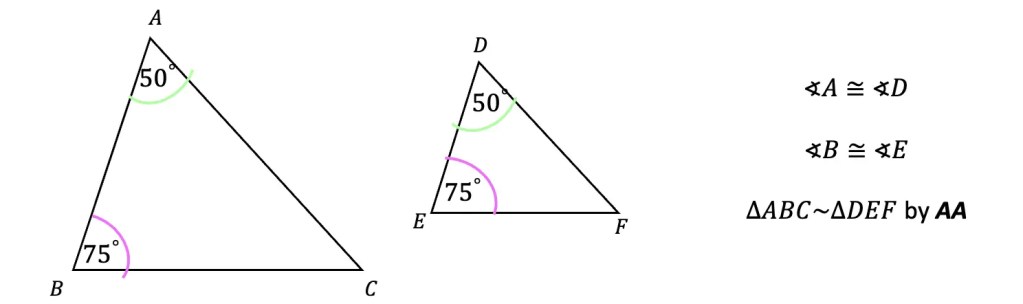
What are Similar Triangles?
When two triangles have congruent angles and proportionate sides, they are similar. This means they can be different in size (smaller or larger) but as long as they have the same angles and the sides are in proportion, they are similar! We use the “~” to denote similarity.
In the Example below, triangle ABC is similar to triangle DEF:
How can we Prove Triangles Similar?
There are three ways to prove similarity between two triangles, let’s take a look at each method below:
Angle-Angle(AA): When two different sized triangles have two angles that are congruent, the triangles are similar. Notice in the example below, if we have the value of two angles in a triangle, we can always find the third missing value which will also be equal.
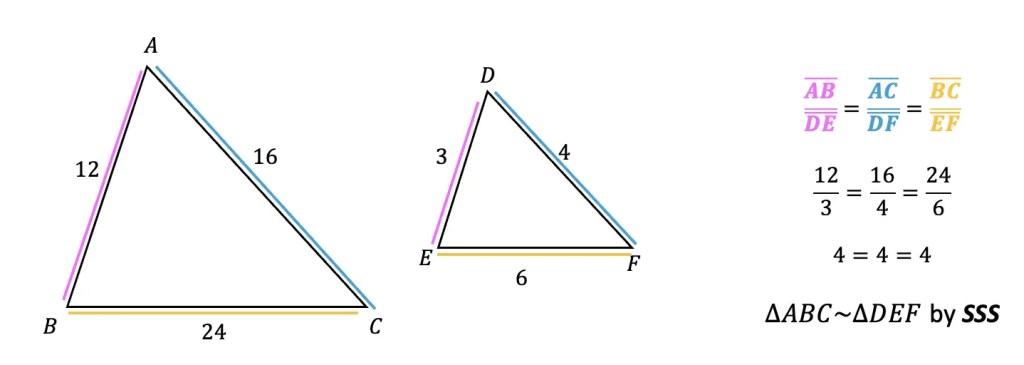
Side-Side-Side (SSS): When two different sized triangles have three corresponding sides in proportion to each other, the triangles are similar.
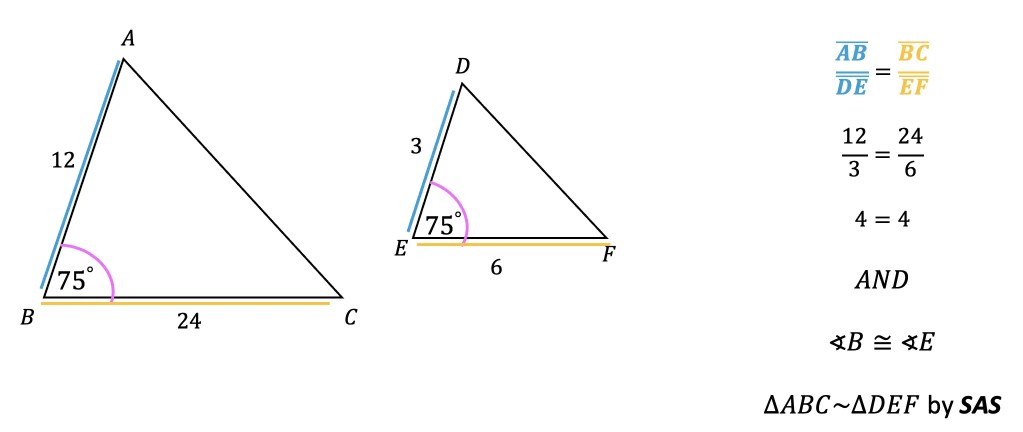
Side-Angle- Aside (SAS): When two different sized triangles have two corresponding sides in proportion to each other and a pair of congruent angles between each proportional side, the triangles are similar.
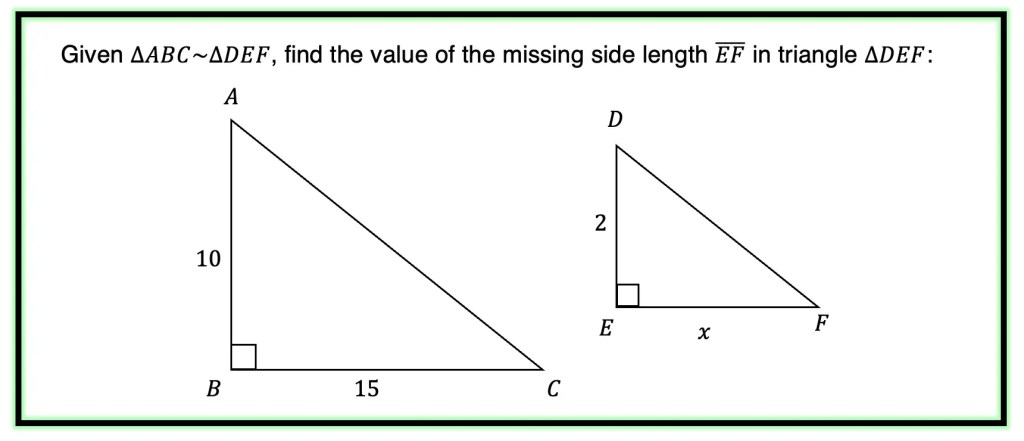
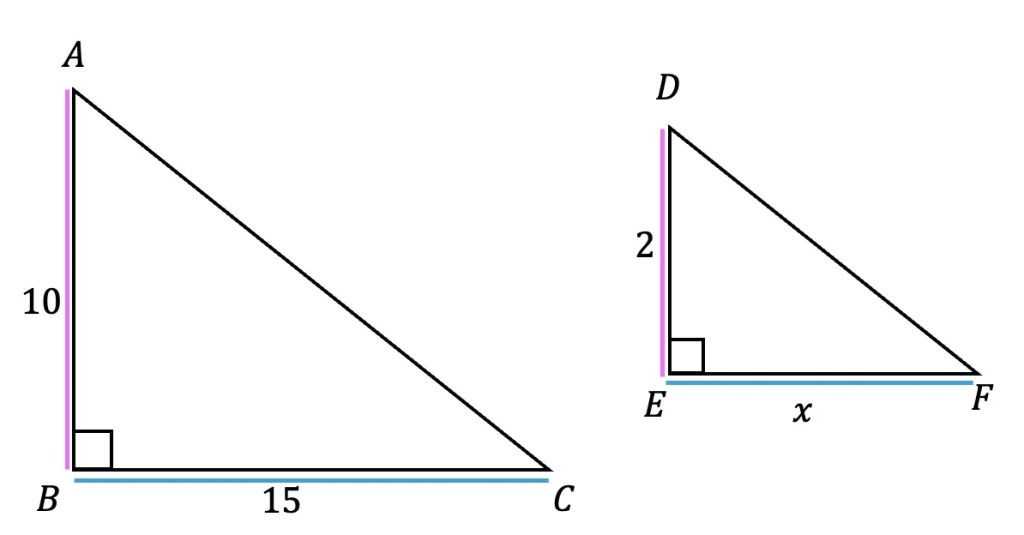
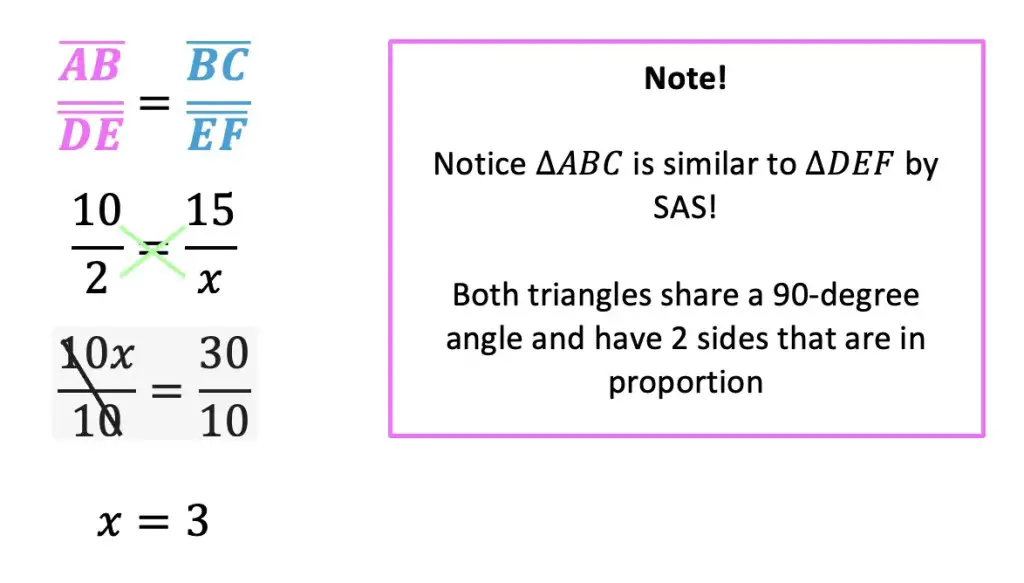
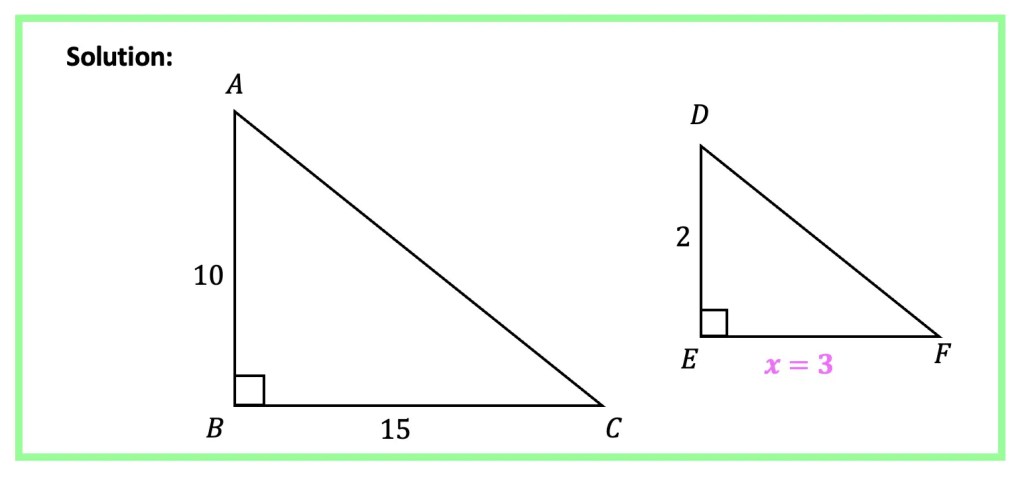
Let’s look at how to apply the above rules with the following Example:
Step 1: Since, we know the triangles ABC and DEF are similar, we know that their corresponding sides must be in proportion! Therefore, we can set up a proportion and find the missing value of length EF by cross multiplying and solving for x.
Practice Questions:
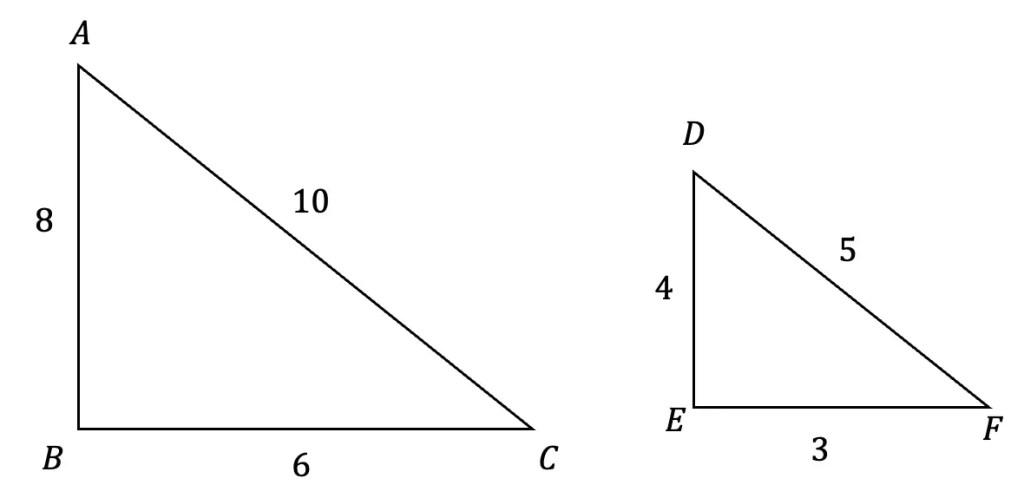
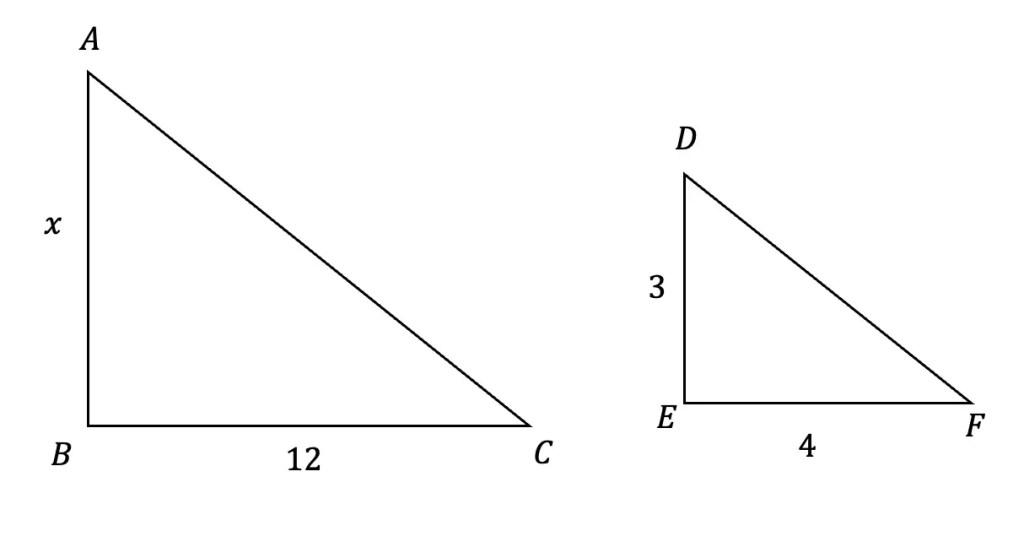
1) Are the following triangles similar? If so, how? Explain.
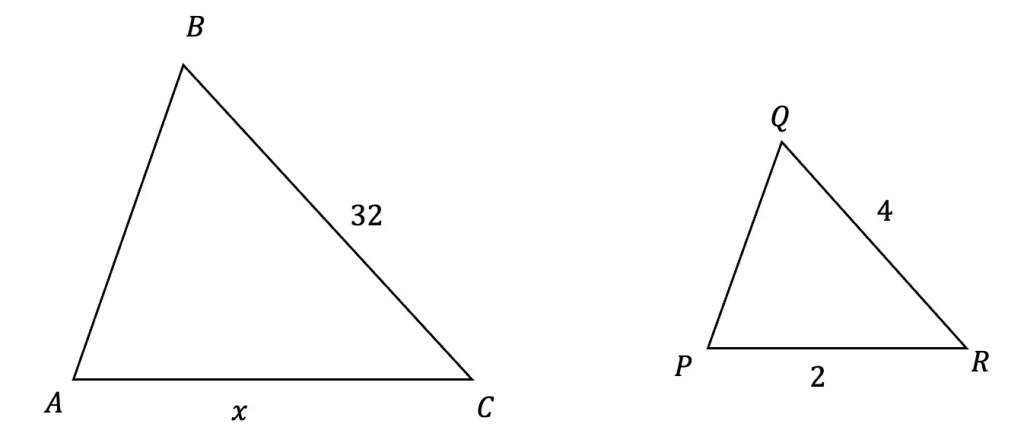
2) Are the following triangles similar? If so, how? Explain.
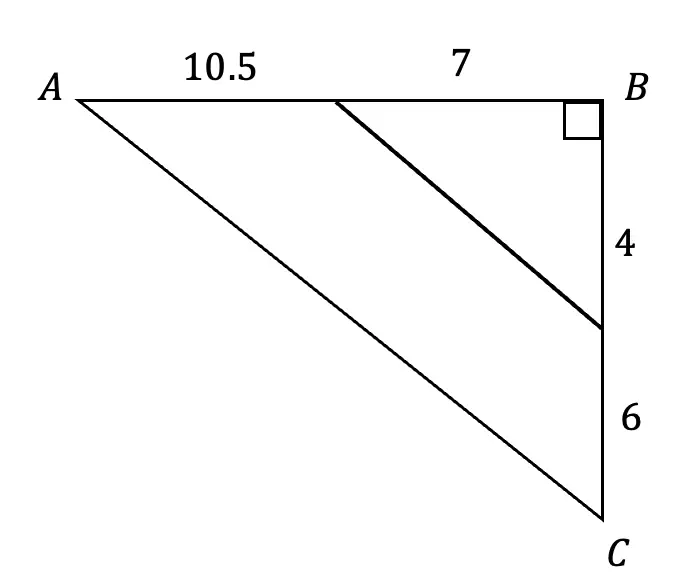
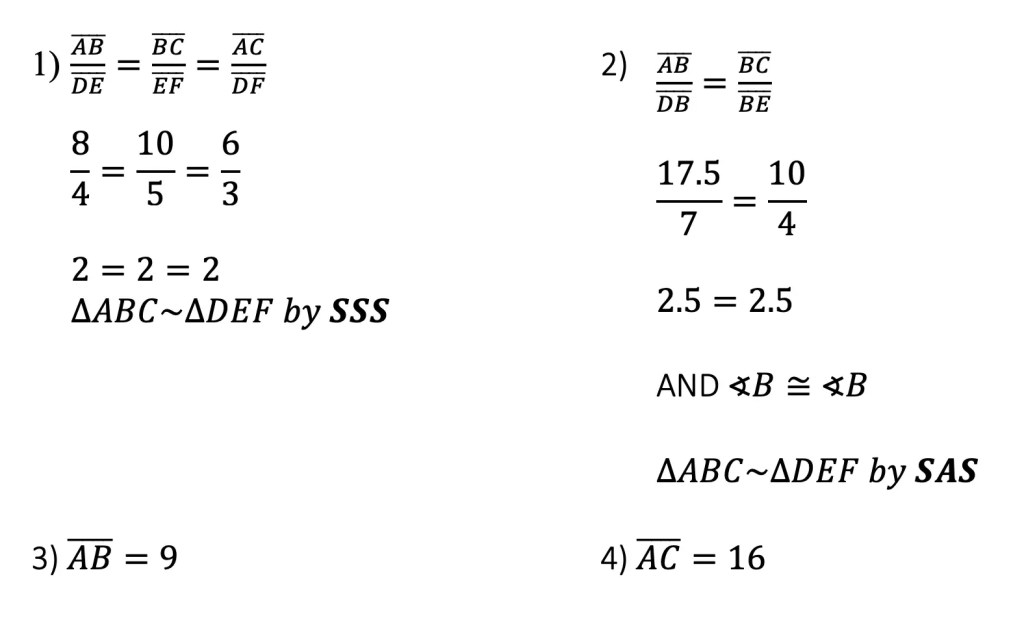
3) Given triangle ABC is similar to triangle DEF, find the side of missing length AB.
4) Given triangle ABC is similar to triangle PQR, find the side of missing length AC.
Solutions:
Still got questions? No problem! Don’t hesitate to comment with any questions below. Thanks for stopping by and happy calculating! 🙂
Hi everyone and welcome to MathSux! In this post, we are going to answer the question, what is the discriminant? Before going any further, if you need a review on what the quadratic equation or imaginary numbers are, check out each related link! Also, don’t forget to check out the video and practice questions below. Happy calculating! 🙂
What is the Discriminant?
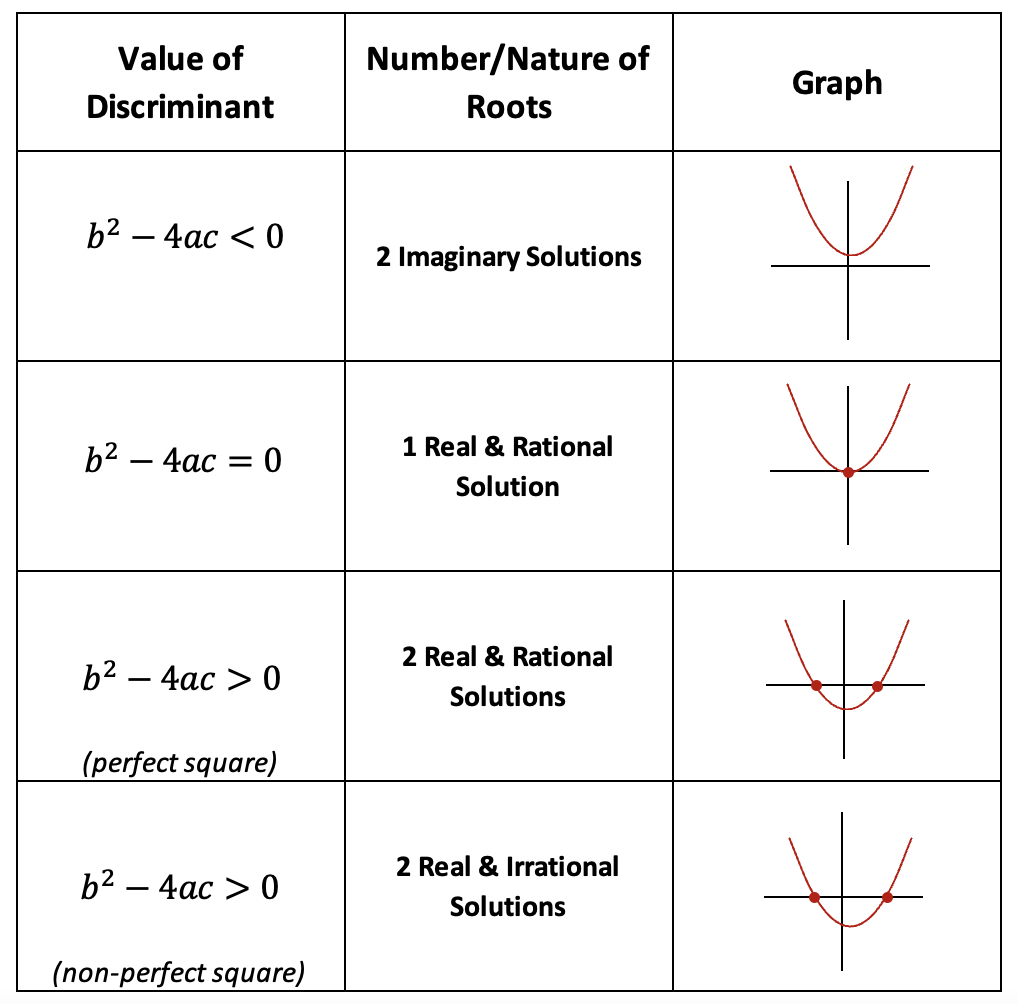
The discriminant is a formula we can use that tells us more about a quadratic equation including:
The number of solutions a quadratic equation has.
The “nature” of the roots of the solution (rational/irrational or real/imaginary).
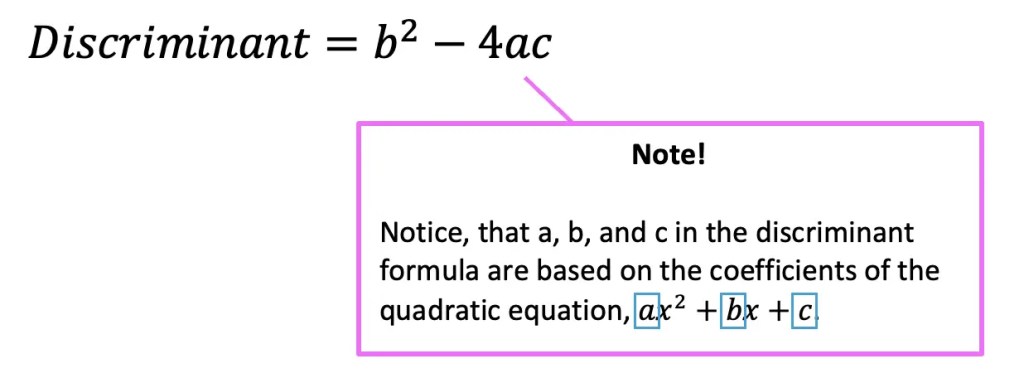
Discriminant Formula:
The discriminant formula may look familiar! It is part of the quadratic formula and we have seen it before, using the very same coefficients a, b, and c from the quadratic equation.
How does it Work?
When we find the value of the discriminant of any quadratic equation, it will give us a value that tells us how many solutions (or roots) a quadratic equation has. Remember when we say “roots” what we really mean are the x-value(s) of the quadratic equation that hit the x-axis. This value will also tell us if the solutions to the quadratic equation are rational/irrational or real/imaginary. Take a look at how it all breaks down below:
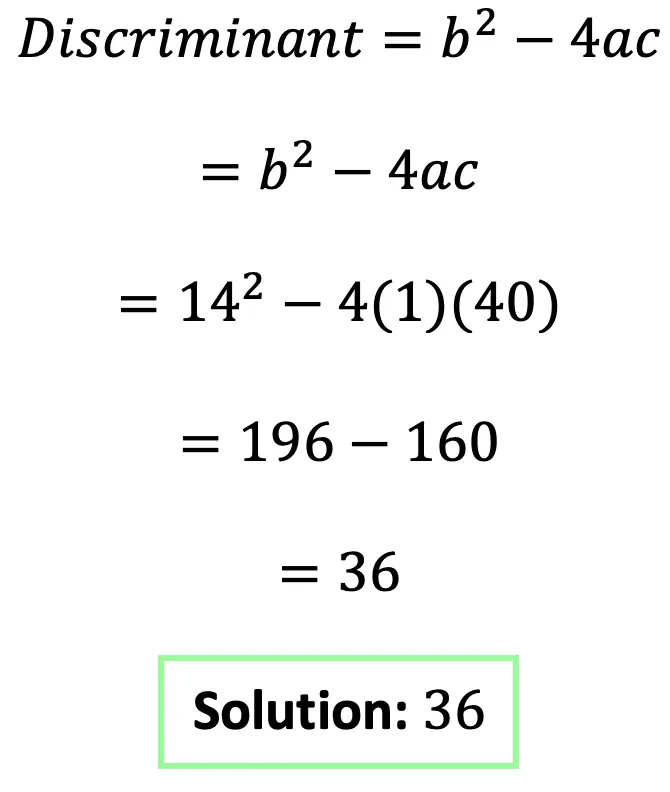
Now that we are familiar with the rules, let’s take a look at an Example:
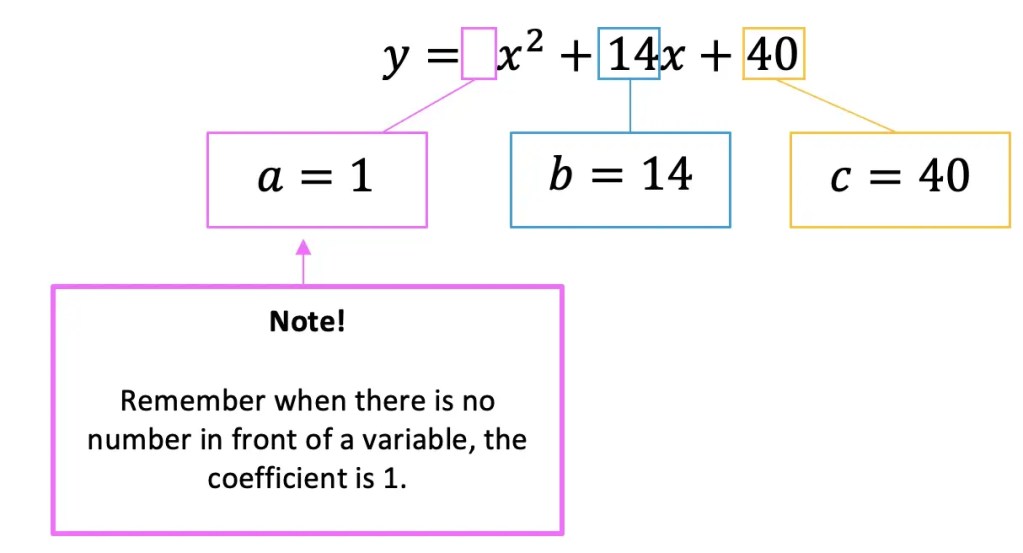
Step 1: First let’s write out our quadratic equation and identify the coefficients a, b, and c so they are ready to be plugged into our discriminant formula.
Step 2: Now let’s write out and fill in our formula using the coefficients and solve.
Step 3: Now let’s analyze our answer! Since, we got a discriminant value of 36, notice that it is a positiveperfect square! If we look back at our discriminant table, this tells us that our quadratic equation is going to have 2 real and rational solutions.
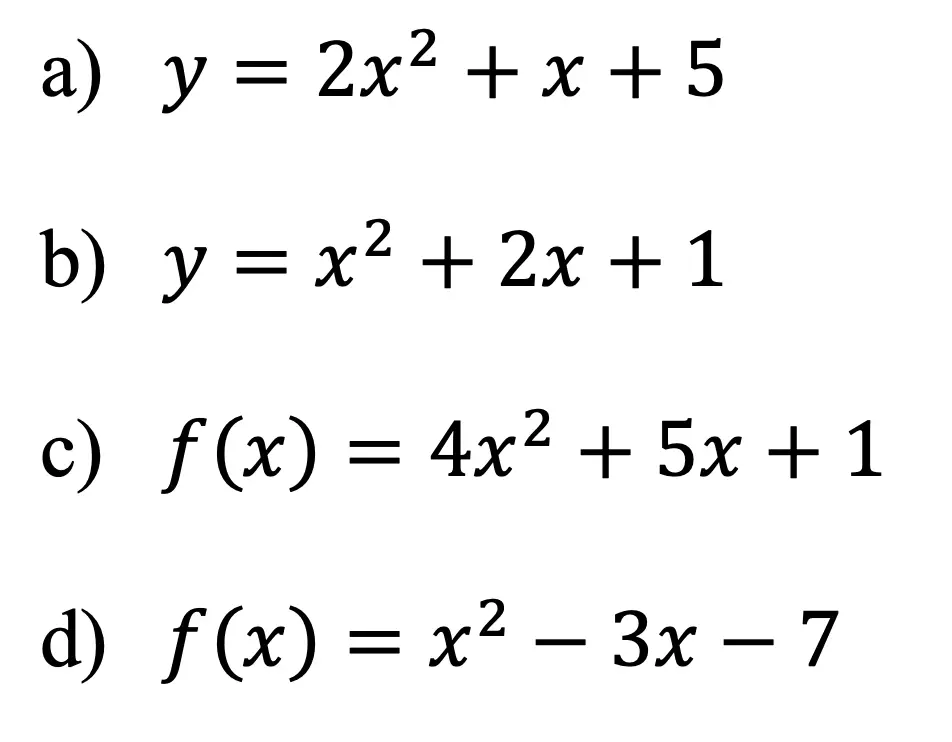
Practice Questions:
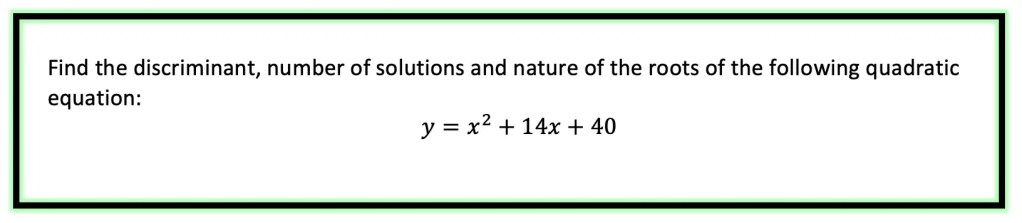
Find the discriminant, number of solutions and nature of the roots of the following quadratic equations:
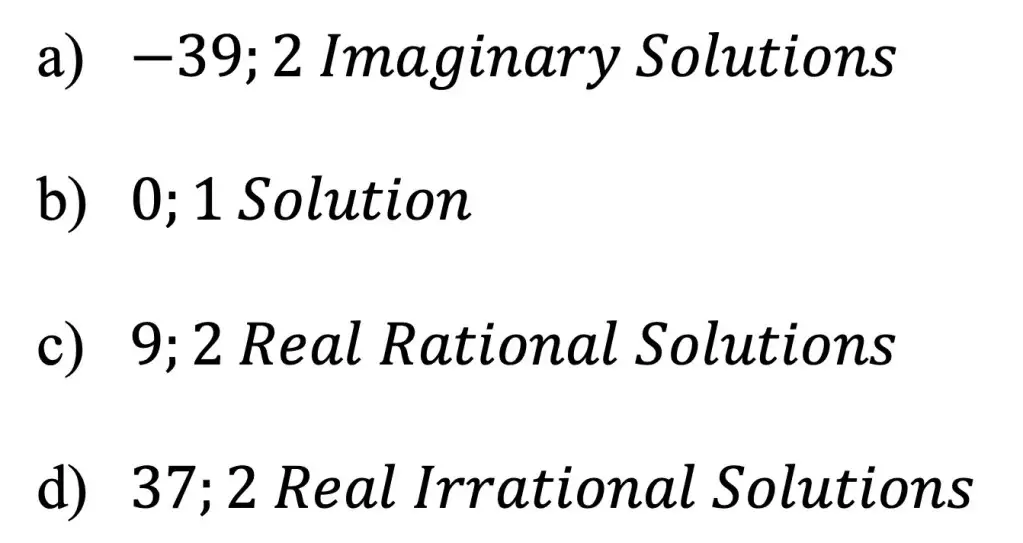
Solutions:
Still got questions? No problem! Don’t hesitate to comment with any questions below or check out the video above. Thanks for stopping by and happy calculating! 🙂