Math + Art: Math Behind Perspective Drawing

Greetings! We are going to do something a little different today and explore Math + Art: Math Behind Perspective Drawing. For all the artists out there who tend to not generally gravitate towards math, this post is for you! There are many ways math can be connected to art, and in this post we will explore the role parallel and perpendicular lines play when it comes to drawing 3-D shapes. And for those who want to learn even more, don’t forget to check out the video below to see how 2-point perspective applies geometry and angles to create 3-D shapes.

What is Perspective Drawing?

Perspective drawing is an art technique that allows us to draw real life objects in 3-D on a flat piece of paper. Notice in the example below that buildings, trees, and power lines get smaller and smaller as we look into the distance just as they would in real life.

Math Behind Perspective Drawing

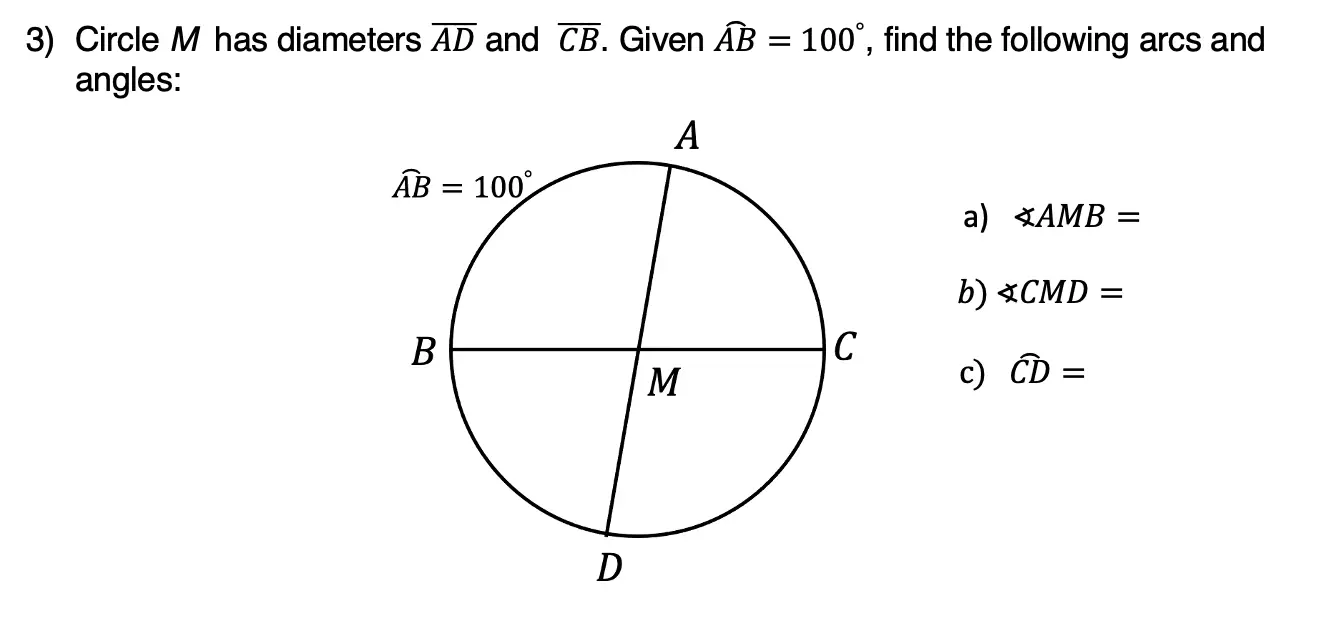
What are the Basics of Perspective Drawing?

Math Behind Perspective Drawing

There are two main things we need to know about perspective drawing.

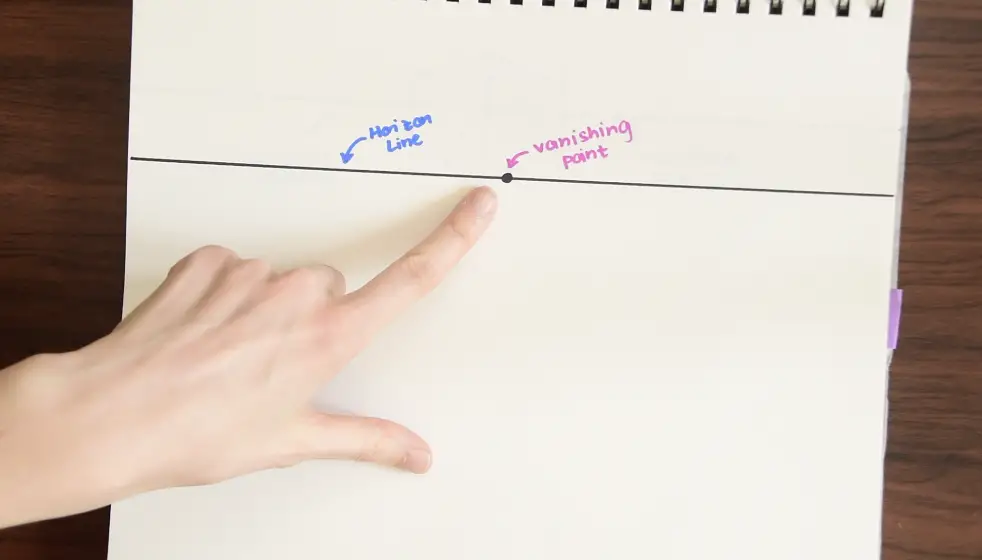
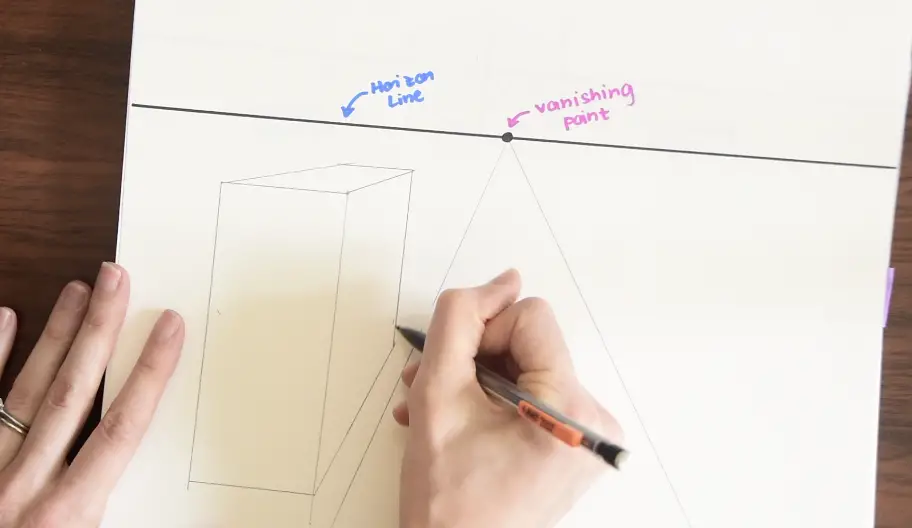
1- Horizon Line: A horizontal line that goes across the entire paper. This represents where land and sky meet.

2- Vanishing Point: This is where many of our lines will be directed in order to create that 3-D affect.

Where do I Begin?

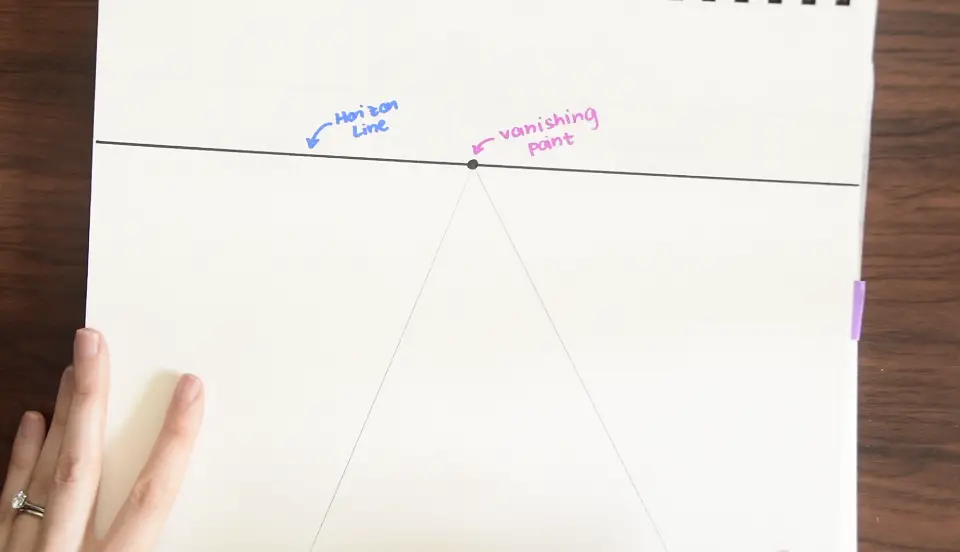
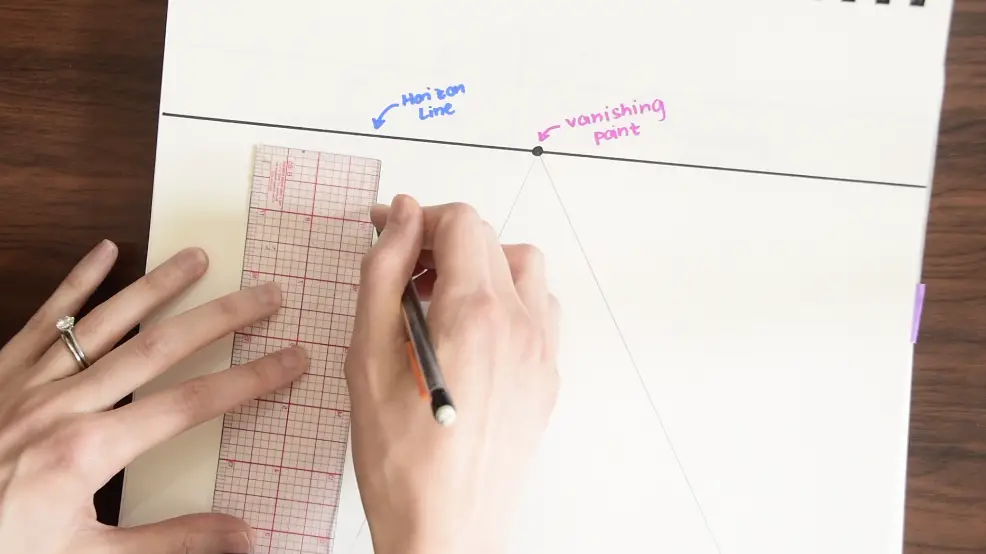
Step 1- Now that we have our horizon line and vanishing point, we can start by drawing a road. Use a ruler to draw two lines that lead to the vanishing point, this should resemble a triangle.

Step 2-From here we can start to draw a building by creating two straight lines that are perpendicular to our horizon line.

Math Behind Perspective Drawing

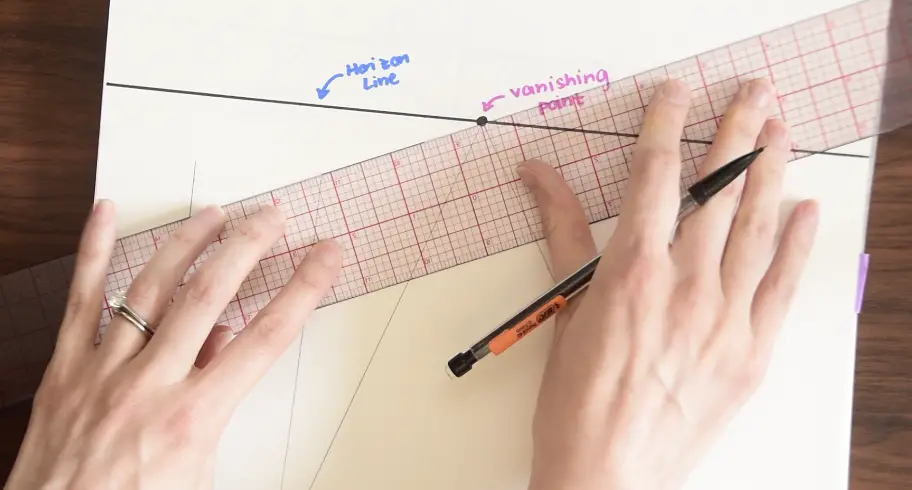
Step 3-Then line up the outermost corner of the building with the vanishing point using a ruler, and draw a line. Do this with each corner of our rectangle for a 3-D effect.
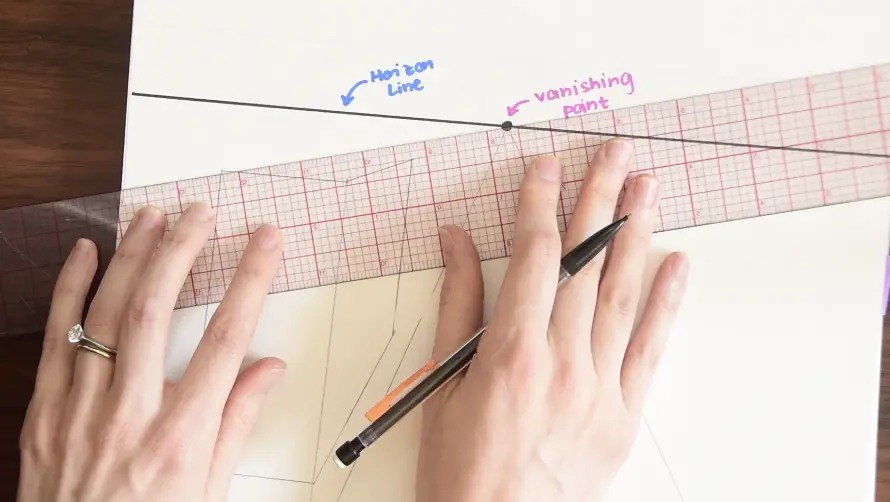
Math Behind Perspective Drawing

Step 3- continued….

Math Behind Perspective Drawing

Step 4- For the remaining lines, use parallel and perpendicular lines to finish off our building.

Math Behind Perspective Drawing

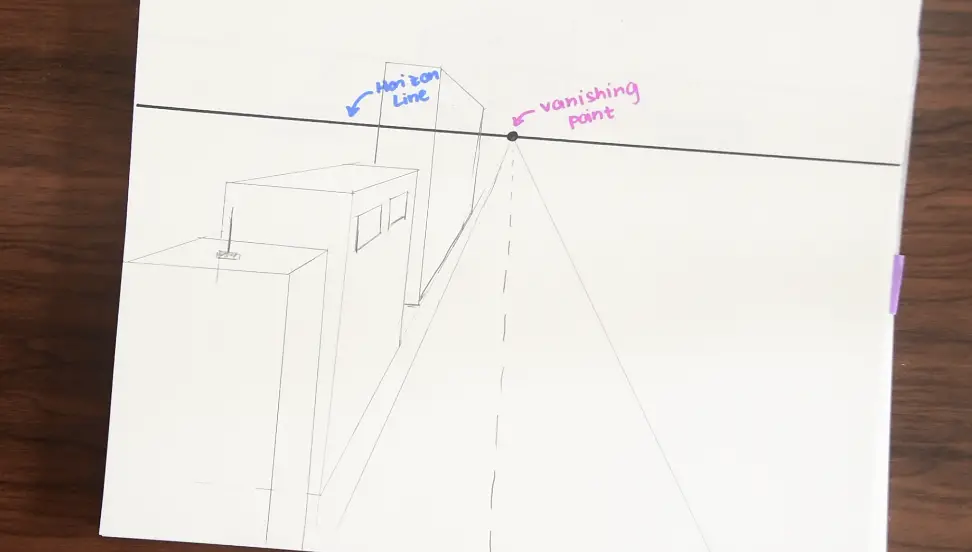
Step 5- Get creative! Add more buildings, windows, antennas, and anything else you might see in a city -scape. Use your imagination! 🙂

This method of perspective drawing is called one-point perspective because there is one vanishing point. But there are also 2-point and 3-point perspectives we can draw!

Want to learn how to do 2-Point Perspective drawing with 2 vanishing points!? Check out the video above to see how geometry and angles are related to this technique of perspective drawing!

Still got questions or want to learn more about perspective drawing? No problem! Don’t hesitate to comment with any questions below. Thanks for stopping by and happy calculating! 🙂

Facebook ~ Twitter ~ TikTok ~ Youtube

For more math + art, check out this post on fractals found in nature here.

How to Construct a 45 Degree Angle with a Compass

Greeting math friends and welcome to another wonderful week of MathSux! In today’s post we are going to break down how to construct a 45 degree angle with a compass. We will take this step by step starting with a simple straight edge, then we will create a 90 degree angle, and finally we will use an angle bisector to bisect that 90 degree angle to get two 45 degree angles. If you have any questions please don’t hesitate to check out the video and step-by-step GIF below. Thanks so much for stopping by and happy calculating! 🙂

How to Construct a 45 degree Angle with a Compass

How to Construct a 45 Degree Angle with a Compass:

Step 1: Using a straightedge or a ruler, draw a straight line, labeling each end point A and B.

Step 2: Next, using a compass, place the point of the compass on the edge of point A and draw a circle.

Step 3: Keeping the same length of the compass, take the point of the compass to the point where the circle and line AB intersect. Then swing the compass to make a new arc on the circle above line AB.

Step 4: Keeping that same length of the compass, go to the new intersection we just made and mark another arc along the circle.

Step 5: Now, take a new length of the compass (any will do), and bring it to one of the intersections we made on the circle.  Then create a new arc above the circle by swinging the compass.

Step 6: Keep the same length of the compass, bring the compass to the other intersection we made on our circle to create a new arc above the circle.

Step 7: Mark a point where these two lines intersect and using a straight edge, connect this intersection to point A. Notice this forms a 90 degree angle (or a right angle).

Step 8: Now to bisect our newly made 90 degree angle, we are going to focus on the pink highlighted points where the original circle intersects with line AB and our newly made line.

Step 9: Using a compass (any length), we are going to take the compass point to one of these hi-lighted points and draw another arc.

Step 10: Keeping that same length of the compass, go to the other highlighted point and make another arc as well.

Step 11: Now with a straight edge, draw a line from point A to the new intersection of arcs we just made.

Step 12: Notice we split or 90 degree angle in half and now have two equal 45 degree angles?!

Still got questions? No problem! Don’t hesitate to comment with any questions below or check out the video above. Thanks for stopping by and happy calculating! 🙂

Constructions and Related Posts:

Looking to construct more than just a square inside a circle? Check out these related posts and step-by-step tutorials on geometry constructions below!

Construct an Equilateral Triangle

Perpendicular Line Segment through a Point

Angle Bisector

Construct a Square Inscribed in a Circle

Altitudes of a Triangle (Acute, Obtuse, Right)

How to Construct a Parallel Line

Bisect a Line Segment

Best Geometry Tools!

Looking to get the best construction tools? Any compass and straight-edge will do the trick, but personally, I prefer to use my favorite mini math toolbox from Staedler. Stadler has a geometry math set that comes with a mini ruler, compass, protractor, and eraser in a nice travel-sized pack that is perfect for students on the go and for keeping everything organized….did I mention it’s only $7.99 on Amazon?! This is the same set I use for every construction video in this post. Check out the link below and let me know what you think!

Facebook ~ Twitter ~ TikTok ~ Youtube

Looking for more constructions? Check out how to construct a square inscribed in a circle and an equilateral triangle by clicking on their respective links! And if you’re looking for even more geometry constructions, check out the link here!

How to find the Area of a Parallelogram: Geometry

Hey math peeps! In today’s post, we are going to go over how to find the area of a parallelogram. There is an easy formula to remember, A=bh, but we are going to look at why this formula works in the first place and then solve a few examples. Just a quick warning: The following examples do use special triangles and if you are need of a review, check out the posts here for 45 45 90 and 30 60 90 special triangles. Also, don’t forget to watch the video and try the practice problems below. Thanks so much for stopping by and happy calculating!

Area of a Parallelogram Formula:

How to find the Area of a Parallelogram

Why does the Formula for Area of a Parallelogram work?

Did you notice that the formula for area of a parallelogram above, base times height, is the same as the area formula for a rectangle?  Why?

If we cut off the triangle that naturally forms along the dotted line of our parallelogram, rotated it, and placed it on the other side of our parallelogram, it would naturally fit like a puzzle piece and create a rectangle! Check it out below:

How to find the Area of a Parallelogram

Now that we know where this formula comes from, let’s see it in action in the examples below:

Example #1:

How to find the Area of a Parallelogram

Step 1: Write out the formula:

Step 2:  Fill in the formula with values found on our parallelogram, b=12 inches h=4 inches, and multiply them together to get 48 inches squared.

How to find the Area of a Parallelogram

That was a simple example, but lets try a harder one that involves special triangles.

Example #2:

How to find the Area of a Parallelogram

Step 1: Write out the formula:

Step 2:  Label the values found on our parallelogram, b=10 ft and notice that we are going to need to find the value of the height.

Step 3: In order to find the value of the height, we need to remember our special triangles! We are not given the value of the height, but we are given some value of the triangle that is formed by the dotted line.  Let us take a closer look and expand this triangle:

Step 4: We can add in the missing 45º degree value so that our triangle now sums to 180º.

Step 5: Remember 45 45 90 special triangles(If you need a review click the link). Because that is exactly what we are going to need to find the value of the height! Below is our triangle on the left, and on the right is the 45 45 90 triangle ratios we need to know to find the value of the height.

Based on the above ratios, we can figure out that the height value is the same value as the base of the triangle, 2.

Step 6: If we place our triangle back into the original parallelogram, we can plug in our value for the height, h=2, into our formula to find the area:

How to find the Area of a Parallelogram

When you’re ready, check out the practice questions below!

Practice Questions:

Find the area of each parallelogram:

Solutions:

Still got questions? No problem! Don’t hesitate to comment with any questions or check out the video above. Happy calculating! 🙂

Facebook ~ Twitter ~ TikTok ~ Youtube

Bisect a Line Segment

Hi everyone and welcome to MathSux! In this post we are going to be constructing a perpendicular bisector by using a compass and stright edge. A perpendicular bisector, (also known as a segment bisector), is a line that cuts a line segment in half and creates four 90º angles. It is a super fast and super simple construction! We’ll also go over the Perpendicular Bisector Theorem we can infer from our original construction. If you’re looking for more geometric constructions, don’t forget to check more out here. Thanks so much for stopping by and happy calculating! 🙂

What is the Perpendicular Bisector of a line segment?

  • A perpendicular bisector slices our line segment AB (or any line segment) in half at its midpoint, creating two equal halves.
  • This will also create a 90º angle ( or right angle) about the line.
Constructing a Perpendicular Bisector through line segment AB

What is happening in this GIF?

Step 1: Notice we are given line segment AB. First, we are going to measure out a little more than halfway across the line segment AB by using a compass.

Step 2: Next we are going to place the point of the compass on point A and swing above and below line segment AB to create a half circle.

Step 3: Keeping the same distance on our compass, we are then going to place the point of the compass onto Point B (the opposite side) and repeat the same step we did on point A, drawing an arc in the shape of a semi-circle.

Step 4: Notice the intersection point above and below line segment AB!? Now, we are going to connect these two points by drawing a line with a ruler or straightedge.

Step 5: Yay! We now have a segment bisector! This cuts line segment AB right at its midpoint, while also dividing line segment AB into two equal halves and creating a 90º angle around our two intersecting lines.

Perpendicular Bisector Theorem:

The Perpendicular Bisector Theorem explains that any point along the perpendicular bisector line we just create is equidistant to each end point of the original line segment (in this case line segment AB).

Therefore, if we were to draw points C,D, and E along the perpendicular bisector, then draw imaginary lines stemming from these points to each end point, we’d get something like the image below:

AC = CB

AD = DB

AE = EB

Line Segment Theorem

Notice that with each of our points on the perpendicular line above, we can now state that the following is true:

AC = CB

AD = DB

AE = EB

The fact that we can state the above is true is reason for the Perpendicular Bisector Theorem!

Constructions and Related Posts:

Looking to construct more than just a perpendicular segment bisector? Check out these related posts and step by step tutorials on geometry constructions below!

Construct an Equilateral Triangle

Perpendicular Line through a Point

Angle Bisector

Construct a 45º angle

Altitudes of a Triangle (Acute, Obtuse, Right)

Construct a Square inscribed in a Circle

Best Geometry Tools!

Looking to get the best construction tools? Any compass and straight edge will do the trick, but personally, I prefer to use my favorite mini math toolbox from Staedler. Stadler has a geometry math set that comes with a mini ruler, compass, protractor, and eraser in a nice travel-sized pack that is perfect for students on the go and for keeping everything organized….did I mention it’s only $7.99 on Amazon?! This is the same set I use for every construction video! Check out the link below and let me know what you think!

Still got questions? No problem! Don’t hesitate to comment with any questions below or check out the video above. Thanks for stopping by and happy calculating! 🙂

Facebook ~ Twitter ~ TikTok ~ Youtube

Want to see how to construct a square inscribed in a circle? Or maybe you want to construct an equilateral triangle? Click on each link to view each construction! And if you’re looking for even more geometry constructions, check out the link here! And if you’re looking for a construction you don’t yet see, please be sure to suggest it in the comments below!

Inscribed Angles & Intercepted Arcs: Geometry

Ahoy math friends and welcome to MathSux! In this post, we are going to go over the inscribed angle theorem which dives into inscribed angles and intercepted arcs. We’ll break down the main basic rule for inscribed angle theorem and the three inscribed angle theorems associated with this rule. If you are looking for more circle theorems, check out these posts on the Intersecting Secants Theorem and Central Angles Theorem. Also, don’t forget to check out the video and practice questions to truly master the topic below. Happy calculating! 🙂

Inscribed Angles:

When two chords come together to touch the outline of a circle, they create something called an inscribed angle. Unlike central angles, an inscribed angle is equal to half the measure of the arc length. In the example below, we can see that the inscribed angle ACB is equal to 25º while its corresponding intercepted arc AB is twice the inscribed angle at 50º. Knowing this allows us to find the value of unknown arcs or inscribed angles.

Inscribed Angles & Intercepted Arcs

Inscribed Angle Theorem:

There are three parts to the inscribed angle theorem to know based on the rule stated above, check them out below!

The inscribed angle theorem states that, in a circle when two inscribed angles intercept the same arc, the angles are congruent. Notice below how angle A and angle B both have the same arc CD (hi-lighted in pink). In this theorem, we have two inscribed angles, angle A and angle B, that intercept the same arc, arc CD.

Inscribed Angles & Intercepted Arcs

Theorem #2: In a circle when an angle is inscribed by a semicircle, it forms a  90º angle (or a right angle). If you look at angle BAC below, you’ll notice that the arc it corresponds with is a semicircle and that angle BAC forms a right angle.

Theorem #3: When a quadrilateral is inscribed within a circle, the opposite angles formed are supplementary, meaning that they add to 180º. The proof below shows angles A and C (hi-lighted in green) as supplementary, but this proof would also work for opposite angles B and D (hi-lighted in pink).

Inscribed Angles & Intercepted Arcs

Let’s look at how to apply these rules with an Example:

a) Step 1: To find the value of angle CDB we need to look at our given information. We know that angle CAB=85º, notice that this follows theorem number 3, “When a quadrilateral is inscribed in a circle, opposite angles are supplementary.” Therefore, we must subtract 110º from 180º to find the value of angle CDB.

b) Step 2: For finding angle ABD, we’re going to use the same theorem we used in part a, opposite supplementary angles of an inscribed quadrilateral are supplementary.

c) Step 3: Next, to find the value of arc ABD, we need to use the basic inscribed angle theorem that tells us an inscribed angle is equal to half the measure of its arc. Then use some basic algebra to solve for arc ABD.

d) Step 4: To find arc ACD, we need to use the basic inscribed angle theorem that tells us an inscribed angle is equal to the value of its arc, then use algebra to solve similar to part c.

If this looks confusing, check out the video above! And when you are ready master this topic with the practice questions below!

Practice Questions:

Use the inscribed angle theorem outlined above to answer the following questions.

Solutions:

Still got questions?  No problem! Check out the video above or comment below for any questions and follow for the latest MathSux posts. Happy calculating! 🙂

Facebook ~ Twitter ~ TikTok ~ Youtube

Looking for more posts on Circle Theorems? Check out the posts below!

Circle Theorems & Formulas

Central Angle Theorem

Intersecting Secants Theorem

Area of a Sector

Circle Theorems

Square Inscribed in a Circle Construction

Greetings math friends and welcome to MathSux! In this week’s post, we are going to take a step-by-step look at how a square inscribed in a circle construction works! Within this post we have a video, a GIF, and a step-by-step written explanation below, the choice of learning how to do this construction is up to you! Happy Calculating! 🙂

Square Inscribed in a Circle Construction

How to Construct a Square Inscribed in Circle:

Step 1: First, we are going to draw a circle using a compass (any size).

Step 2: Using a ruler, draw a diameter or straight line across the length of the circle, going through its midpoint.

Step 3: Next, open up the compass across the circle. Then take the point of the compass to one end of the diameter and swing the compass above the circle, creating an arc.

Step 4: Keeping that same length of the compass, go to the other side of the diameter and swing above the circle again making another arc until the two arcs intersect.

Step 5: Now, we are going to repeat steps 3 and 4, this time creating arcs below the circle using the same compass size.

Step 6: Connect the point of intersection above and below the circle using a ruler or straight edge. This creates a perpendicular bisector, cutting the diameter in half and forming a 90º angle.

Step 7: Lastly, we are going to use a ruler to connect each corner point to one another creating a square!

Constructions and Related Posts:

Looking to construct more than just a square inside a circle? Check out these related posts and step-by-step tutorials on geometry constructions below!

Construct an Equilateral Triangle

Perpendicular Line Segment through a Point

Angle Bisector

Construct a 45º angle

Altitudes of a Triangle (Acute, Obtuse, Right)

How to Construct a Parallel Line

Bisect a Line Segment

Best Geometry Tools!

Looking to get the best construction tools? Any compass and straight-edge will do the trick, but personally, I prefer to use my favorite mini math toolbox from Staedler. Stadler has a geometry math set that comes with a mini ruler, compass, protractor, and eraser in a nice travel-sized pack that is perfect for students on the go and for keeping everything organized….did I mention it’s only $7.99 on Amazon?! This is the same set I use for every construction video in this post. Check out the link below and let me know what you think!

Still got questions? No problem! Don’t hesitate to comment with any questions or concerns below. Also if you’re looking for a different type of construction you don’t yet see here, please let me know! Happy calculating! 🙂

Let’s be friends! Check us out on the following social media platforms for even more free MathSux practice questions and videos:

Facebook ~ Twitter ~ TikTok ~ Youtube

Looking for something similar to square inscribed in a circle construction? Check out this post here on how to construct and equilateral triangle here! And if you’re looking for even more geometry constructions, check out the link here!

30 60 90 Triangle

Hi everyone and welcome to MathSux! In this post, we are going to break down 30 60 90 degree special right triangles. What is it? Where did it come from? What are the ratios of its side lengths and how do we use them? You will find all of the answers to these questions about this right angled triangle in this post. Also, don’t forget to check out the video below and practice questions at the end of this post to truly become a 30 60 90 special right triangle master! Happy calculating! 🙂

If you want to learn about the other special triangle, 45 45 90 triangle, check out this post here. And if you’re looking to make math suck just a little bit less? Subscribe to our Youtube channel for free math videos every week! 🙂

Facebook ~ Twitter ~ TikTok ~ Youtube

30 60 90 Triangle Ratio:

30 60 90 triangle side lengths

Notice that the 30 60 90 triangle is made up of one right angle across from the hypotenuse (which is always going to be the longest side), a 60 degree angle with a longer leg on the opposite side, and a 30 degree angle measure across from the shorter leg.

What is a 30 60 90 Triangle and why is it “Special”?

The 30 60 90 triangle is a special right triangle because it forms an equilateral triangle when a mirror image of itself is drawn. This means that all sides are equal when a mirror image of the triangle is drawn which allows us to find the ratio between each of the sides of the triangle by using the Pythagorean Theorem. Check it out below!

30 60 90 Special Triangles

Now let’s draw a mirror image of our triangle to create an equilateral triangle.  Next, we can label the length of the new side opposite 30 degrees (the shorter leg) “a,” and add this new mirror image length with the original we had to get, a total of a+a=2a.

30 60 90 Special Triangles

If we look at our original 30 60 90 triangle, we now have the following values for each side based on our equilateral triangle. Notice we still need to find the length value of the longer leg, opposite angle 60 degrees.

30 60 90 Special Triangles
Pythagorean Theorem Formula
Fill in values from our triangle longer leg
Distribute the exponent and start solving for our “?” by subtracting a^2 from both sides.
Now take the square root of both sides to solve for “?.”	We have found a solution! Our missing side length is equal to a√3.

To sum up, we have applied the Pythagorean Theorem formula, filled in values found in our triangle for each length, distributed the exponent and subtracted a2 from both sides, took the square root, and finally found our solution for our ratio for the longer leg opposite 60 degrees.

Now we can re-label our triangle, knowing the length of the hypotenuse in relation to the two legs. This creates a ratio that applies to all 30 60 90 triangles!

30 60 90 triangle side lengths

How do I use this ratio?

30 60 90 triangle side lengths

Knowing the above ratio, allows us to find any length of any and every 30 60 90 triangle, when given the value of one of its sides. Let’s tsee how this ratio works with some examples.

Example #1:

30 60 90 triangle side lengths

Step 1: First let’s look at our ratio and compare it to our given triangle.

30 60 90 triangle side lengths

Step 2: Notice we are given the value of a, which is equal to 4, knowing this we can now fill in each length of our triangle based on the ratio of a 30 60 90 triangle.

30 60 90 triangle side lengths

Now let’s look at another Example where we are given the length of the hypotenuse and need to find the values of the other two missing sides.

Example #2:

30 60 90 triangle side lengths

Step 1: First let’s look at our ratio and compare it to our given triangle.

30 60 90 triangle side lengths

Step 2: Notice we are given the value of the hypotenuse, 2a=20. Knowing this we can find the value of a by dividing 20 by 2 to get a=10. Once we have the value of a=10, we can easily find the length of the last, longer leg based on the 30 60 90 ratio:

30 60 90 triangle side lengths

Now for our last Example, we will see how to find the value of the shorter leg and hypotenuse, when we are given the side length of the longer leg across from 60º and need to find the other two missing sides.

Example #3:

30 60 90 triangle side lengths

Step 1: First let’s look at our ratio and compare it to our given triangle.

30 60 90 triangle side lengths

Step 2: In this case, we need to use little algebra to find the value of a, using the ratio for 30 60 90 triangles.

30 60 90 triangle side lengths
We set up this equation, knowing that 9 is across from 60 degrees, and that a√3=9. 	To solve for a, we divide square root both sides by √3. 	We get a solution a=9/√3! Yay! We cannot have a radical in the denominator, so we rationalize the denominator by multiplying the numerator and denominator by √3.

Now that we have one piece of the puzzle, the value of a, let’s fill in the value of the shorter leg of our triangle below:

Finally, let’s find the value of the length of the hypotenuse, which is equal to 2a in our ratio. Knowing the length of all sides, we can fill in the lengths of each side of our triangle for our solution.

Think you are ready to master these types of questions on your own? Try the practice problems below!

Practice Questions:

Find the value of the missing sides of each 30 60 90 degree triangle.

Solutions:

Still got questions? No problem! Don’t hesitate to comment with any questions or check out the video above. Happy calculating! 🙂

Facebook ~ Twitter ~ TikTok ~ Youtube

Related Trigonometry Posts:

The Unit Circle

Basic Right Triangle Trigonometric Ratios (SOH CAH TOA)

4545 90 Special Triangles

Factoring Trigonometric Functions

Graphing Trigonometric Functions

Trig Identities

Transforming Trig Functions

Law of Cosines

Law of Sines

NYE Ball Fun Facts: Volume & Combinations

Greetings math friends, and Happy New Year! In today’s post we’re going do something a little different and take a look at the math behind the very famous and very shiny New Year’s Eve Ball that drops down every year at midnight.  We’ll break down the shape, the volume, and the number of those dazzling Waterford crystals (and no this post isn’t sponsored) and look at some NYE Ball Fun Facts.

NYE Ball Fun Facts

Shape: Geodesic Sphere

Yes, apparently the shape of the New Year’s ball is officially called a “Geodesic Sphere.”  It is 12 feet in diameter and weighs 11,875 pounds.

Volume (Estimate): 288π ft3

If we wanted to estimate the volume of the New Year’s Ball we would could use the formula for volume of a sphere:

NYE Ball Fun Facts

Number of Waterford Crystals: 2,688

Talk about the ultimate shiny bauble! The NYE ball lights up the night with all 2,688 crystals in the shape of different sized triangles, each with heights of 5.75 inches or 4.75 inches.

NYE Ball Fun Facts

Number of Lights: 48 light emitting diodes (LED’s)

On each triangle, there are 48 LEDs: 12 red, 12 blue, 12 green, and 12 white, for a total of 32,256 LEDs on the entire NYE ball itself.

NYE Ball Fun Facts

Permutations and Combinations:

Permutations: With this many lights and colors, there are over a billion potential permutations of colors on the entire NYE ball.

Combinations: Let’s break down one triangle with 48 LED lights each with 12 red, 12 blue, 12 green, and 12 white LEDs. How many possible combinations of lights are possible if we were to choose 7 blue, 5 red, 10 green, and 1 white turned on all at the exact same time?

We end up with the combination formula below:

NYE Ball Fun Facts

That means that there are 496,793,088 possible ways that 7 blue lights, 5 red lights, 10 green lights, and 1 white light can be lit up on a triangle that is part of the entire NYE ball!

Interested in more NYE fun facts?  Check out the sources of this article here.

NYE Fact Sheet from: timessquarenyc.org

NYE Ball picture: Timesquareball.net

If you like finding the volume of the NYE ball maybe, you’ll want to find the volume of the Hudson Yards Vessal in NYC here.  Happy calculating and Happy New Year from MathSux!

Facebook ~ Twitter ~ TikTok ~ Youtube

Central Angles Theorems: Geometry

Hi everyone, and welcome to MathSux! In this post, we are going to go over the Central Angles Theorems of circles. We’ll go over the theorems associated with central angles and then solve a quick example. Make sure to test your understanding of central angles and arcs with the practice questions at the end of this post. And, if you want more, don’t forget to check out the video below, happy calculating!

Central Angles and Arcs:

Central angles and arcs form when two radii are drawn from the center point of a circle.  When these two radii come together they form a central angle. A central angle is equal to the length of the arc. When it comes to measuring the central angle, the central angle is always equal to arc length and vice versa:

Central Angles = Arc Length

central angles theorems

Central Angle Theorems:

There are a two central angle theorems to know, check them out below!

Central Angle Theorem #1:

central angles theorems

Central Angle Theorem #2:

central angles theorems

Let’s look at how to apply these rules with an Example:

central angles theorems

Let’s do this one step at a time.

central angles theorems

Practice Questions:

Solutions:

Still got questions? No problem! Don’t hesitate to comment with any questions or check out the video above. Happy calculating! 🙂

Facebook ~ Twitter ~ TikTok ~ Youtube

Circle Theorems & Formulas

Intersecting Secants Theorem

Inscribed Angles & Intercepted Arcs

Area of a Sector

Circle Theorems

TikTok Math Video Compilations

Happy December everyone! With crazy 2020 coming to an end, I thought I would share some TikTok math video compilations of Algebra, Geometry, Algebra 2/Trig, and Statistics for a quick review of all our videos posted throughout the year. Enjoy these TikTok math video compilations and happy calculating! 🙂

Want to make math suck just a little bit less? Subscribe and follow us for FREE fun colorful math videos and lessons every week! 🙂

Facebook ~ Twitter ~ TikTok ~ Youtube

TikTok Math Video Compilations

Algebra:

Within algebra, you will find arithmetic sequences, combining like terms, box and whisker plots, geometric sequences, solving radical equations, completing the square, 4 ways to factor quadratic equations, piecewise functions and more!

Geometry:

Within Geometry, you will find, how to construct an equilateral triangle, a median of a trapezoid, area of a sector, how to find perpendicular and parallel lines through a given point, SOH CAH TOA right triangle trigonometry, reflections, and more!

Algebra 2/Trig.

Within Algebra 2/Trig., you will find, how to expand a cubed binomial, how to divide polynomials, how to solve log equations, imaginary numbers, synthetic division, unit circle basics, how to graph y=sin(x), and more!

Statistics:

Within statistics, you will find, box and whisker plots, how to find the variance, and, the probability of flipping a coin 2 times!

For full length video, don’t forget to check out our free math video index page! Thanks for stopping by! 🙂