Hi everyone, and welcome to MathSux! In this post, we are going to go over the Central Angles Theorems of circles. We’ll go over the theorems associated with central angles and then solve a quick example. Make sure to test your understanding of central angles and arcs with the practice questions at the end of this post. And, if you want more, don’t forget to check out the video below, happy calculating!
Central Angles and Arcs:
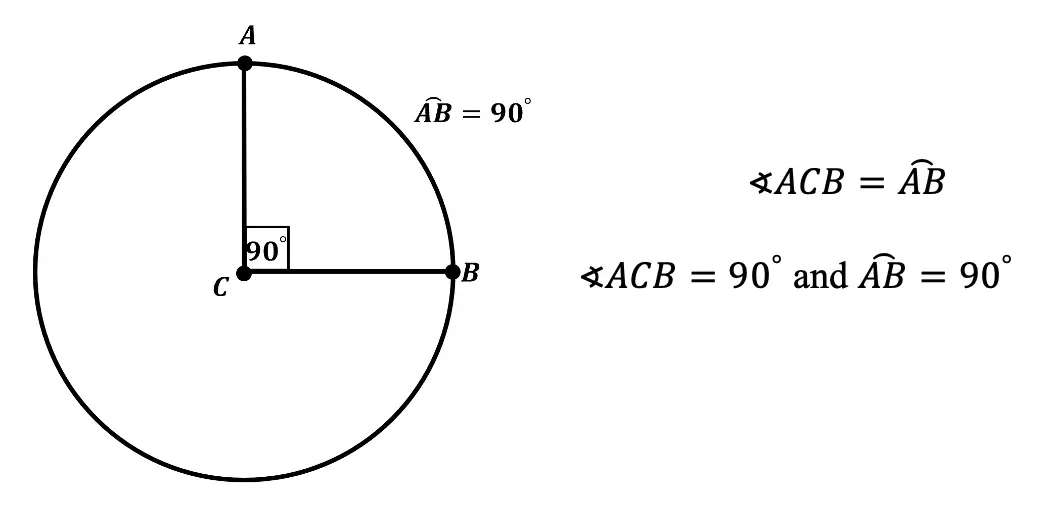
Central angles and arcs form when two radii are drawn from the center point of a circle. When these two radii come together they form a central angle. A central angle is equal to the length of the arc. When it comes to measuring the central angle, the central angle is always equal to arc length and vice versa:
Central Angles = Arc Length
Central Angle Theorems:
There are a two central angle theorems to know, check them out below!
Central Angle Theorem #1:
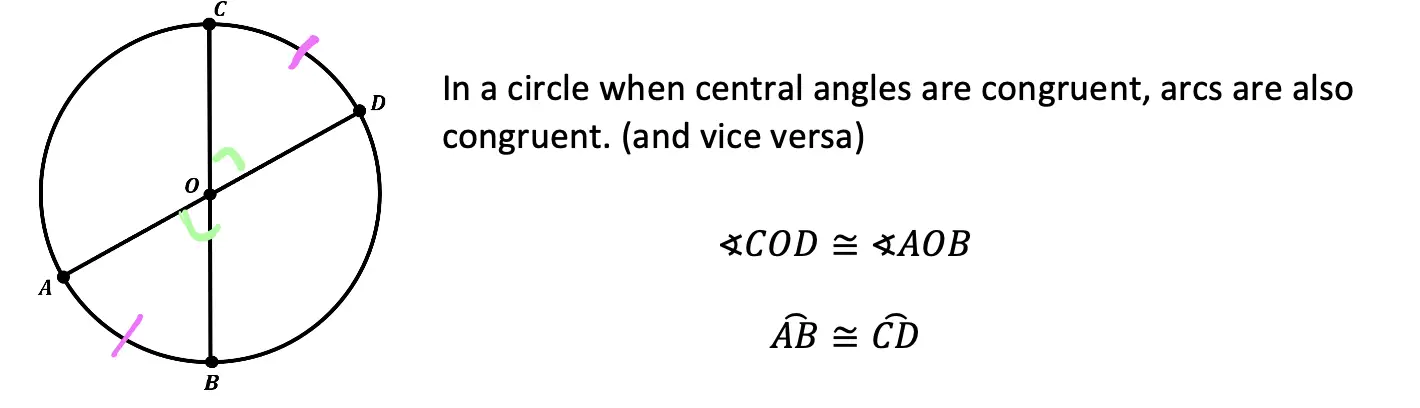
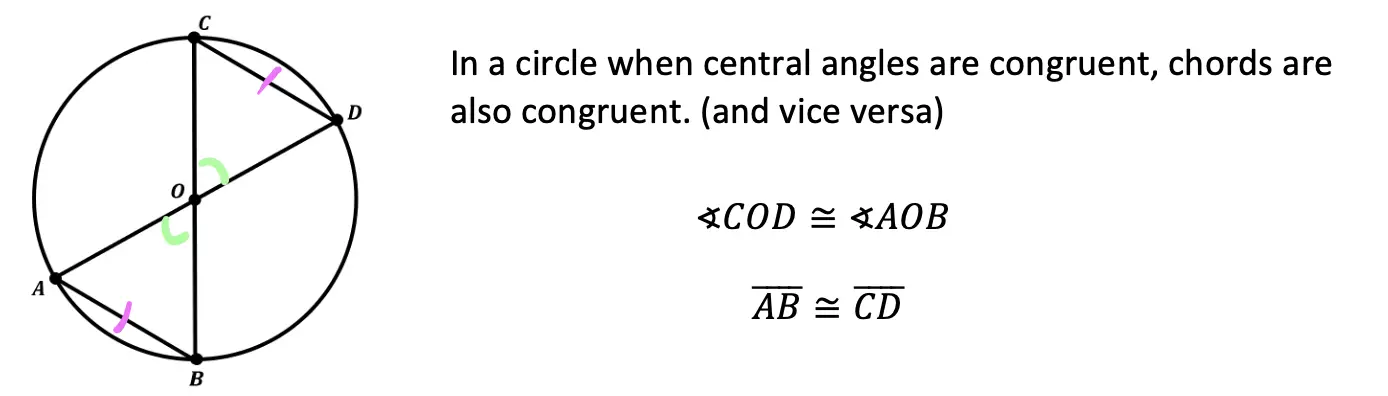
Central Angle Theorem #2:
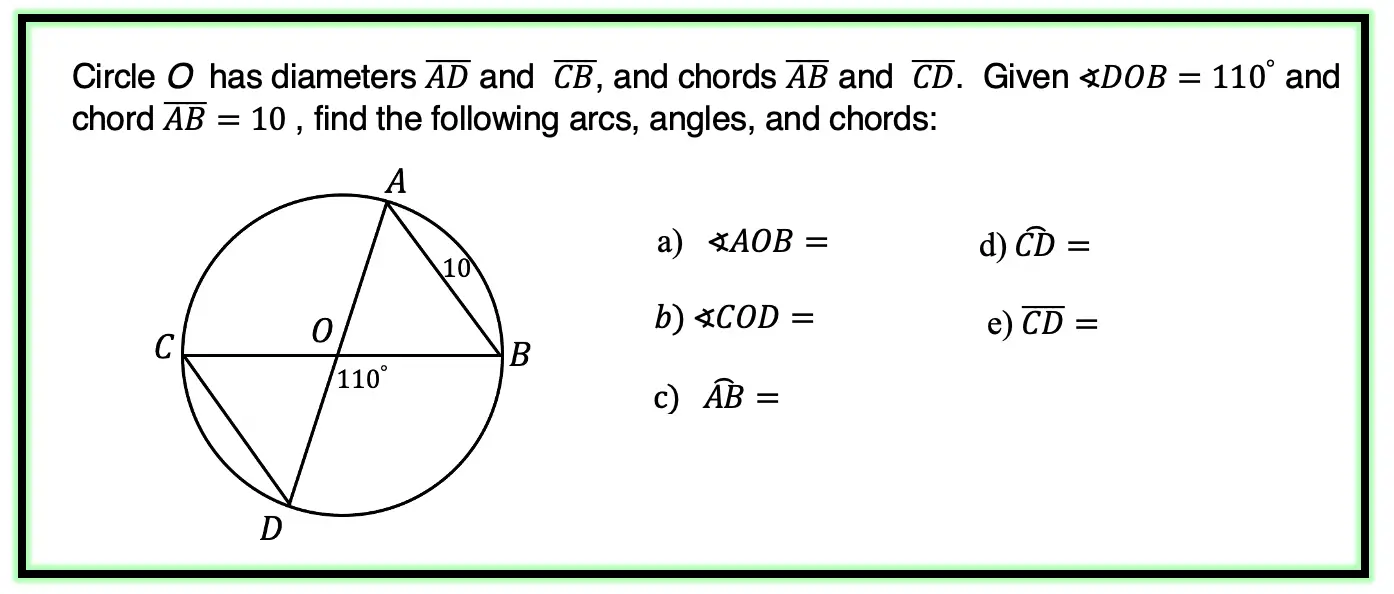
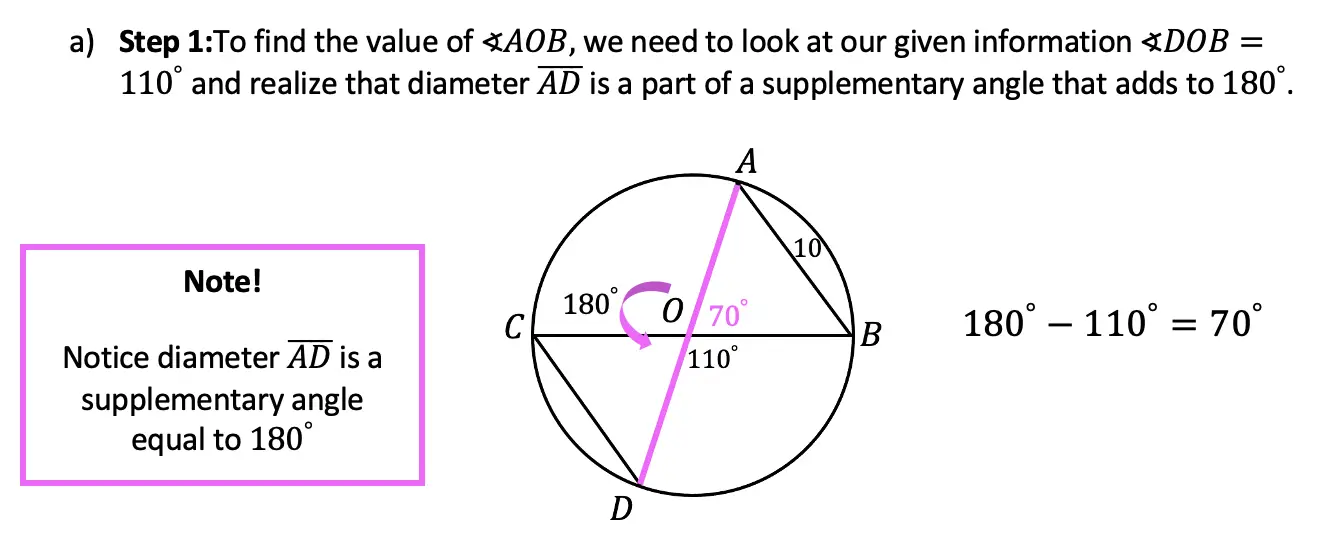
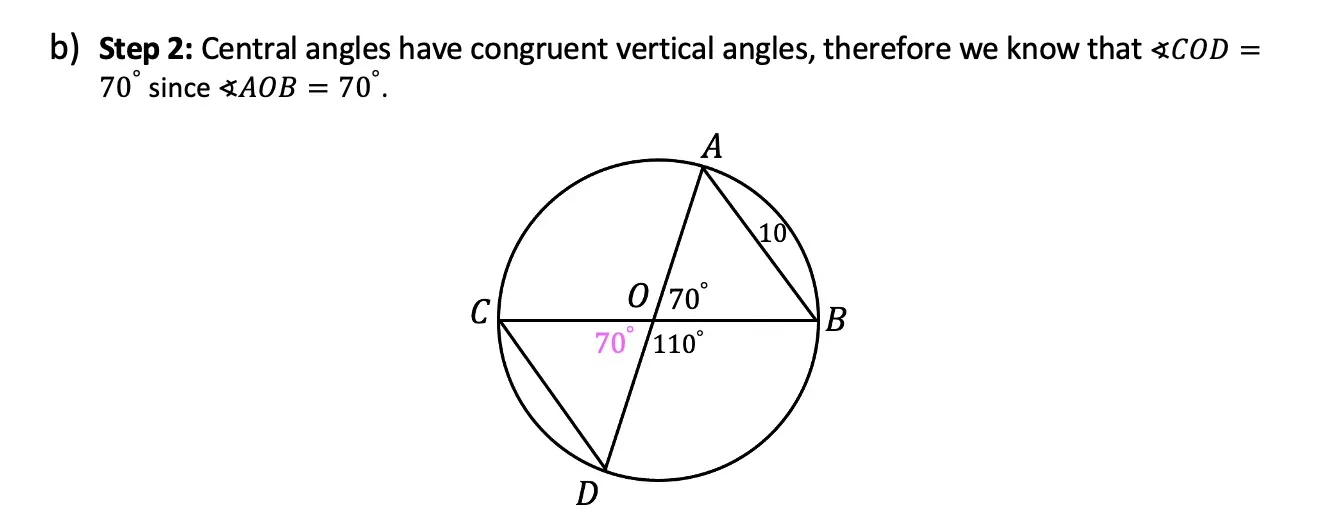
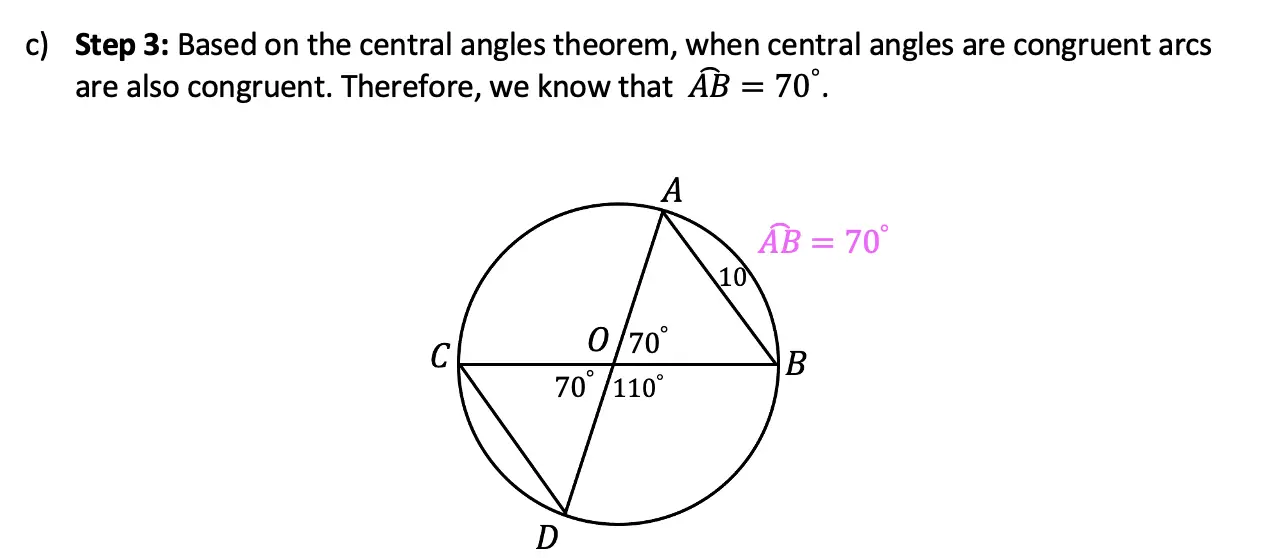
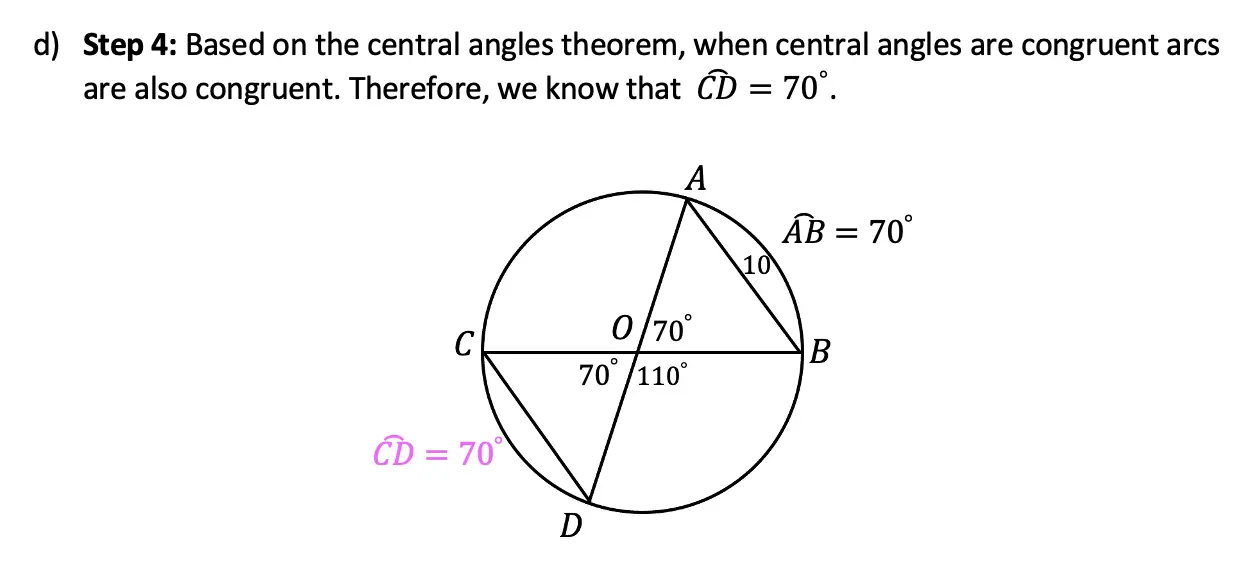
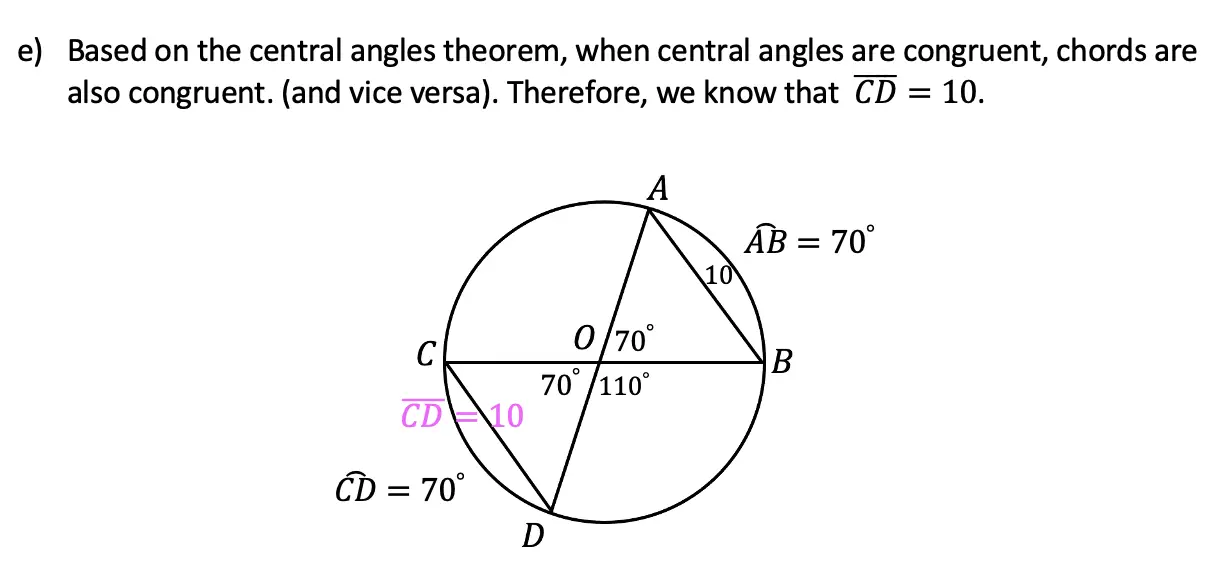
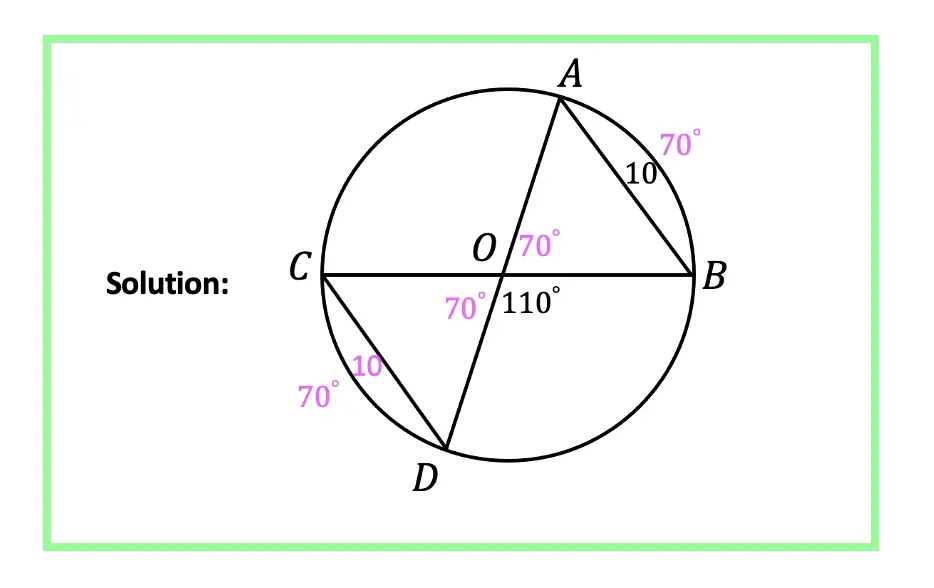
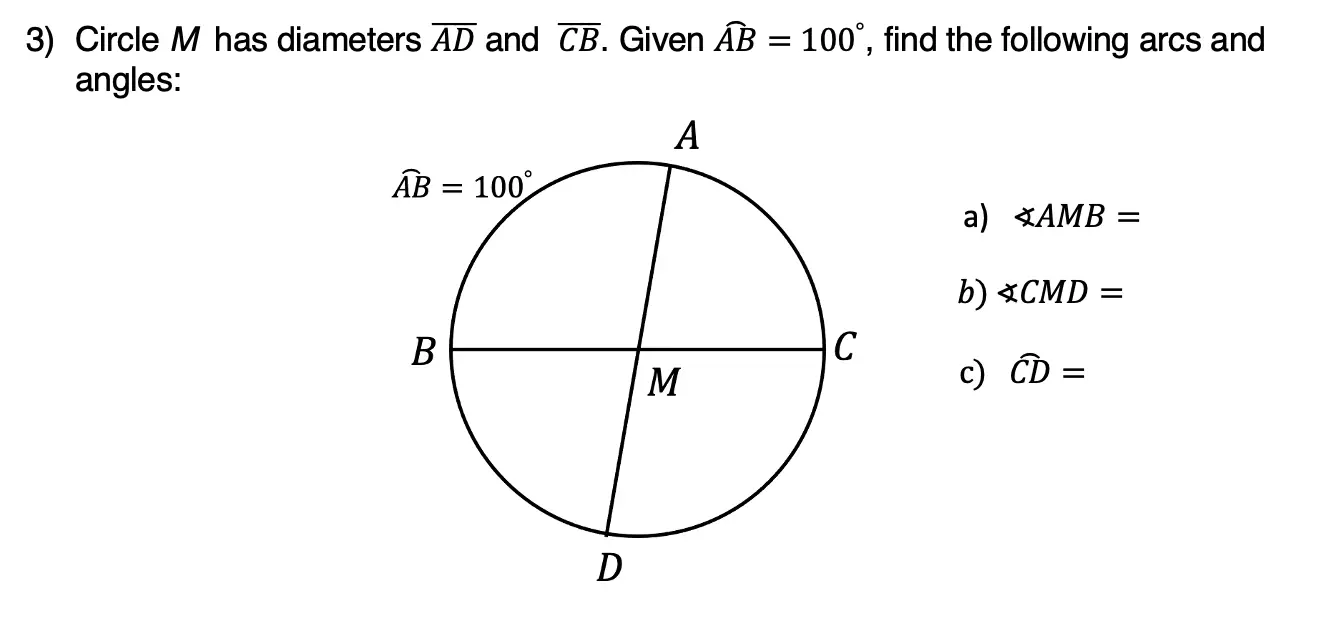
Let’s look at how to apply these rules with an Example:
Let’s do this one step at a time.
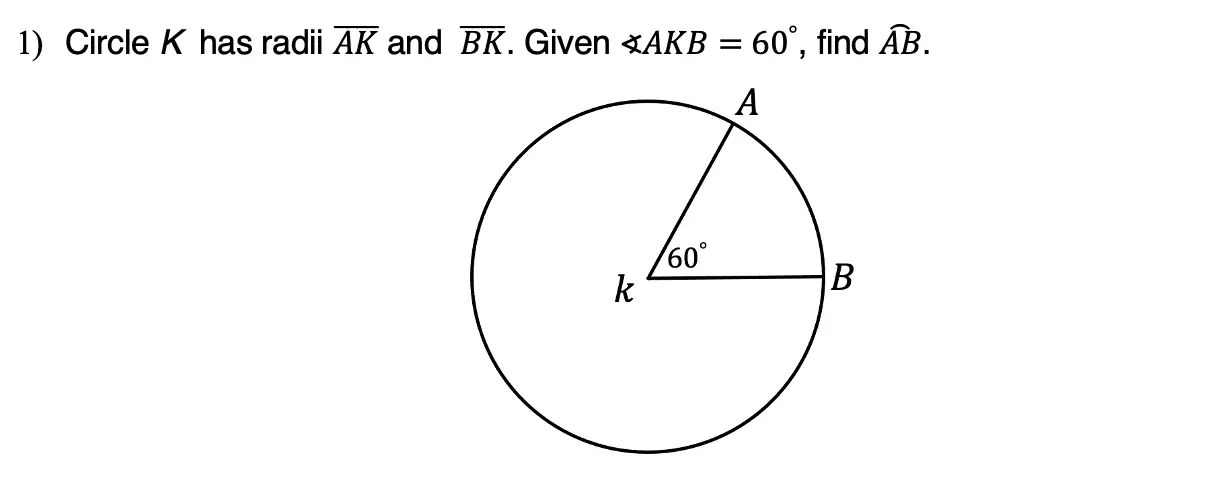
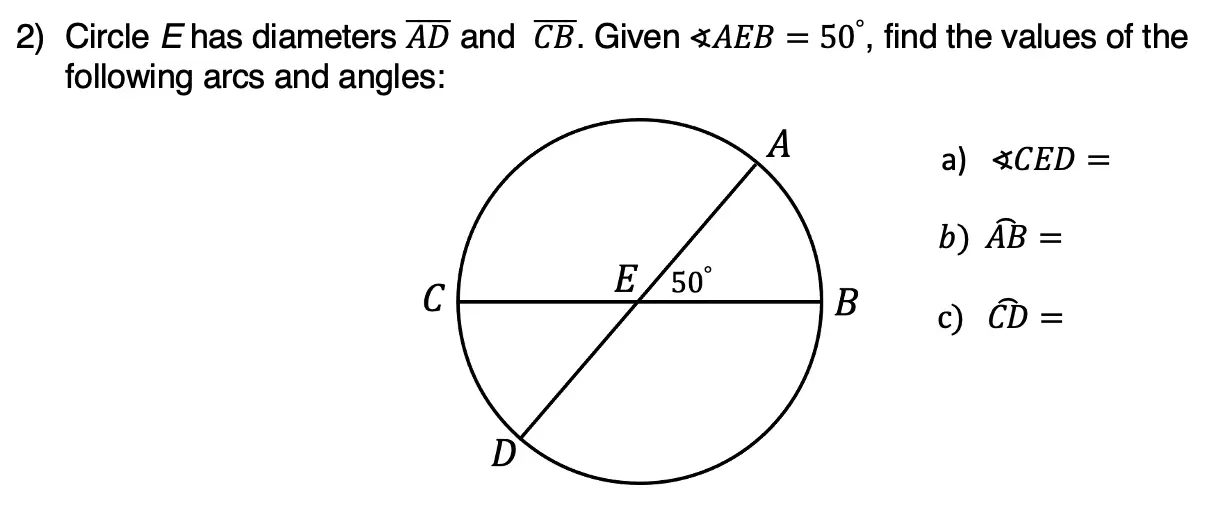
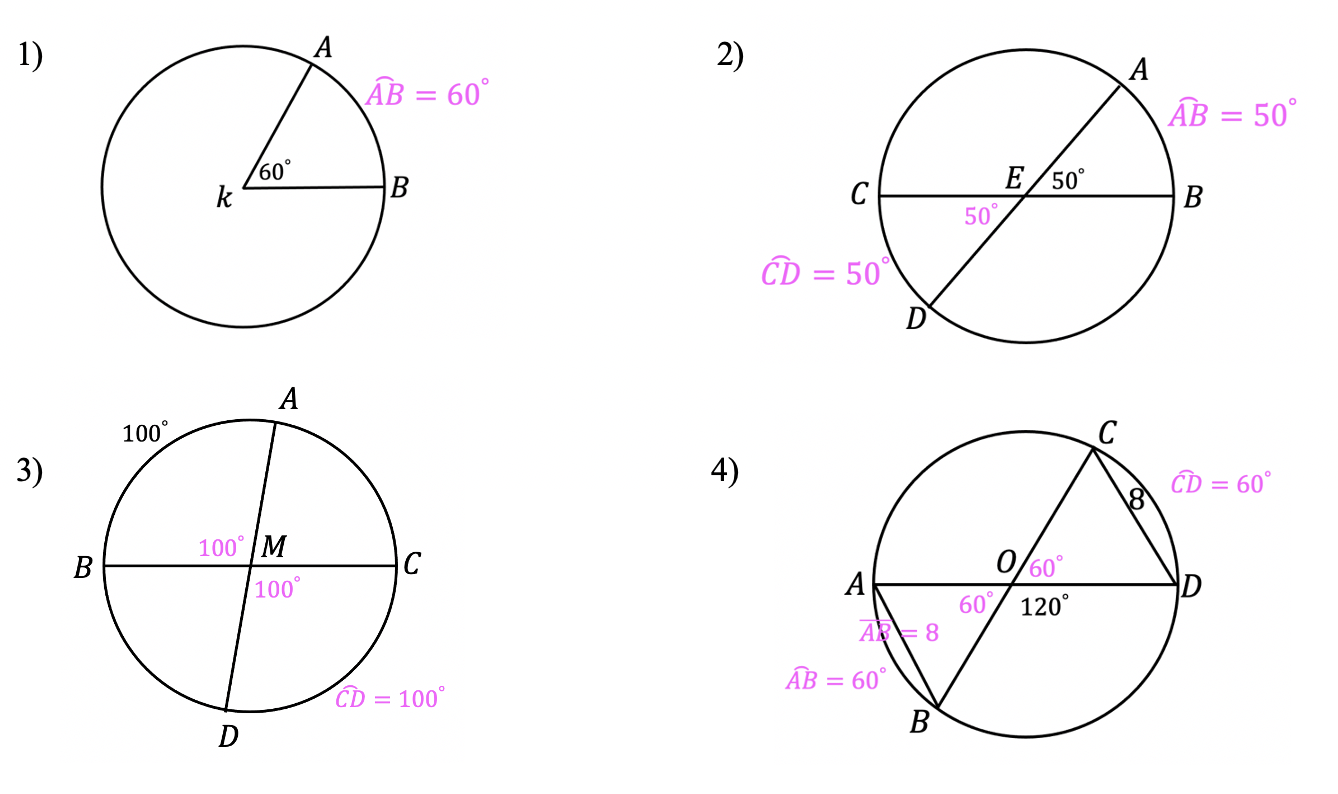
Practice Questions:
Solutions:
Still got questions? No problem! Don’t hesitate to comment with any questions or check out the video above. Happy calculating! 🙂
Happy December everyone! With crazy 2020 coming to an end, I thought I would share some TikTok math video compilations of Algebra, Geometry, Algebra 2/Trig, and Statistics for a quick review of all our videos posted throughout the year. Enjoy these TikTok math video compilations and happy calculating! 🙂
Want to make math suck just a little bit less? Subscribe and follow us for FREE fun colorful math videos and lessons every week! 🙂
Within algebra, you will find arithmetic sequences, combining like terms, box and whisker plots, geometric sequences, solving radical equations, completing the square, 4 ways to factor quadratic equations, piecewise functions and more!
Geometry:
Within Geometry, you will find, how to construct an equilateral triangle, a median of a trapezoid, area of a sector, how to find perpendicular and parallel lines through a given point, SOH CAH TOA right triangle trigonometry, reflections, and more!
Algebra 2/Trig.
Within Algebra 2/Trig., you will find, how to expand a cubed binomial, how to divide polynomials, how to solve log equations, imaginary numbers, synthetic division, unit circle basics, how to graph y=sin(x), and more!
Statistics:
Within statistics, you will find, box and whisker plots, how to find the variance, and, the probability of flipping a coin 2 times!
For full length video, don’t forget to check out our free math video index page! Thanks for stopping by! 🙂
Greetings math friends! In today’s post we’re going to go over some unit circle basics. We will find the value of trigonometric functions by using the unit circle and our knowledge of special triangles. For even more practice questions and detailed info., don’t forget to check out the video and examples at the end of this post. Keep learning and happy calculating! 🙂
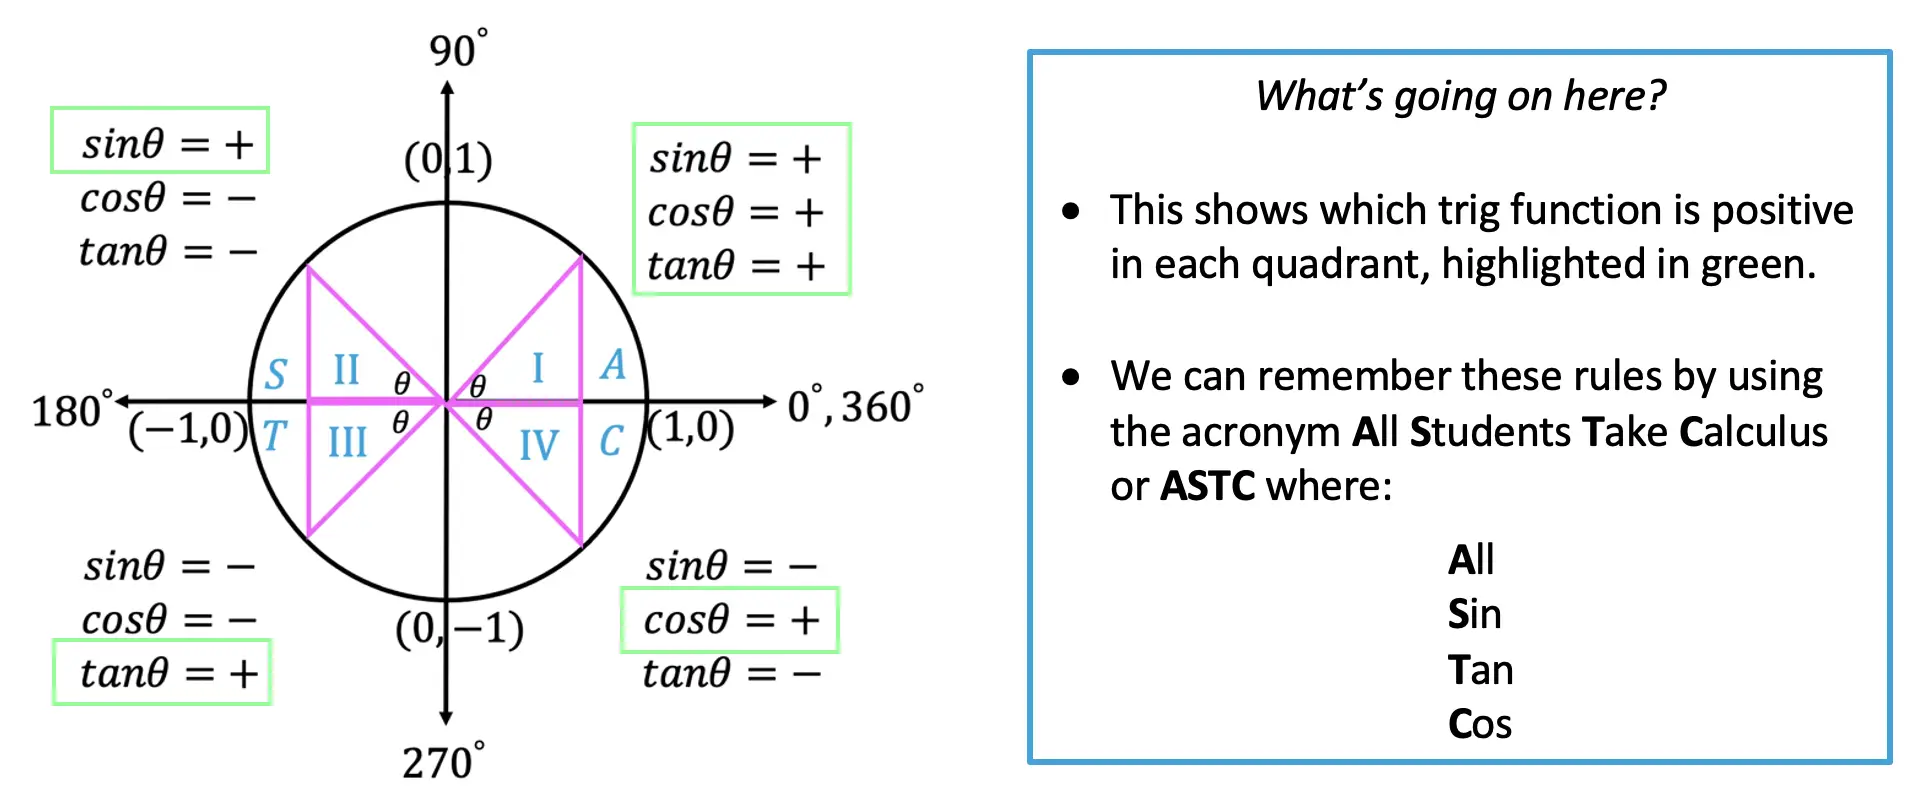
What is the Unit Circle?
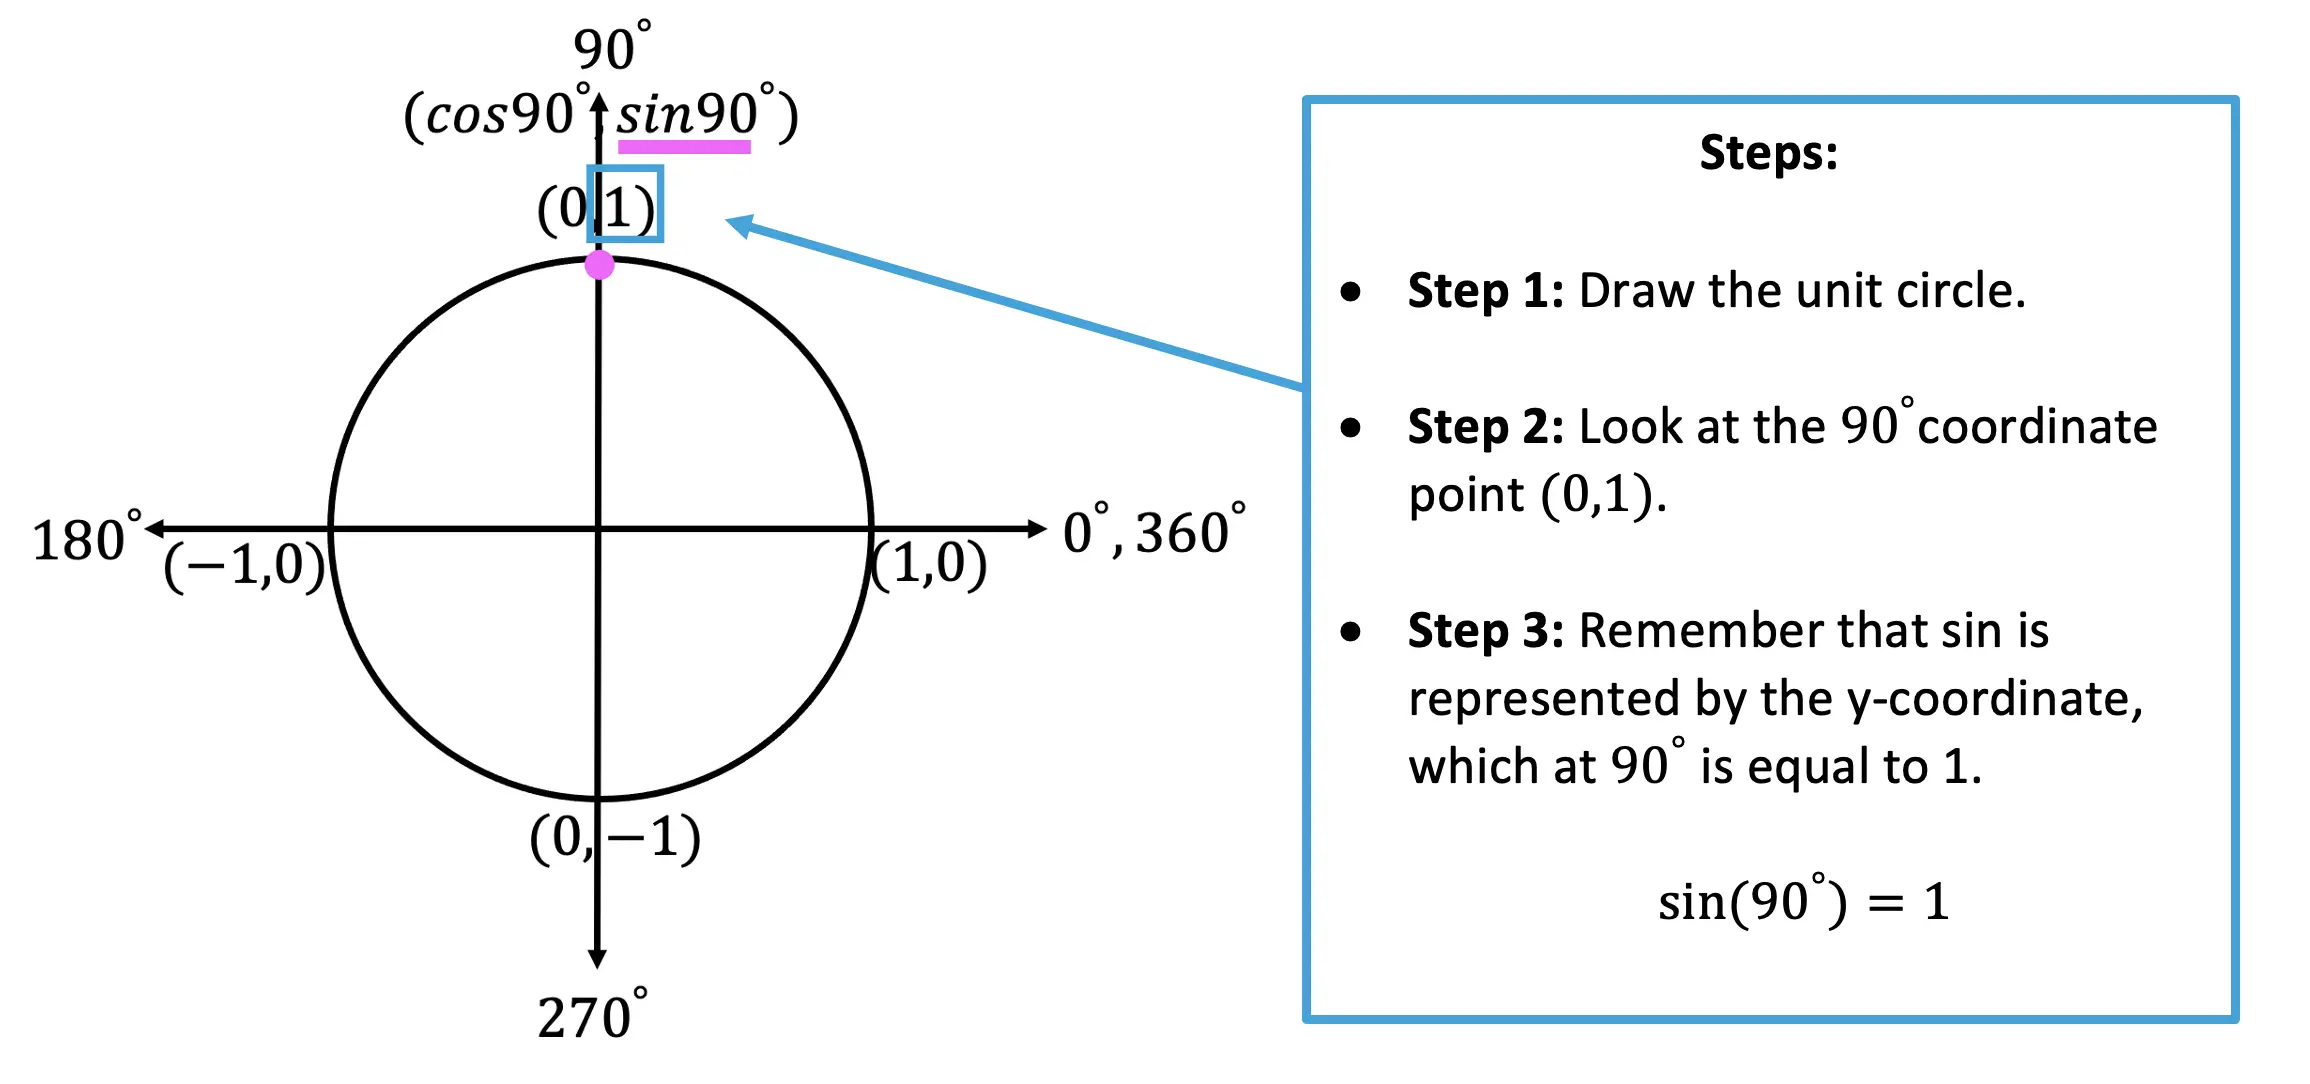
The Unit Circle is a circle where each point is 1 unit away from the origin (0,0). We use it as a reference to help us find the value of trigonometric functions.
Notice the following things about the unit circle above:
Degrees follow a counter-clockwise pattern from 0 to 360 degrees.
Values of cosine are represented by x-coordinates.
Values of sine are represented by y-coordinates.
Using the unit circle we can find the degree and radian value of trigonometric functions (SOH CAH TOA). Check out the example below!
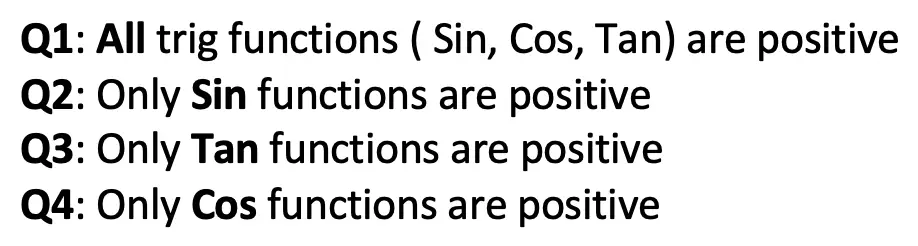
What’s the big deal with Quadrants?
Within a coordinate plane there are 4 quadrants numbered I, II, III, and IV used throughout all of mathematics. Within these quadrants there are different trigonometric functions that are positive to each unique quadrant. This will be important when solving questions with reference angles later in this post. Check out which trig functions are positive in each quadrant below:
Now let’s look at some examples on how to find trigonometric functions using our circle!
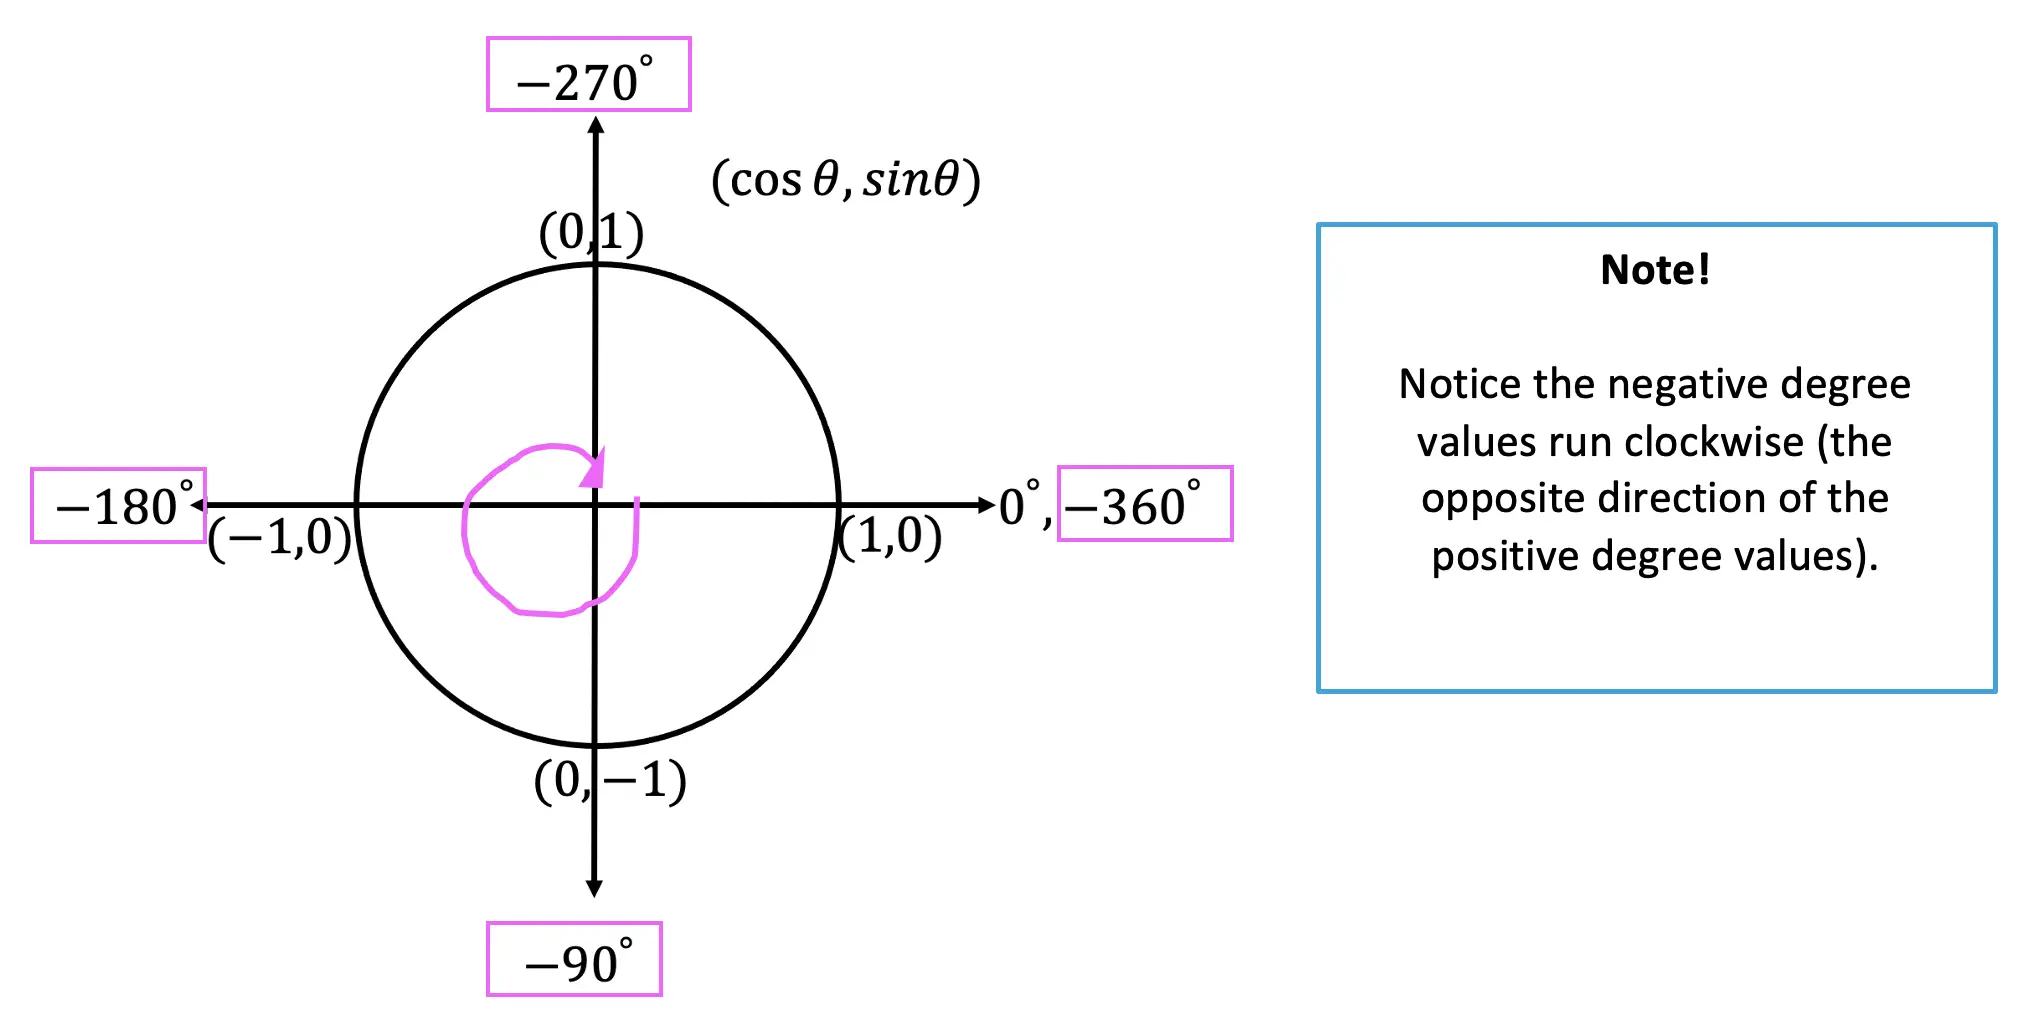
Negative Degree Values:
The unit circle also allows us to find negative degree values which run clockwise, check it out below!
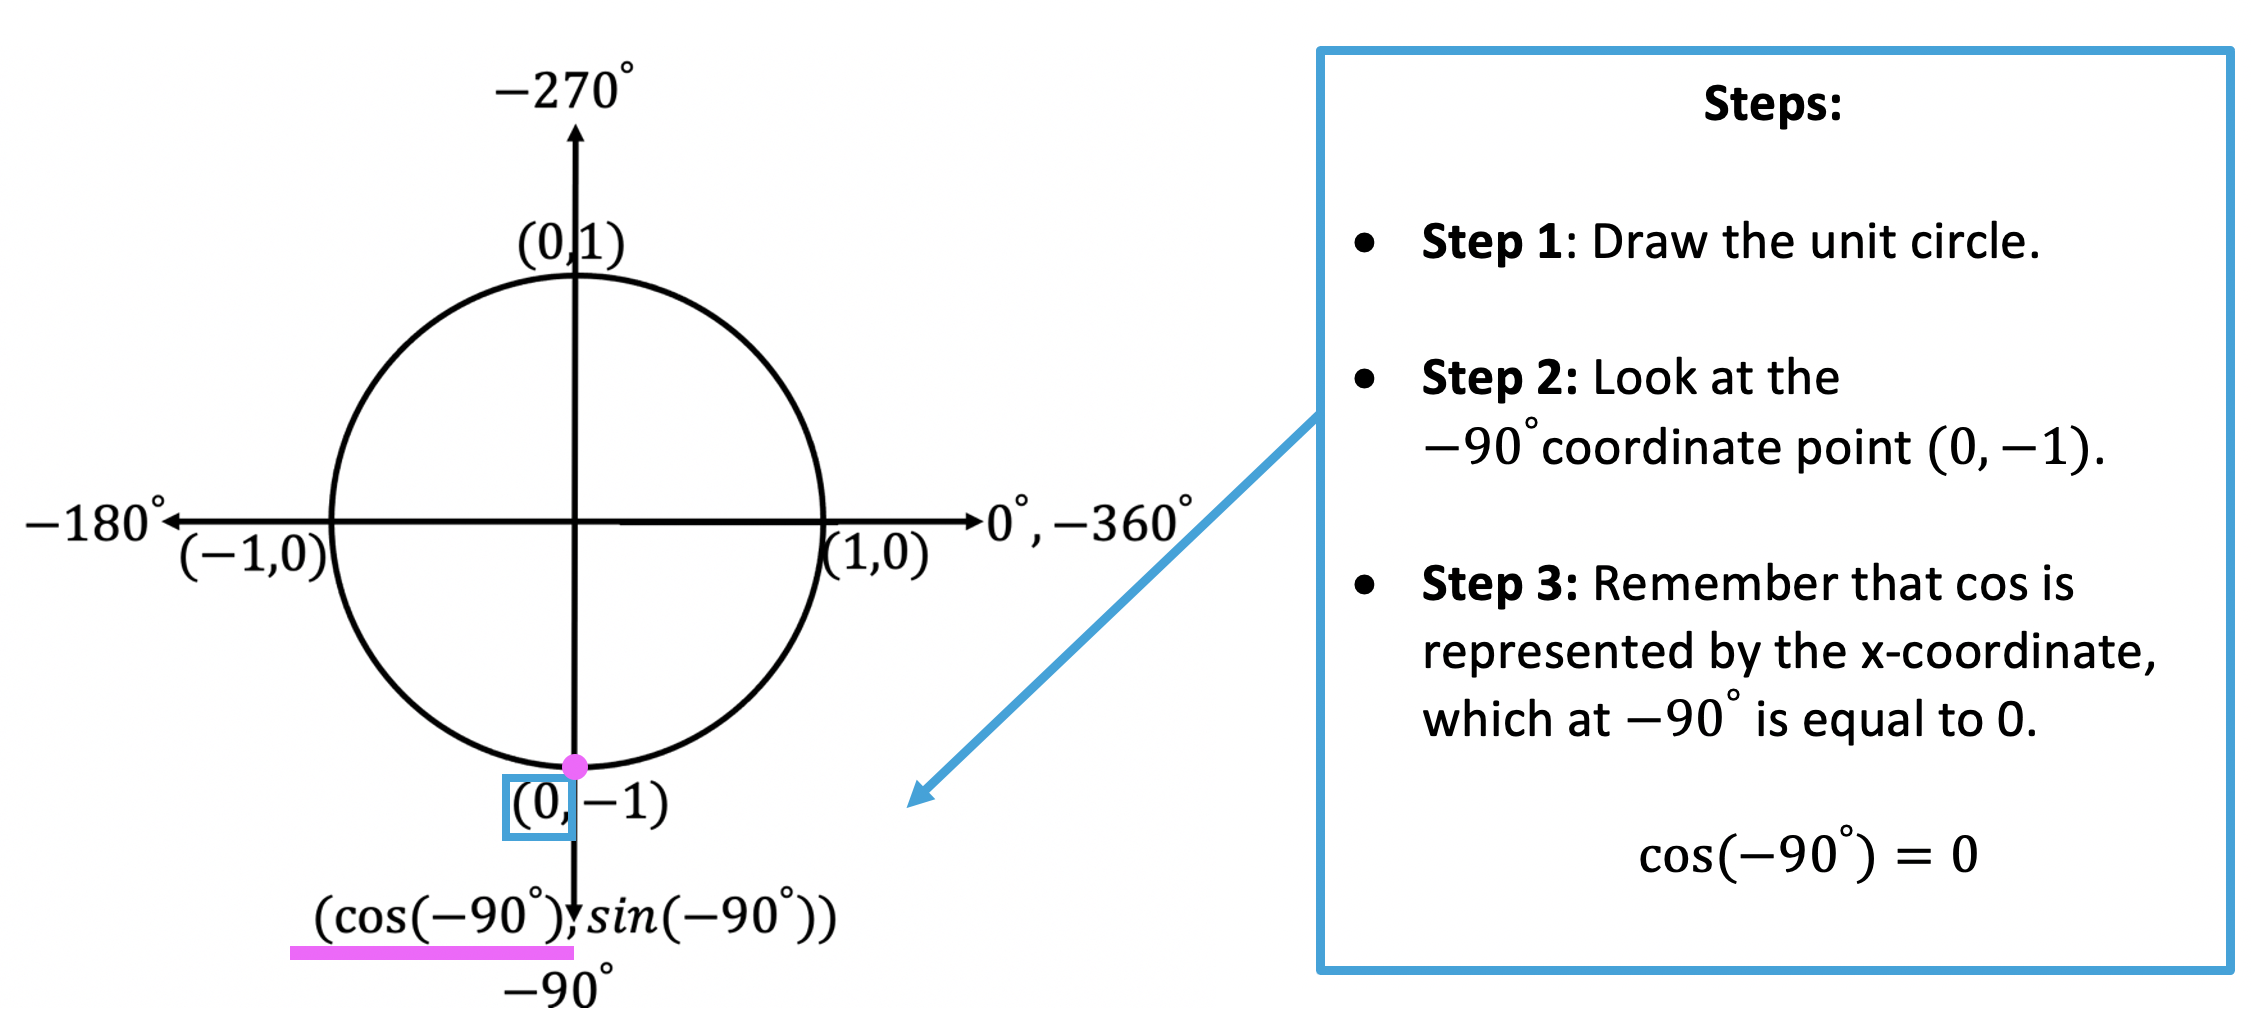
Knowing that negative degrees run clockwise, we can now find the value of trigonometric functions with negative degree values.
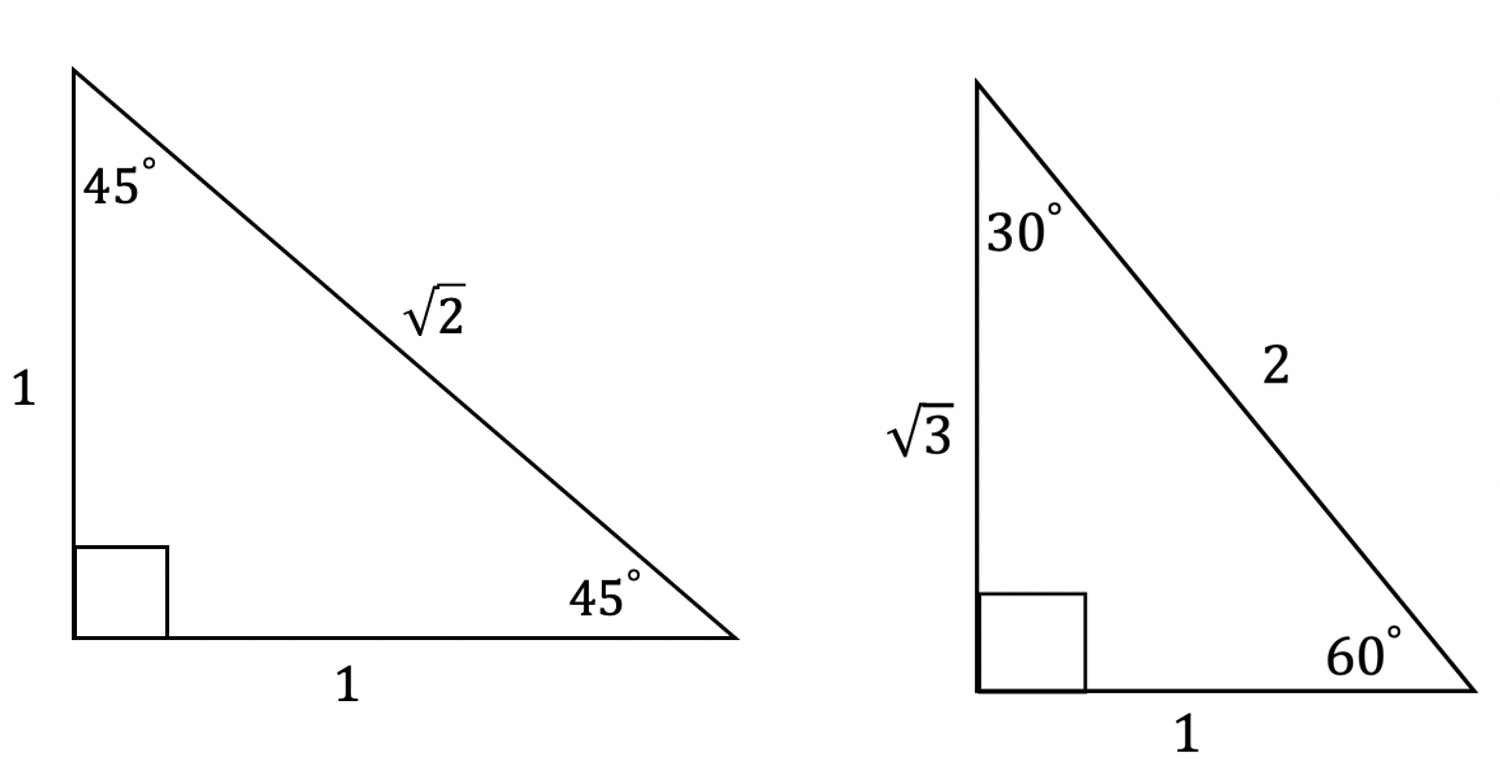
How to find trig ratios with 30º, 45º and 60º ?
Instead of memorizing much, much more of the unit circle, there’s a trick to memorizing two simple special triangles for answering these types of questions. The 45º 45º 90º special triangle and the 30º 60º 90º special triangle. (Why does this work? These special triangles can also be derived and found on the unit circle).
Using the above triangles and some basic trigonometry in conjugation with the unit circle, we can find so many more angles, take a look at the example below:
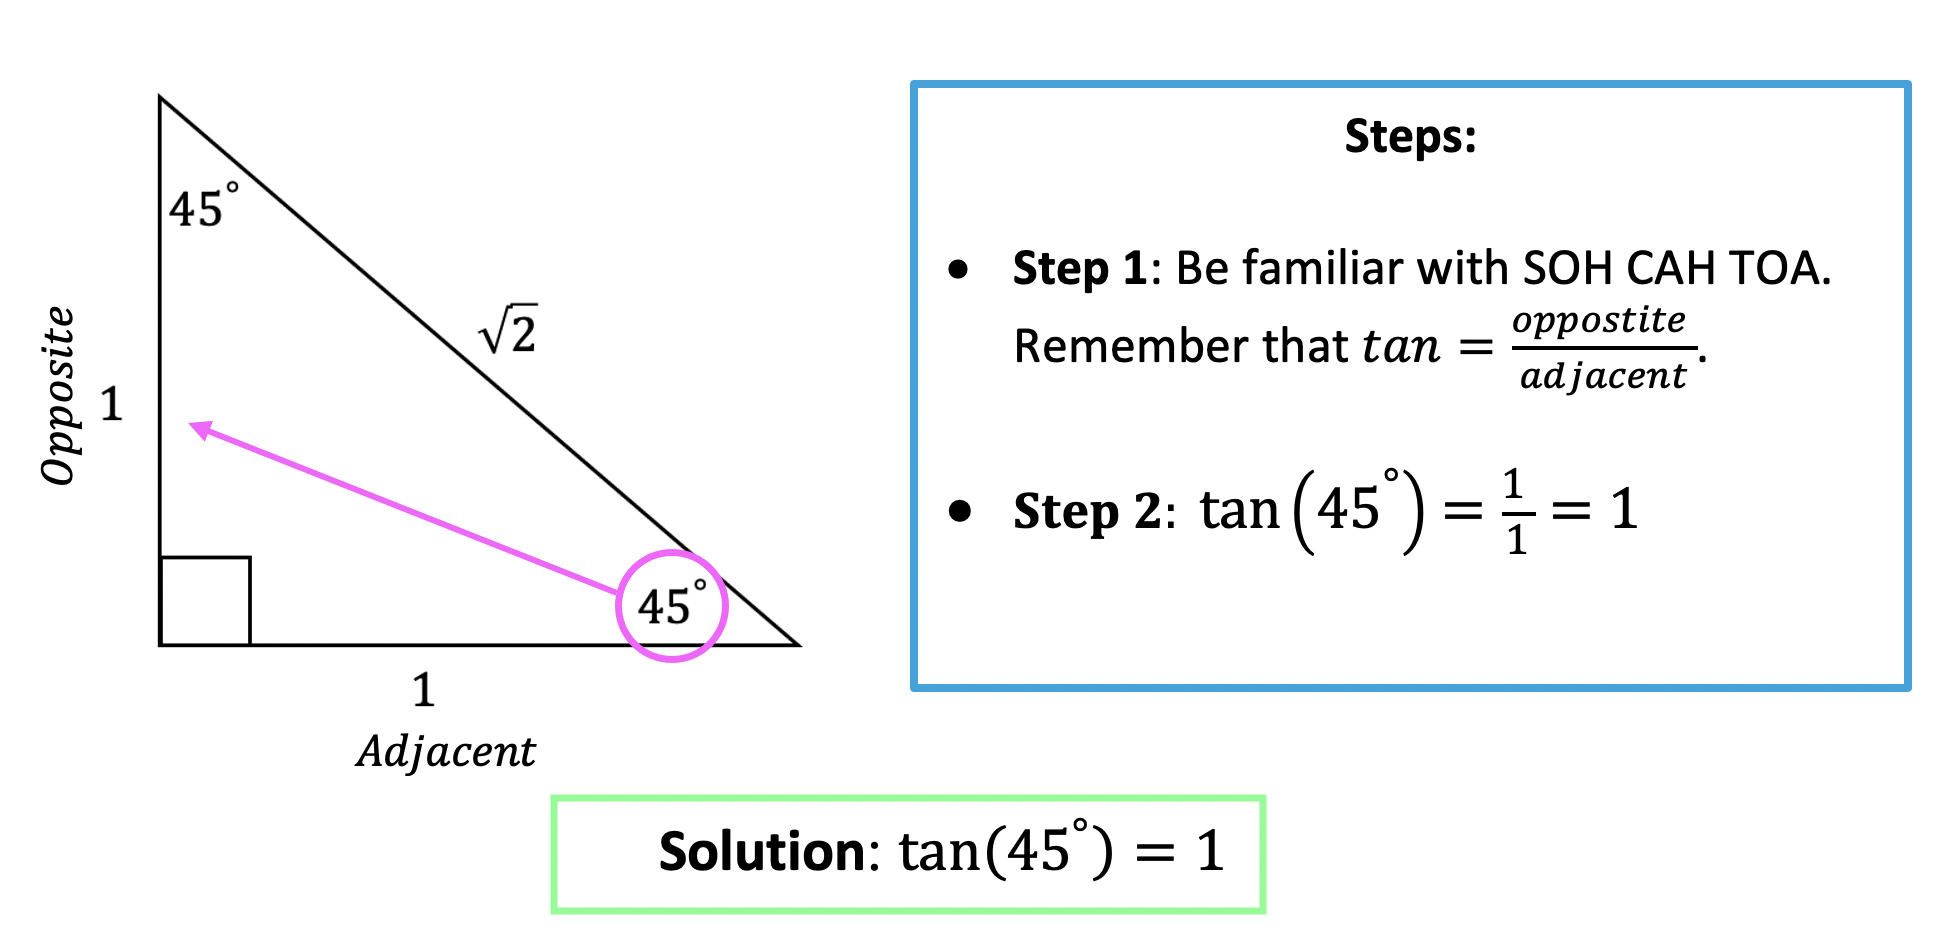
Since we need to find the value of tan(45º) , we will use the 45º, 45º, 90º special triangle.
For our last question, we are going to need to combine our knowledge of unit circles and special triangles:
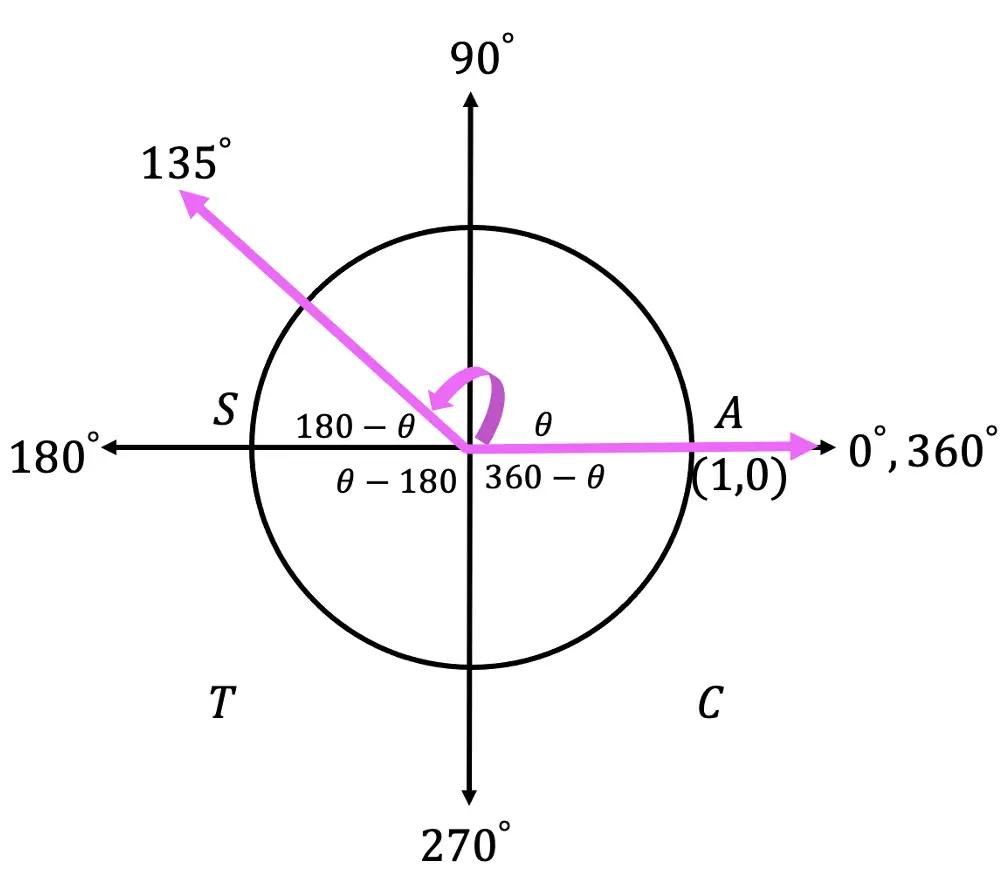
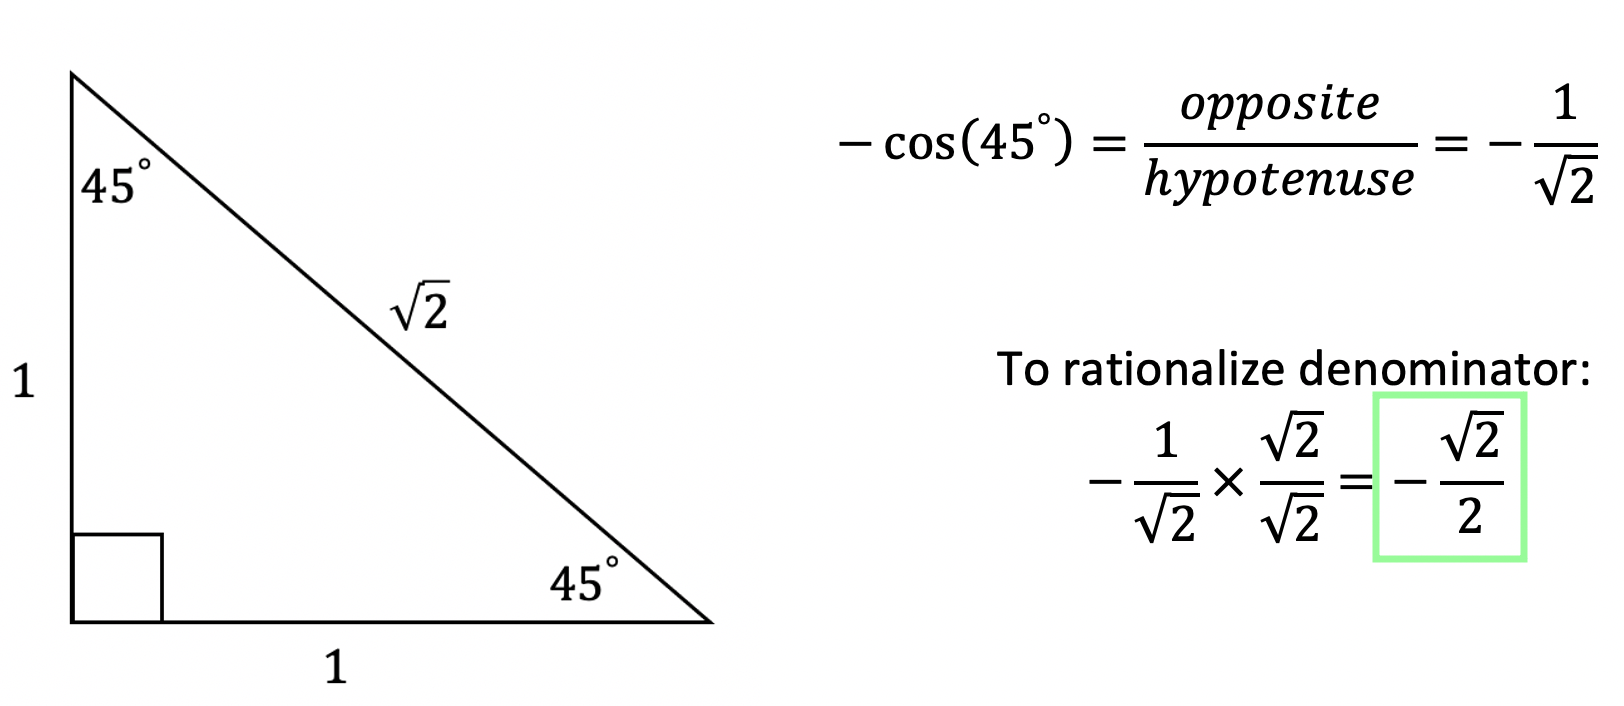
-> In order to do this, we must first look at where our angle falls on the unit circle. Notice that the angle 135º is encompassed by the pink lines and falls in quadrant 2.
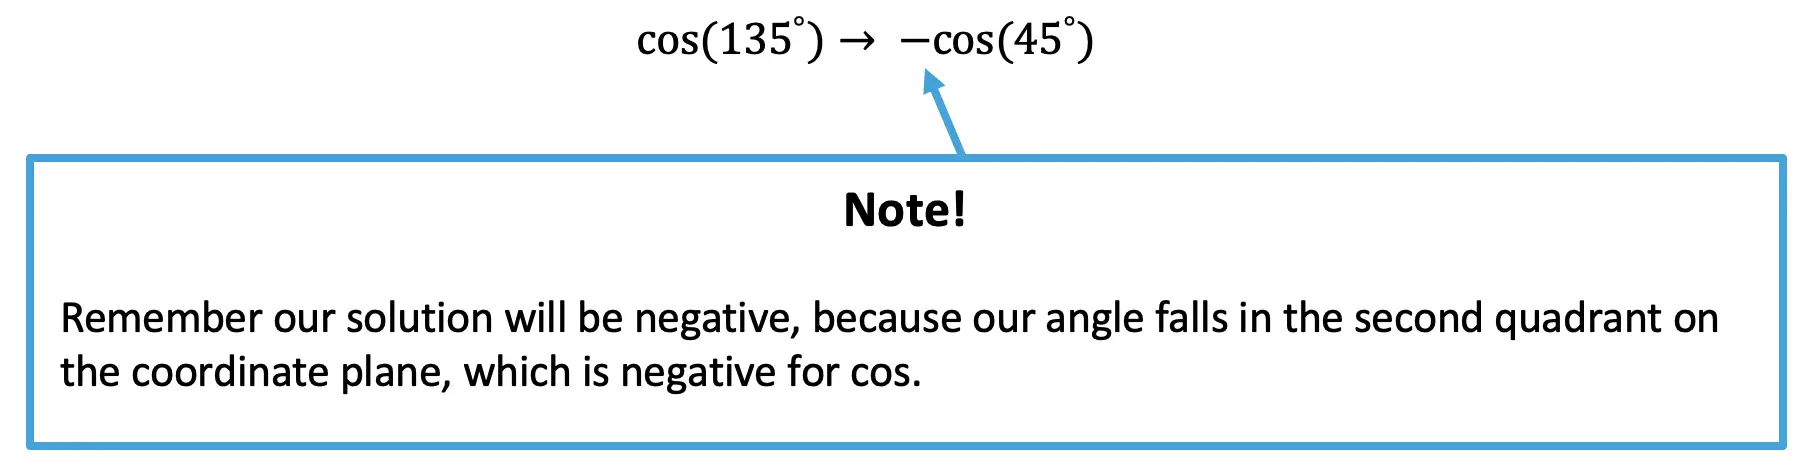
-> Since our angle falls in the second quadrant where only the trig function sin is positive. Since we are finding an angle with the function cosine, we know the solution will be negative.
-> Now we need to find something called a reference angle. Which is what those θ, 180°-θ, θ-180°, 360°-θ and symbols represent towards the center of the unit circle. Using these symbols will help us find the value of cos(135º).
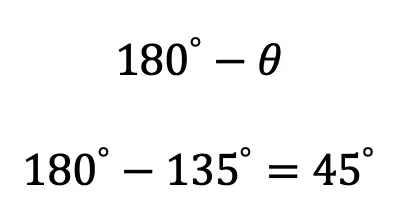
Because the angle we are trying to find,135º , falls in the second quadrant, that means we are going to use the reference angle that falls in that quadrant 180º-θ theta, using the angle we are given as θ.
-> Now we can re-write and solve our trig equations using our newly found reference angle, 45º.
Now we are going to use our 45º 45º 90º special triangle and SOH CAH TOA to evaluate our trig function. For a review on how to use SOH CAH TOA, check out this link here.
When you’re ready, try the problems on your own below!
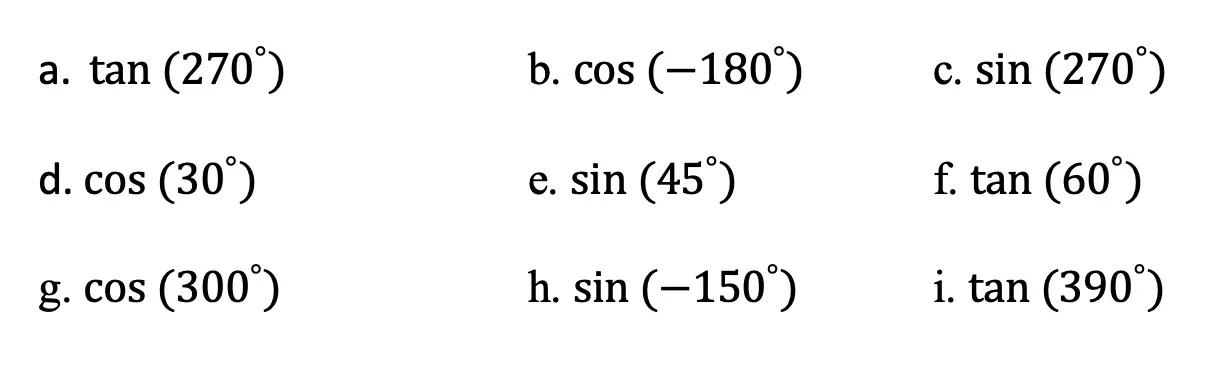
Practice Questions:
Solve the following trig functions using a unit circle and your knowledge of special triangles:
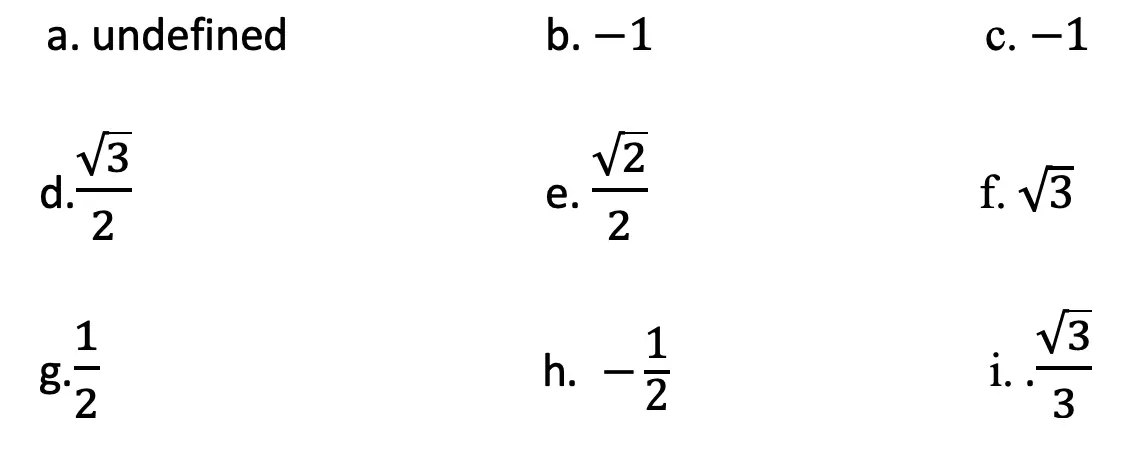
Solutions:
Still got questions? No problem! Don’t hesitate to comment with any questions or check out the video above for even more examples. Happy calculating! 🙂
d=Common Difference (Number Added/Subtracted to each Term in Sequence)
Hi everyone and welcome to Mathsux! In this post, we’re going to go over arithmetic sequences (otherwise known as arithmetic progression). We’ll identify what arithmetic sequences are, break down each part of the arithmetic sequence formula an=a1+(n-1)d, and solve two different types of examples. As always if you want more questions, check out the video below and the practice problems at the end of this post. Happy calculating! 🙂
What are Arithmetic Sequences?
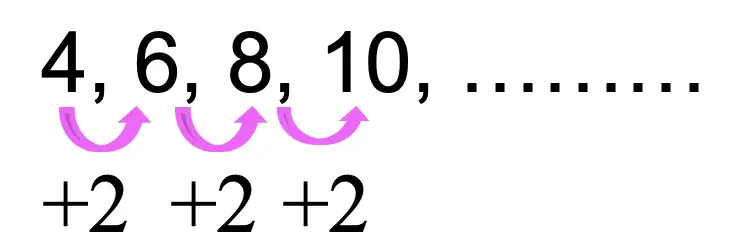
Arithmetic sequences are a sequence of numbers that form a pattern when the same number is either added or subtracted to each successive term. Take a look at the example of an arithmetic sequence below:
Notice the pattern? We are adding the number 2 to each term in the sequence above. If the pattern were to continue, the next term of the sequence above would be 10+2 which gives us 12. This is an arithmetic sequence!
In the above sequence, it’s easy for us to identify what the next term in the sequence would be, but what happens if we were asked to find the 123rd term of an arithmetic sequence? That’s where the Arithmetic Sequence Formula would come in handy!
Arithmetic Sequence Formula:
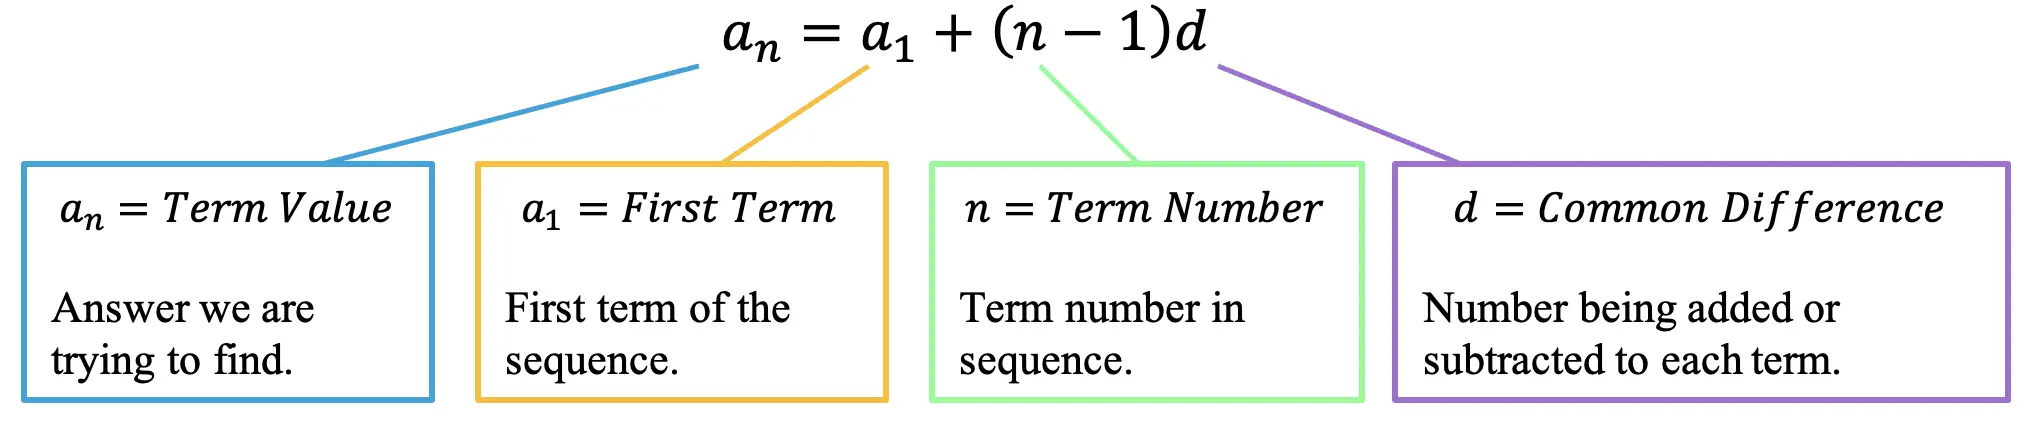
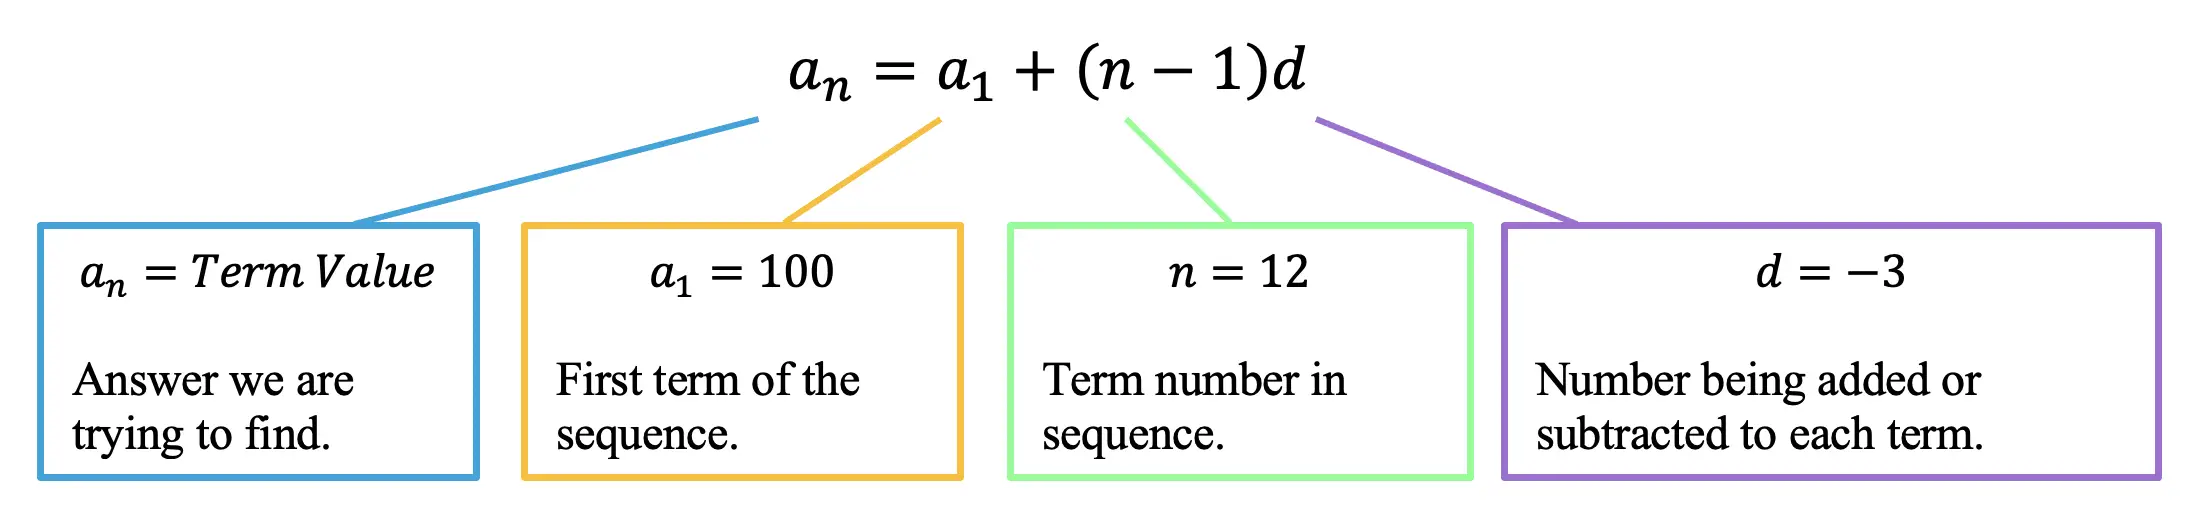
Take a look at the arithmetic sequence formula below, where each piece of our formula is identified with a purpose.
an=a1+(n-1)d
a1= The first term is always going to be that initial term that starts our arithmetic sequence. In this case, our sequence is 4,6,8,10, …… so our first term is the number 4.
n= Another interesting piece of our formula is the letter n, this always stands for the term number we are trying to find. A great way to remember this is by thinking of the term we are trying to find as the nthterm, which is unknown.
d = One key thing to notice about the formula below that is unique to arithmetic sequences is something called the Common Difference. The common difference is the number that is added or subtracted to each consecutive term within the sequence.
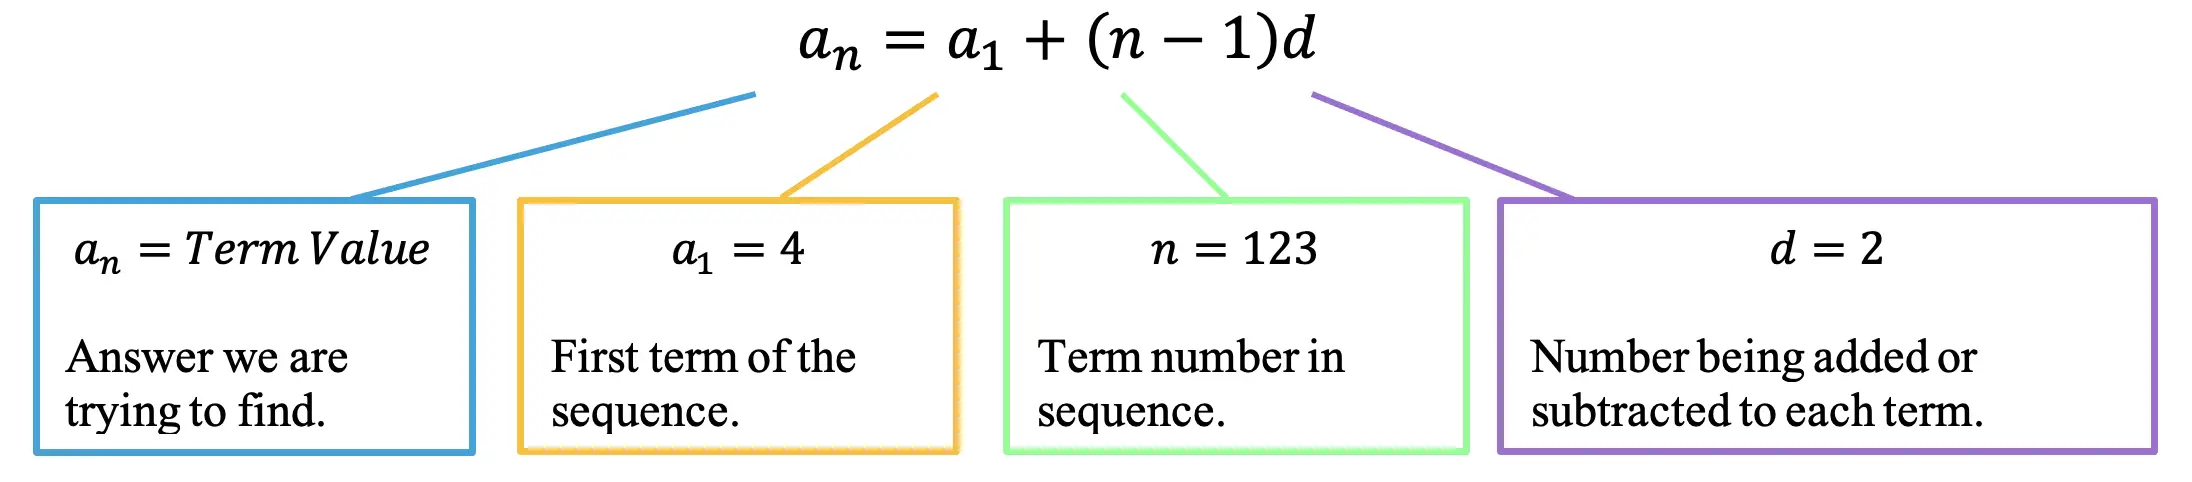
Now that we know the arithmetic sequence formula, let’s try to answer our original question below:
Step 1: First let’s identify the common difference between each previous and subsequent term of the sequence. Notice each term in the sequence is being added by 2 (like we identified earlier in this post). Therefore, our common difference for this sequence is 2.
Step 2: Next, let’s write the arithmetic sequence formula and identify each part of our formula (First Term=4, Term number=123, common difference=2).
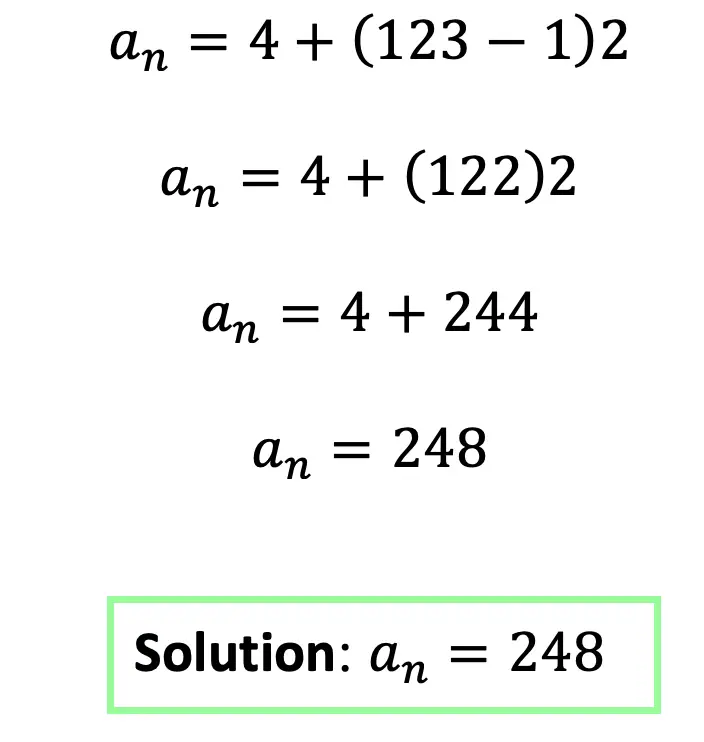
Step 3: Fill in our formula and solve with the given values.
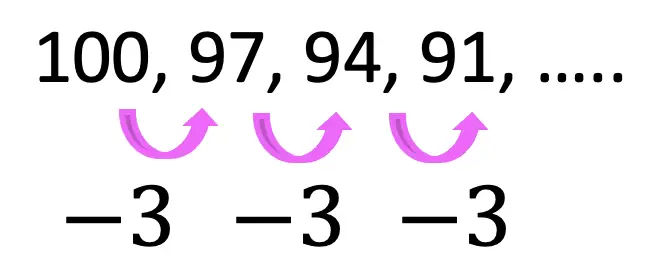
Now let’s look at another example where we subtract the same number from each term in the sequence, making the common difference negative.
Step 1: First let’s identify the common difference between each previous term and each subsequent term of the sequence. Notice each term in the sequence is being subtracted by 3. Therefore, our common difference for this sequence is -3, negative, because we are subtracting.
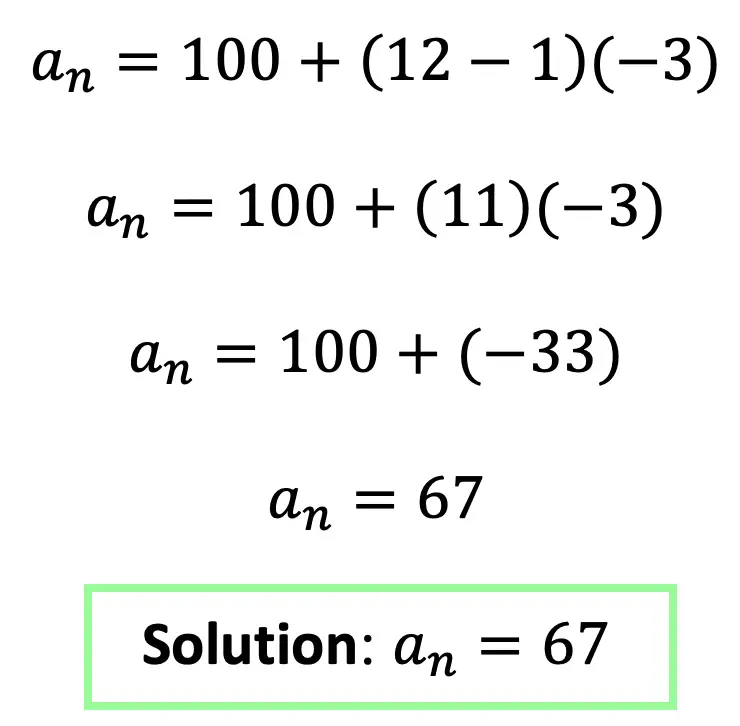
Step 2: Next, let’s write the arithmetic sequence formula and identify each part of our formula (First Term=100, Term number=12, common difference=-3).
Step 3: Finally, let’s fill in our formula and solve with the given values.
Think you are ready to practice solving arithmetic sequences on your own? Try the following practice questions with solutions below:
Practice Questions:
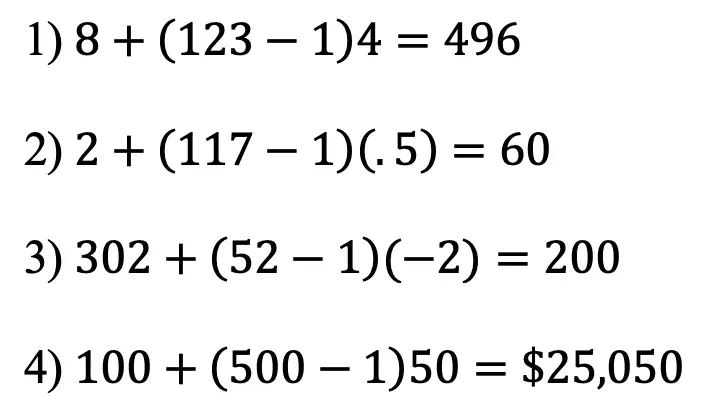
Find the 123rd term given the following sequence: 8, 12, 16, 20, 24, ….
Find the 117th term given the following sequence: 2, 2.5, 3, 3.5, …..
Find the 52nd term given arithmetic sequence: 302, 300, 298, …..
A software engineer charges $100 for the first hour of consulting and $50 for each additional hour. How much would 500 hours of the consultation cost?
Solutions:
Still got questions? No problem! Don’t hesitate to comment with any questions or check out the video above. Happy calculating! 🙂
Fun Fact!
Did you know that the arithmetic sequence formula can be considered an explicit formula? An explicit formula means that even though we do not know the other terms of a sequence, we can still find the unknown value of any term within the given sequence. For example, in the first example we did in this post (example #1), we wanted to find the value of the 123rd term of the sequence. We were able to do this by using the explicit arithmetic sequence formula, and most importantly, we were able to do this without finding the first 122 previous terms one by one…life is so much easier when there is an explicit arithmetic sequence formula in your life!
Other examples of explicit formulas can be found within the geometric sequence formula and the harmonic series.
Related Posts:
Looking to learn more about sequences? You’ve come to the right place! Check out these sequence resources and posts below. Personally, I recommend looking at the geometric sequence or finite arithmetic series posts next!
Still, got questions? No problem! Don’t hesitate to comment below or reach out via email. And if you would like to see more MathSux content, please help support us by following ad subscribing to one of our platforms. Thanks so much for stopping by and happy calculating!
Greetings math folks! For anyone familiar with trigonometry and SOH CAH TOA trigonometric ratio you should know that there is something special about right triangles. We are about to learn more about right triangles, as there are two distinct types of special right triangles in this world that we need to know, this includes the 45 45 90 triangle and the 30 60 90 triangle. In this post, we are going to go over the 45 45 90 special right triangle! If you are looking for the other very famous special triangle, (30 60 90), check out this post here.
With the help of this special triangle, we are going to see how to find the missing sides of a right triangle when given only one of its lengths (and the angles of the right triangle given are 45 45 90). For even more examples, check out the video and practice questions below and at the end of this post. Happy calculating! 🙂
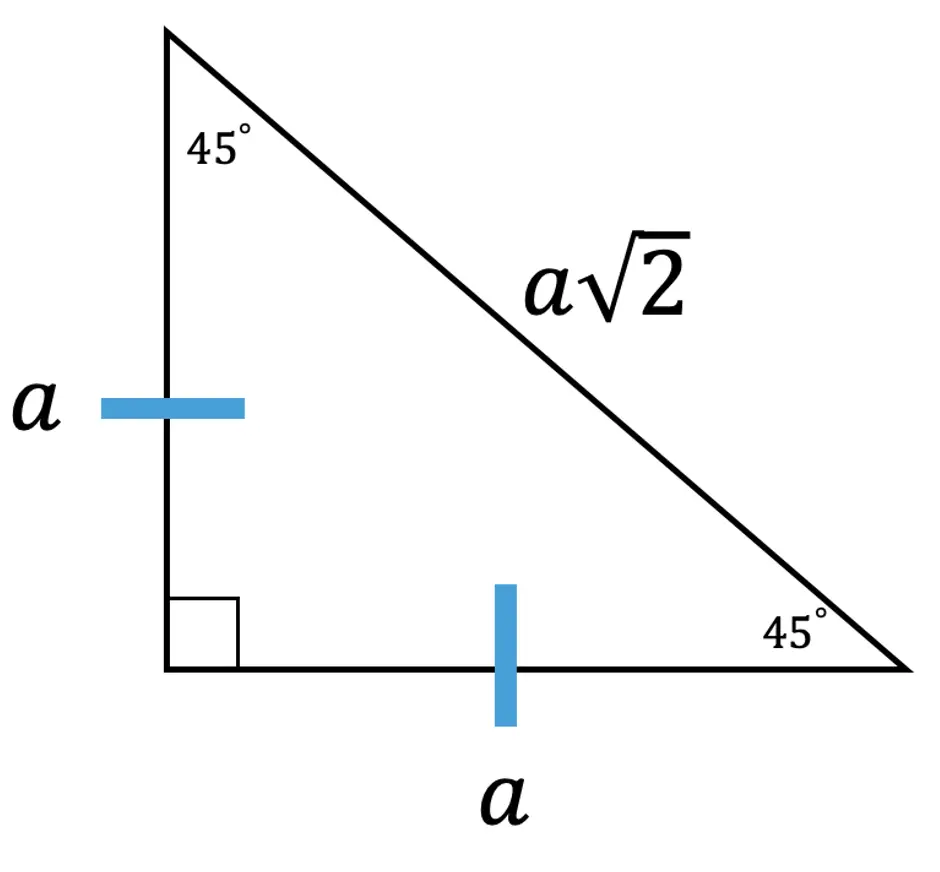
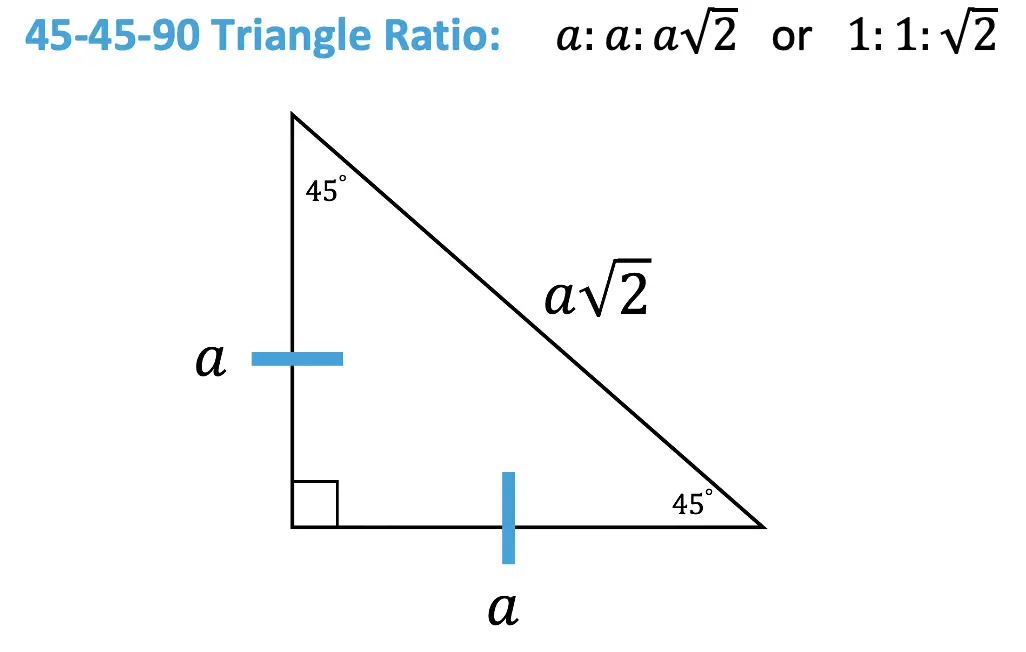
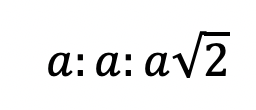
45 45 90 Right Triangle Ratio:
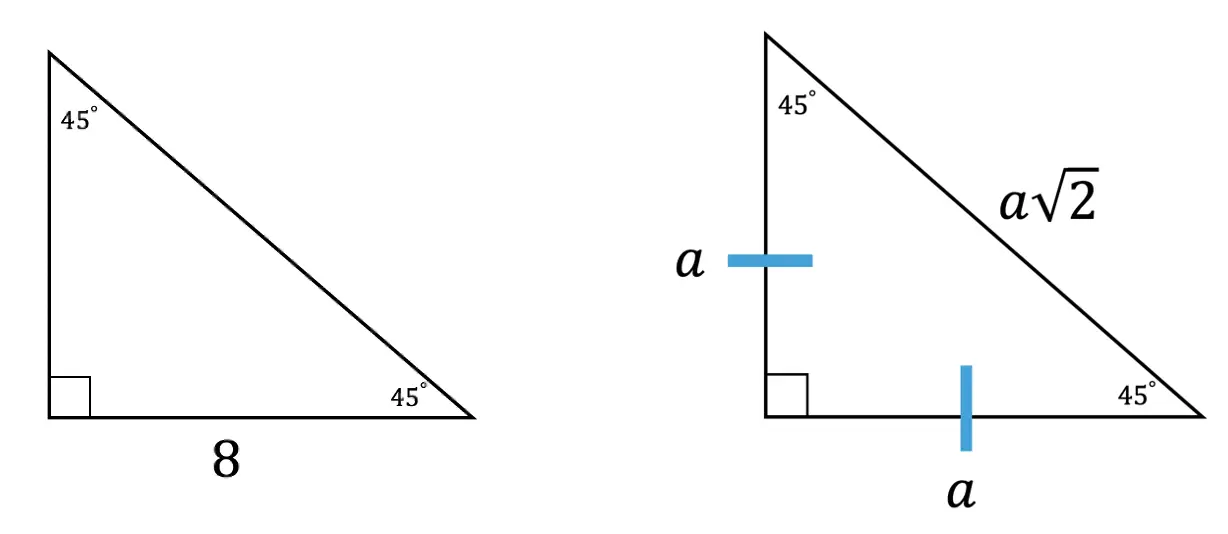
Looking above at our 45 45 90 special triangle, notice it contains one right angle and 2 equal angles of 45 degrees. Based on these angle proportions, we are able to infer information about each sides length, thats where our ratio comes in!
45 45 90 Triangle – Why is it special? Where did come from?
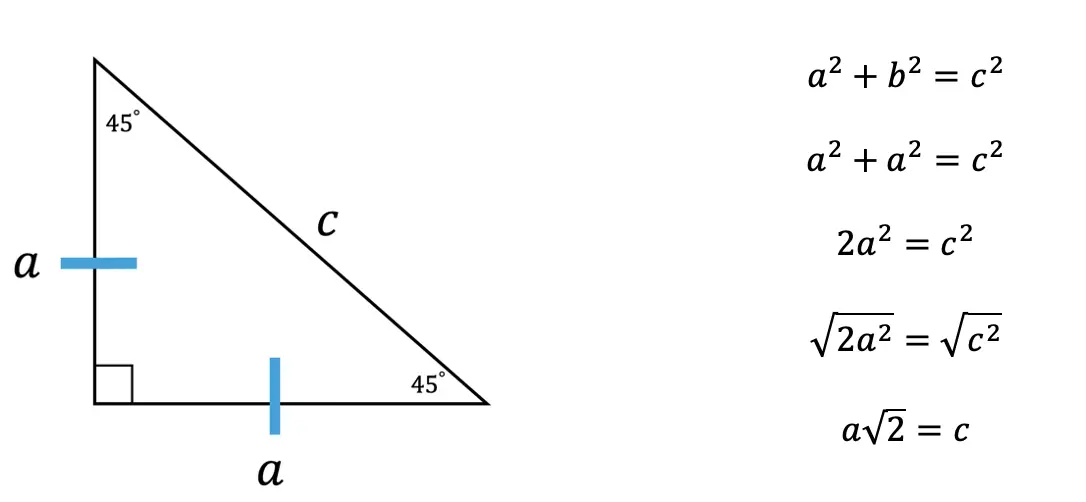
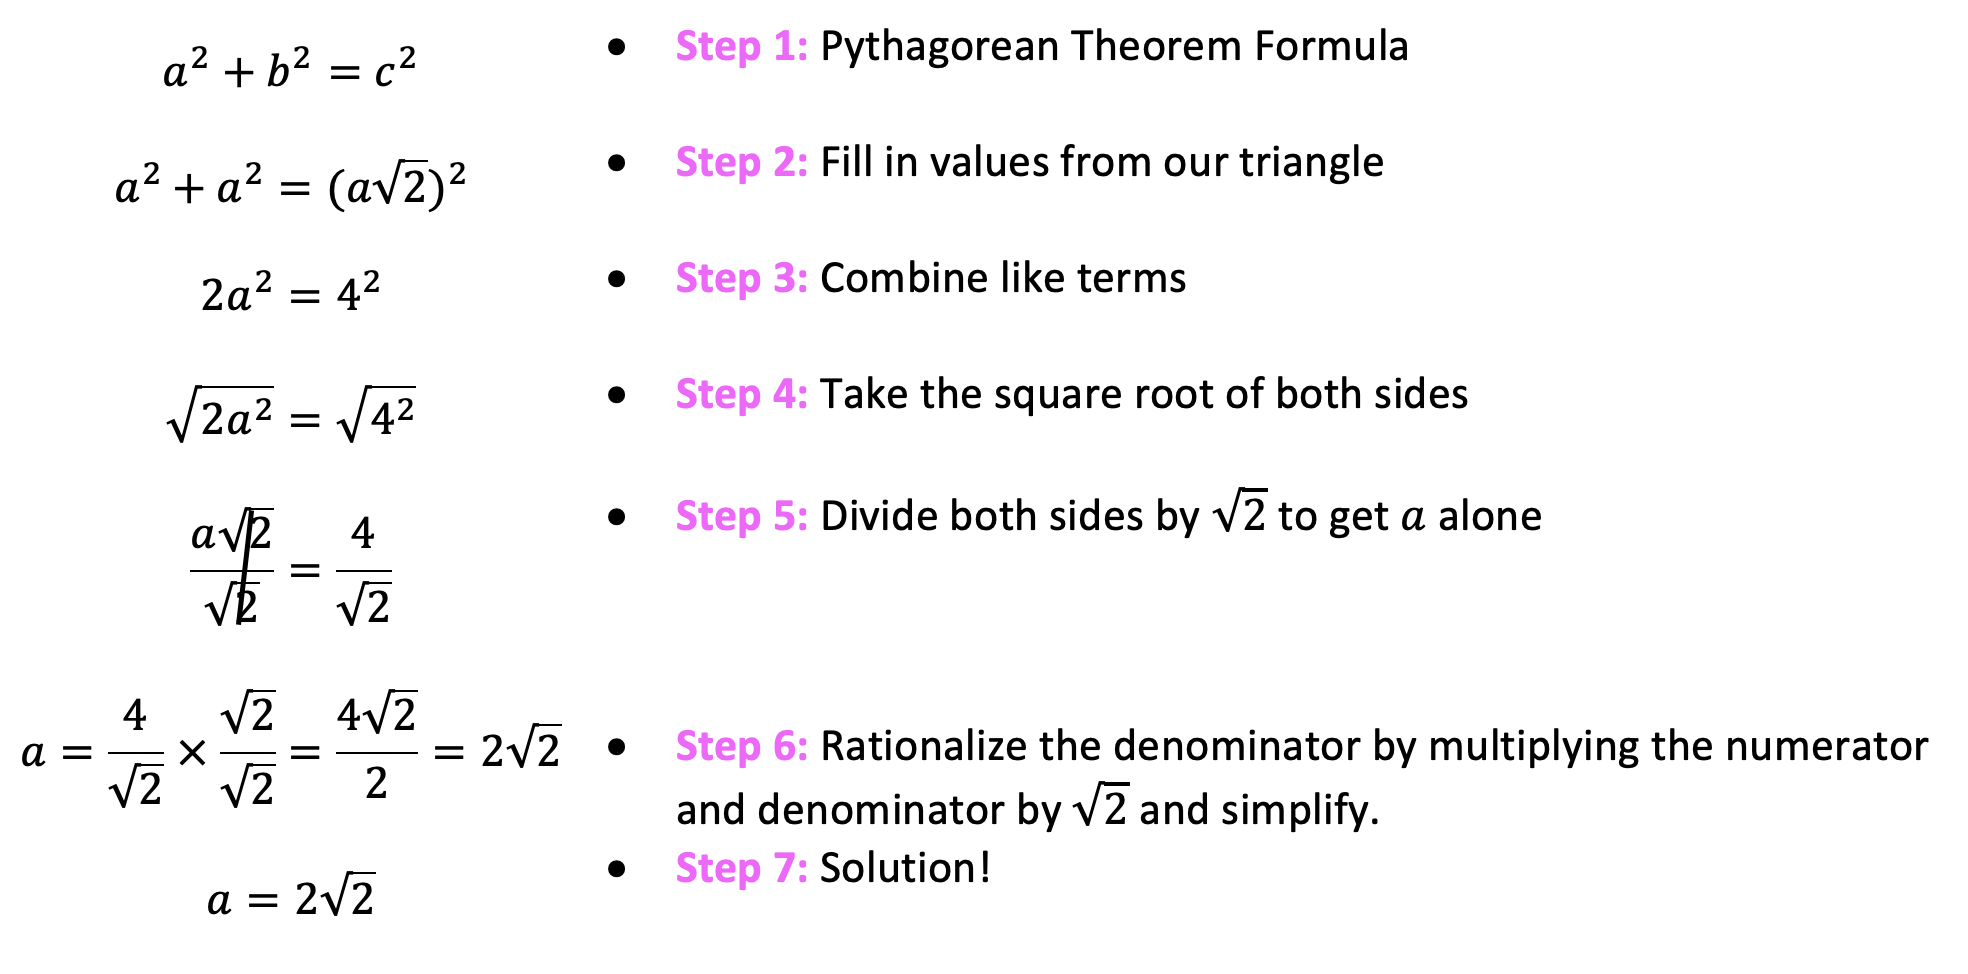
45 45 90 special right triangles are “special” because they are a type of Isosceles Right Triangle, meaning they have two equal sides (marked in blue below). If we know that the isosceles triangle has two equal lengths, we can find the value of the length of the hypotenuse by using the Pythagorean Theorem based on the other two equal sides. Check out how we derive the 45 45 90 ratio below!
Notice, we started with the Pythagorean Theorem, then filled in our variables based on each given sides length. Next, we combined like terms and then took the square root of each side of the equation. Lastly, we found the value of hypotenuse, c, based on the other two legs, which is equal to the length of a times radical 2.
Now that we know the length of the hypotenuse in terms of each sides length a, we can re-label our triangle. Since we found the length of the hypotenuse in relation to the two equal legs, notice that this creates a ratio that applies to each and every triangle out there!
How do I use this ratio?
Ok, great we have derived the 45 45 90 ratio, but what do I do with this thing and how do I use it?
Knowing the above ratio, allows us to find the length of any missing side of a 45 45 90 special triangle (when given the value of one of its sides).
Let’s now try some 45 45 90 right triangle examples with missing sides below:
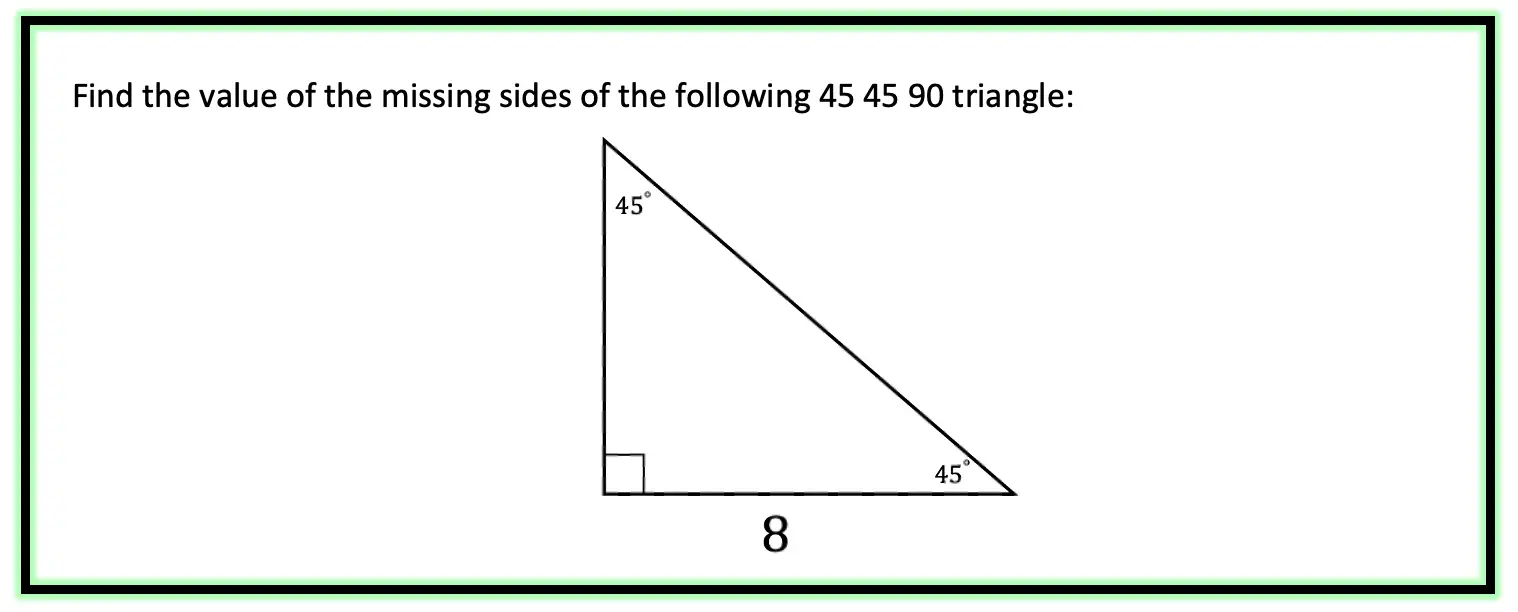
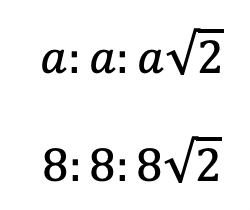
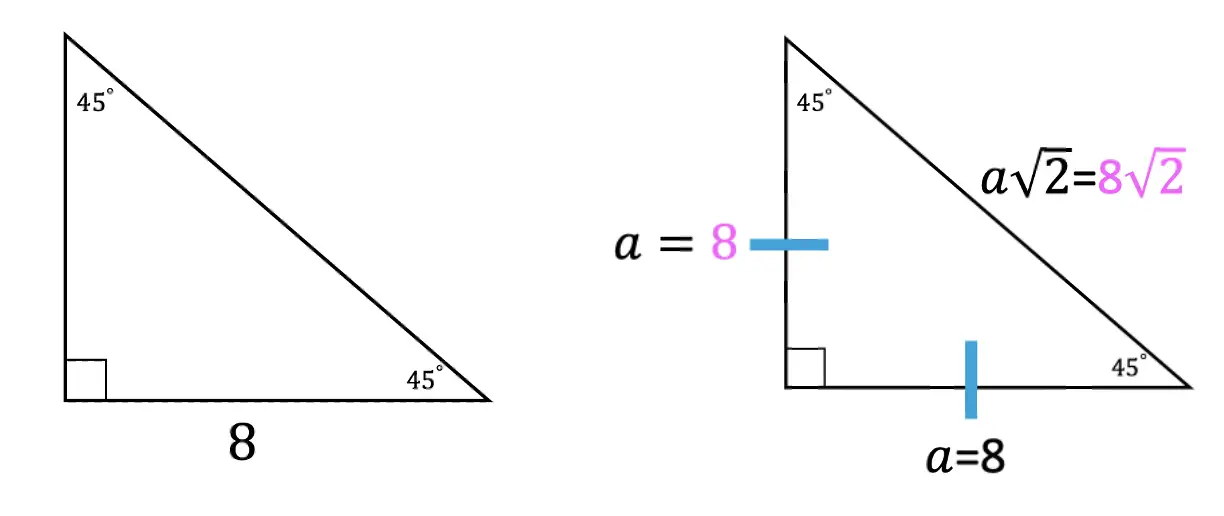
Example #1:
Step 1: First, let’s look at our ratio and compare it to our given right triangle.
Step 2: Notice we are given the value of the bottom leg, a=8. Knowing this we can fill in each length of our right triangle based on the ratio of a 45 45 90 special triangle shown below:
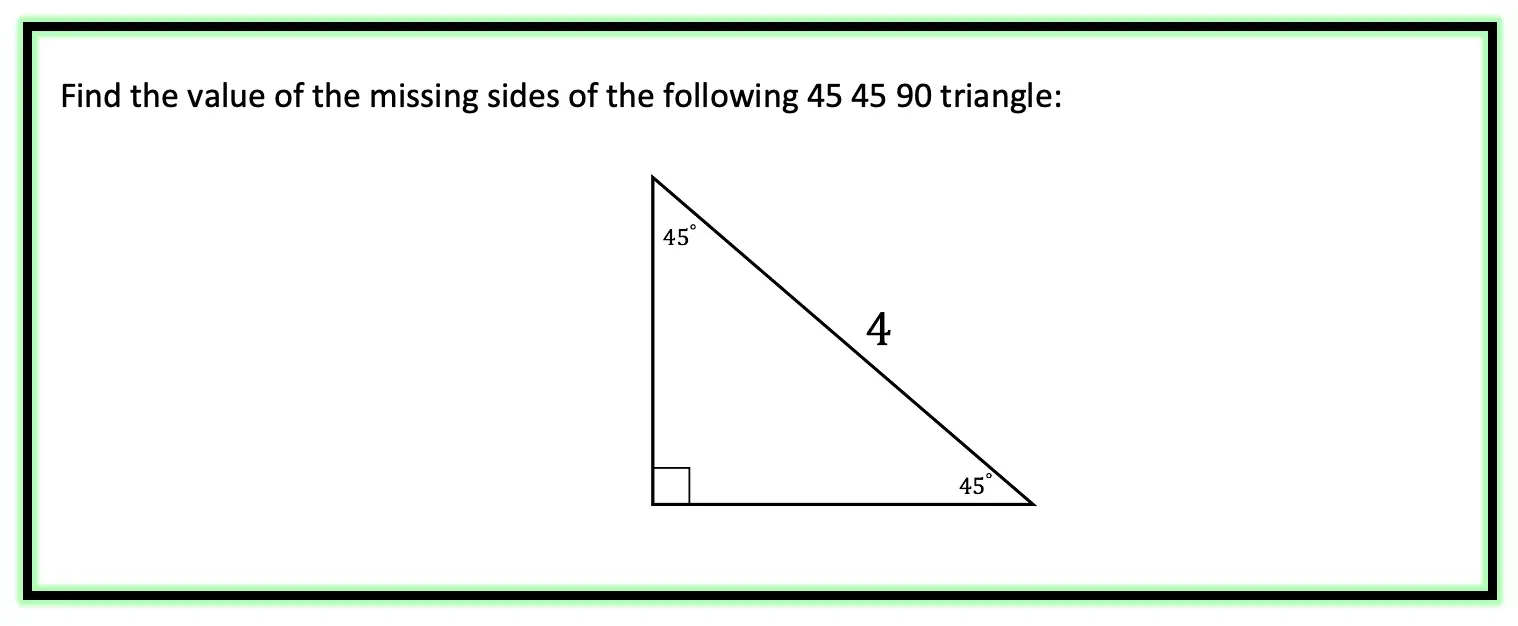
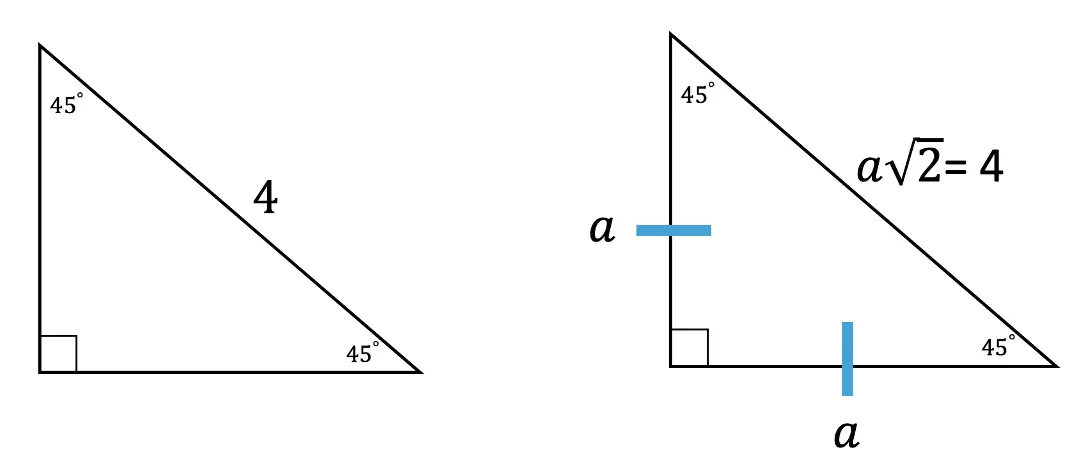
Now let’s look at an example where we are given the length of the hypotenuse and need to find the values of the other two missing sides of a 45 45 90 right triangle.
Example #2:
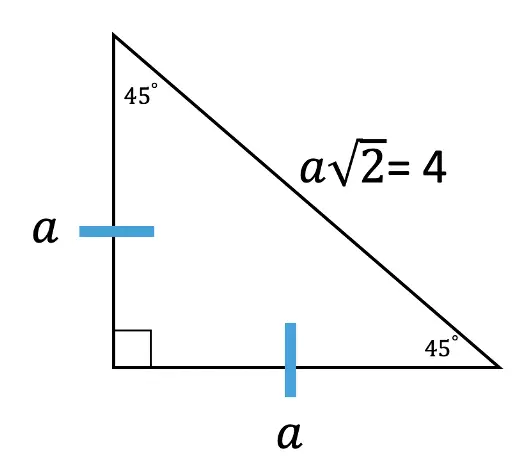
Step 1: First, let’s look at our ratio and compare it to our given right triangle.
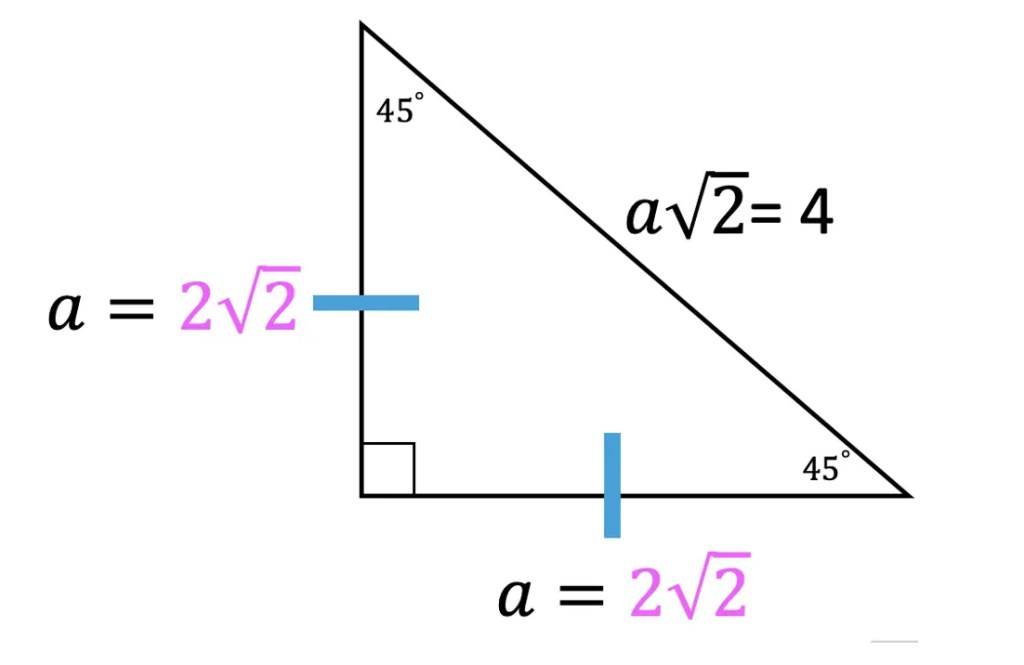
Step 2: In this case, we need to do a little math to find the value of a, based on the Pythagorean Theorem. See how we use the Pythagorean Theorem step by step below to find the value of missing sides represented by a.
Now try mastering the art of the 45 45 90 special triangle on your own with the practice problems below!
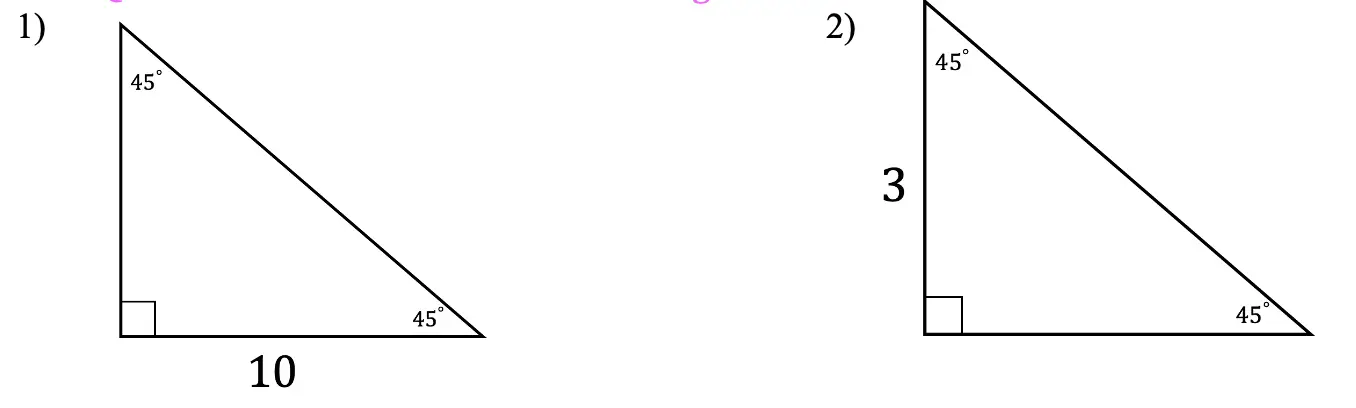
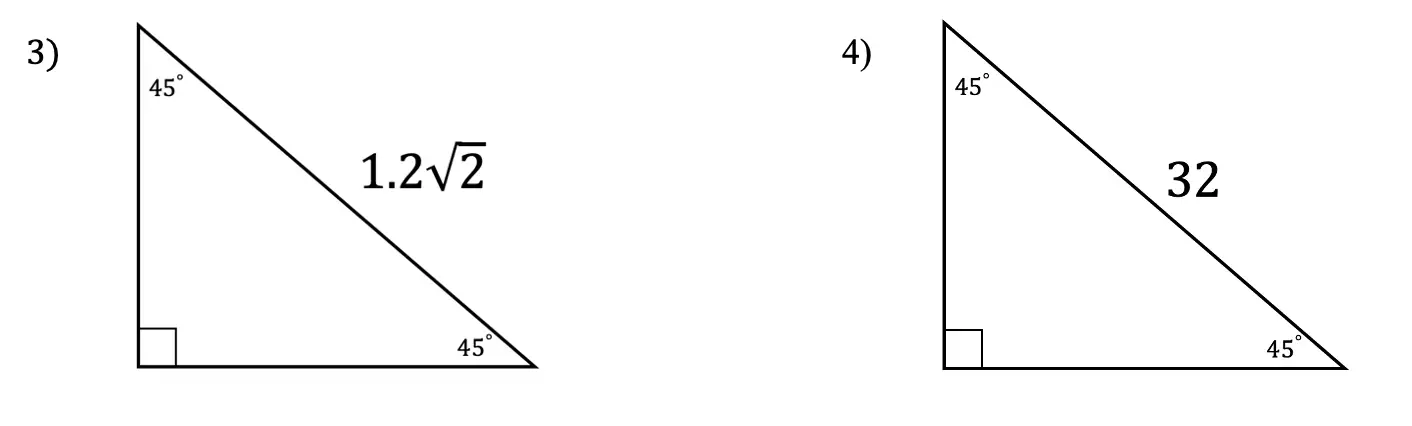
Practice Questions:
Find the value of each missing side length of each 45 45 90 right triangle.
Solutions:
Still got questions? No problem! Don’t hesitate to comment with any questions or check out the video above. Happy calculating! 🙂
Hey there math friends! In this post we will go over how and when to use synthetic division to factor polynomials! So far, in algebra we have gotten used to factoring polynomials with variables raised to the second power, but this post explores how to factor polynomials with variables raised to the third degree and beyond!
If you have any questions don’t hesitate to comment or check out the video below. Also, don’t forget to master your skills with the practice questions at the end of this post. Happy calculating! 🙂
What is Synthetic Division?
Synthetic Division is a shortcut that allows us to easily divide polynomials as opposed to using the long division method. We can only use synthetic division when we divide a polynomial by a binomial in the form of (x-c), where c is a constant number.
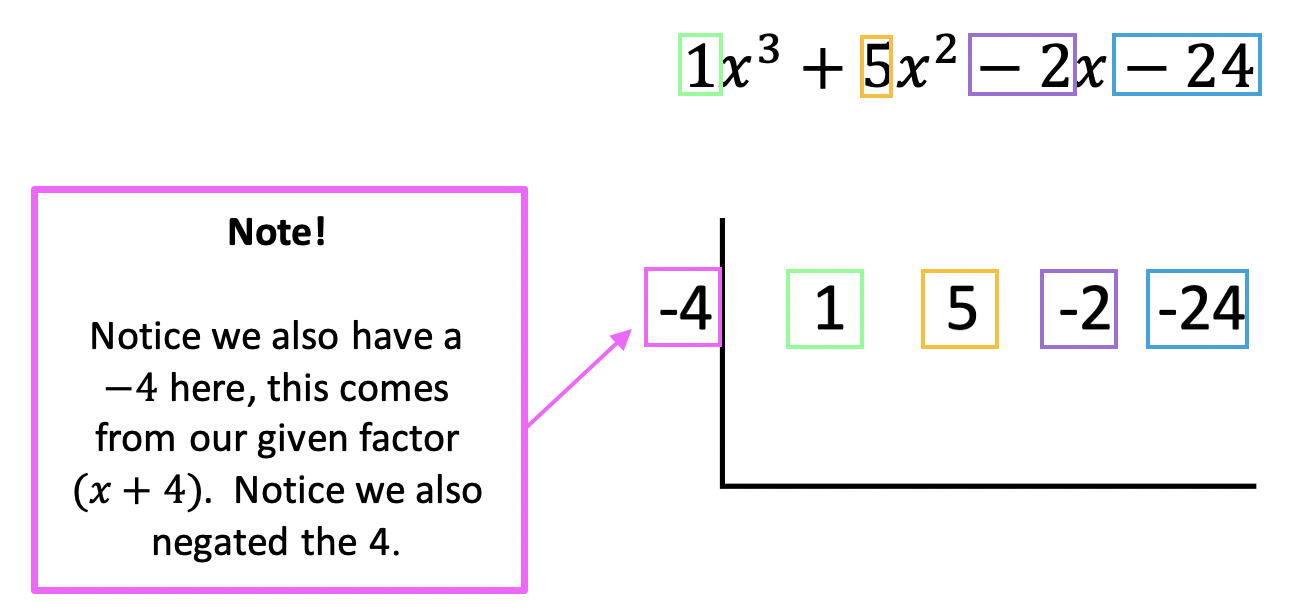
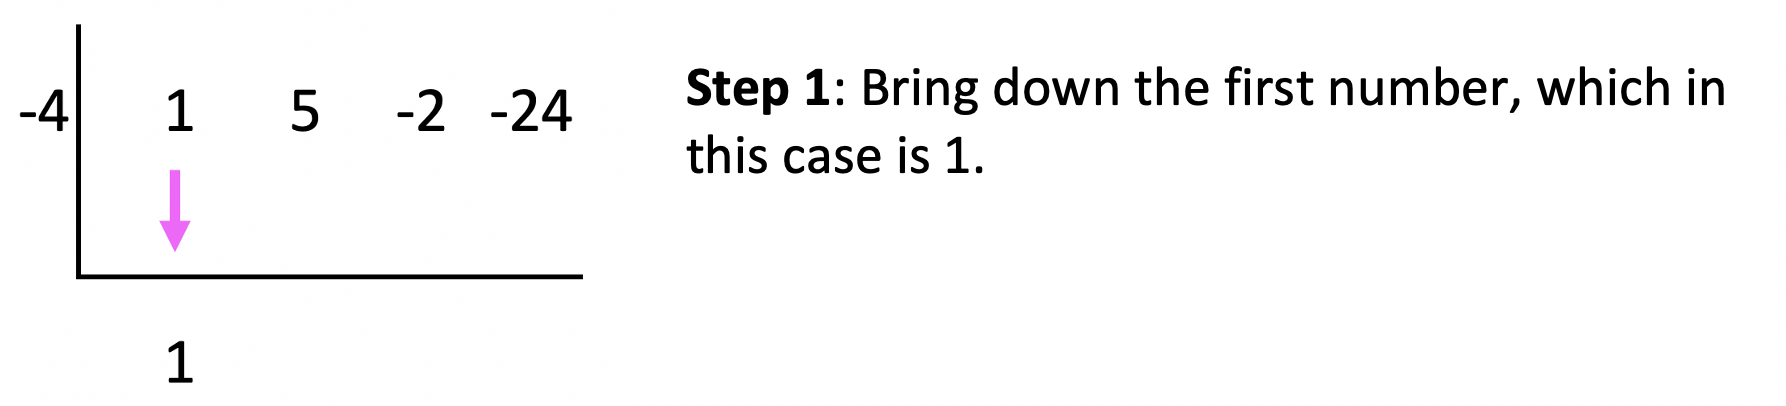
Example #1:
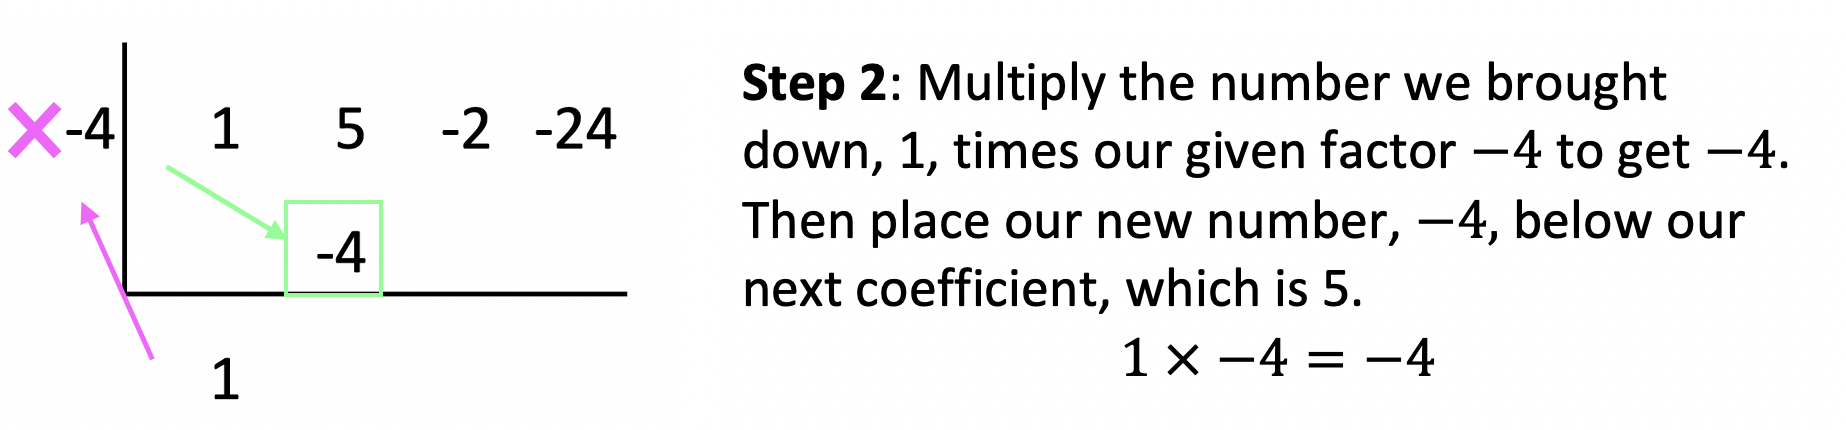
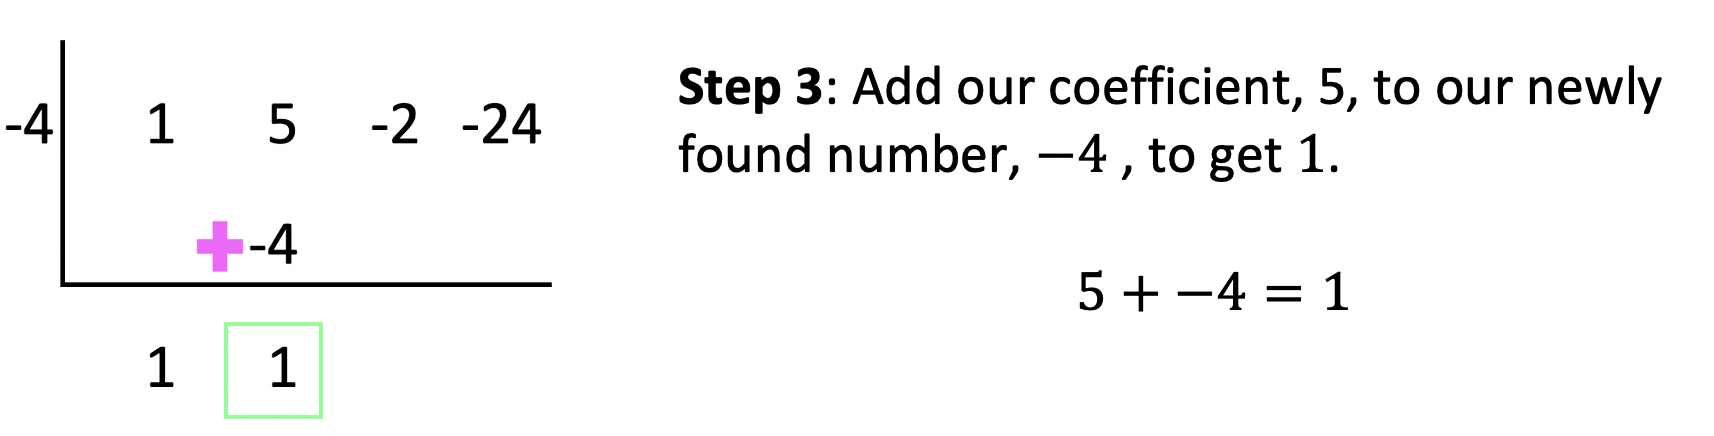
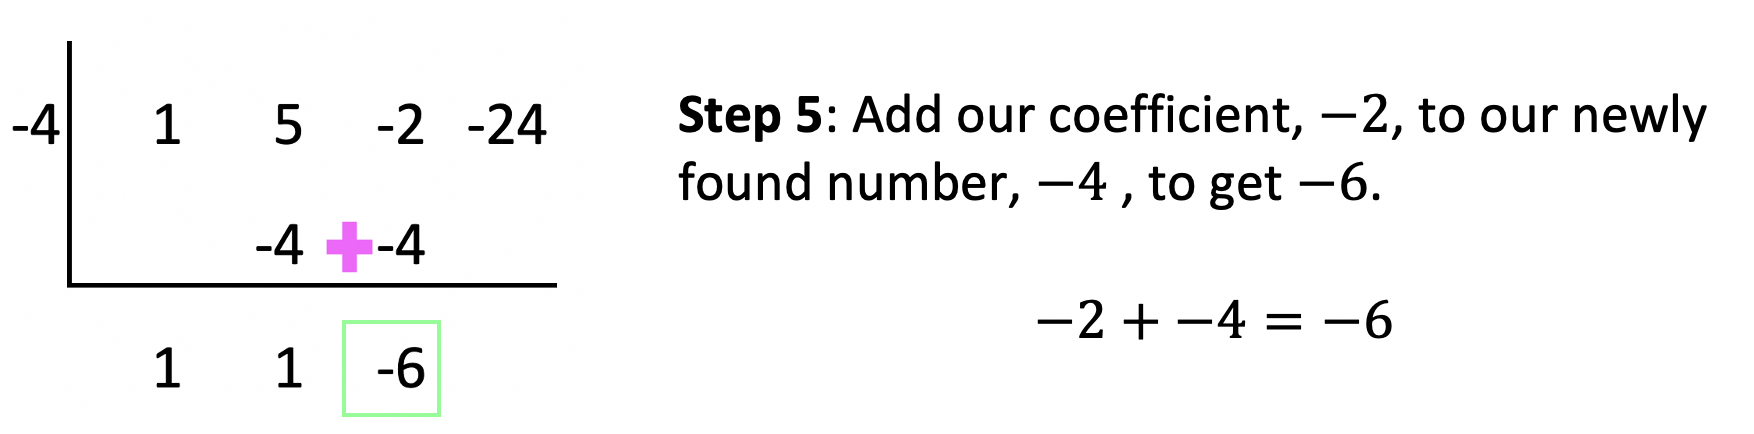
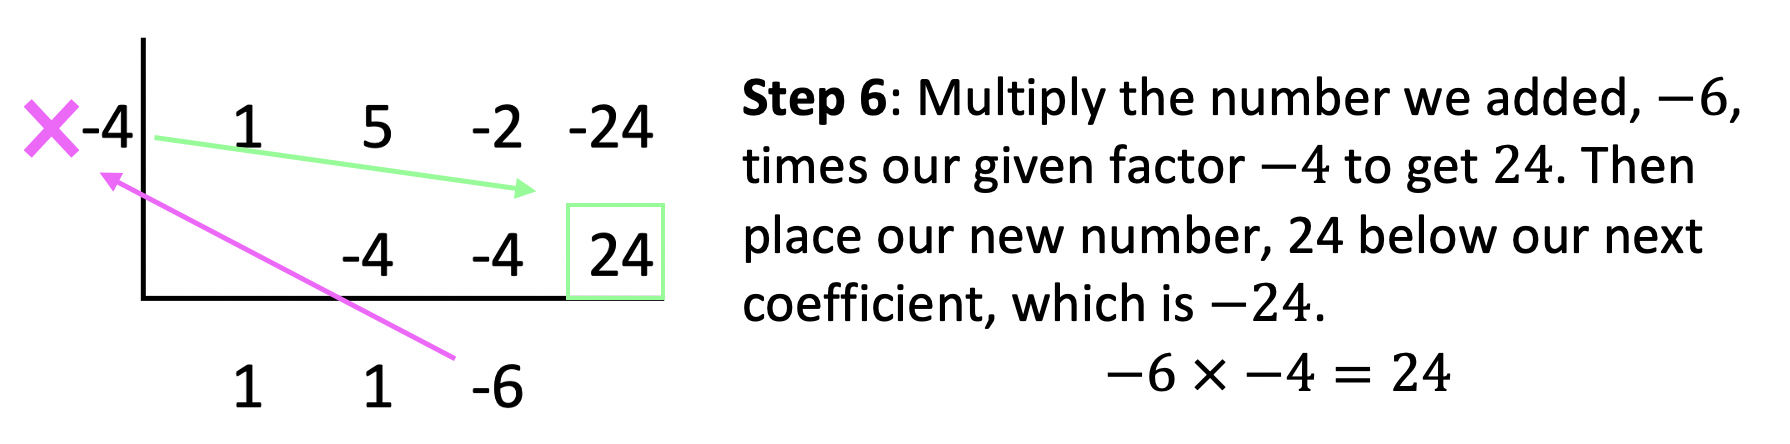
*Notice we can use synthetic division in this case because we are dividing by (x+4) which follows our parameters (x-c), where c is equal to 4.
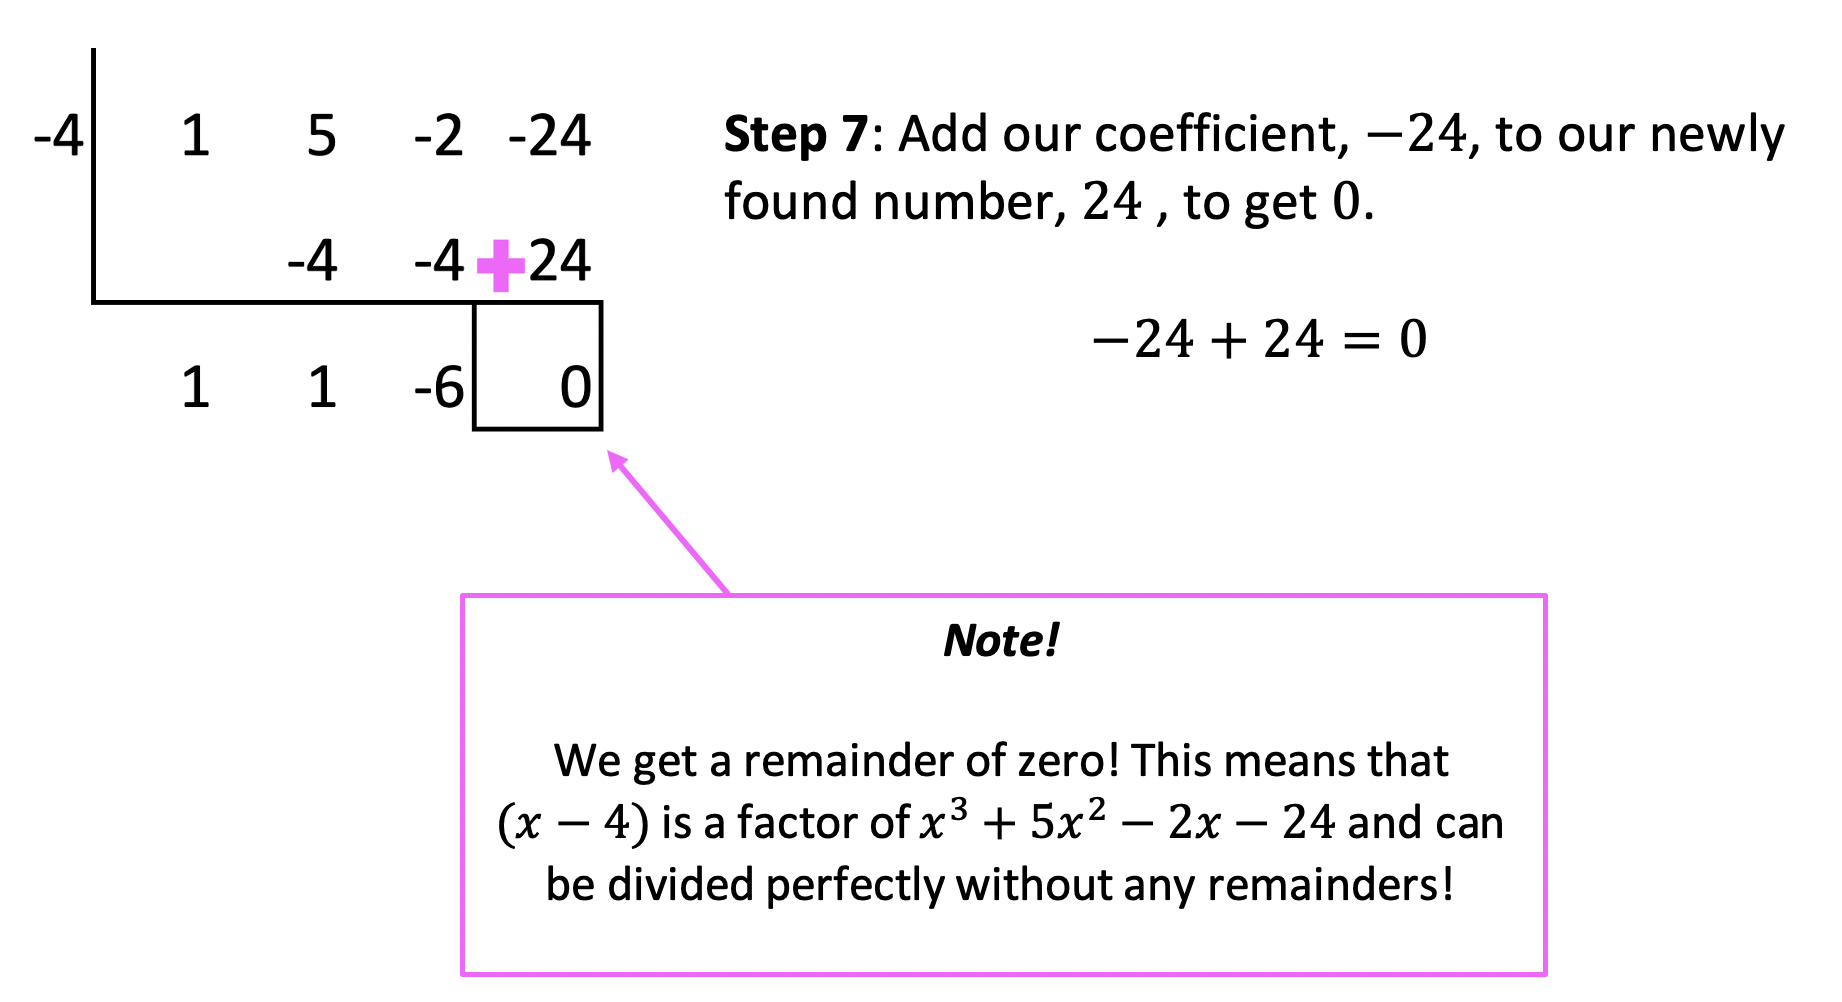
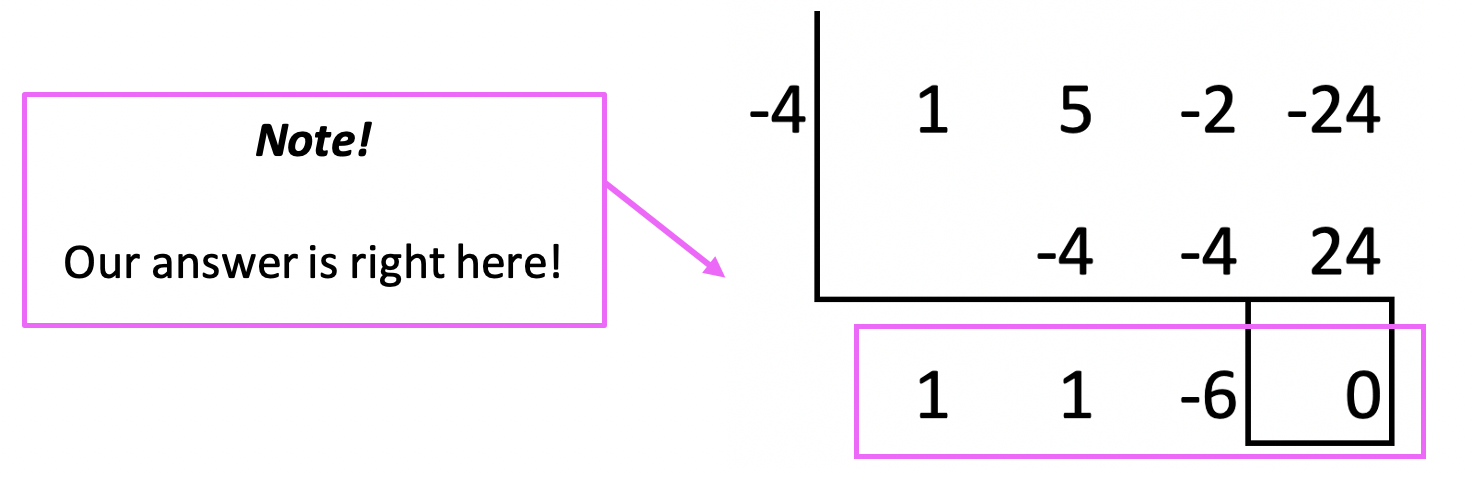
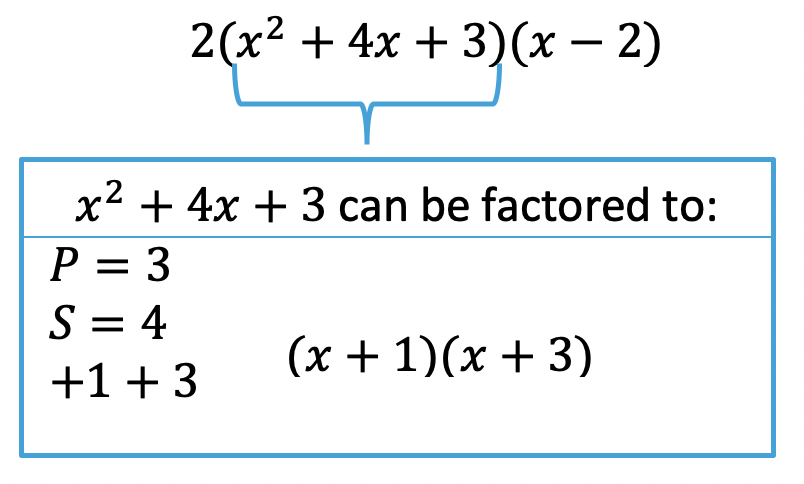
Example #2: Factoring Polynomials
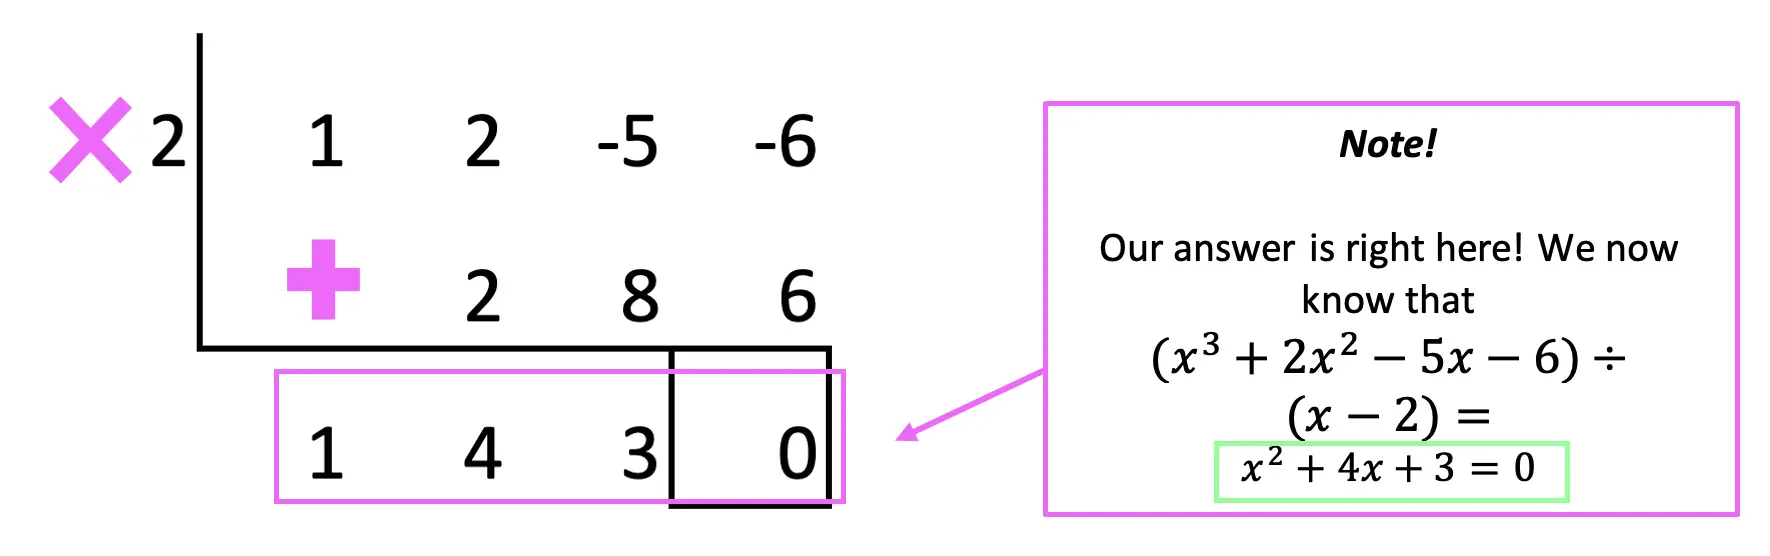
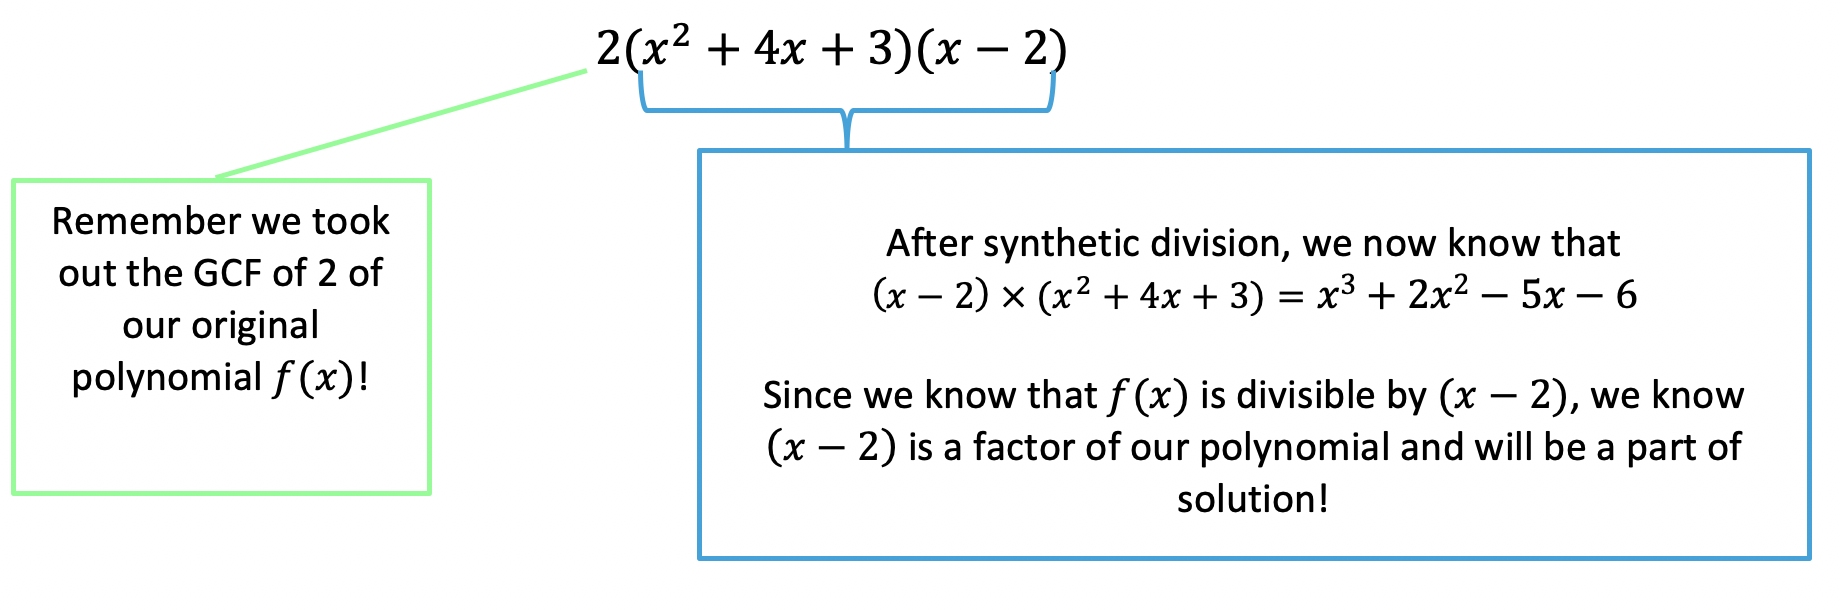
Let’s take a look at the following example and use synthetic division to factor the given polynomial:
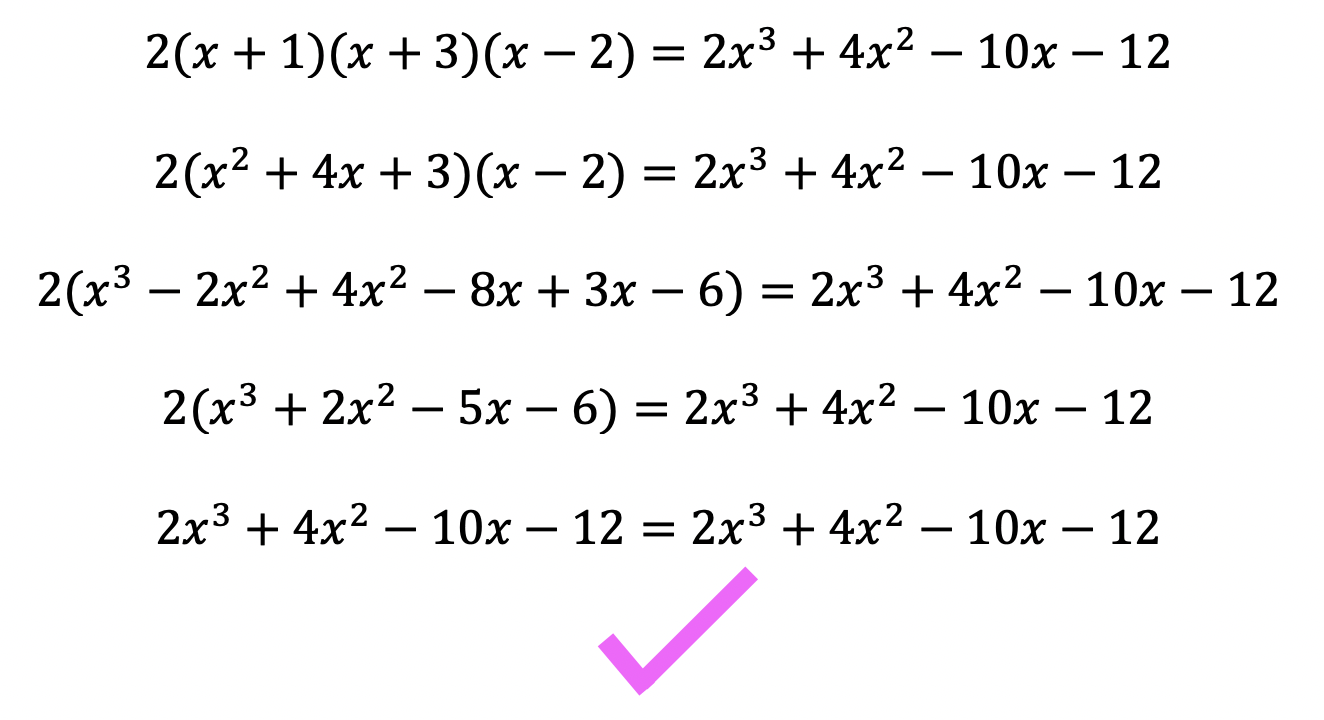
Check!
The great thing about these questions is that we can always check our work! If we wanted to check our answer, we could simply distribute 2(x+1)(x+3)(x-2) and get our original polynomial, f(x)=2x3+4x2-10x-12.
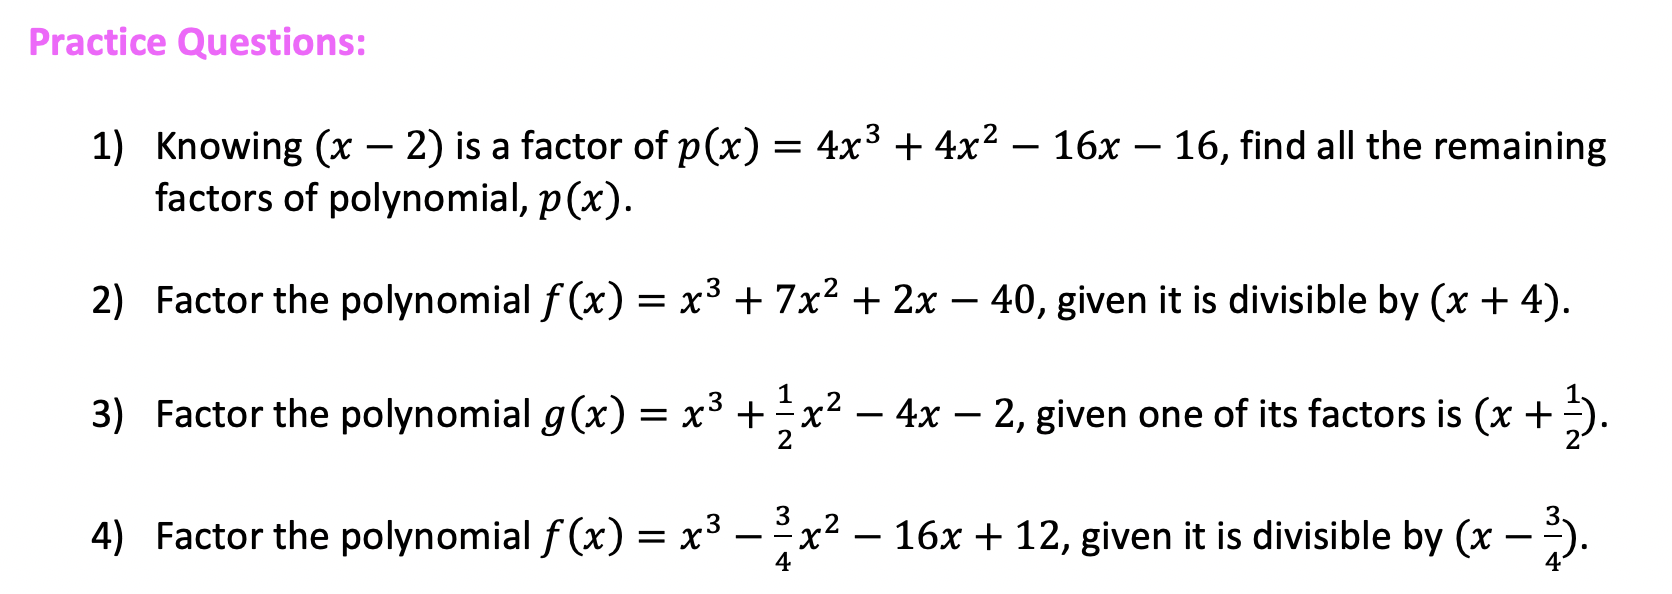
Try the practice problems on your own below!
Looking to brush up on how to divide polynomials the long way using long division? Check out this post here!
Still got questions? No problem! Don’t hesitate to comment with any questions or check out the video above. Happy calculating! 🙂
Greetings math friends! In this post, we arere going to go over the formulas for Variance and Standard Deviation. We will take this step by step by explaining the significance of the variance and standard deviation formulas in relation to a set of data. Get your calculators ready because this step by step although not hard, will take some serious number crunching! Also, don’t forget to check out the video on standard deviation and variance below to see how to check your work using a calculator. Happy calculating! 🙂
If you’re looking for related formulas, Mean Absolute Deviation (MAD) and Expected Value, scroll to the bottom of this post! And if you’re interested we’ll also touch upon the difference between population variance and sample variance later in this post.
What is the Variance?
The variance represents the spread of data or the distance each data point is from the mean. When we have multiple observations in our data, we want to know how far each unit of data is from the mean. Are all the data points close together or spread far apart? What is the probability distribution? This is what the variance will help tell us!
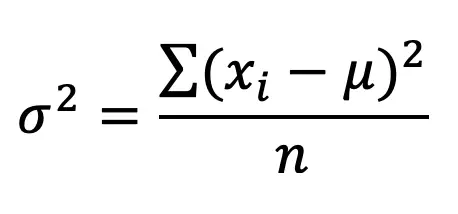
Don’t freak out but here’s the formula for variance, notated as using the greek letter, sigma squared, σ2:
where…
xi= Value of Data Point
μ= mean
n=Total Number of Data Points]
(xi-μ)=Distance each data point is to the mean
In plain English, this translates to:
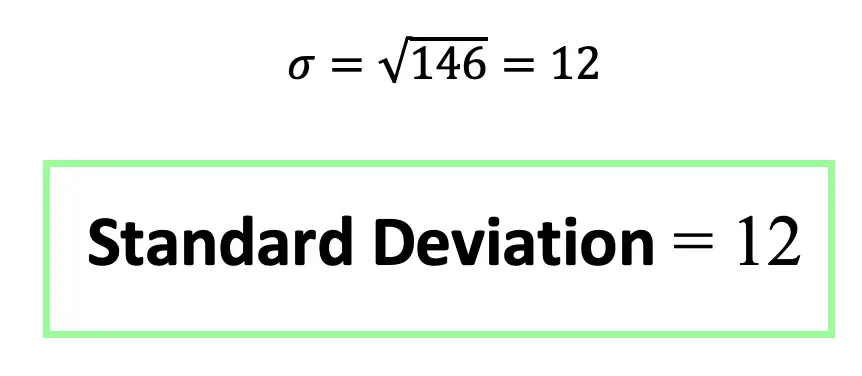
Let’s try an example to find the standard deviation and variance of the data set below.
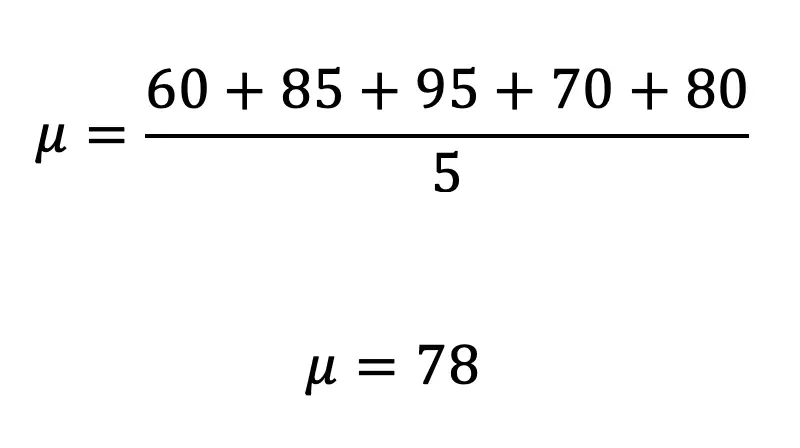
Step 1: First, let’s find the mean, μ.
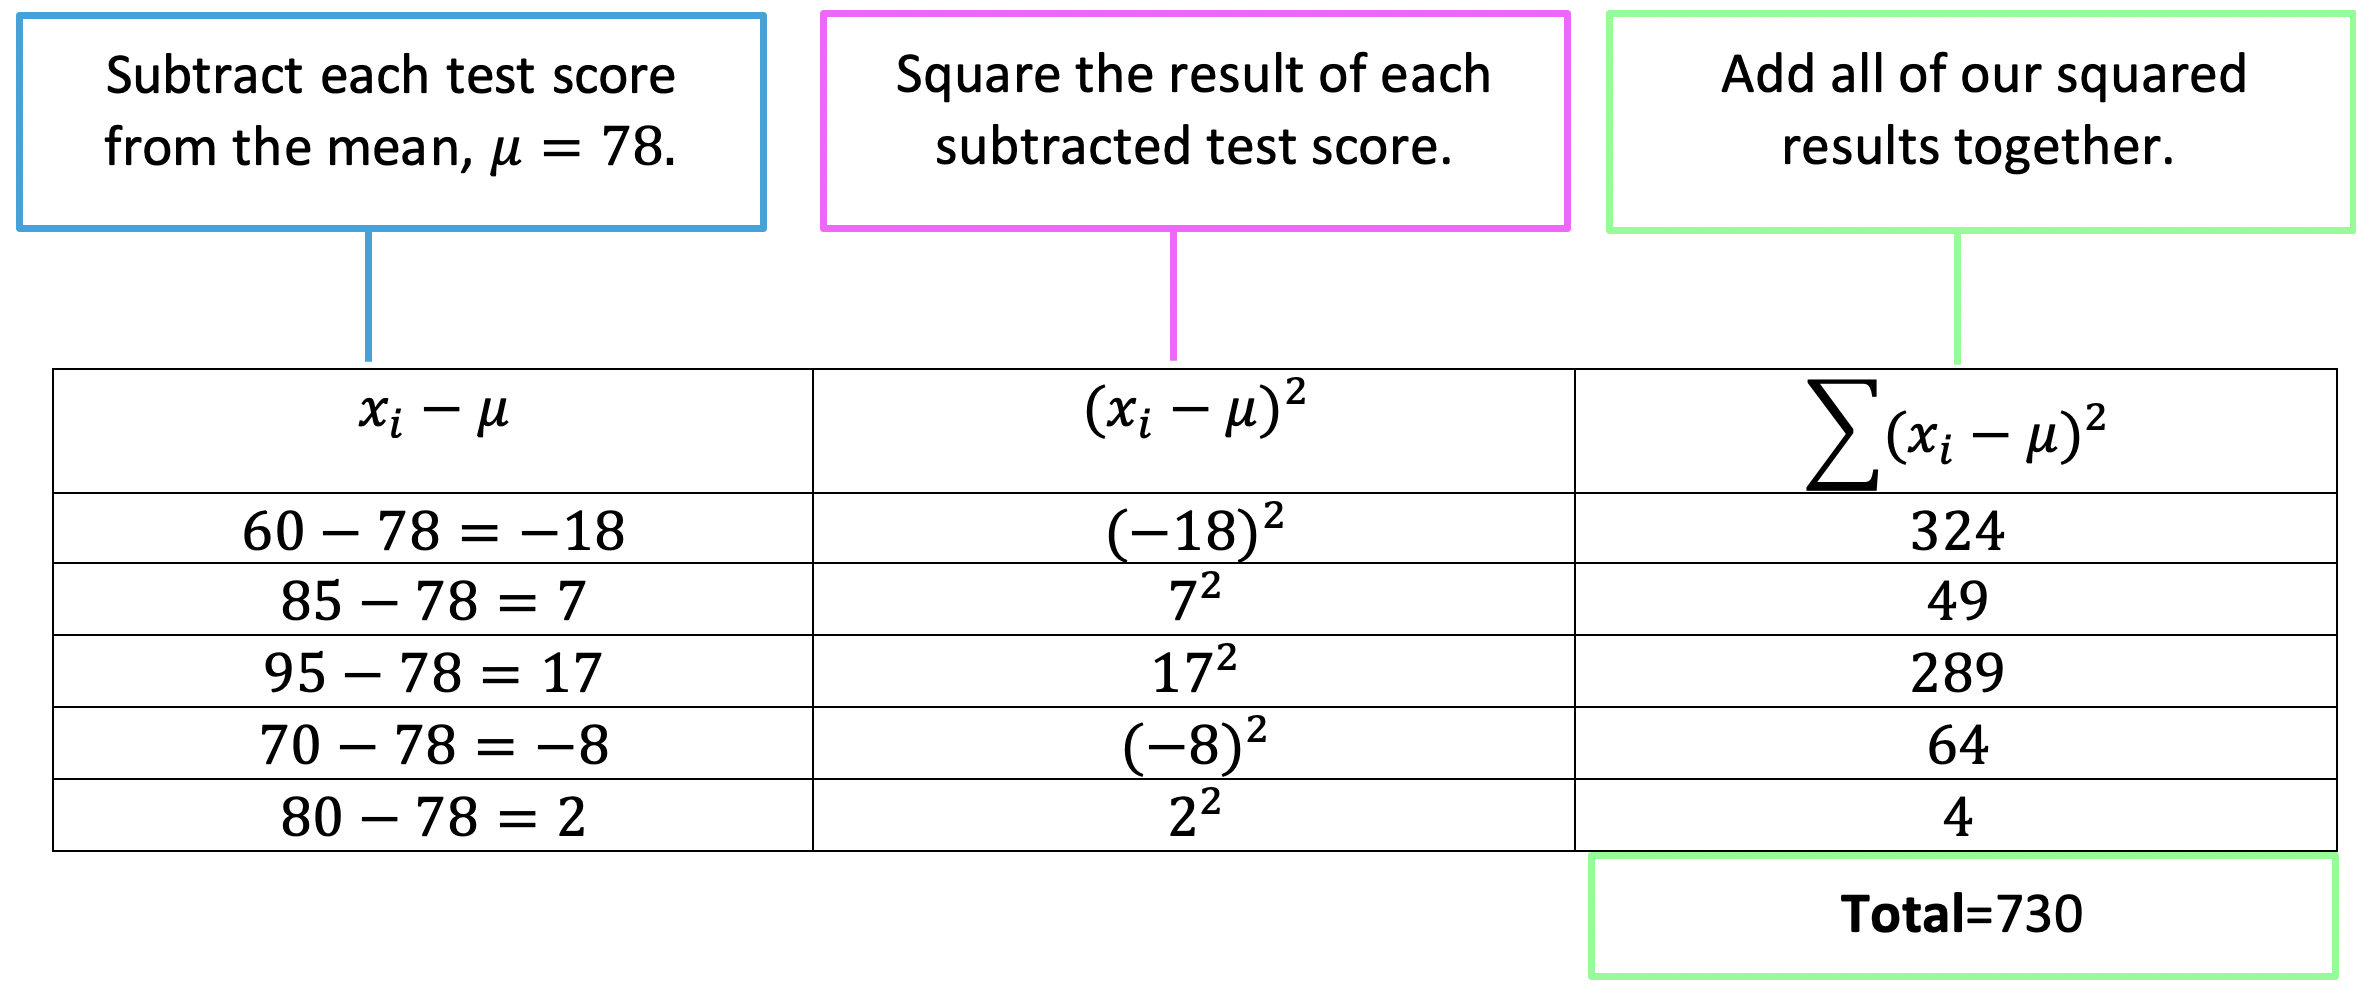
Step 2: Now that we have the mean, we are going to do each part of our formula one step at a time in the table below.
Notice we subtract each test score from the mean, μ=78. Then we square the result of each subtracted test score to get the squared deviation of each data value, then finally sum all the squared results together.
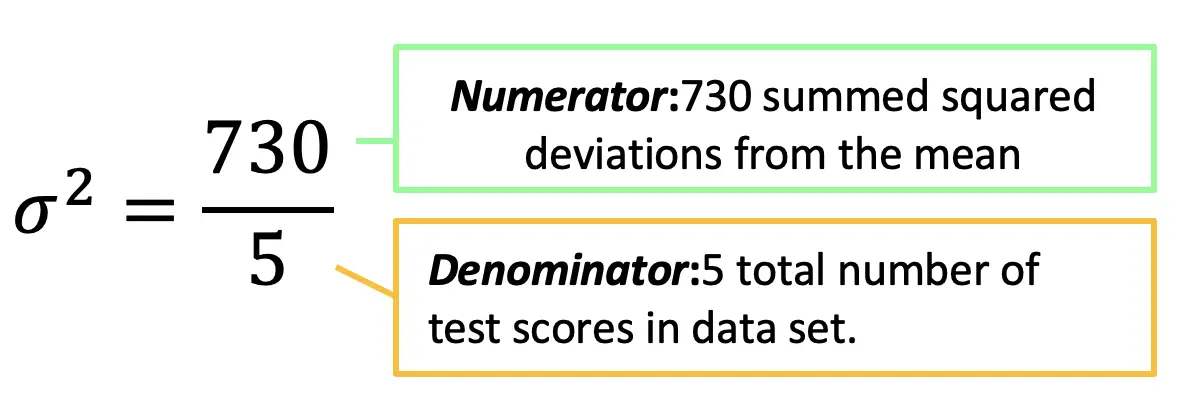
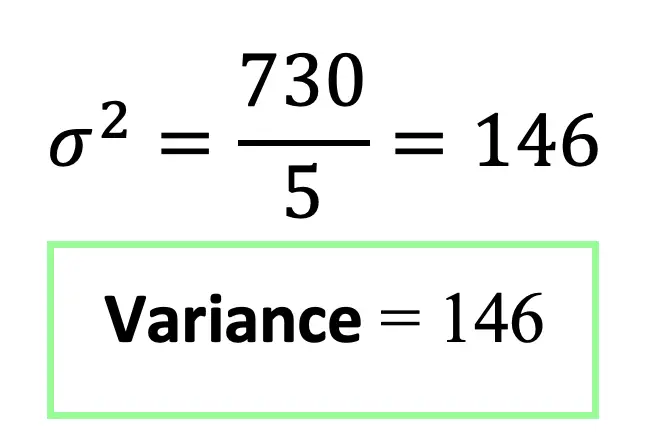
Step 3: Now that we summed all of our squared deviations, to get 730, we can fill this in as our numerator in the variance formula. We also know our denominator is equal to 5 because that is the total number of test scores in our data set.
What is Standard Deviation?
Standard deviation is a unit of measurement that is unique to each data set and is used to measure the spread of data. The standard deviation formula happens to be very similar to the variance formula!
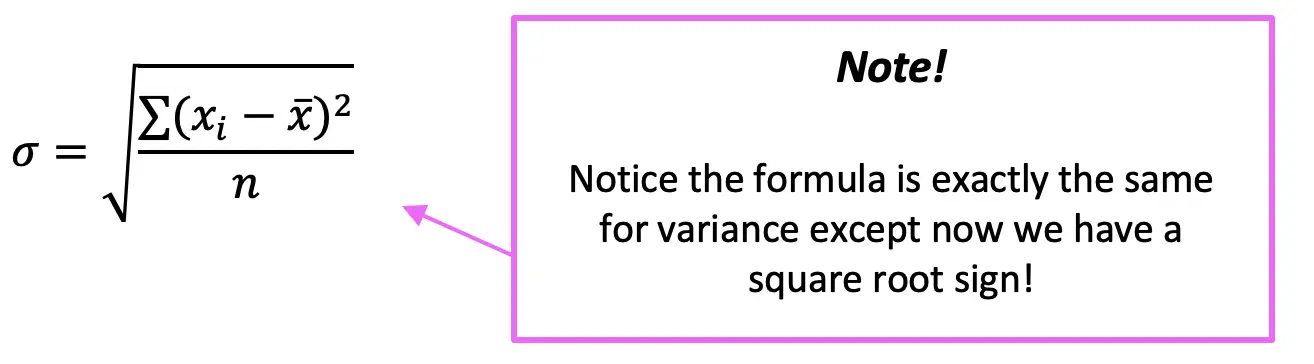
Below is the formula for standard deviation, notated as sigma, the greek letter, σ:
Since this is the same exact formula as variance with a square root, all we need to do is take the square root of the variance to find standard deviation:
Sample VS. Population
What is the difference between a sample vs. a population?
A population in statistics refers to an entire data set that at times can be humanly incapable of reaching.
For example: If we wanted to know the average income of everyone who lives in New York State, it would be almost impossible to reach every working person and ask them how much they make for a living.
To make up for the impossibility of data collection, we usually only survey a sample of the entire population to get income levels of let’s say 10,000 people across New York State, a much more reasonable in terms of data collecting!
And taking this sample size from the entire working population of New York State provides us with a sample mean, a sample variance, and a sample standard deviation.
On the other hand, if we were able to ask every student in a school what their grade point average was and get an answer, this would be an example of a whole population. Using this information, we would be able to find the population mean, population variance, and population standard deviation.
Sample notation also differs from population notation, but don’t worry about these too much, because the formulas and meanings remain the same. For example, the population mean is represented by the greek letter, μ, but the sample mean is represented by x bar.
Now try calculating the standard deviation of each data set below on your own with the following practice problems!
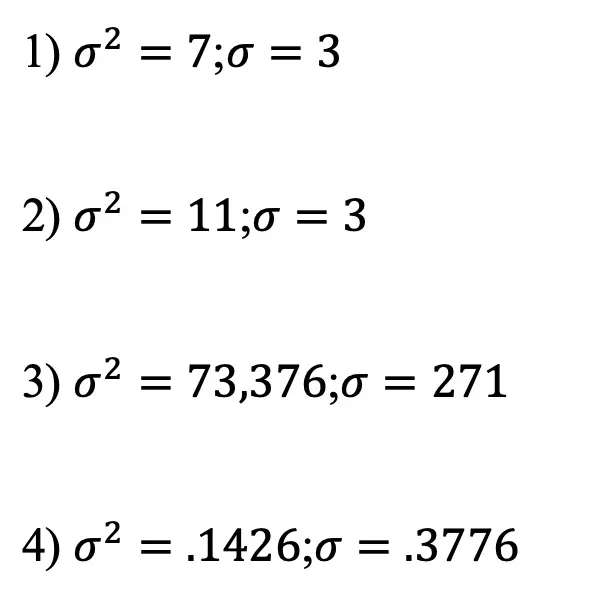
Practice Questions:
Solutions:
Other Related Formulas
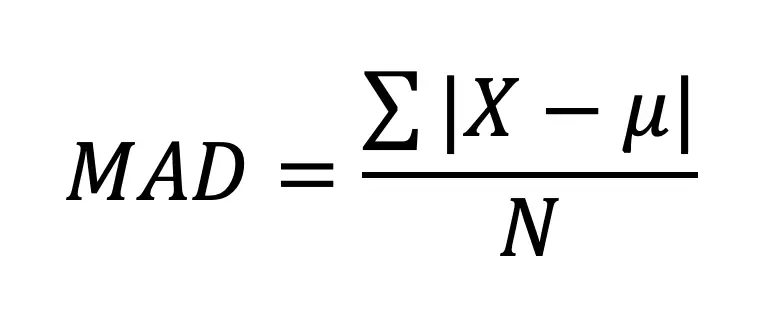
Mean Absolute Deviation (MAD):
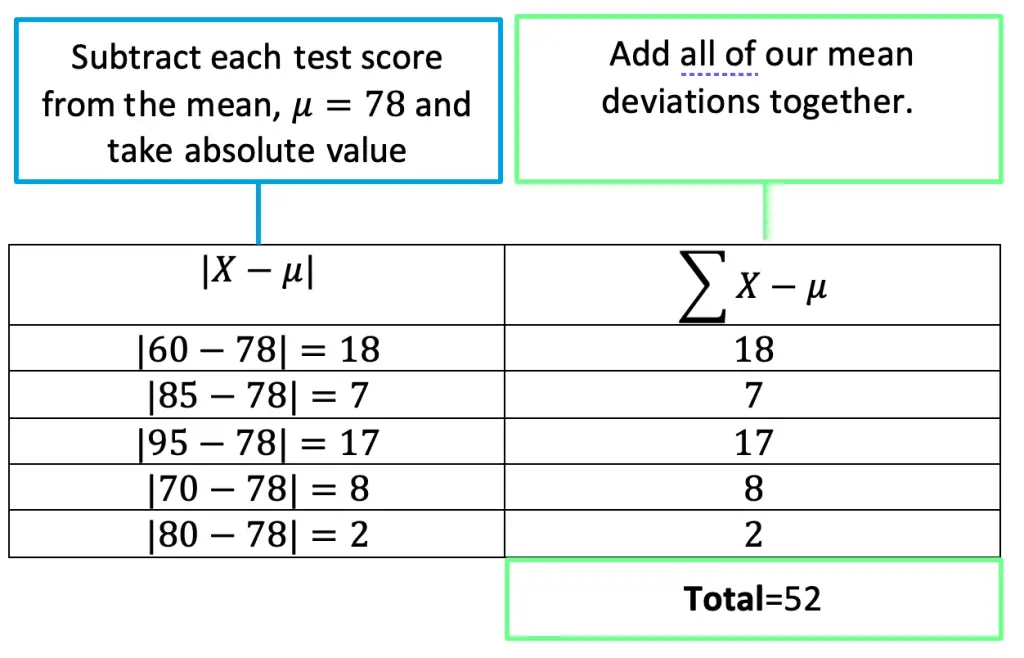
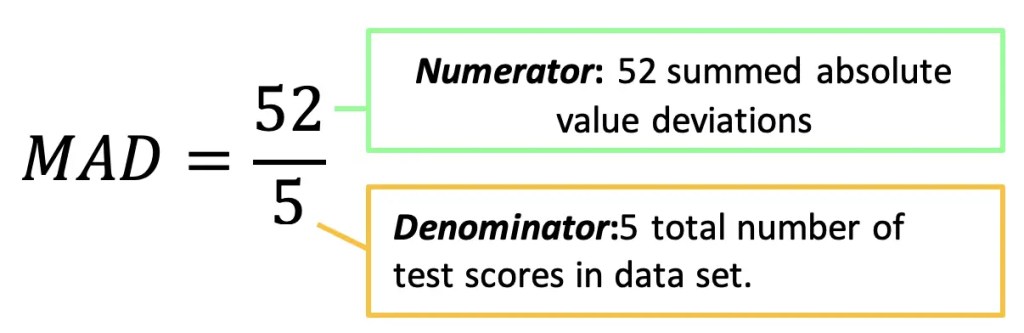
The Mean Absolute Deviation otherwise known as MAD is another formula related to variance and standard deviation. In the MAD formula above, notice we are doing very similar steps, by finding the distance to the mean of each data point, only this time we are taking the aboslute value of the ditsance to the mean. Then we sum all the absolute value distances together and divide by the total number of data points.
Why do we use aboslute value in this formula? We take the absolut value, because if didn’t the distance to the means summed togther would cancel eachother out to get zero!
Where…
X = Data point value
μ = mean
N=Total number of data points
|X-μ|=absolute deviation
If we were to take the sample from our example earlier,60, 85, 95, 70, 80, in this post and find the MAD it would go something like this:
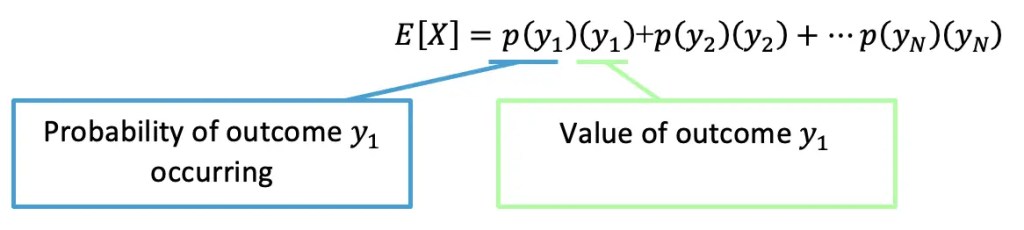
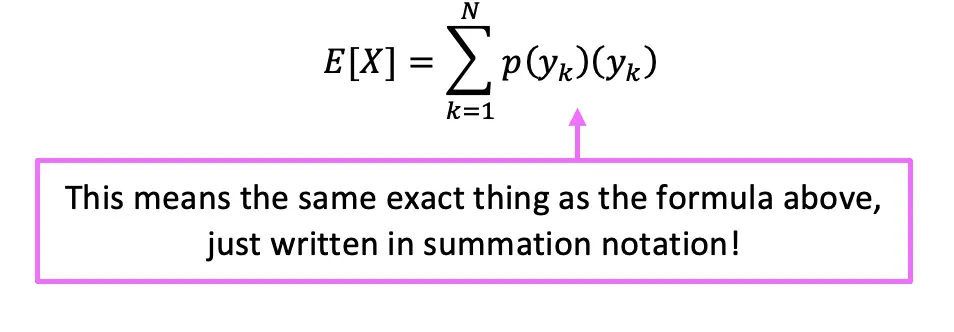
Expected Value:
Expected Value is the weighted average of all possible outcomes of one “game” or “gamble” based on the respective probabilities of each potential outcome for a discrete random variable. A “gamble” is defined by the following rules: 1) All possible outcomes are known 2) An outcome cannot be predicted 3) All possible outcomes are of numeric value and 4) The Game can be repeated multiple times under the same conditions.
Still got questions? No problem! Don’t hesitate to comment with any questions or check out the video above. Happy calculating! 🙂
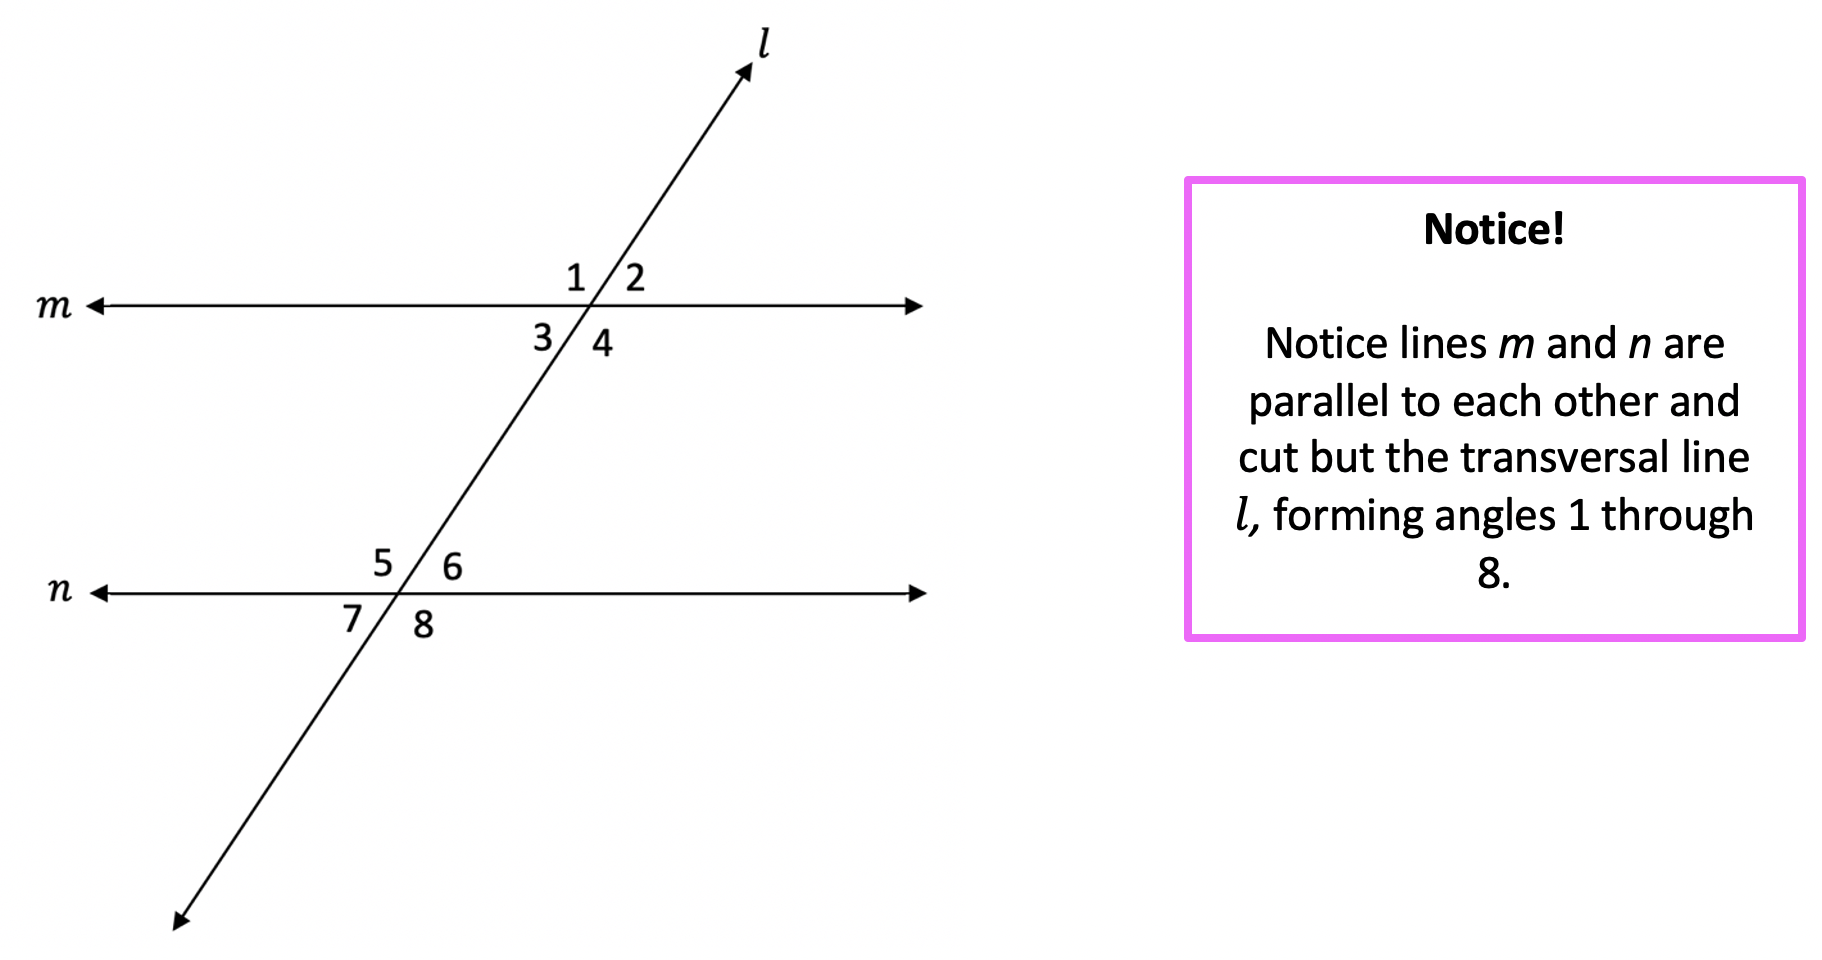
Happy Wednesday math friends! In this post we are going to look at transversals and parallel lines and find the oh so many congruent and supplementary angles they form when they come together! Congruent angles that form with these types of lines are more commonly known as Alternate Interior Angles, Alternate Exterior Angles, Corresponding angles, and Supplementary angles. Let’s look at this one step at a time:
What are Transversals and Parallel Lines?
When two parallel lines are cut by a diagonal line ( called a transversal) it looks something like this:
Each angle above has at least one congruent counterpart. There are several different types of congruent relationships that happen when a transversal cuts two parallel lines and we are going to break each down:
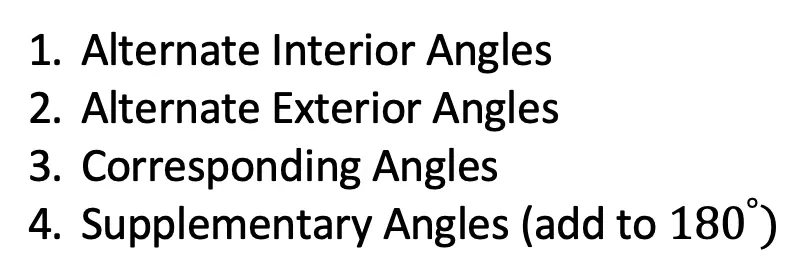
1) Alternate Interior Angles:
When a transversal line cuts across two parallel lines, opposite interior angles are congruent.
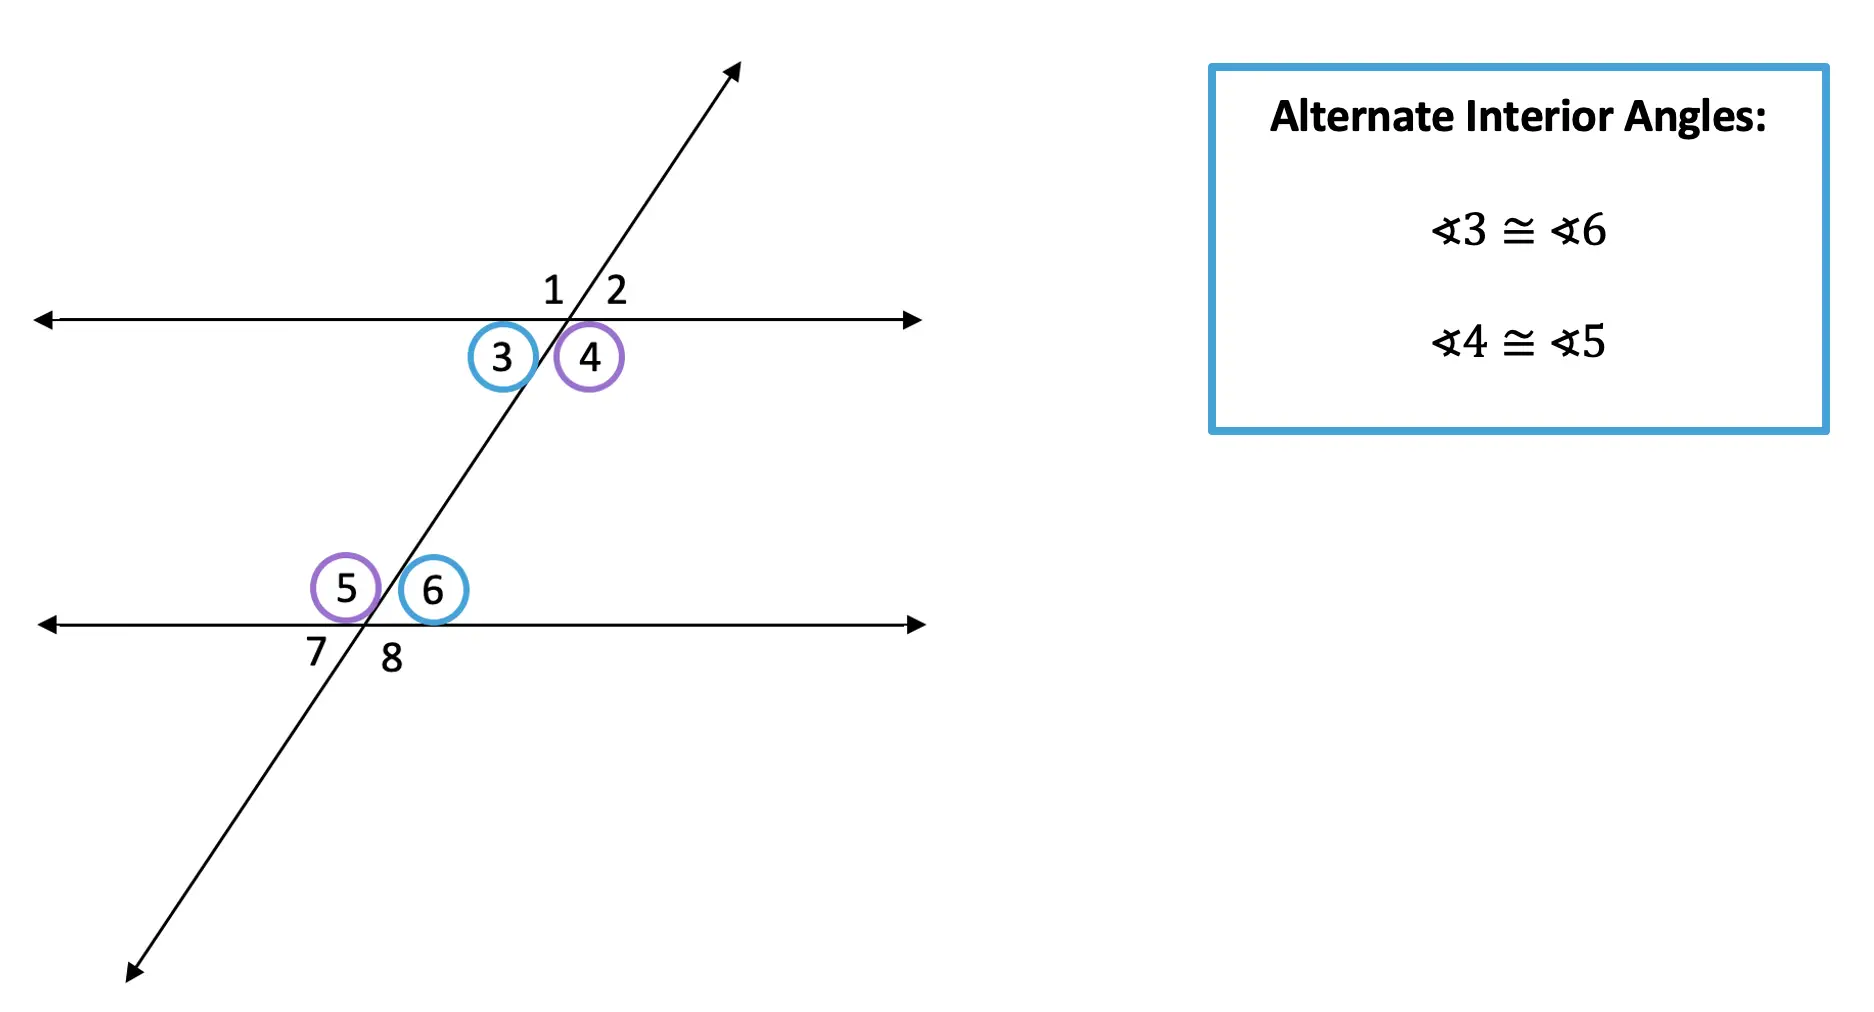
2) Alternate Exterior Angles:
When a transversal line cuts across two parallel lines, opposite exterior angles are congruent.
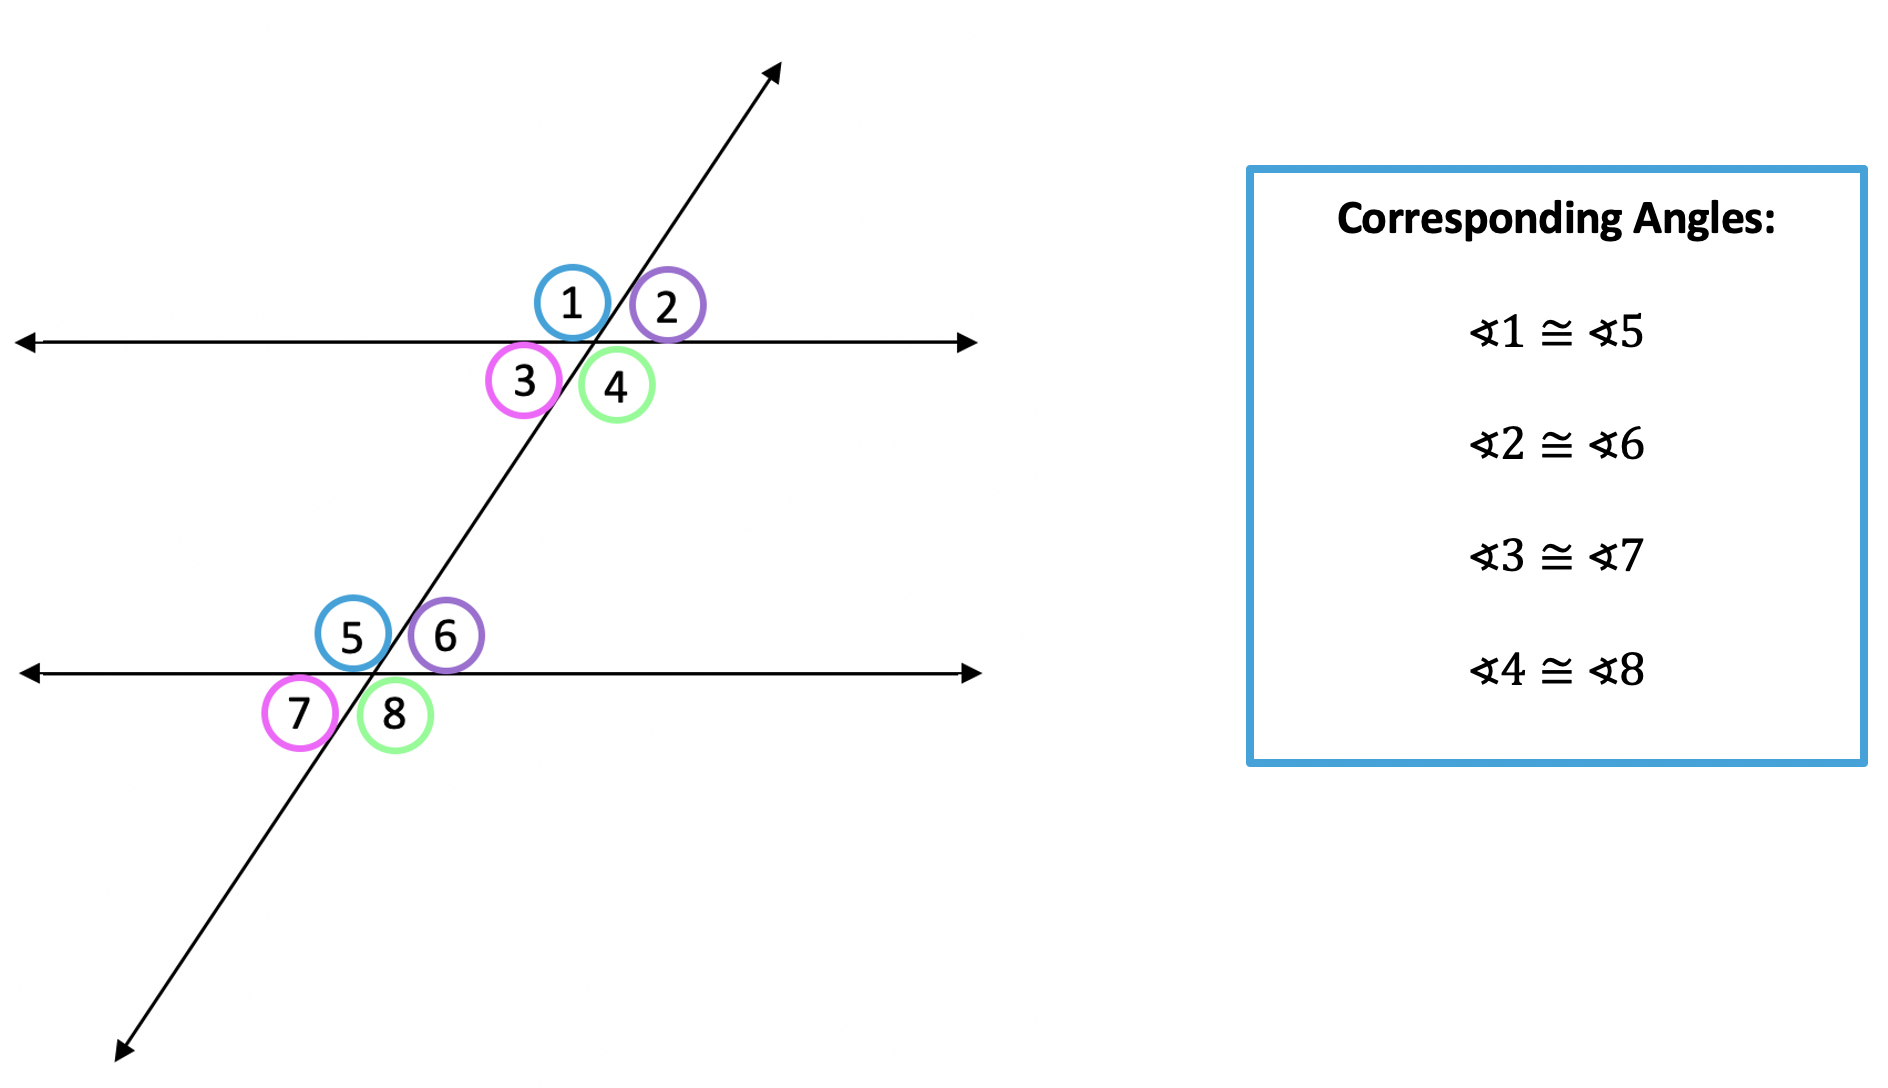
3) Corresponding Angles:
When a transversal line cuts across two parallel lines, corresponding angles are congruent.
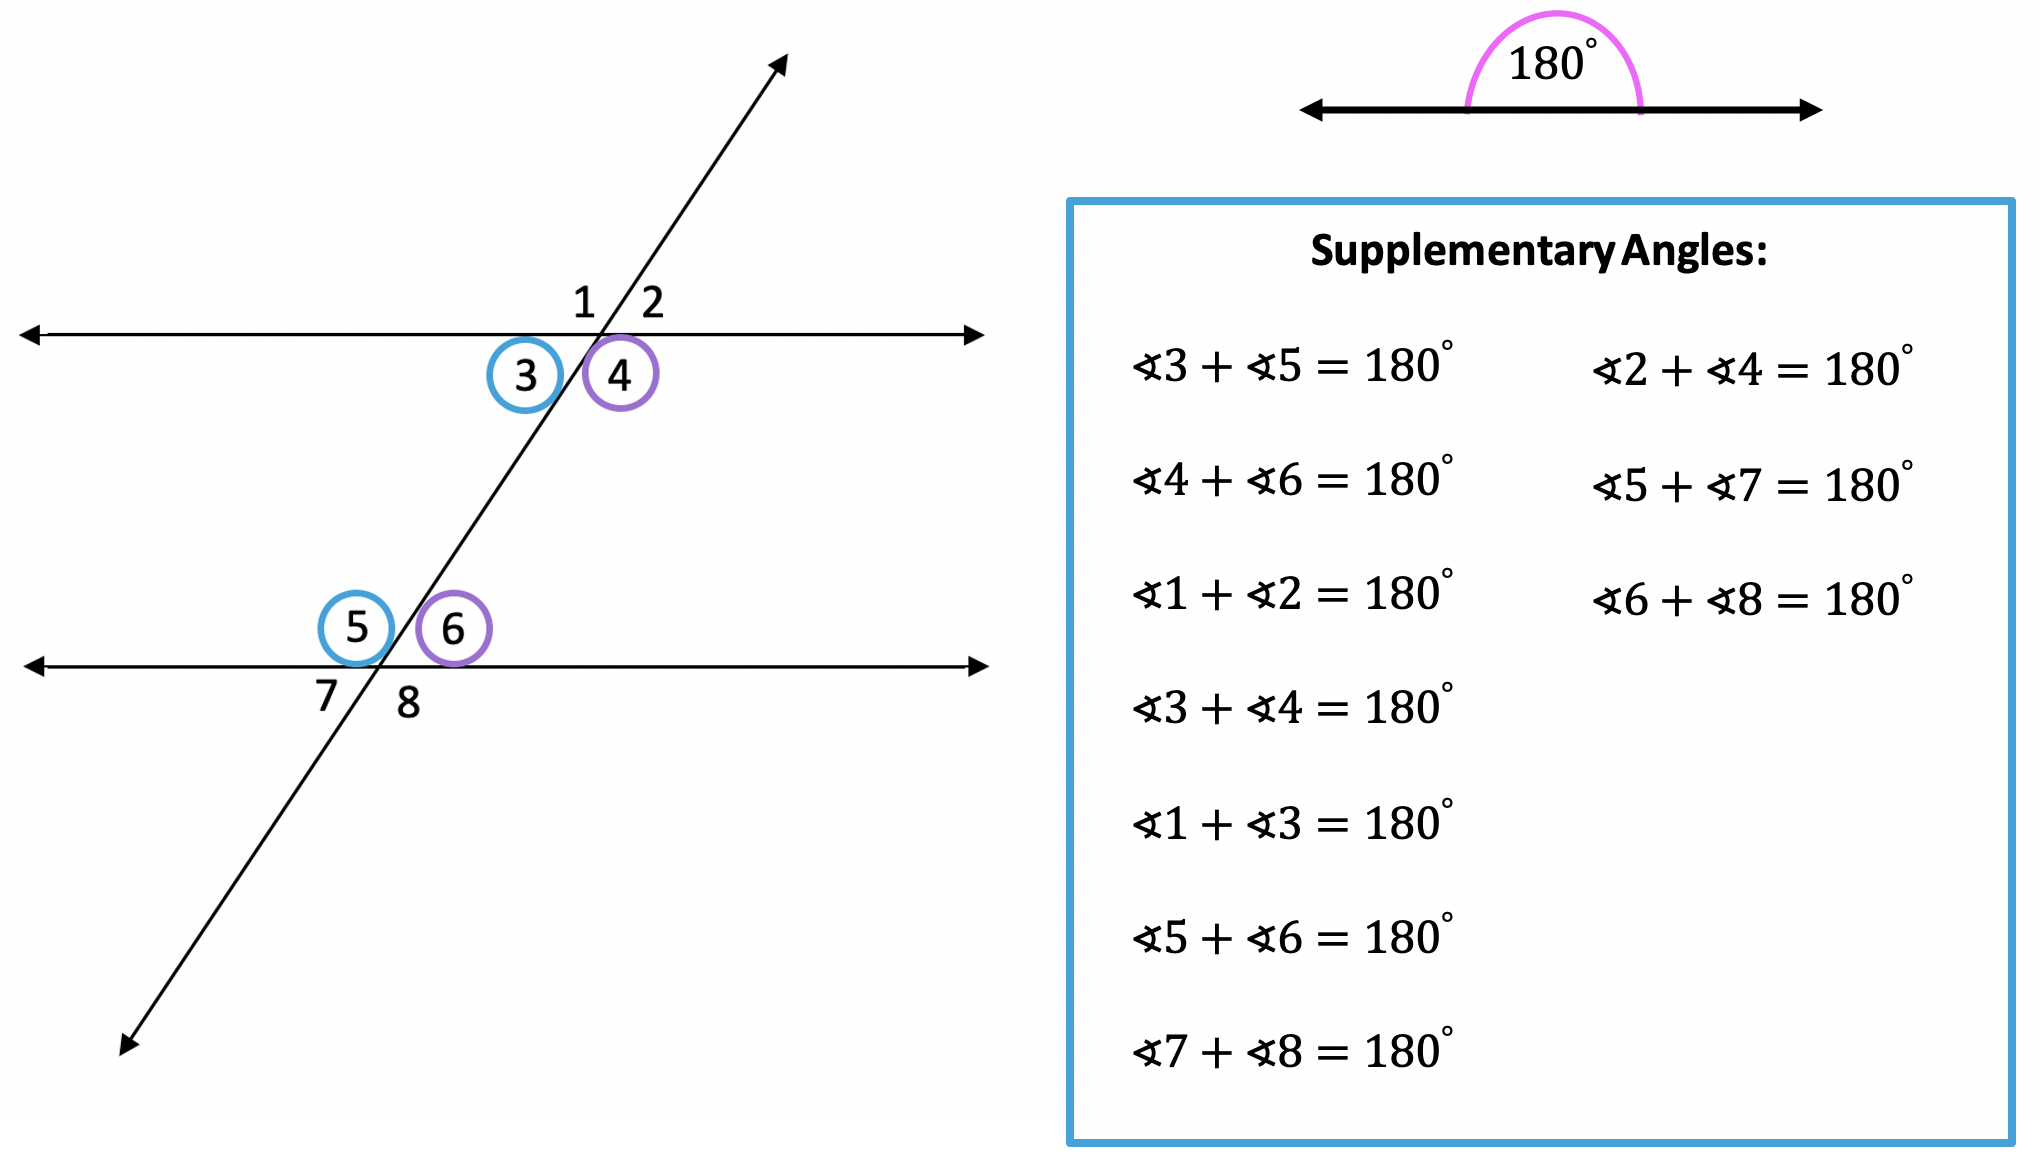
4) Supplementary Angles:
Supplementary angles are a pair of angles that add to 180 degrees. 180 degrees is the value of distance found within a straight line, which is why you’ll find so many supplementary angles below:
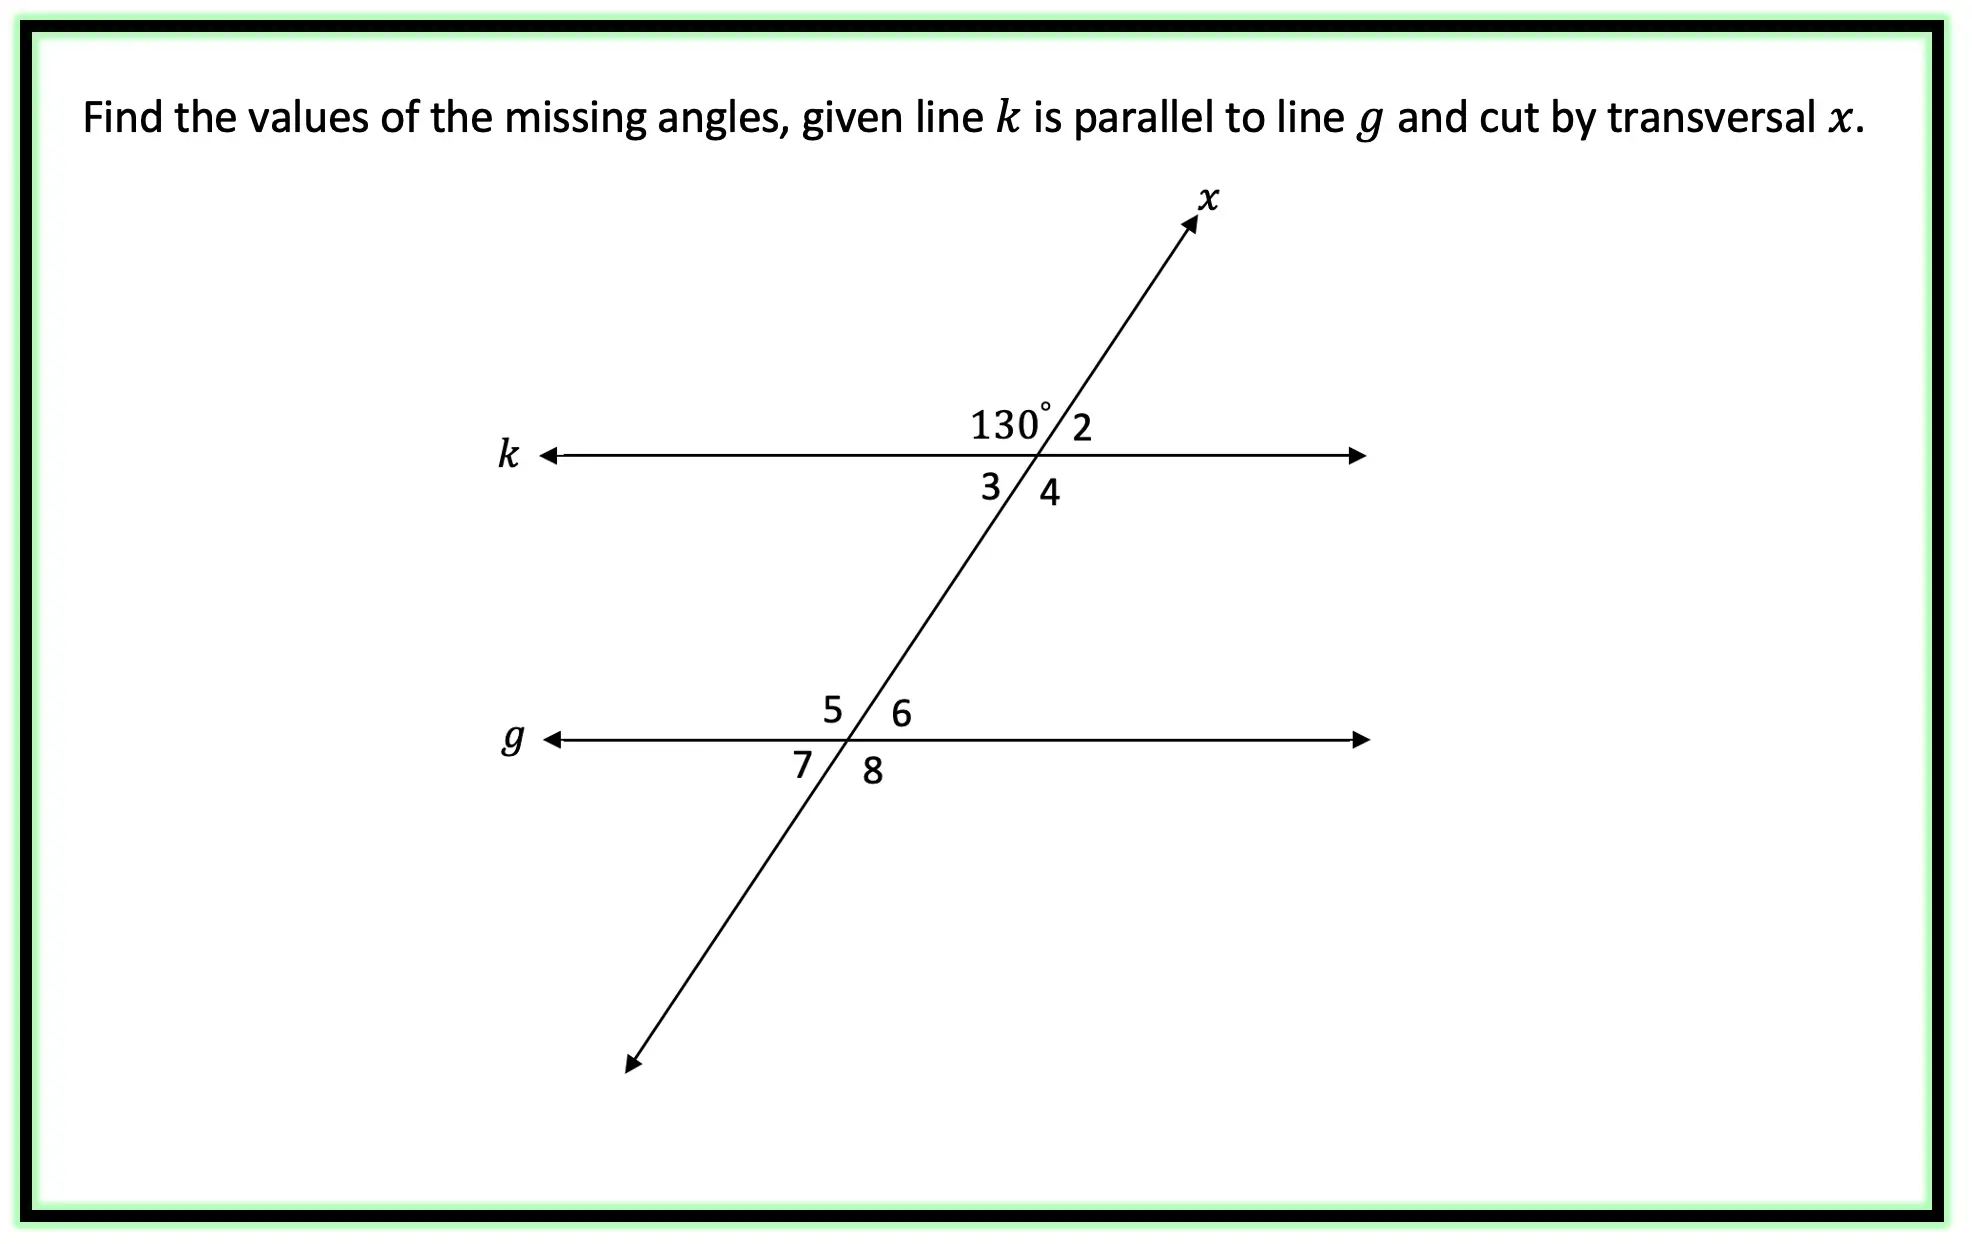
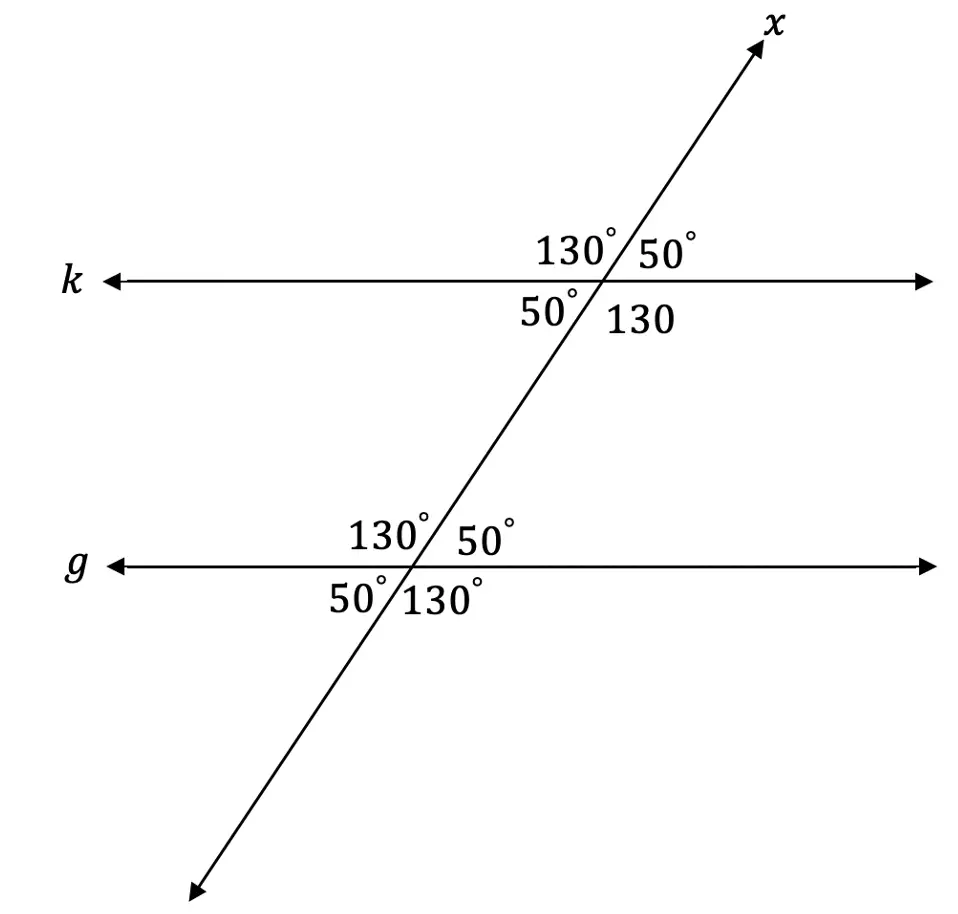
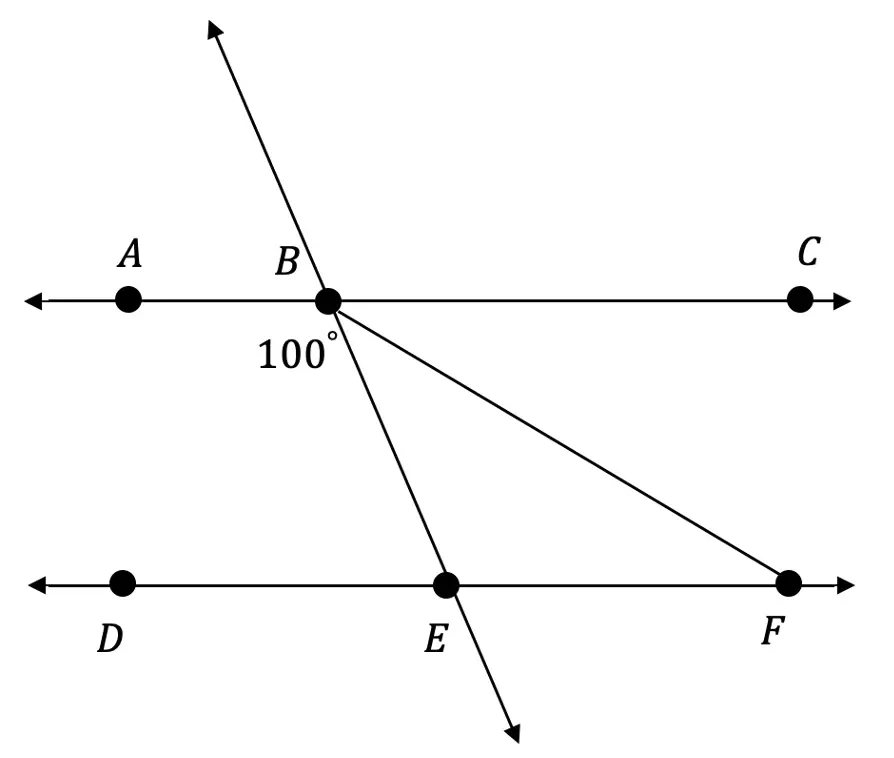
Knowing the different sets of congruent and supplementary angles, we can easily find any missing angle values when faced with the following question:
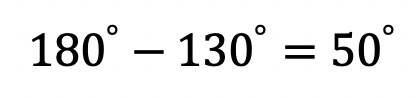
-> Using our knowledge of congruent and supplementary angles we should be able to figure this out! Right away we can find angle 2 by noticing angle 1 and angle 2 are supplementary angles (add to 180 degrees).
-> Knowing angle 2 is 50 degrees, we can now fill in the rest of our transversal angles based on our corresponding and supplementary rules.
Try the following transversal and parallel lines questions below! Some may a bit harder than the previous example, if you get stuck, check out the video that goes over a similar example above and happy calculating! 🙂
Practice Questions:
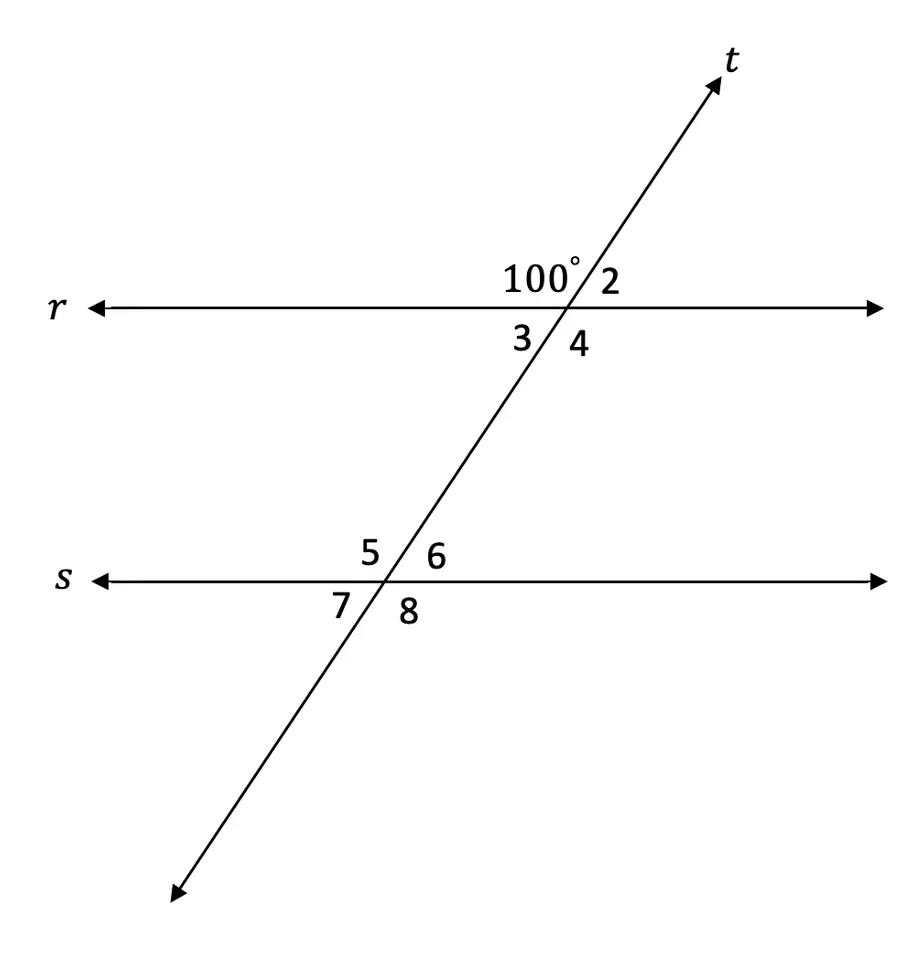
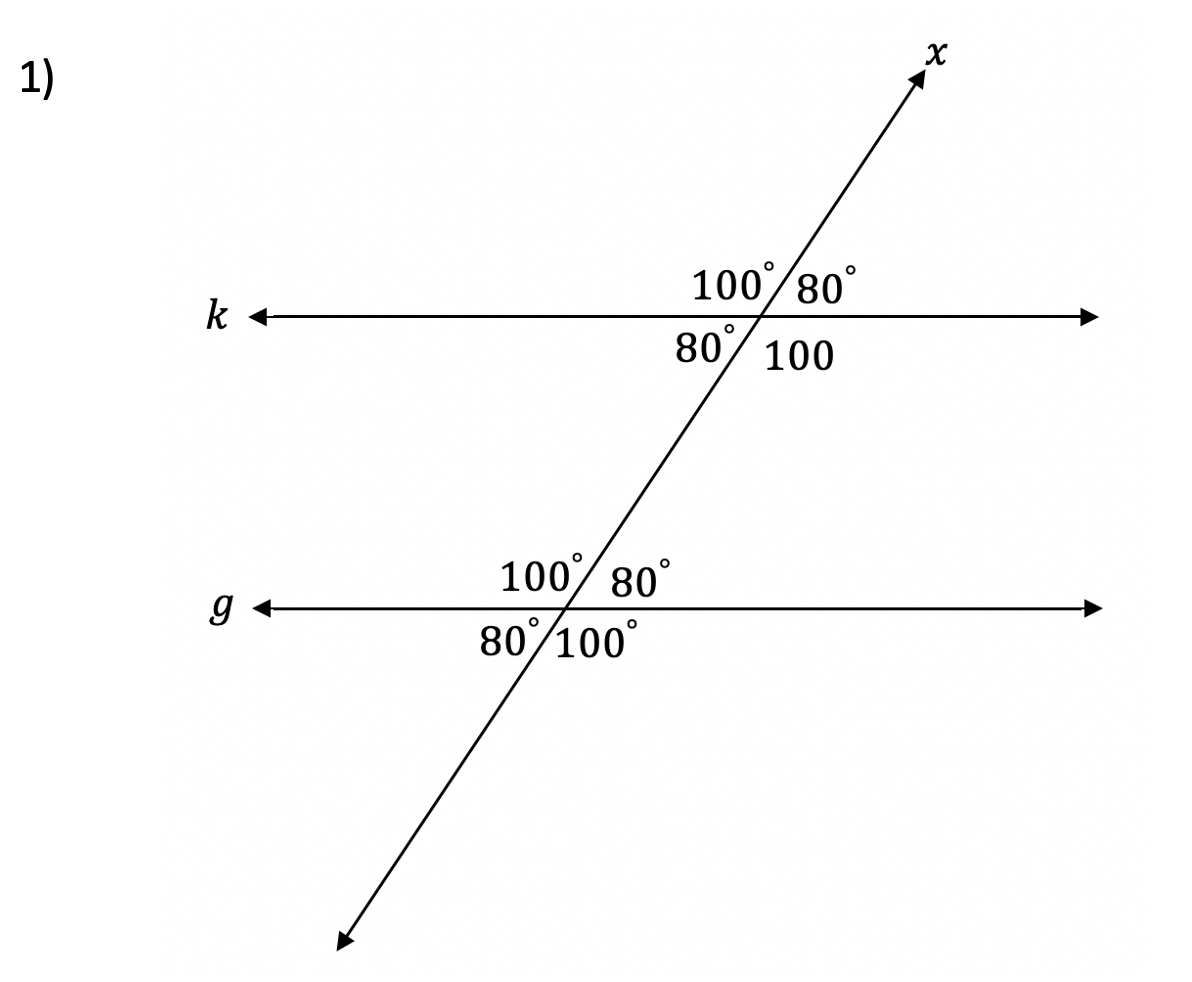
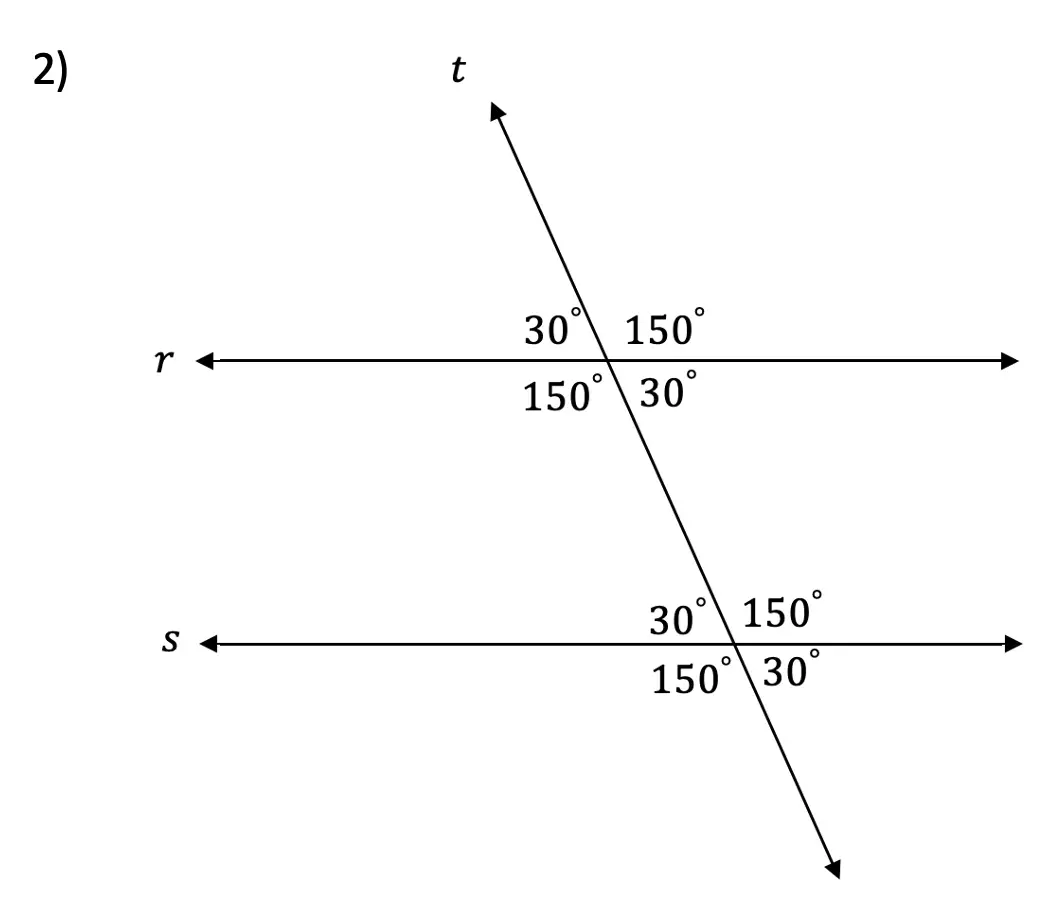
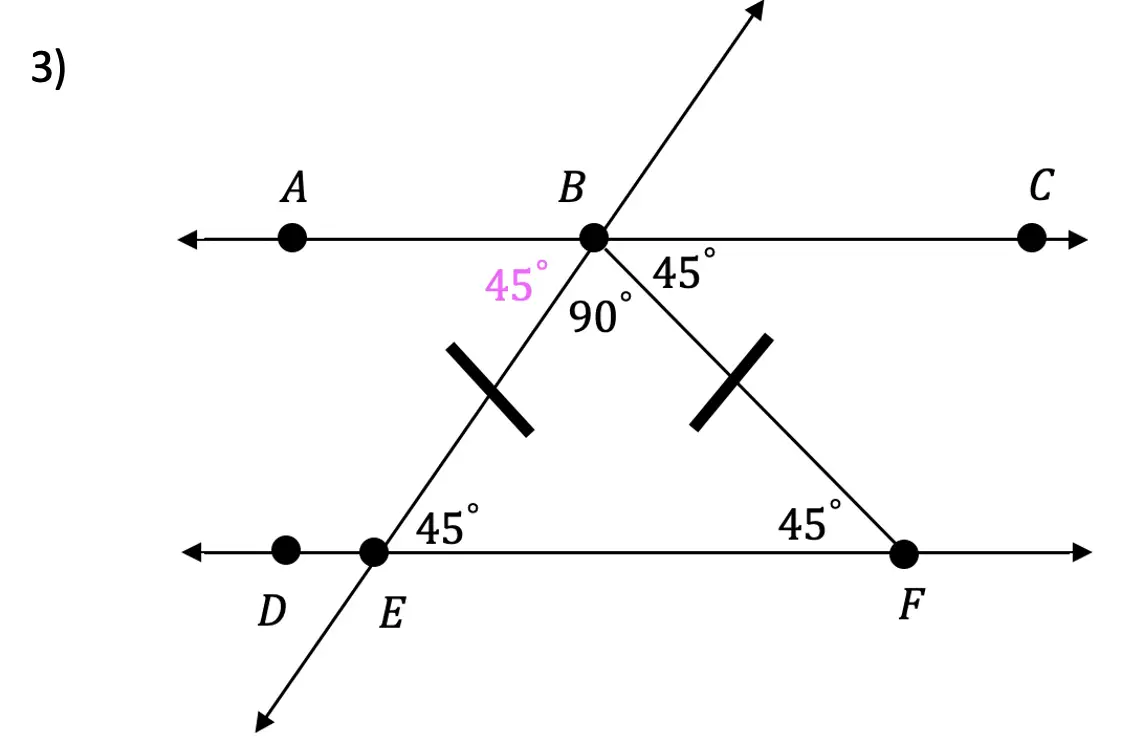
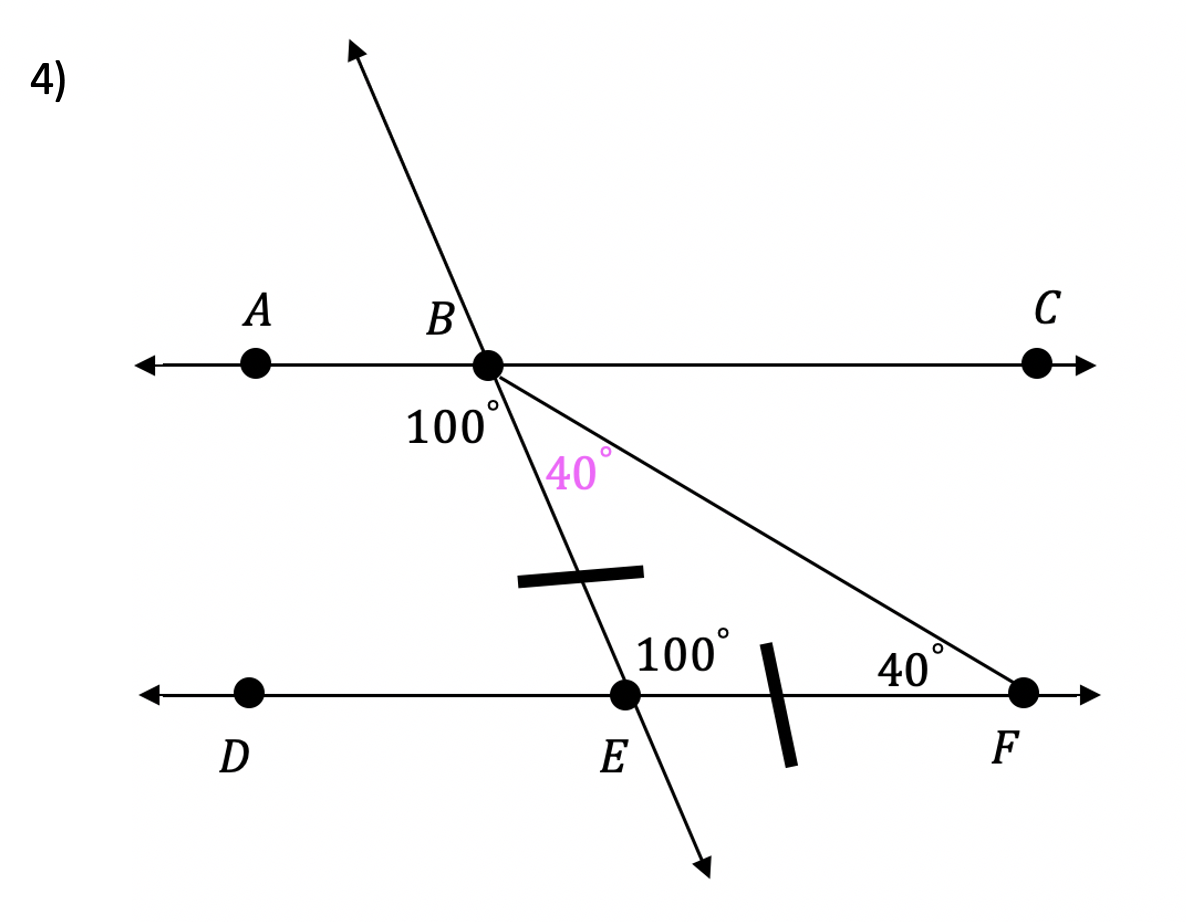
Find the value of the missing angles given line r is parallel to line s and line t is a transversal.
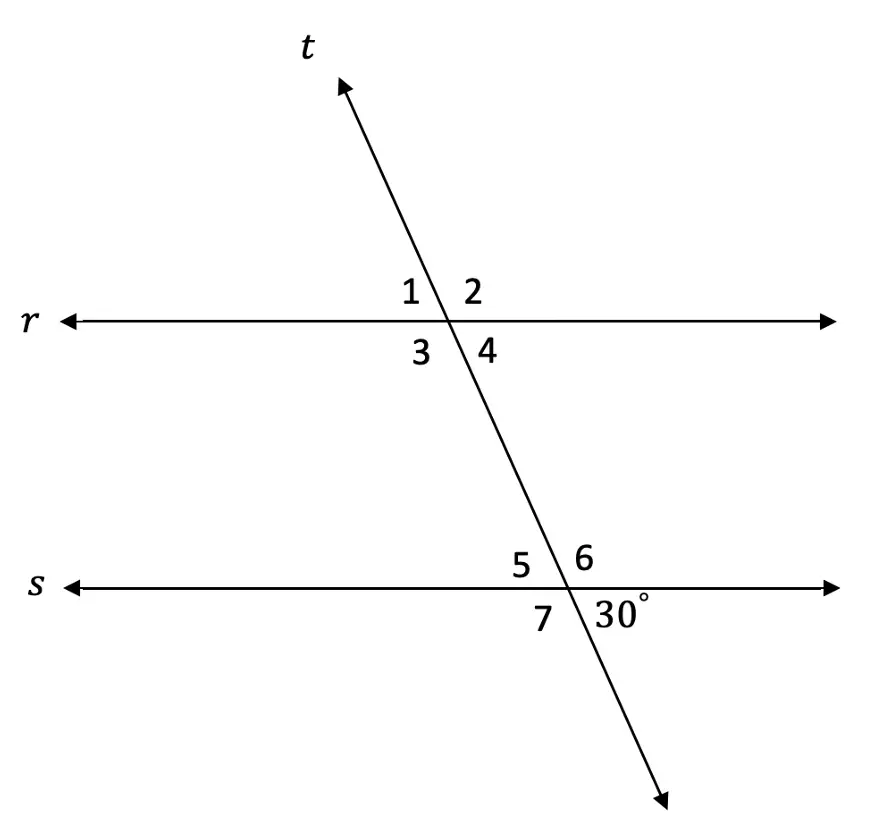
2. Find the value of the missing angles given line r is parallel to line s and line t is a transversal.
Solutions:
Still got questions? No problem! Don’t hesitate to comment with any questions or check out the video above. Happy calculating! 🙂
Ahoy math friends! This post takes a look at one method of analyzing data; box and whisker plots. Box and whisker plots are great for visually identifying outliers and the overall spread of numbers in a data set. We will go over step by step how to create a box and whisker plot given a set of data, we will then look at how to find the interquartile range and upper and lower outliers. If you have any questions, don’t hesitate to check out the video or comment below. Stay curious and happy calculating! 🙂
Looking for more MathSux? Check out this post on variance and standard deviation here!
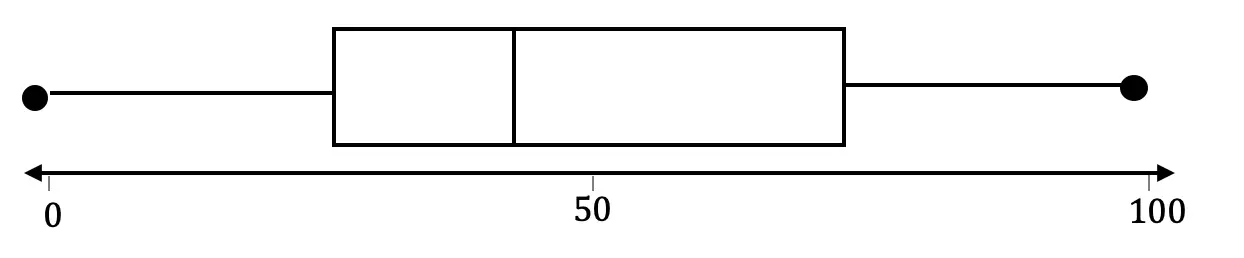
Box plots look something like this:
Why Box Plots?
Box Plots are a great way to visually see the distribution of a set of data. For example, if we wanted to visualize the wide range of temperatures found in a day in NYC, we would get all of our data (temperatures for the day), and once a box plot was made, we could easily identify the highest and lowest temperatures in relation to its median (median: aka middle number).
From looking at a Box Plot we can also quickly find the Interquartile Range and upper and lower Outliers. Don’t worry, we’ll go over each of these later, but first, let’s construct our Box Plot!
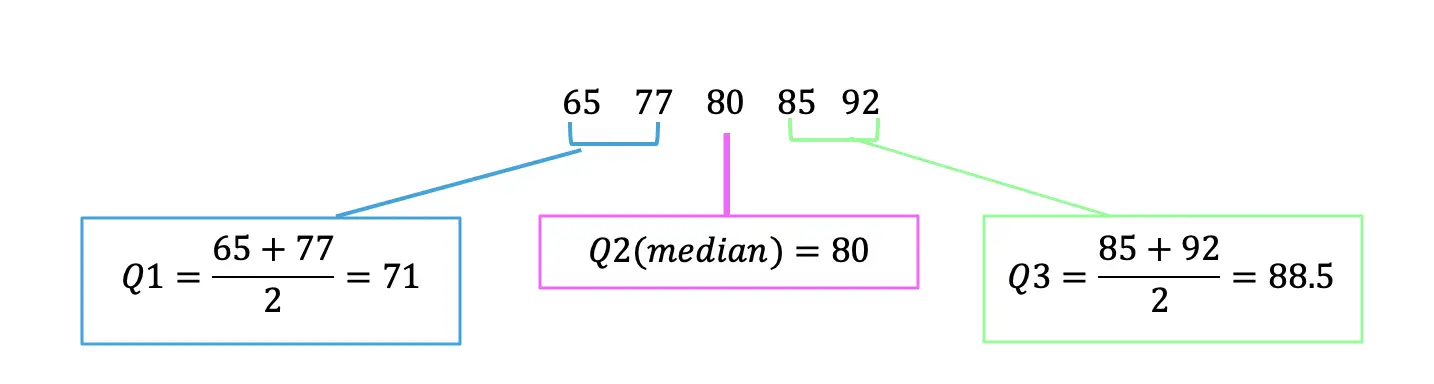
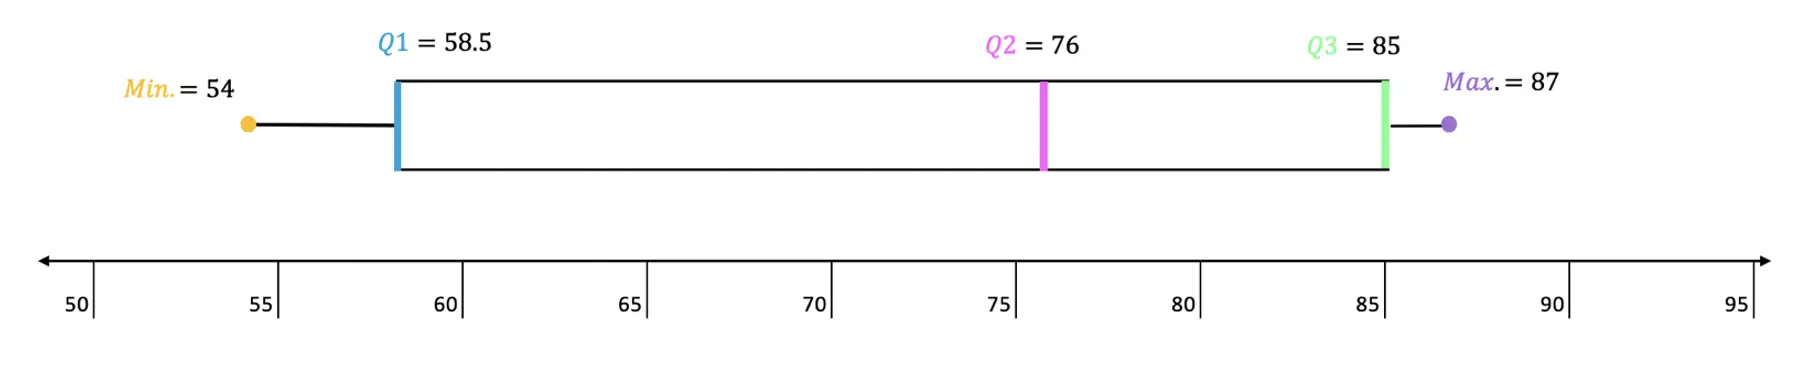
-> First, we want to put all of our temperatures in order from smallest to largest. -> Now we can find Quartile 1 (Q1), Quartile 2 (Q2) (which is also the median), and Quartile 3 (Q3). We do this by splitting the data into sections and finding the middle value of each section.
Q1=Median of first half of data
Q2=Median of entire data set
Q3=Median of second half of data
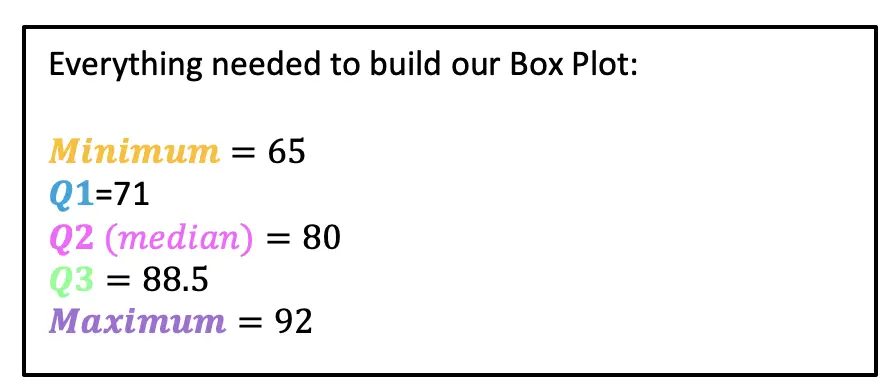
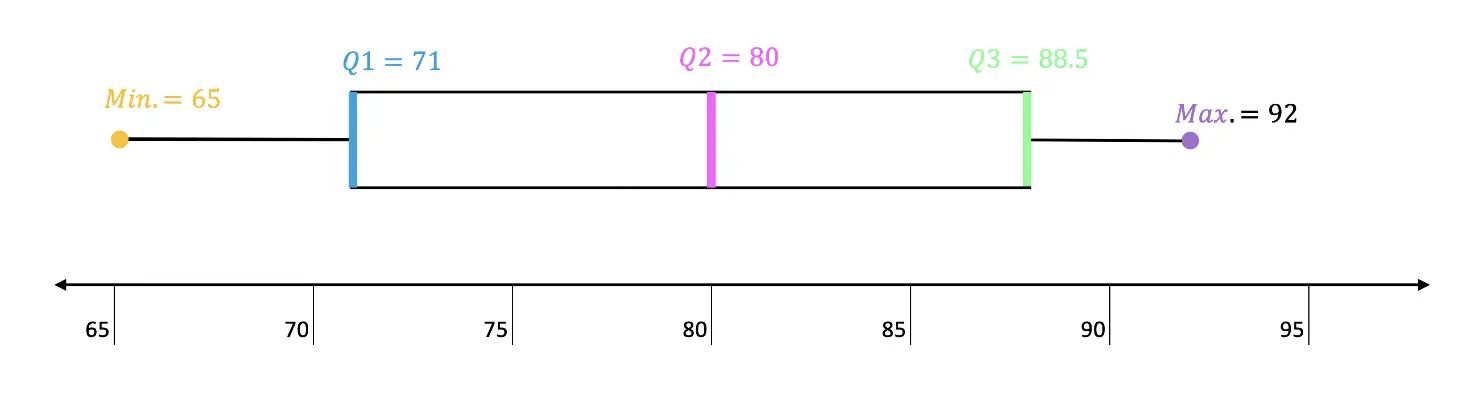
-> Now that we have all of our quartiles, we can make our Box Plot! Something we also have to take notice of, is the minimum and maximum values of our data, which are 65 and 92 respectively. Let’s lay out all of our data below and then build our box plot:
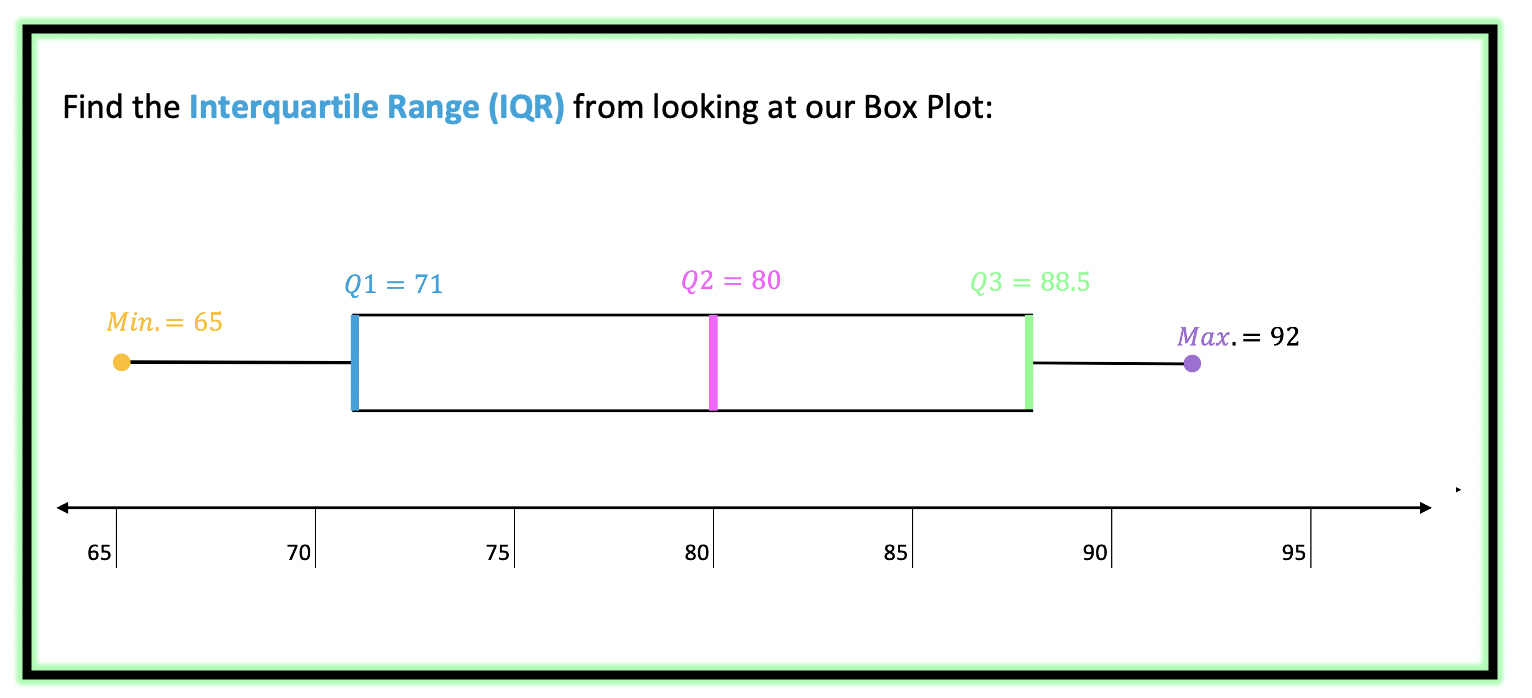
Now that we have our Box Plot, we can easily find the Interquartile Range and upper/lower Outliers.
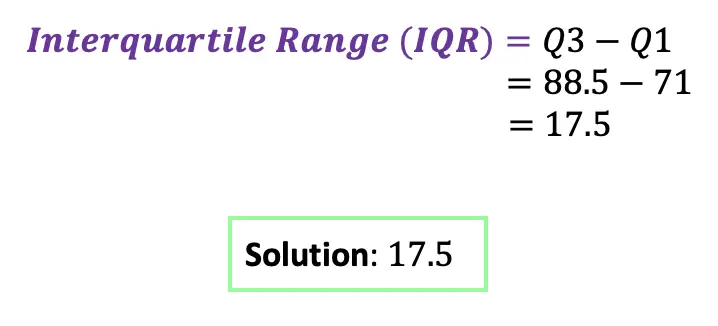
->The Interquartile Range is the difference between Q3 and Q1. Since we know both of these values, this should be easy!
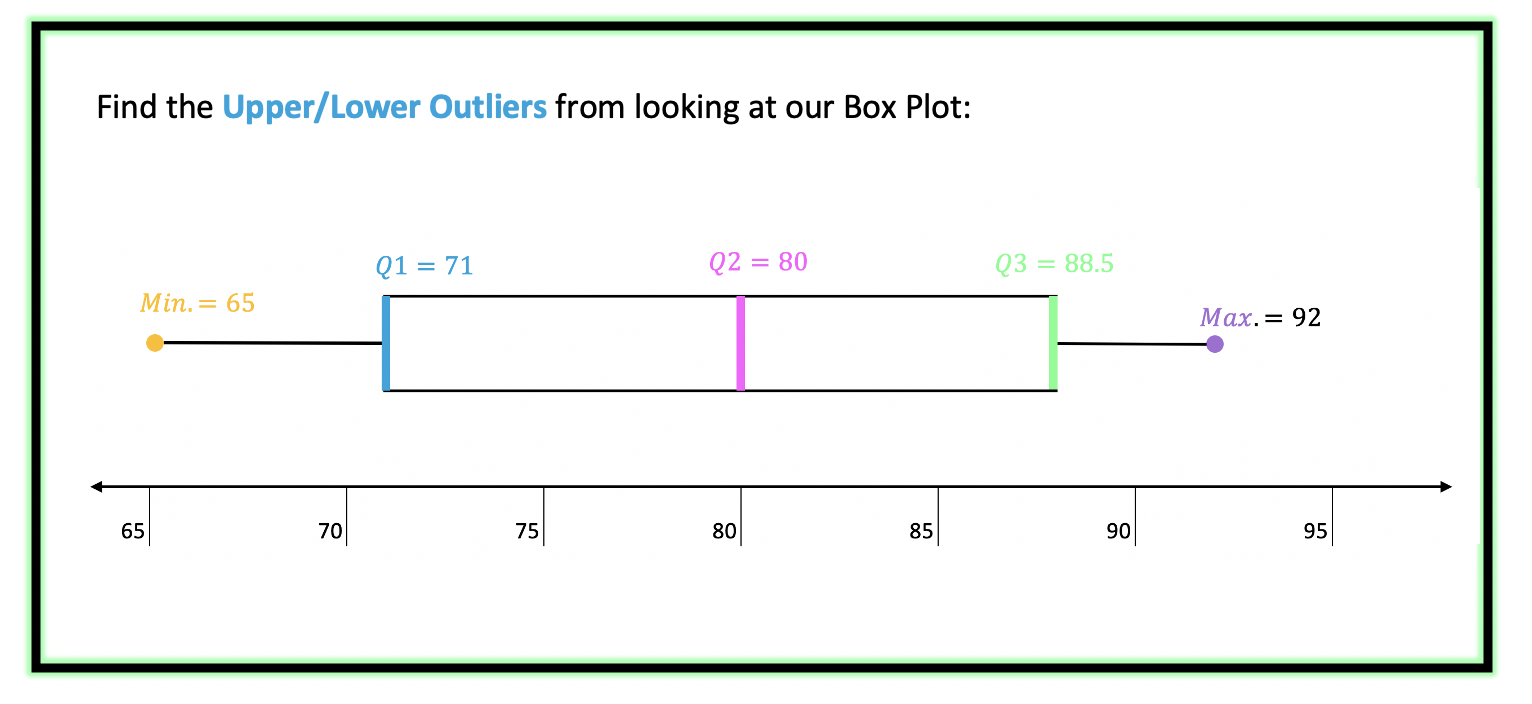
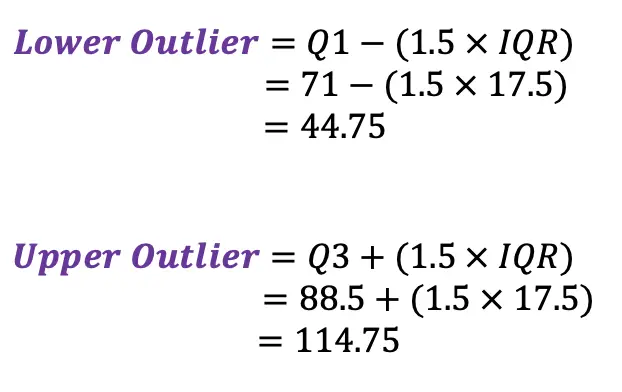
Next, we calculate the upper/lower Outliers.
-> The Upper/Lower Outliers are extreme data points that can skew the data affecting the distribution and our impression of the numbers. To see if there are any outliers in our data we use the following formulas for extreme data points below and above the central data points.
*These numbers tell us if there are any data points below 44.75 or above 114.75, these temperatures would be considered outliers, ultimately skewing our data. For example, if we had a temperature of or these would both be considered outliers.
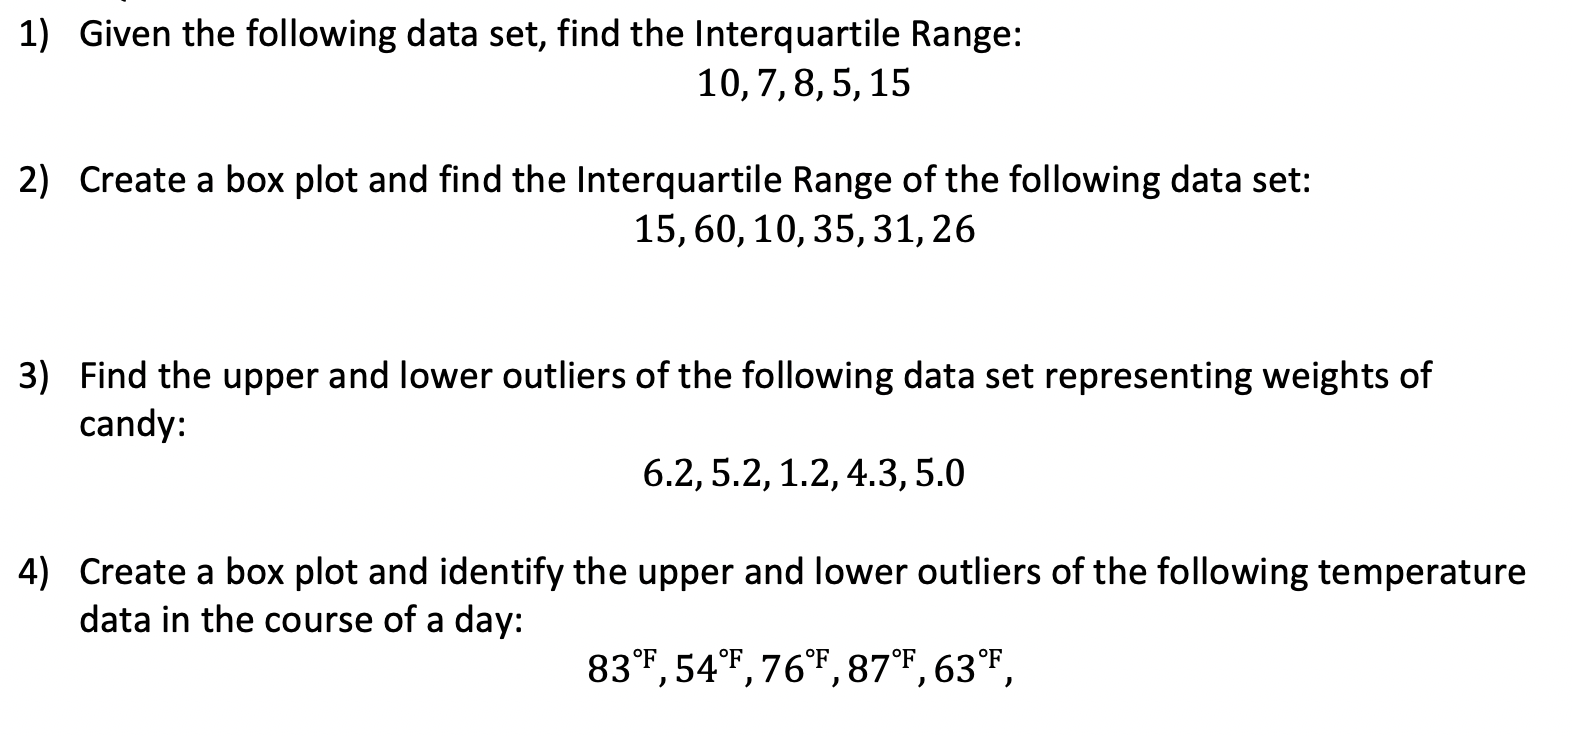
Practice Questions:
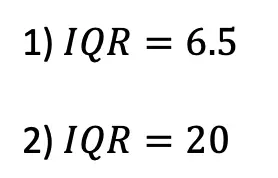
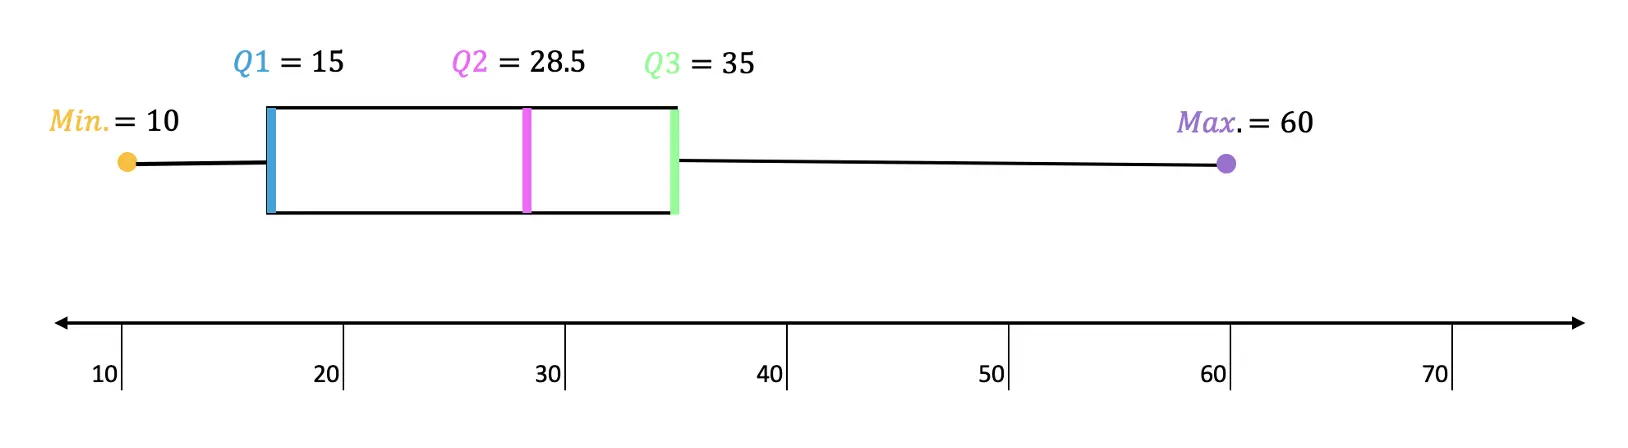
Solutions:
Still got questions? No problem! Don’t hesitate to comment with any questions or check out the video above. Happy calculating! 🙂
Happy Wednesday math peeps! This post introduces constructions by showing us how to construct an equilateral triangle by using a compass and straightedge (or ruler). For anyone new to constructions in geometry, this is the perfect topic for art aficionados since there is more drawing here than there is actual math!
What is an Equilateral Triangle?
Equilateral Triangle: An equilateral triangle is a triangle with three equal sides. Not an easy one to forget, the equilateral triangle is super easy to construct given the right tools (compass+ straightedge). Take a look below:
Equilateral Triangle: Triangle with all equal sides
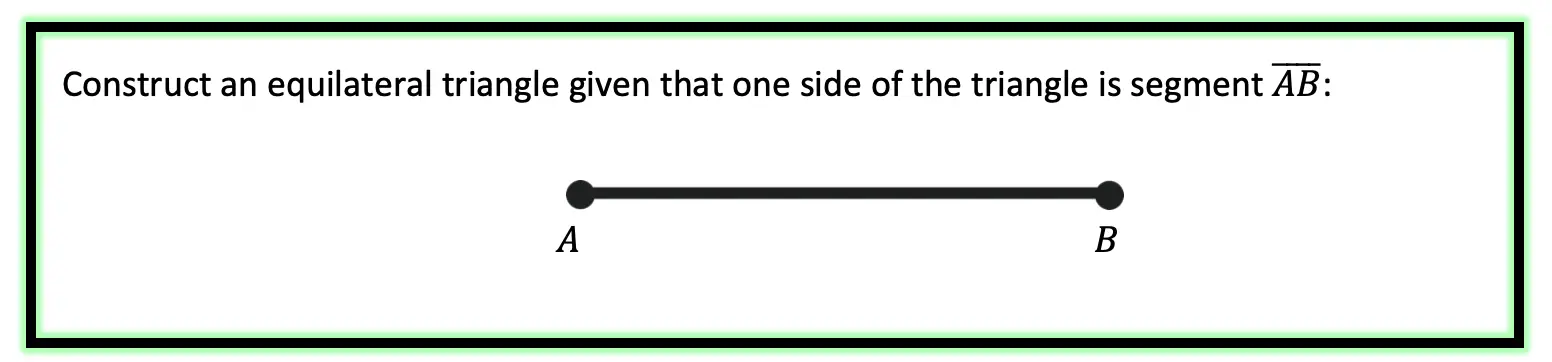
Construct an Equilateral Triangle Example:
Check out the GIF below to see how to construct an equilateral triangle step by step using a compass and straightedge with pictures and explanations below!
Solution:
What’s Happening in this GIF?
1. Using a compass, we measure the distance of line segment .
2. With the compass point remaining on point A, we then draw an arc that has the same distance as line segment .
3. With the compass now placed on point B, draw an arc that has the same distance as line segment .
4. Notice where the arcs intersect? Using a ruler, connect points A and B to the new intersection point. This will create two new equal sides of our triangle!
5. We have now officially constructed a triangle with all equal side lengths!
Constructions and Related Posts:
Looking to construct more than just an equilateral triangle? Check out these related posts on geometry constructions!
Looking to get the best construction tools? Any compass and straight-edge will do the trick, but personally, I prefer to use my favorite mini math toolbox from Staedler. Stadler has a geometry math set that comes with a mini ruler, compass, protractor, and eraser in a nice travel-sized pack that is perfect for students on the go and for keeping everything organized….did I mention it’s only $7.99 on Amazon?! This is the same set I use for every construction video in this post. Check out the link below and let me know what you think!
Looking to learn more about triangles? Check out this post on right triangle trigonometry here! And if you’re looking for even more geometry constructions, check out the link here!