Transforming Trig Functions: Amplitude, Frequency, Period, Phase Shifts

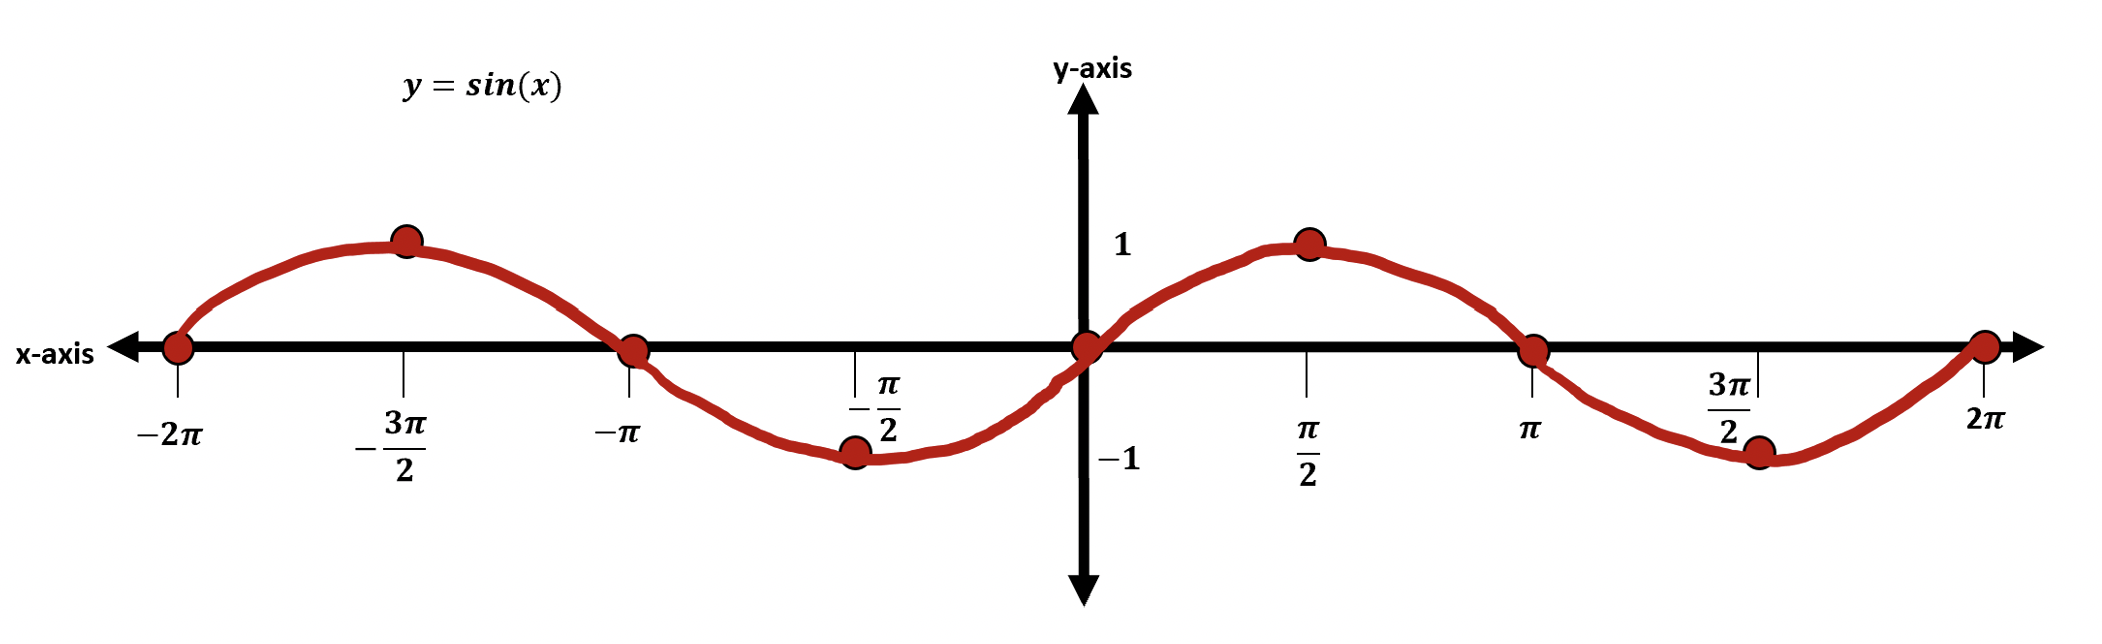
Hi everyone, and welcome to MathSux! In this post, we are going to break down transforming trig functions by identifying their amplitude, frequency, period, horizontal phase shift, and vertical phase shifts. Fear not! Because we will break down what each of these terms (amplitude, frequency, period, horizontal phase shift and vertical phase shifts) mean and how to find them when looking at a trigonometric function and then apply each of these changes step by step to our graph. In this particular post, we will be transforming and focusing on a cosine function, but keep in mind that the same rules apply for transforming sine functions as well (example shown below in practice).

And if you’re ready for more, check out the video and the practice problems below, happy calculating! 🙂

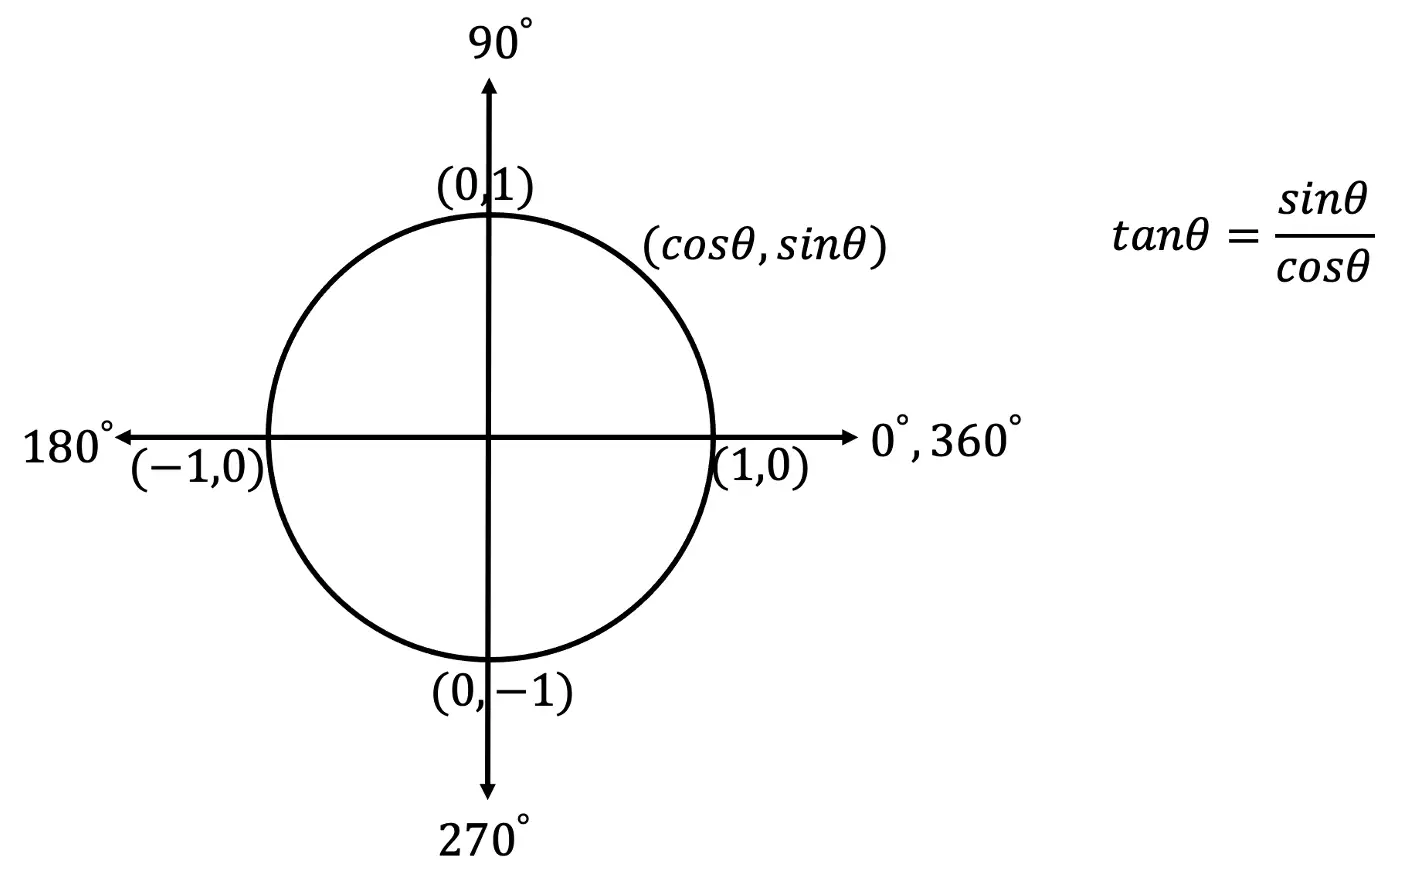
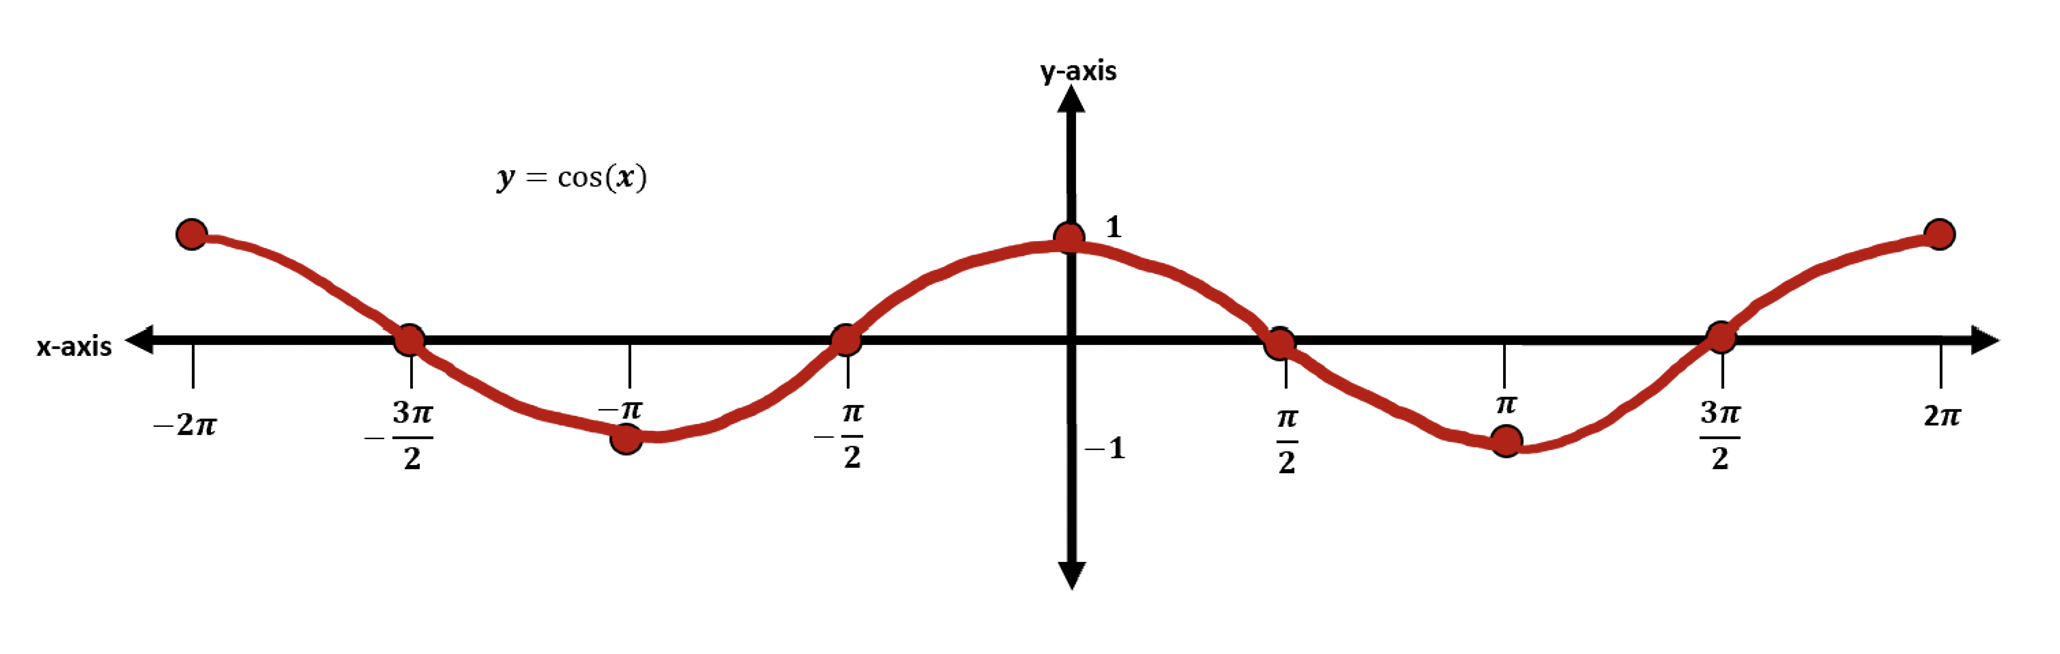
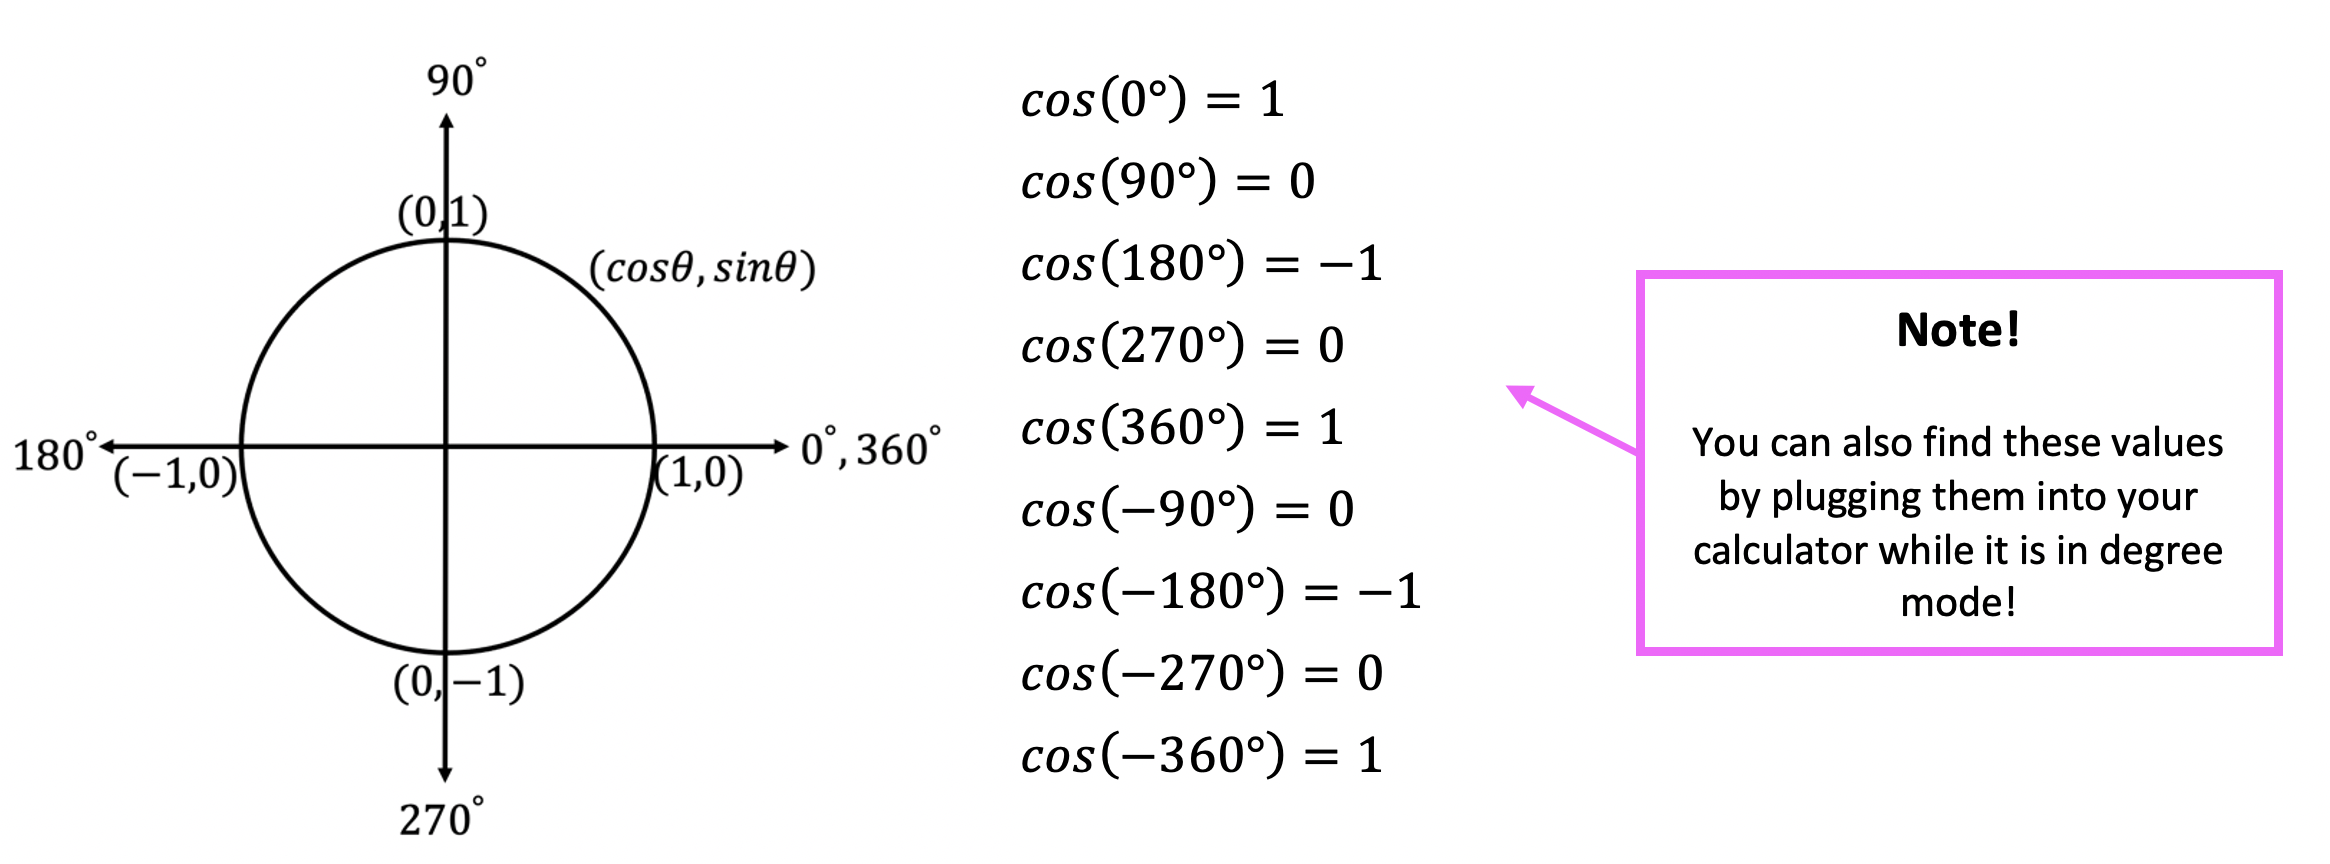
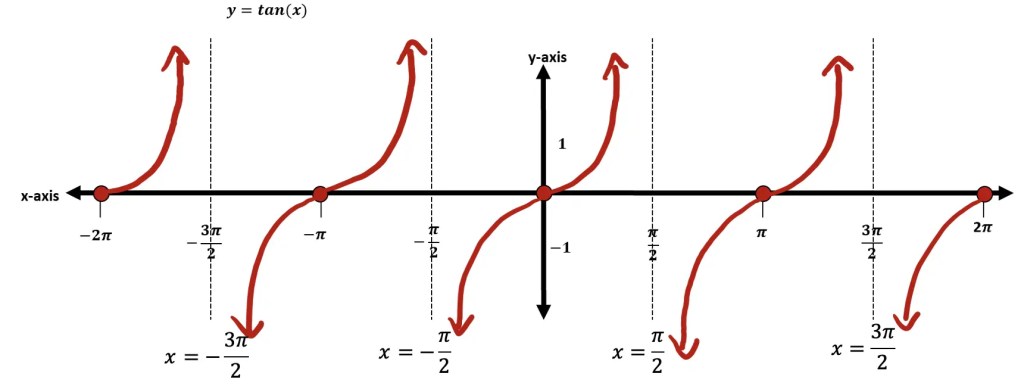
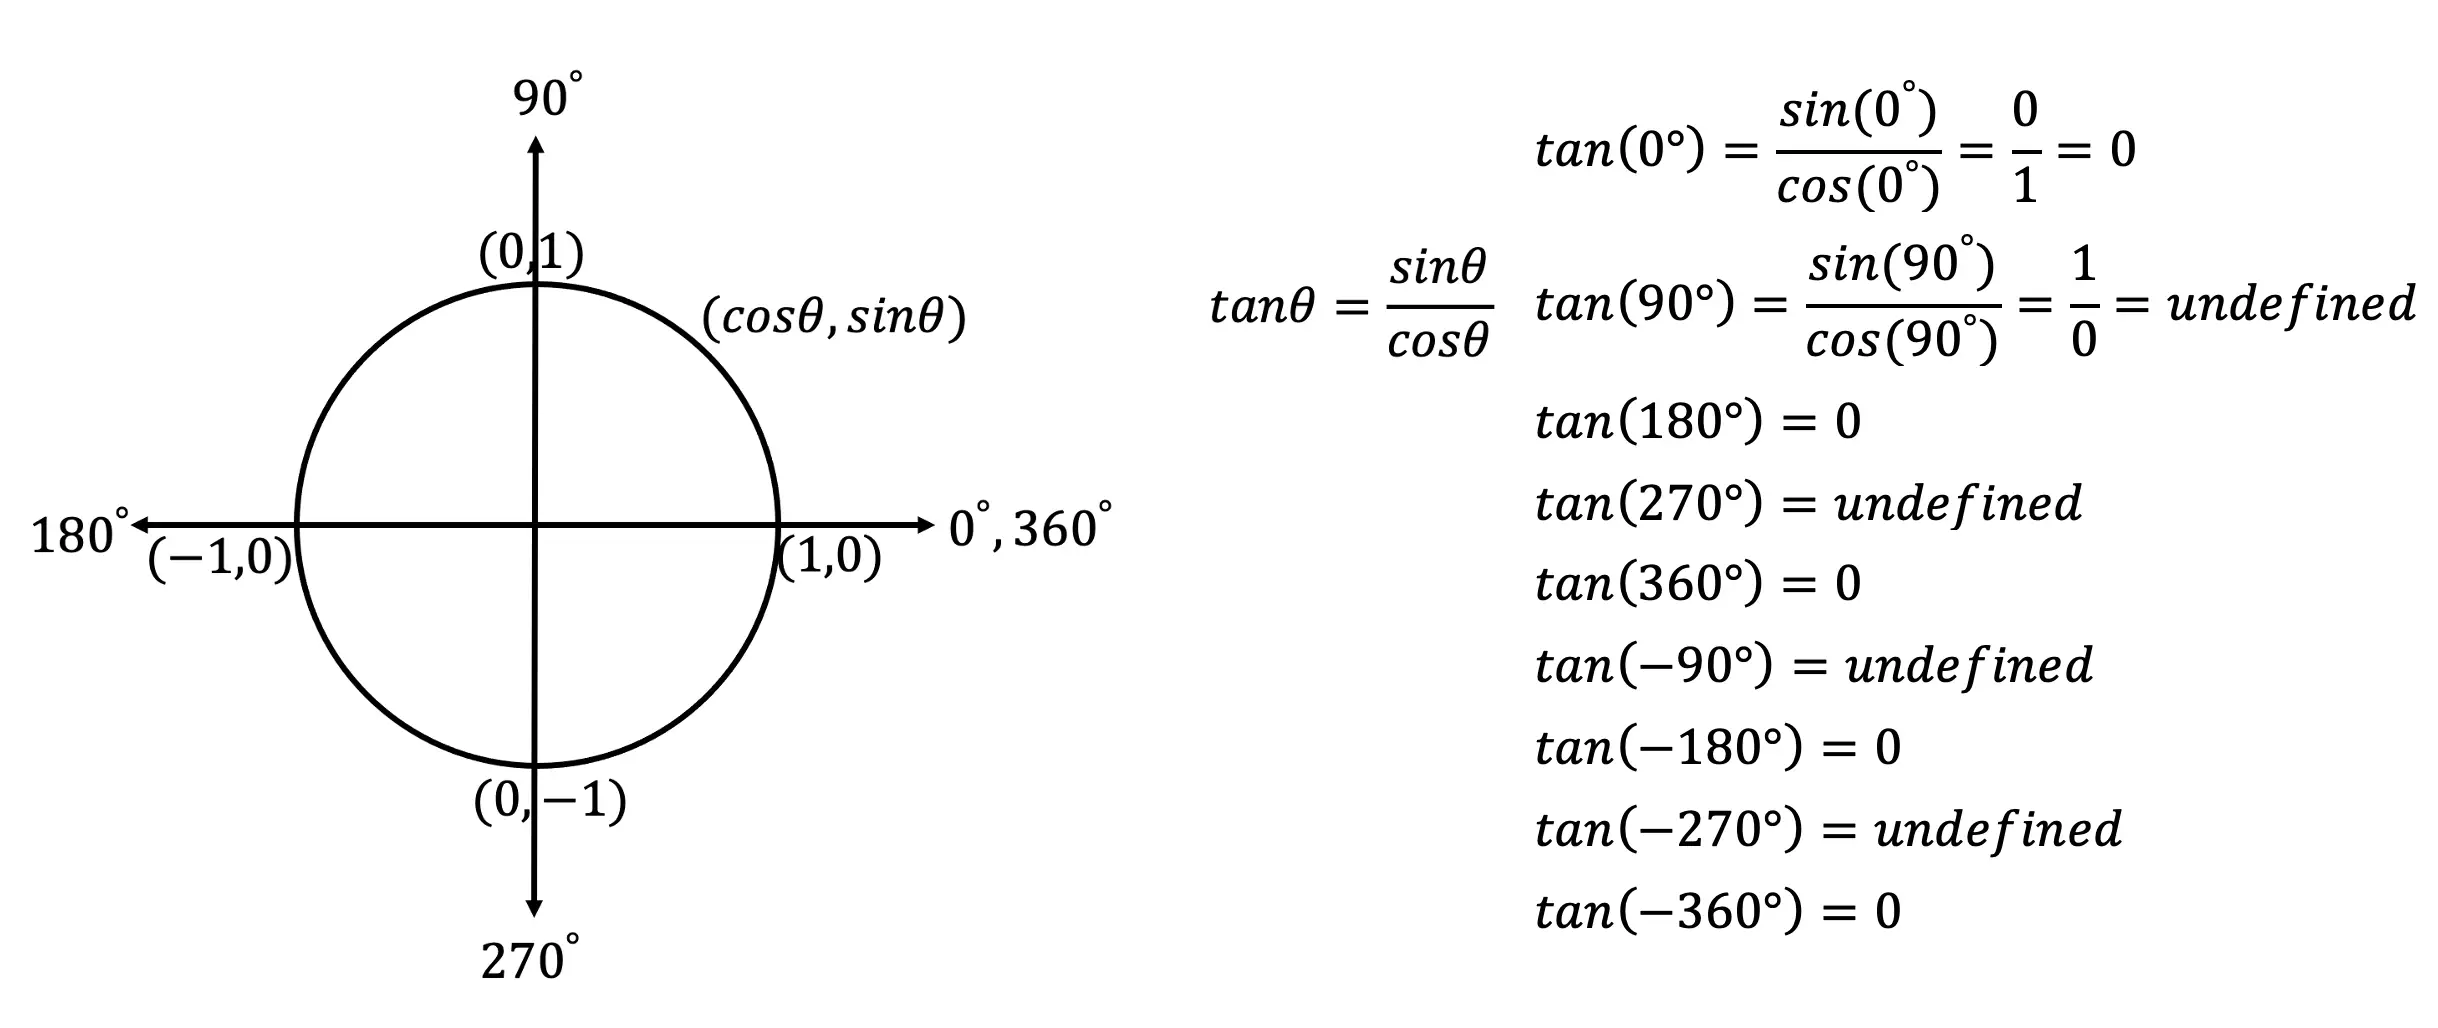
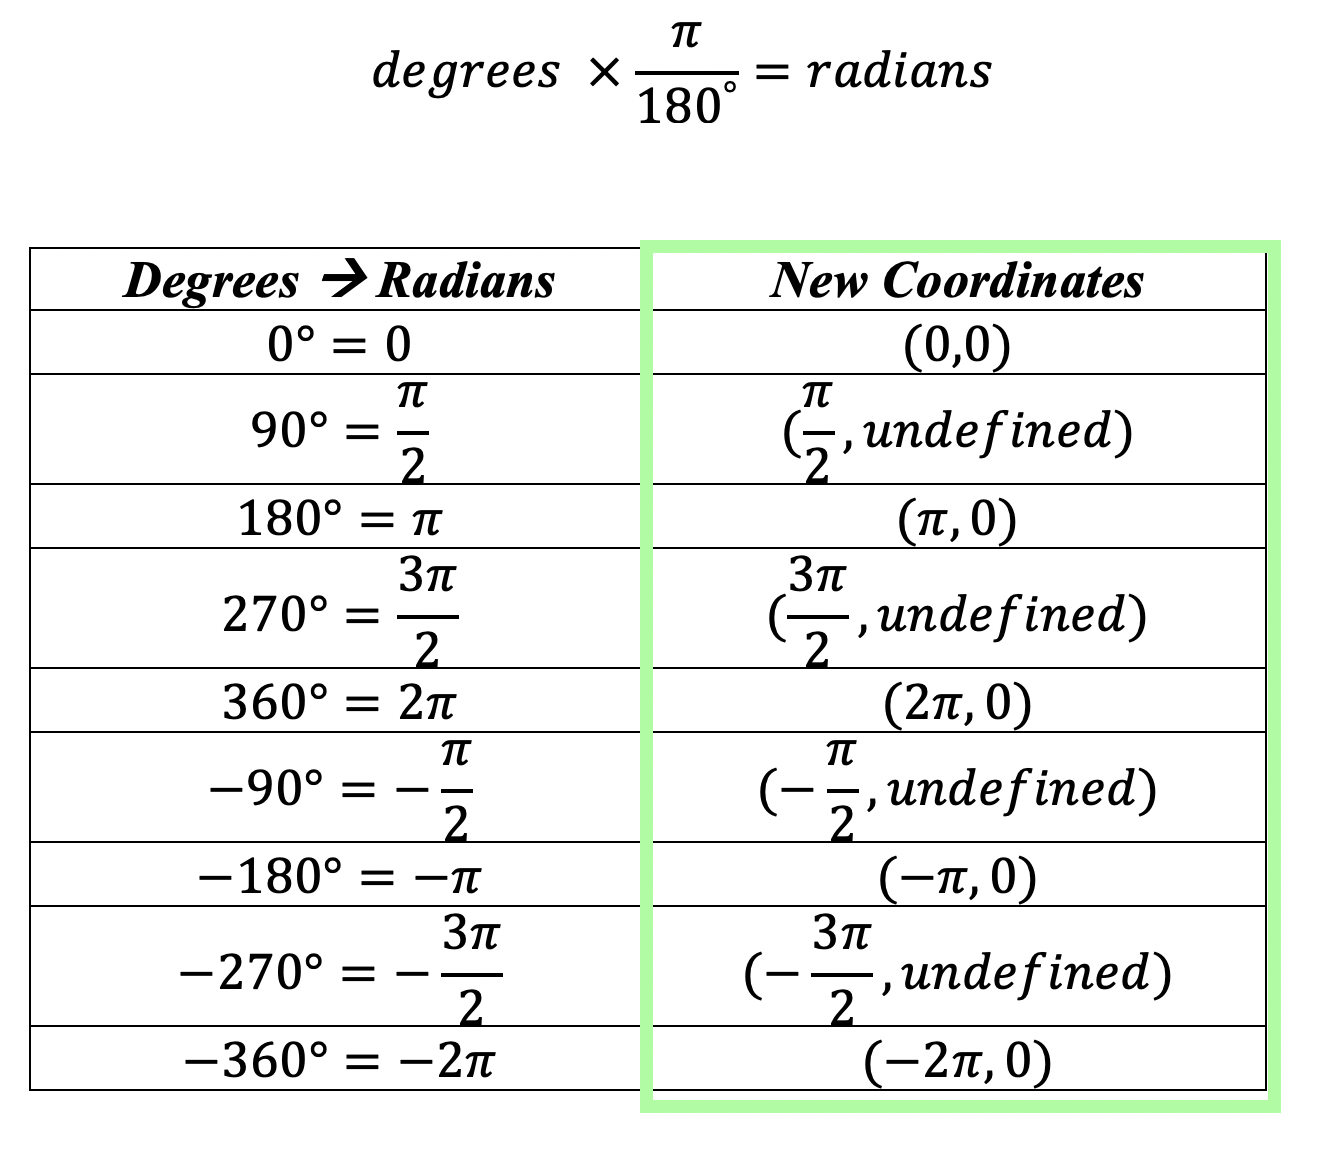
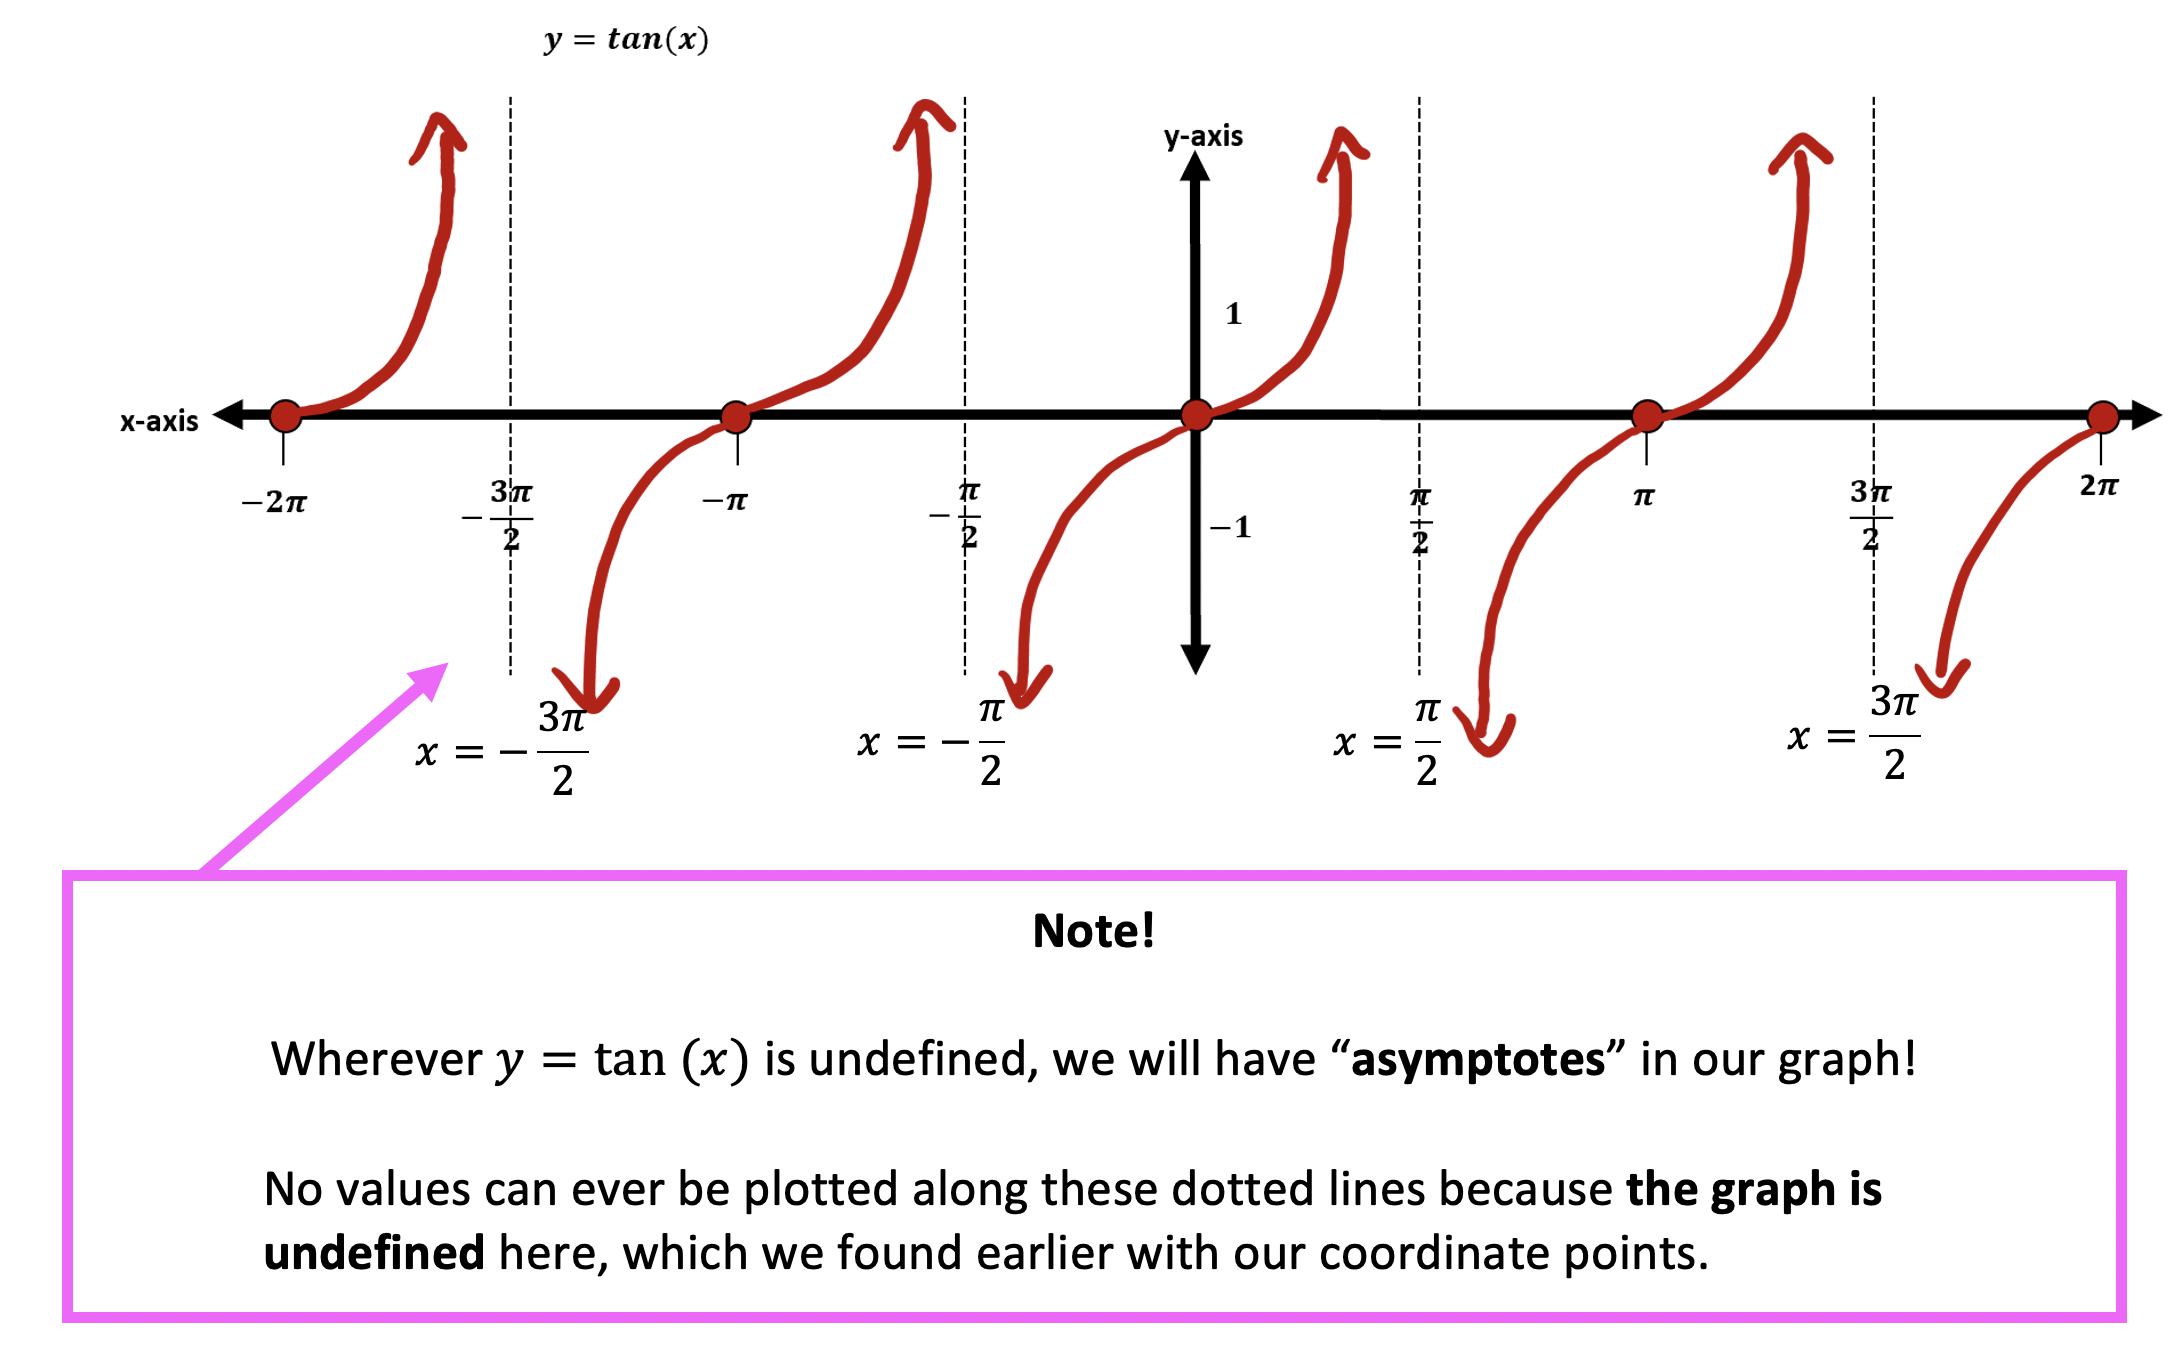
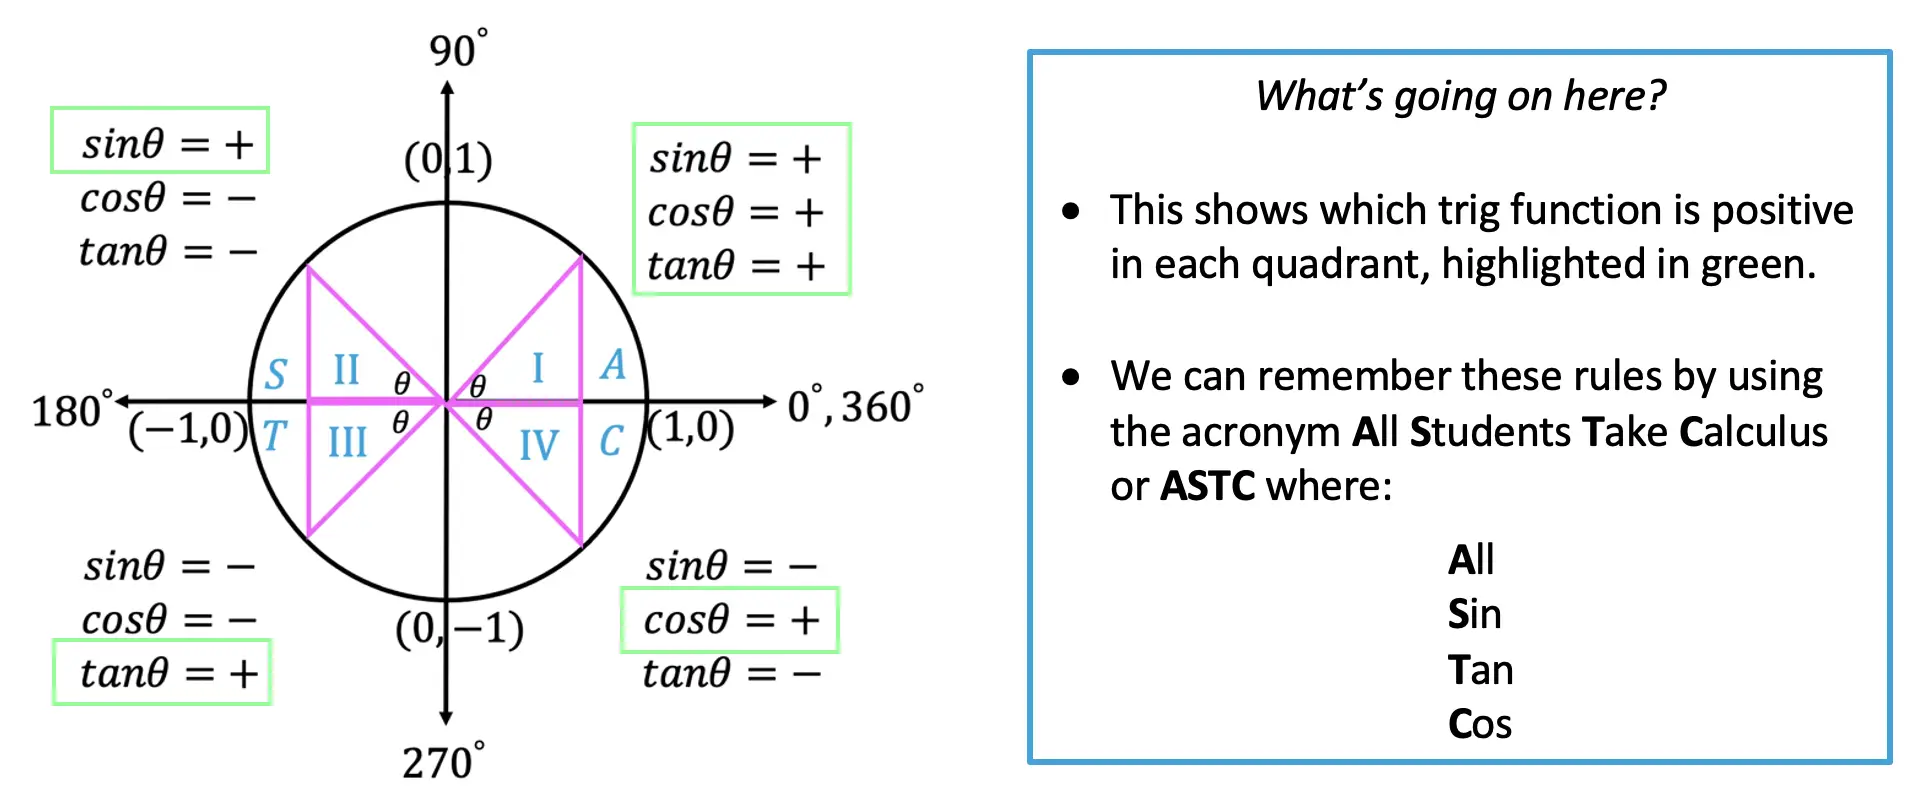
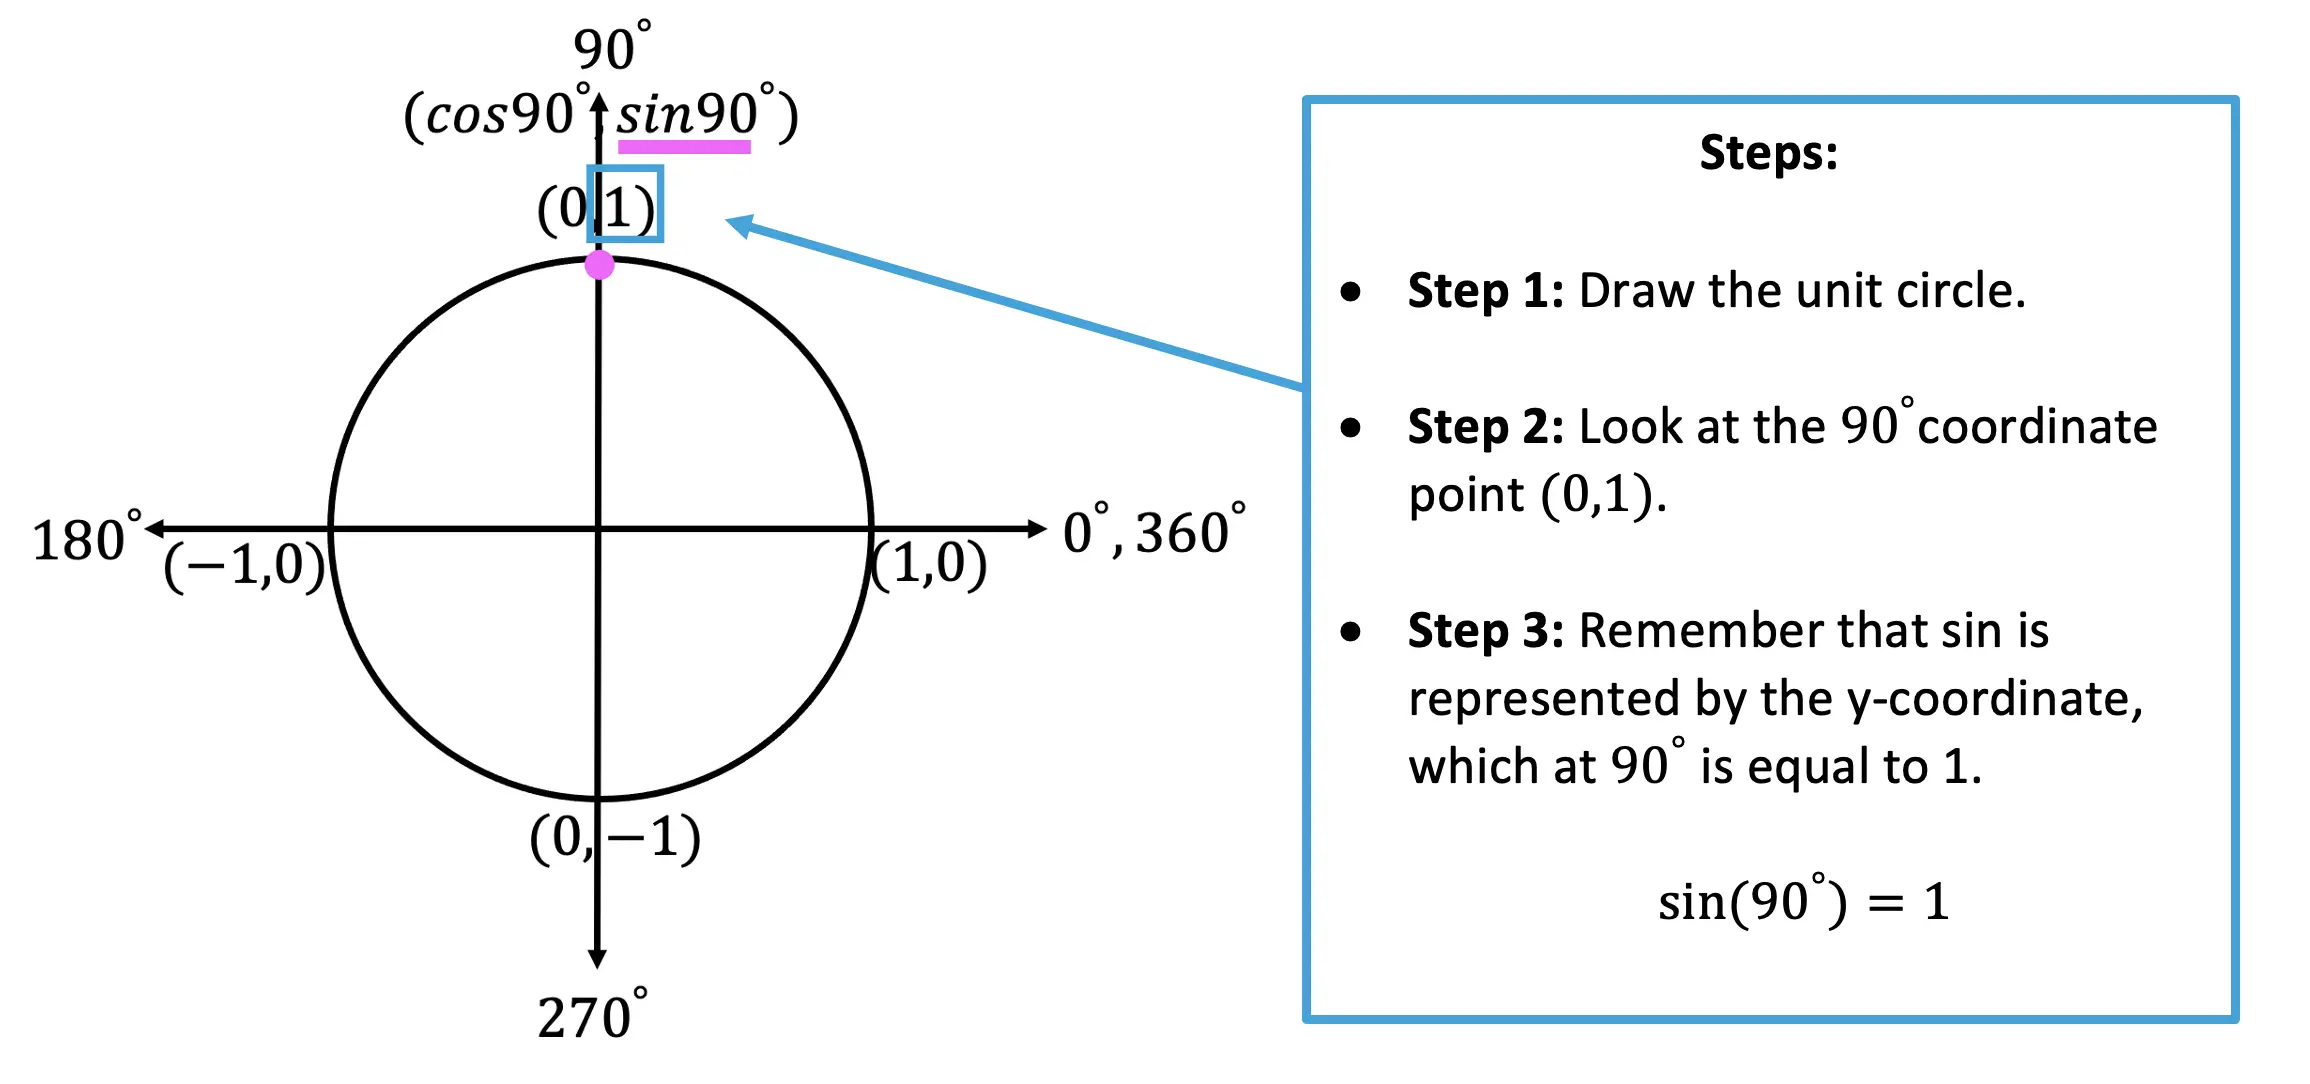
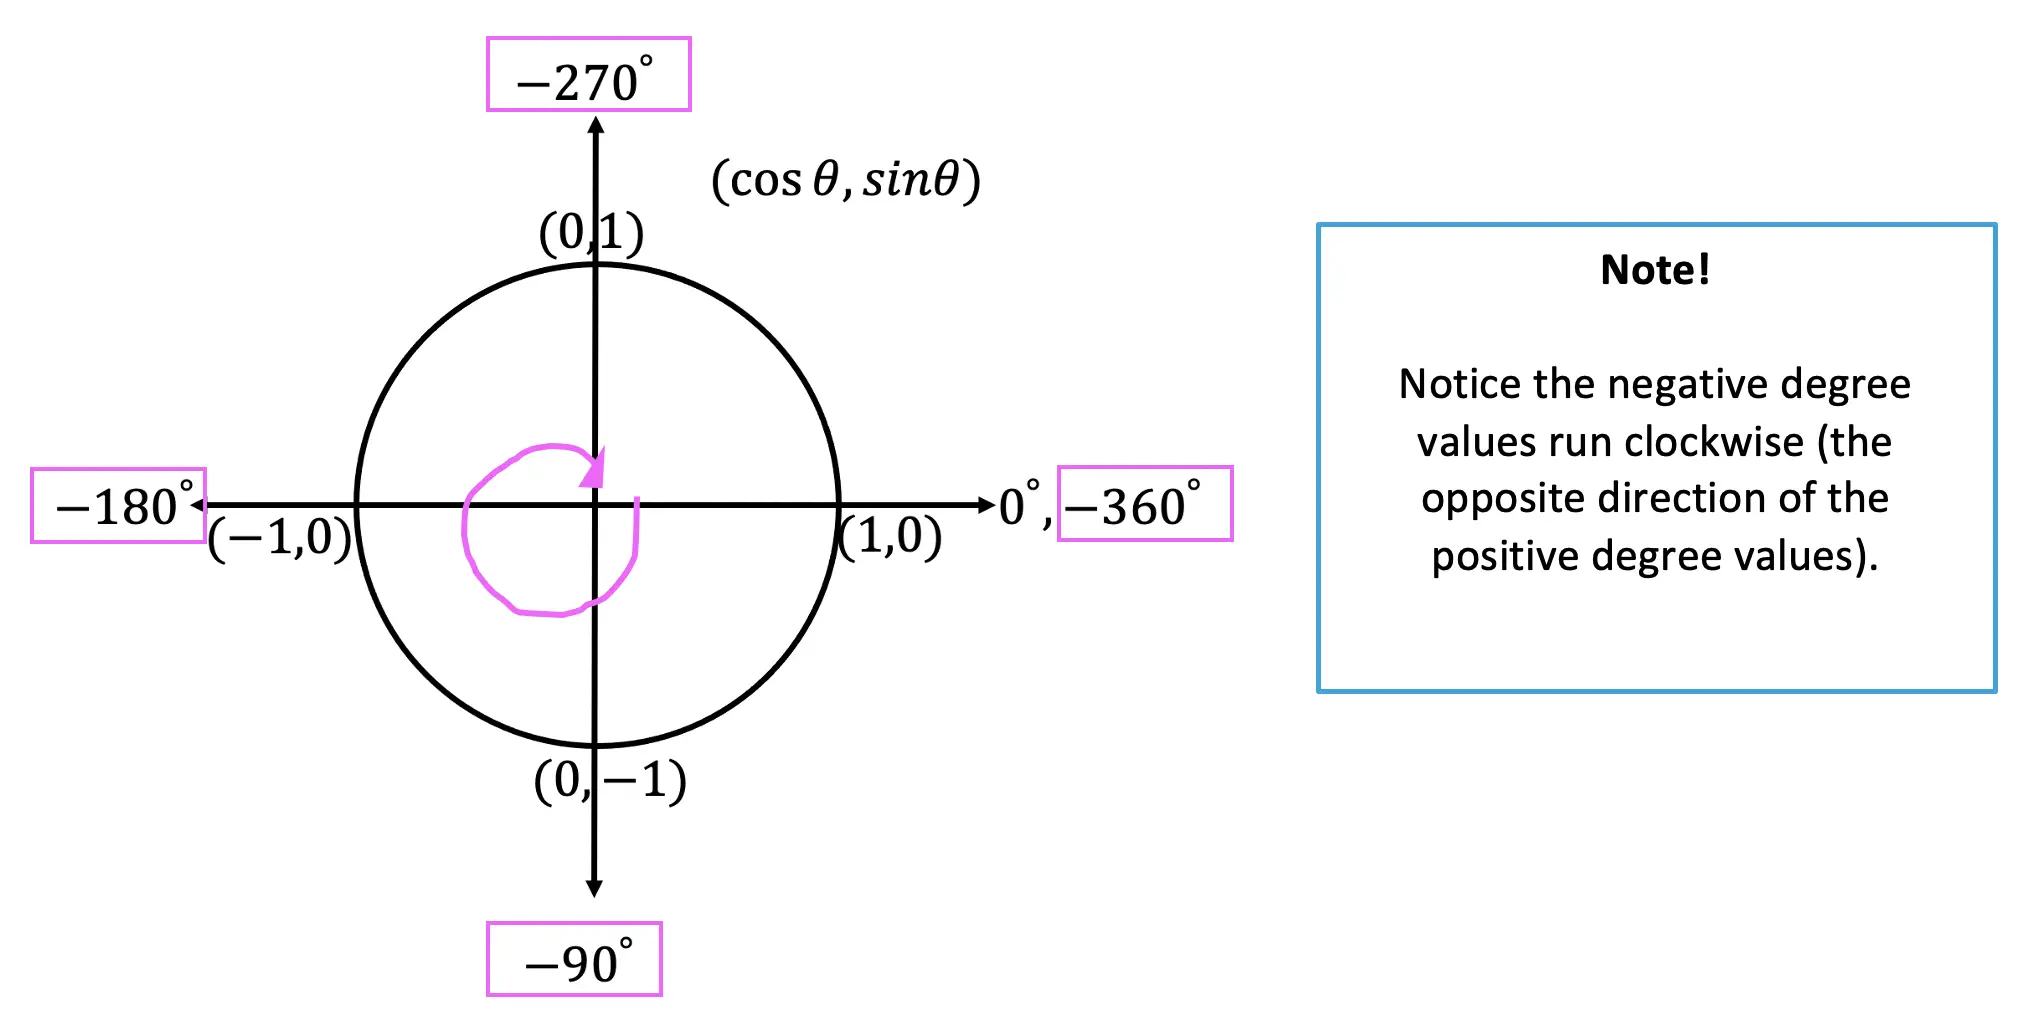
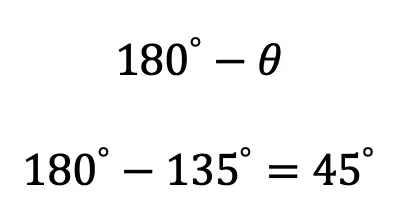
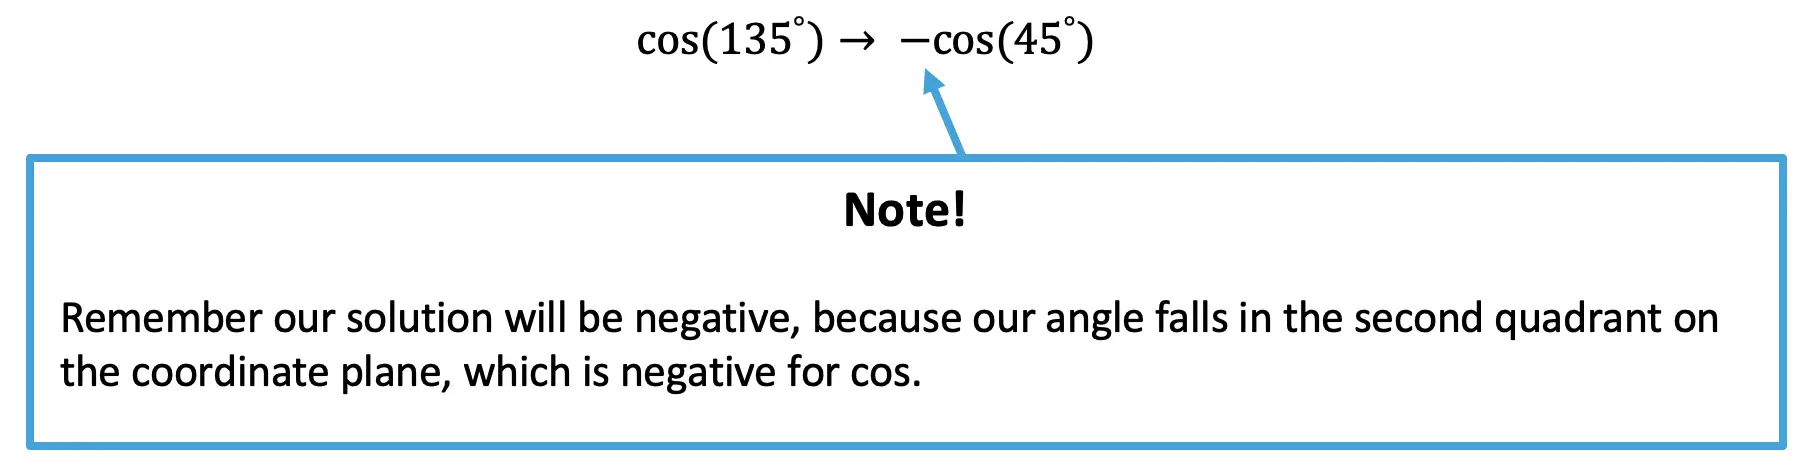
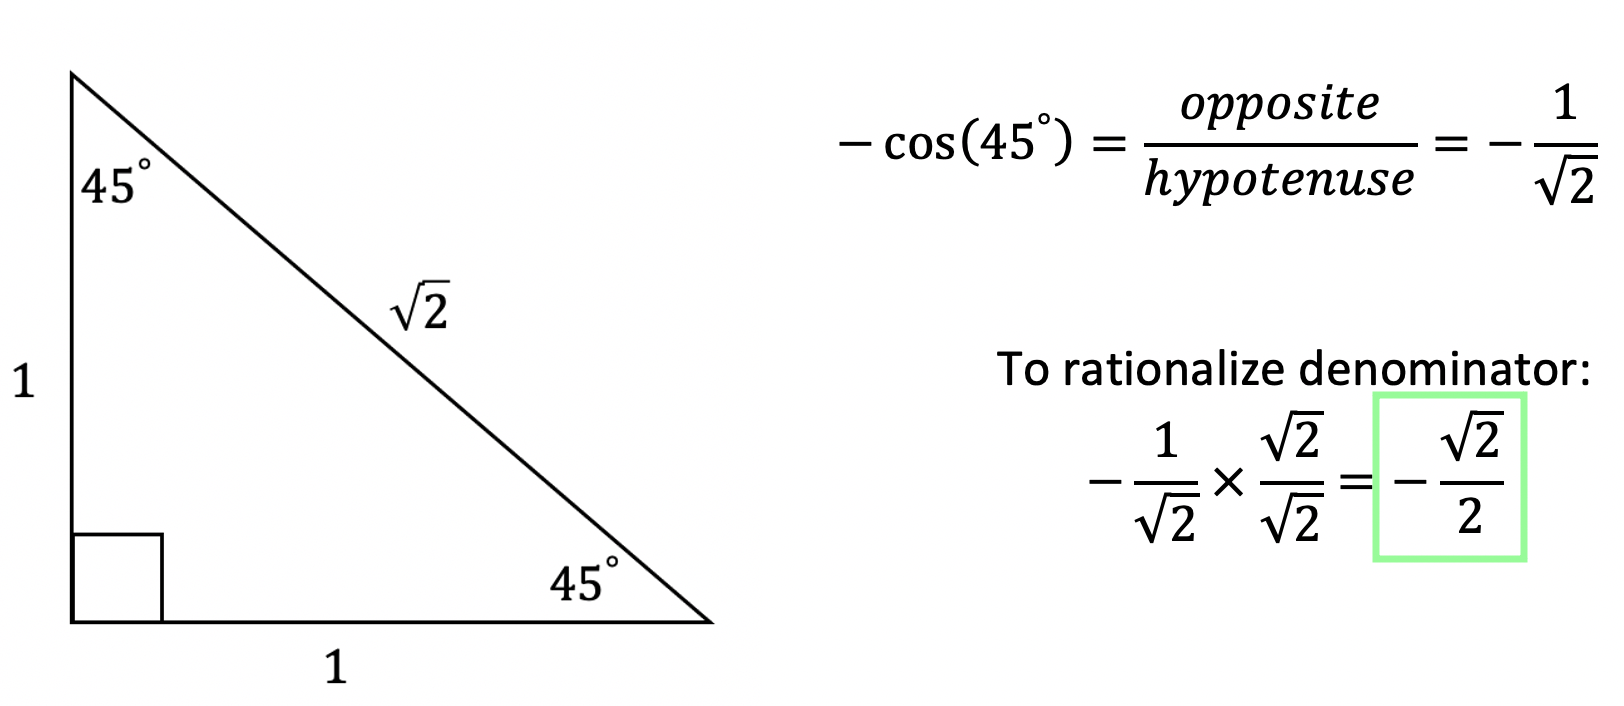
*For a review on how to derive the basic Trig functions (y=sinx, y=cosx, and y=tanx), click here.

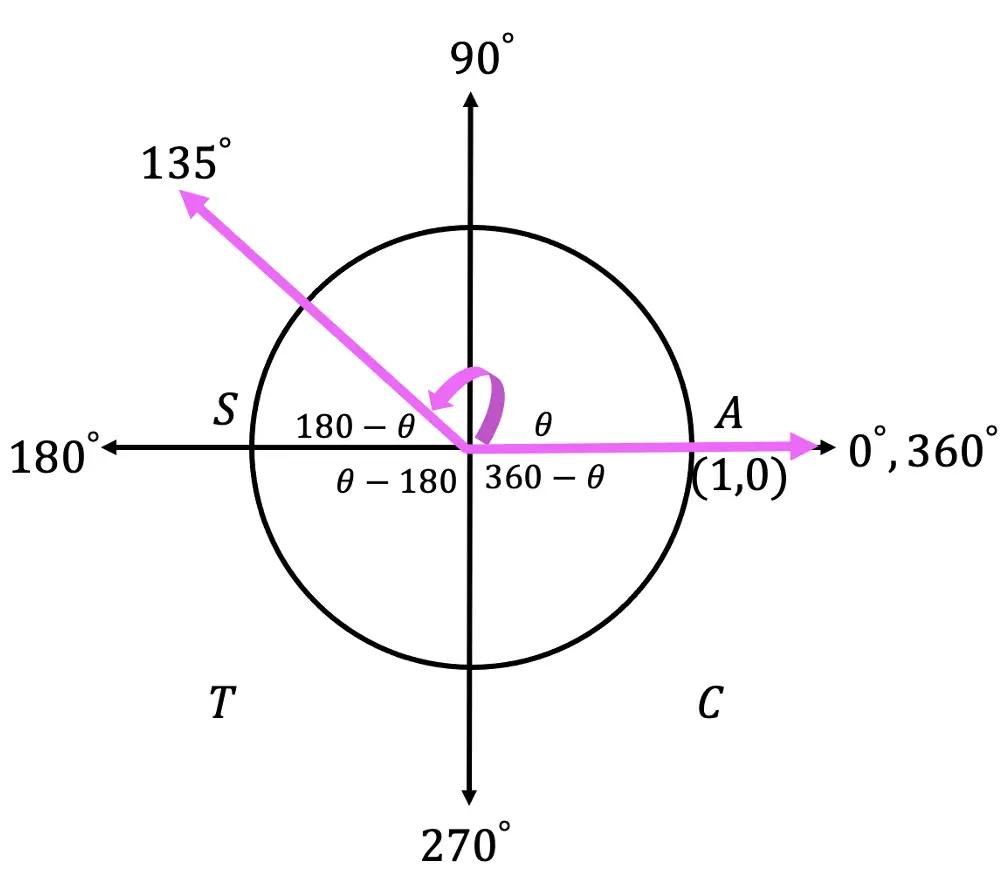
What are the Different Parts of a Trig Function?

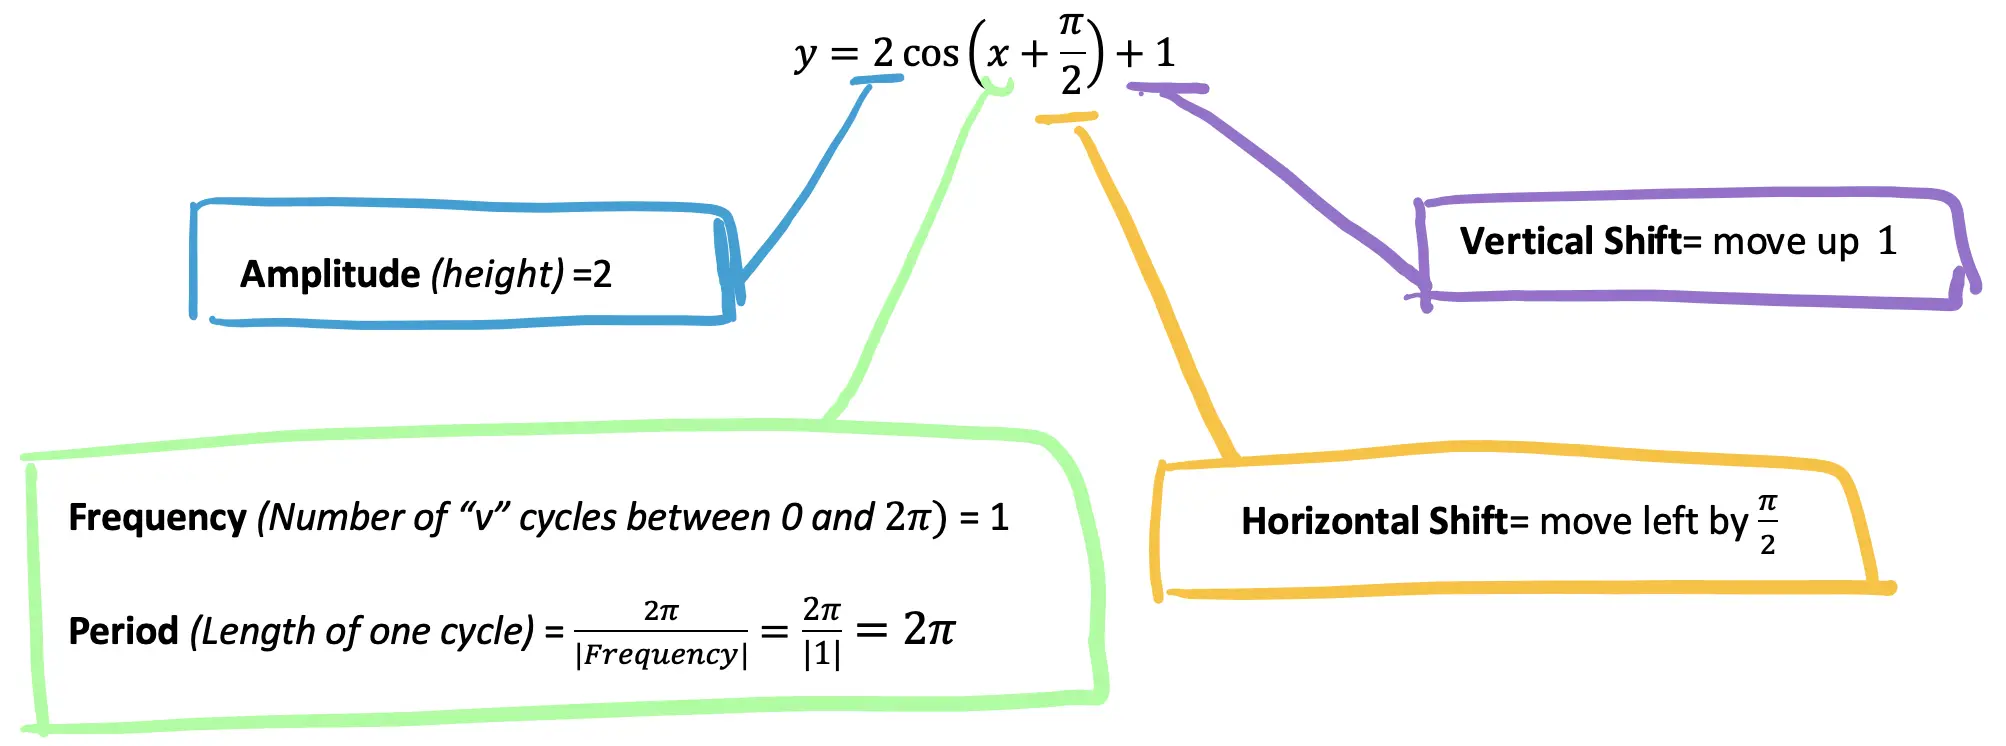
When transforming trig functions, there are several things to look out for, let’s take a look at what each part of a trig function represents below:

Trig functions

Amplitude: The distance (or absolute value) between the x axis and the highest point on the graph.

Frequency: This is the number of cycles that happen between 0 and 2π. (Α “cycle” in this case is the number of “s” cycles for the sine function).

Period: The x-value/length of one cycle. (Α “cycle” in this case is the number of “s” cycles for the sine function). This is found by looking at the graph and seeing where the first cycle ends, or, by using the formula:       

Horizontal Shift: When a trigonometric function is moved either left or right along the x axis.

Vertical Shift: When a trigonometric function is moved either up or down along the y axis.

Let’s try an Example, by graphing the following trig function step by step by identifying the amplitude, frequency, period, vertical shift, and horizontal phase shift.

Step 1: First let’s label and identify all the different parts of our trig function and what each part represents.

Trig functions

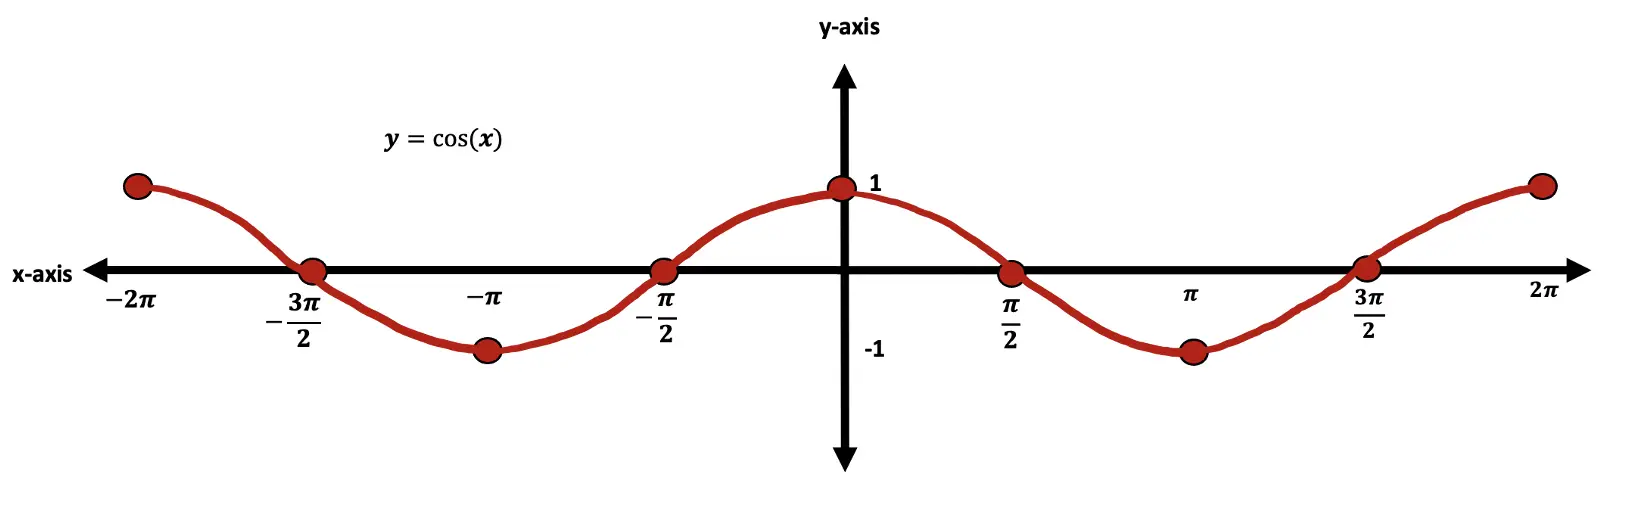
Step 2: Now let’s transform our trig graph one step at a time.  First, let’s start graphing y=cos(x) without any transformations, the basic graph.

Trig functions
Graph y=cos(x)

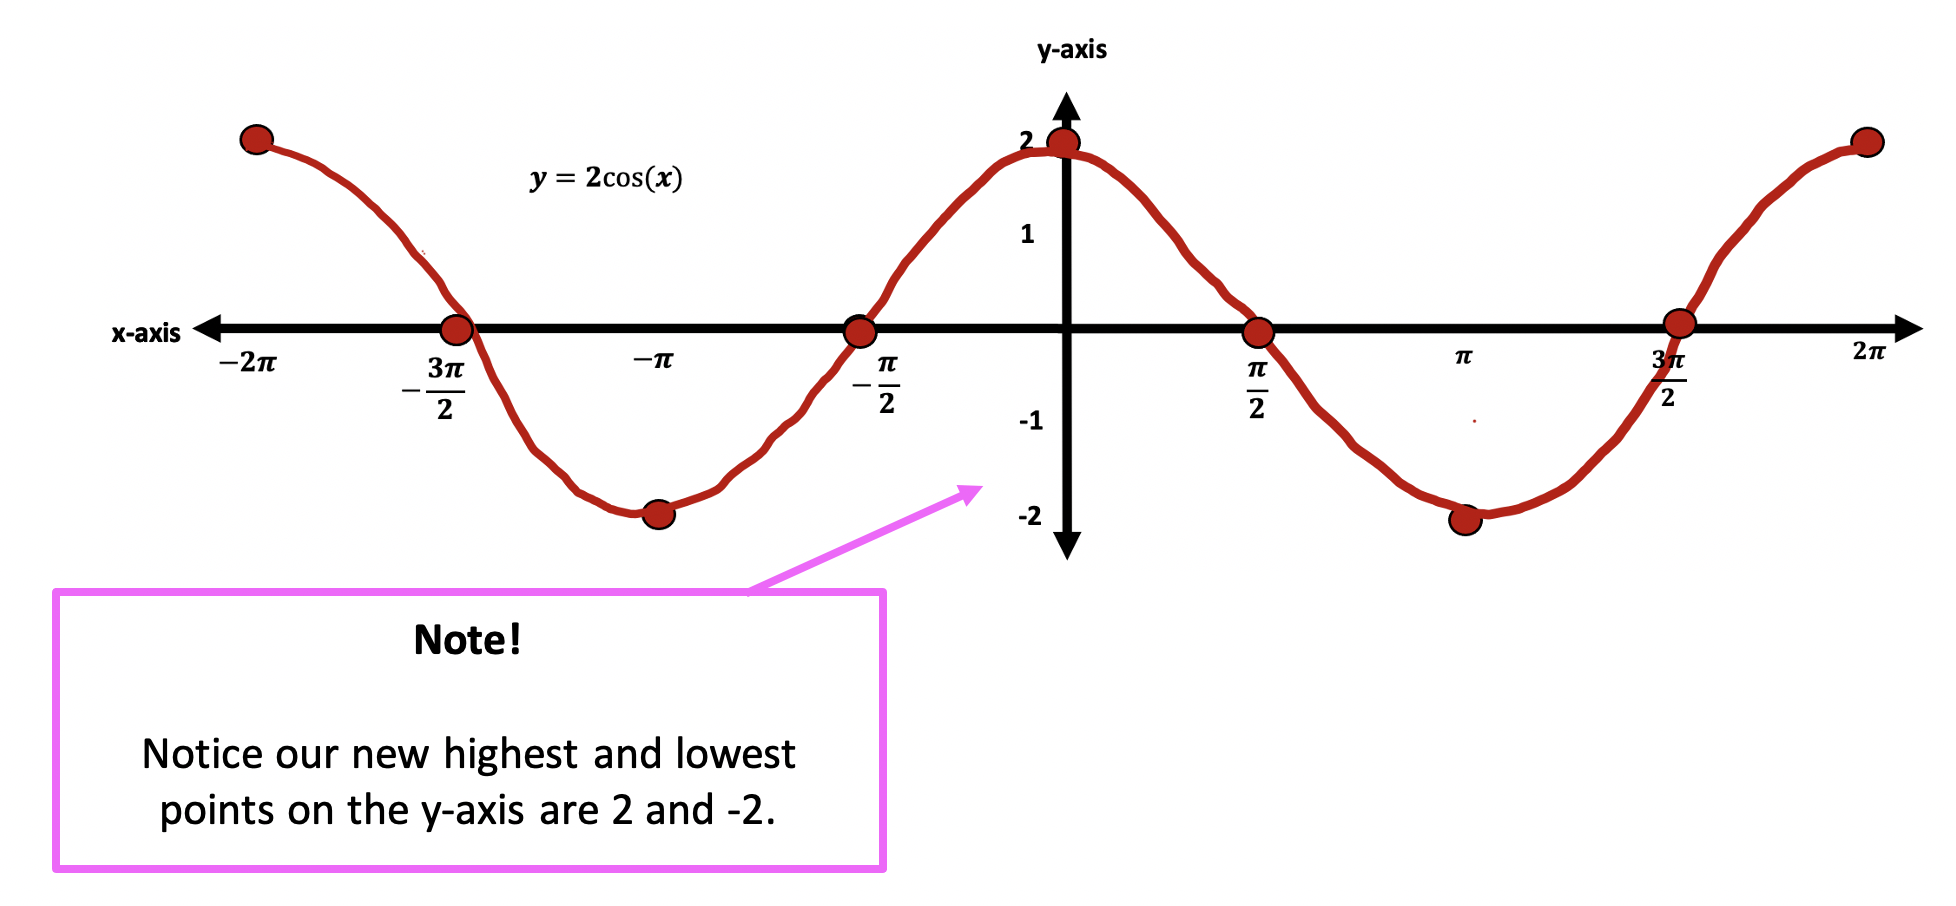
Step 3: Next, let’s add our amplitude of 2, otherwise known as the height, or distance to the x-axis.  To do this our highest and lowest points on the y-axis will now be moved to 2 and -2 respectively. 

Trig functions
Re-draw y=cos(x), with an amplitude of 2 to get y=2cos(x)

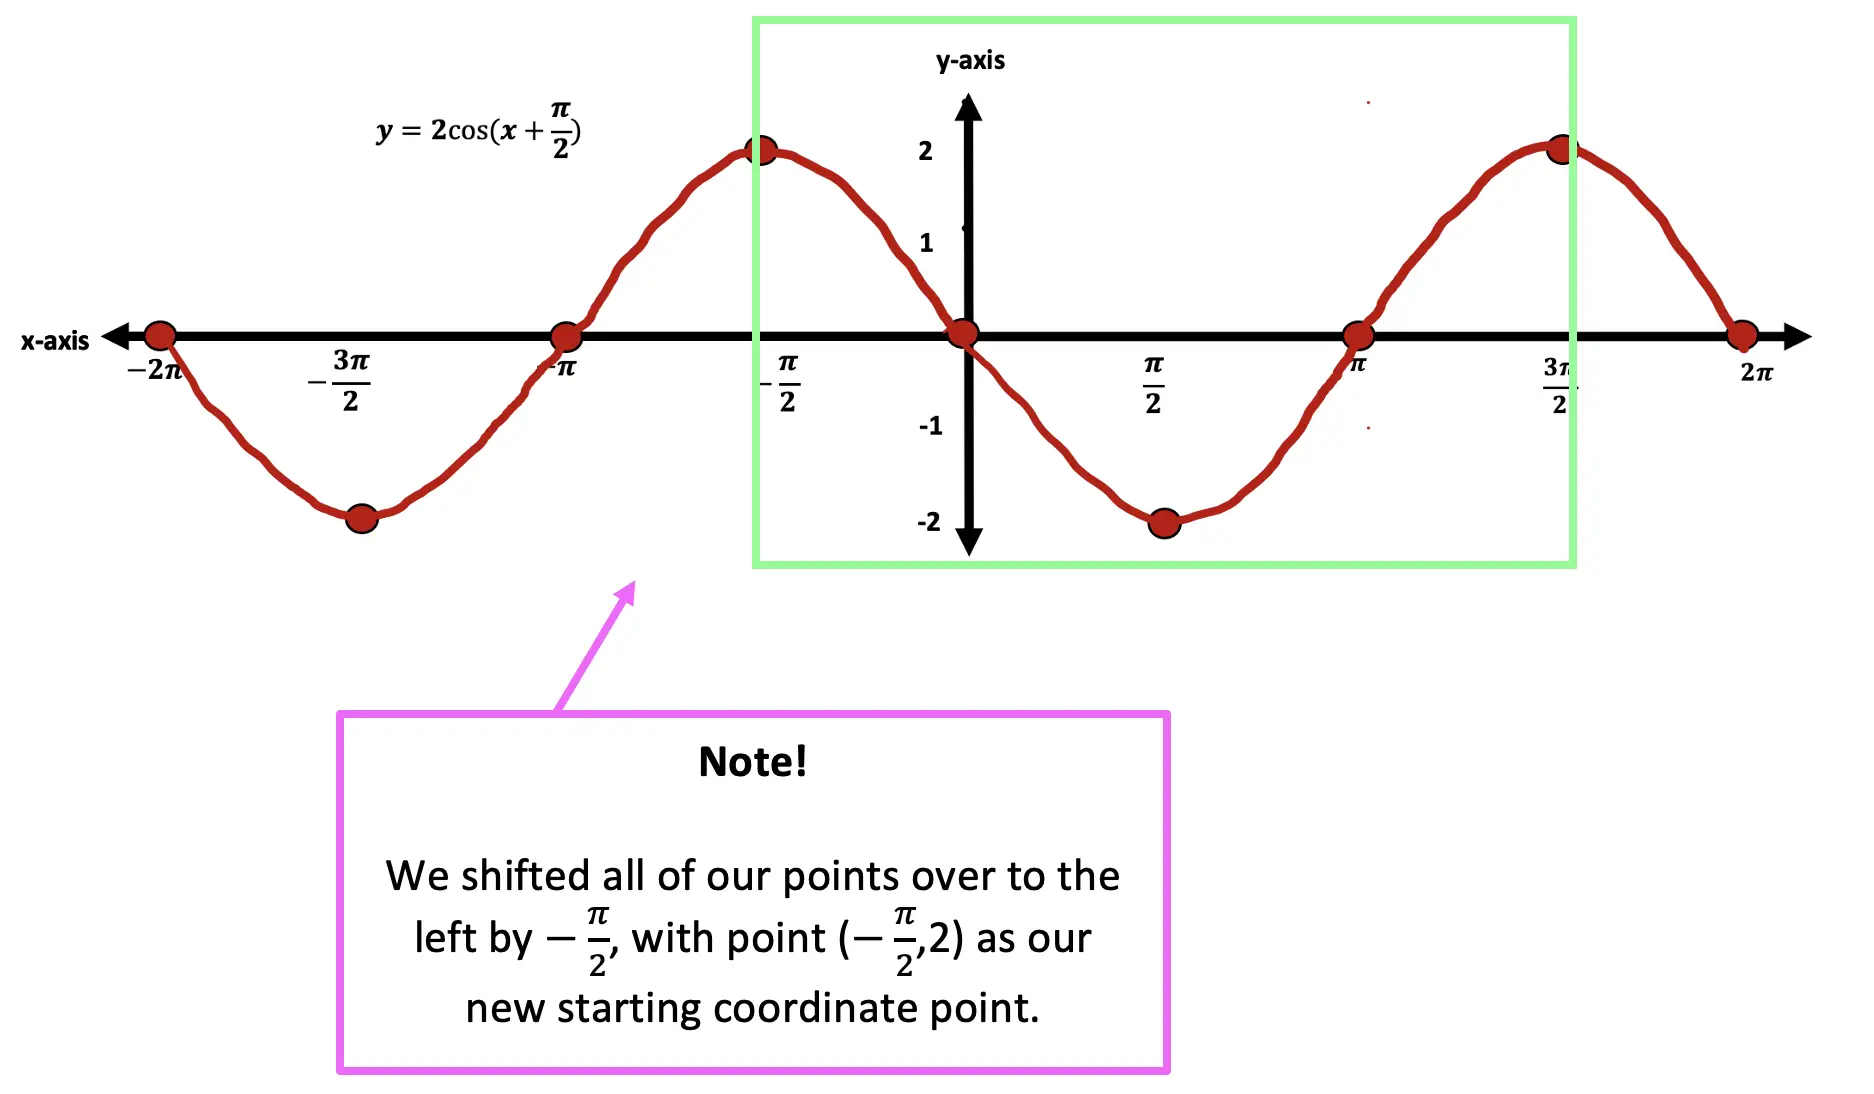
Step 4: Next, we can apply our horizontal shift to the left by (π/2) or 90º.  To do this, we need to look at where negative (π/2) is on our graph at (-π/2) and move our entire graph over to start at this new point, “shifting” over each coordinate point by (π/2) along the x axis.

Trig functions
Shift our graph y=2cos(x) over by 90º to the left to get y=2cos(x+(π/2))

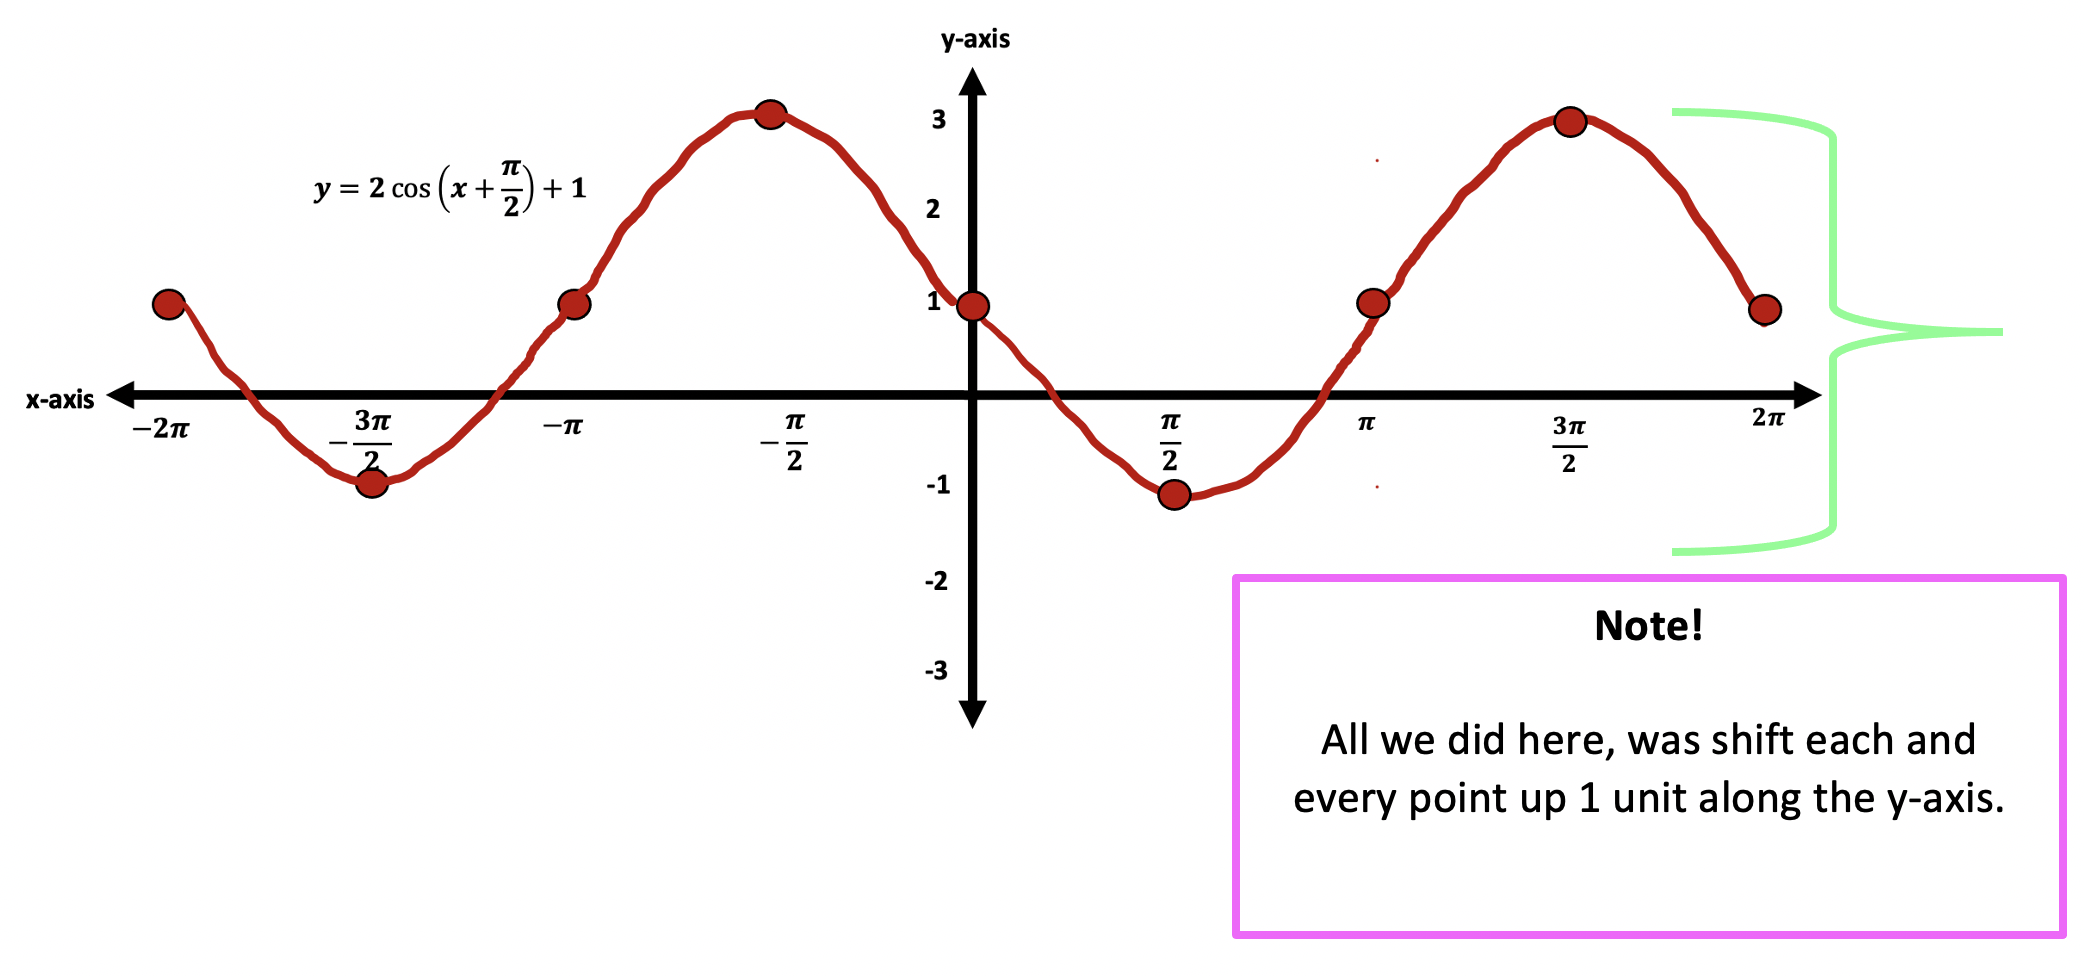
Step 5: For our last transformation, we have a vertical phase shift up 1 unit.  All this means is that we are going to shift our entire graph up by 1 unit along the y axis.

Trig function graph
phase shift
vertical shift
Shift our entire graph y=2cos(x+(π/2)) up one unit along the y-axis to get y=2cos(x+(π/2))+1

Think you are ready to try graphing trig functions and identifying the amplitude, frequency, period, vertical phase shift, and horizontal phase shift? Check out the practice questions and answers below!
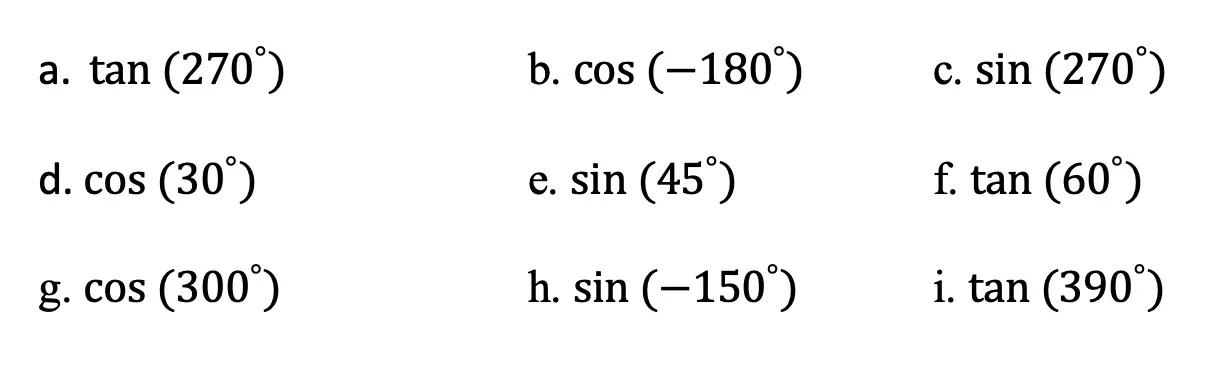
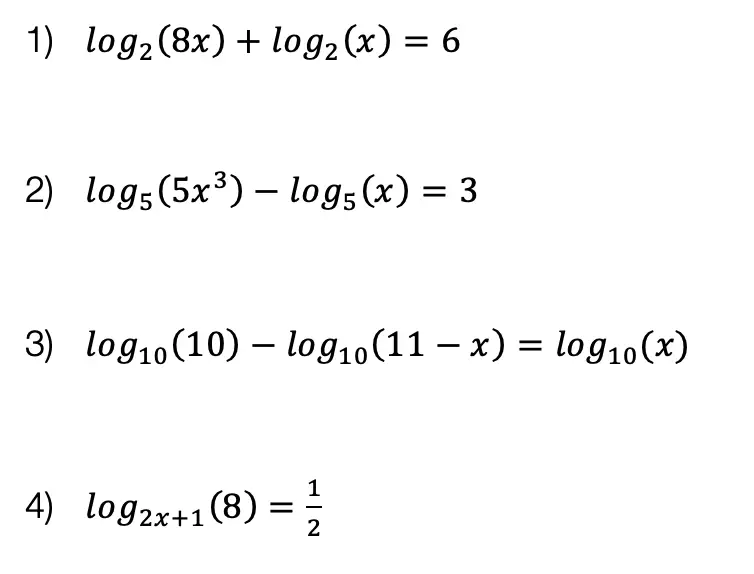
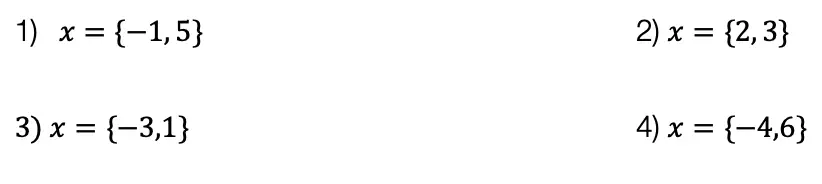
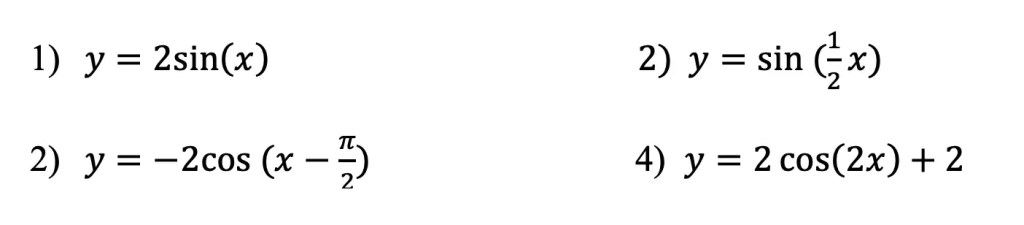
Practice Questions:

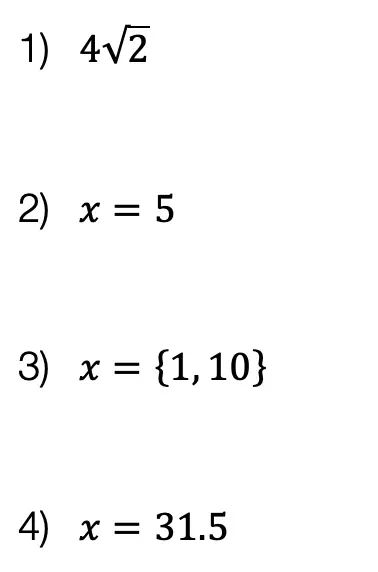
When you’re ready check out the function transformations solutions below:
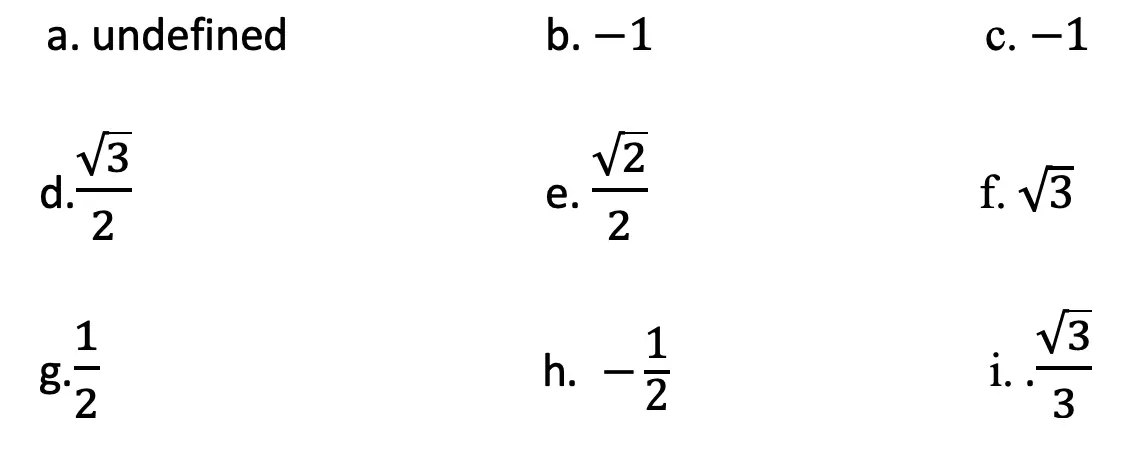
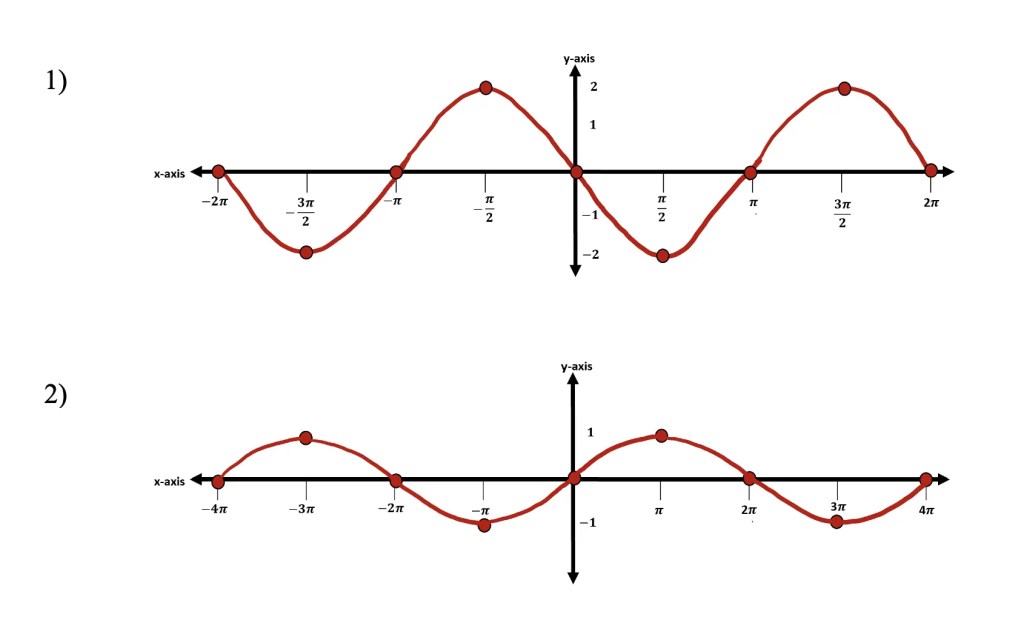
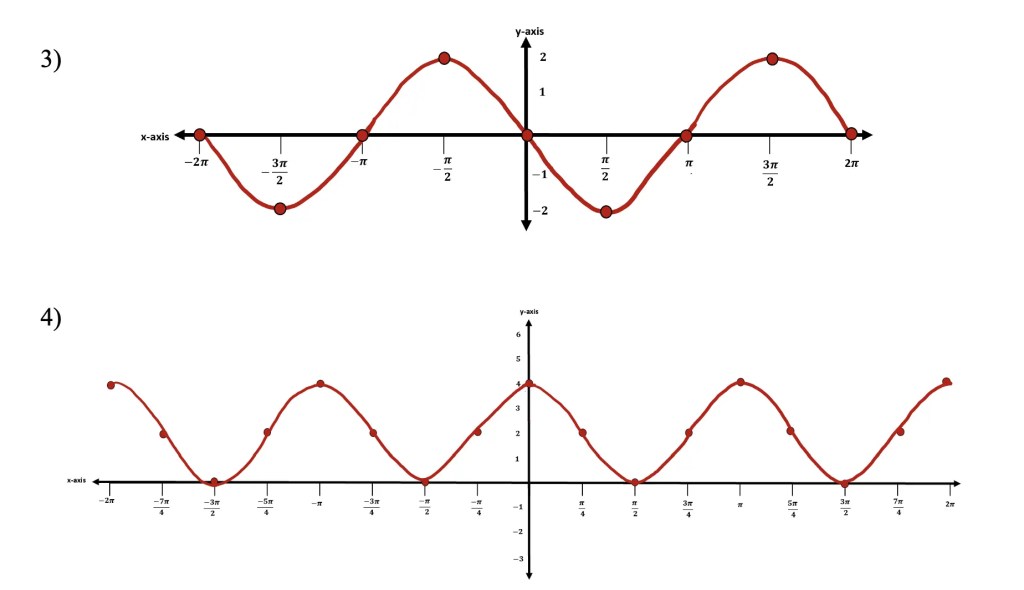
Solutions:

Still, got questions? No problem! Don’t hesitate to comment with any questions or check out the video above for an in-depth explanation. Happy calculating! 🙂

Facebook ~ Twitter ~ TikTok ~ Youtube

Related Trigonometry Posts:

The Unit Circle

Basic Right Triangle Trigonometric Ratios (SOH CAH TOA)

4545 90 Special Triangles

30 60 90 Special Triangles

Graphing Trigonometric Functions

Trig Identities

Factoring Trigonometric Functions

Law of Cosines

Law of Sines

TikTok Math Video Compilations

Happy December everyone! With crazy 2020 coming to an end, I thought I would share some TikTok math video compilations of Algebra, Geometry, Algebra 2/Trig, and Statistics for a quick review of all our videos posted throughout the year. Enjoy these TikTok math video compilations and happy calculating! 🙂

Want to make math suck just a little bit less? Subscribe and follow us for FREE fun colorful math videos and lessons every week! 🙂

Facebook ~ Twitter ~ TikTok ~ Youtube

TikTok Math Video Compilations

Algebra:

Within algebra, you will find arithmetic sequences, combining like terms, box and whisker plots, geometric sequences, solving radical equations, completing the square, 4 ways to factor quadratic equations, piecewise functions and more!

Geometry:

Within Geometry, you will find, how to construct an equilateral triangle, a median of a trapezoid, area of a sector, how to find perpendicular and parallel lines through a given point, SOH CAH TOA right triangle trigonometry, reflections, and more!

Algebra 2/Trig.

Within Algebra 2/Trig., you will find, how to expand a cubed binomial, how to divide polynomials, how to solve log equations, imaginary numbers, synthetic division, unit circle basics, how to graph y=sin(x), and more!

Statistics:

Within statistics, you will find, box and whisker plots, how to find the variance, and, the probability of flipping a coin 2 times!

For full length video, don’t forget to check out our free math video index page! Thanks for stopping by! 🙂

Graphing Trig Functions: Algebra 2/Trig.

Hi everyone and welcome to MathSux! This post is going to help you pass Algebra 2/Trig. In this post, we are going to apply our knowledge of the unit circle and trigonometry and apply it to graphing trig functions y=sin(x), y=cos(x), and y=tan(x). We have been using trig functions in basic trigonometry, but today, we will see what each function (sin, cos, and tan) look like graphed on a coordinate plane.

If you are already familiar with the basics of graphing trig functions and want to learn how to transform them, including knowing how to identify the amplitude, period frequency, vertical shift, and horizontal phase shift, then please check out this post here on transforming trigonometric functions.

If you have any questions, don’t hesitate to comment or check out the video below. Thanks for stopping by and happy calculating! 🙂

How do we get coordinate points for graphing Trigonometric Functions?

For deriving our trigonometric function graphs [y=sin(x), y=cos(x), and y=tan(x)] we are going to write out our handy dandy Unit Circle. By looking at our unit circle and remembering that coordinate points are in (cos(x), sin(x)) form and that tanx=(sin(x))/(cos(x)) we will be able to derive each and every trig graph!

*Note below is the unit circle we are going to reference to find each value, for an in-depth explanation of the unit circle, check out this link here.

How to Graph y=sin(x)?

While Graphing Sine, you may notice that the sine function curves creates what looks like an “S” shape. As they say, “S” is for Sine, this is the easiest way to remember what the sine function looks like! Check it out below.

Graphing Trig Functions

Now that we know what the sine function looks like once it’s graphed, let’s see why it looks that way in the first place by deriving each coordinate point with the help of the unit circle.

Step 1: We are going to derive each degree value for sin by looking at the unit circle. These will be our coordinates for graphing y=sin(x). *For a review on how to get these values, check out the link here explaining the unit circle.

Step 2: Now we need to convert all the x-values from degrees to radians.  Fear not because this can be done easily with a simple formula!

      To convert degrees à radians, just use the formula below:

Step 3: Now that we have our coordinate points and converted degrees to radians, we can draw out our function y=sin(x) on the coordinate plane! 

Graphing Trig Functions

Now we will follow the same process for graphing y=cos(x) and y=tan(x).

How to Graph y=cos(x)?

While Graphing Cosine, you may notice that the cosine function creates what looks like a “V” shape. I always like to think “V” is for victory, but of course, in this case, it is for cosine, that is the easiest way to remember what this function looks like! Check it out below.

Graphing Trig Functions

Now that we know what the cosine function looks like once graphed, let’s see why it looks this way in the first place by deriving each coordinate point with the help of the unit circle.

Step 1: We are going to derive each degree value for cos by looking at the unit circle. These will be our coordinates for graphing y=cos(x). *For a review on how to get these values, check out the link here explaining the unit circle.

Graphing Trig Functions

Step 2: Now we need to convert all the x-values from degrees to radians.

Graphing Trig Functions

Step 3: Now that we have our coordinate points and converted degrees to radians, we can draw out our function y=cos(x) on the coordinate plane! 

Graphing Trig Functions

What do you think would happen if we were to vertical shift our entire function up by one unit? Or move our entire function to the left by 90 degrees with a horizontal phase shift? Check out what happens here!

How to Graph y=tan(x)?

While Graphing Tangent, you may notice that the tangent function looks totally different than sine or cosine. Check it out below.

Step 1: We are going to derive each degree value for the tangent function by looking at the unit circle. In order to derive values for tan(x), we need to remember that tan(x)=sin(x)/cos(x). Once found, these will be our coordinates for graphing y=tan(x). *For a review on how to get these values, check out the link here explaining the unit circle.

Graphing Trig Functions

Step 2: Now we need to convert all the x-values from degrees to radians.

Graphing Trig Functions

Step 3: Now that we have our coordinate points and converted degrees to radians, we can draw out our function y=tan(x) on the coordinate plane! 

Graphing Trig Functions

Still got questions? No problem! Don’t hesitate to comment with any questions or check out the video above for an in-depth explanation. Happy calculating! 🙂

Facebook ~ Twitter ~ TikTok ~ Youtube

Ready for the next lesson? Now that you know the basics of graphing the sine, cosine, and tangent functions, learn how to transform each trig function on a coordinate plane by identifying the amplitude, period frequency, vertical shift, and horizontal phase shift of each function, by checking out this post here on transforming trigonometric functions. When you’re ready for more, check out the related trig posts below!

Related Trigonometry Posts:

The Unit Circle

Basic Right Triangle Trigonometric Ratios (SOH CAH TOA)

4545 90 Special Triangles

30 60 90 Special Triangles

Law of Sines

Transforming Trig Functions

Factoring Trig Functions

Law of Cosines

Trig Identities

The Unit Circle: Algebra 2/Trig.

Greetings math friends! In today’s post we’re going to go over some unit circle basics. We will find the value of trigonometric functions by using the unit circle and our knowledge of special triangles. For even more practice questions and detailed info., don’t forget to check out the video and examples at the end of this post. Keep learning and happy calculating! 🙂

What is the Unit Circle?

The Unit Circle is a circle where each point is 1 unit away from the origin (0,0).  We use it as a reference to help us find the value of trigonometric functions.

The Unit Circle

Notice the following things about the unit circle above:

  1. Degrees follow a counter-clockwise pattern from 0 to 360 degrees.
  2. Values of cosine are represented by x-coordinates.
  3. Values of sine are represented by y-coordinates.
  4. Using the unit circle we can find the degree and radian value of trigonometric functions (SOH CAH TOA). Check out the example below!

What’s the big deal with Quadrants?

Within a coordinate plane there are 4 quadrants numbered I, II, III, and IV used throughout all of mathematics. Within these quadrants there are different trigonometric functions that are positive to each unique quadrant.  This will be important when solving questions with reference angles later in this post. Check out which trig functions are positive in each quadrant below:

The Unit Circle
The Unit Circle

Now let’s look at some examples on how to find trigonometric functions using our circle!

The Unit Circle

Negative Degree Values:

The unit circle also allows us to find negative degree values which run clockwise, check it out below!

The Unit Circle

Knowing that negative degrees run clockwise, we can now find the value of trigonometric functions with negative degree values.

The Unit Circle

How to find trig ratios with 30º, 45º and 60º ?

Instead of memorizing much, much more of the unit circle, there’s a trick to memorizing two simple special triangles for answering these types of questions. The 45º 45º 90º  special triangle and the  30º 60º 90º special triangle. (Why does this work? These special triangles can also be derived and found on the unit circle).

special triangles

Using the above triangles and some basic trigonometry in conjugation with the unit circle, we can find so many more angles, take a look at the example below:

Since we need to find the value of tan(45º) , we will use the 45º, 45º, 90º  special triangle.

special triangles

For our last question, we are going to need to combine our knowledge of unit circles and special triangles:

-> In order to do this, we must first look at where our angle falls on the unit circle.  Notice that the angle 135º is encompassed by the pink lines and falls in quadrant 2.

The Unit Circle

-> Since our angle falls in the second quadrant where only the trig function sin is positive.  Since we are finding an angle with the function cosine, we know the solution will be negative.

-> Now we need to find something called a reference angle.  Which is what those θ, 180°-θ, θ-180°, 360°-θ and  symbols represent towards the center of the unit circle.  Using these symbols will help us find the value of cos(135º). 

Because the angle we are trying to find,135º , falls in the second quadrant, that means we are going to use the reference angle that falls in that quadrant 180º-θ theta, using the angle we are given as θ.

The Unit Circle

-> Now we can re-write and solve our trig equations using our newly found reference angle, 45º.

Now we are going to use our  45º 45º 90º special triangle and SOH CAH TOA to evaluate our trig function.  For a review on how to use SOH CAH TOA, check out this link here.

special triangles

When you’re ready, try the problems on your own below!

Practice Questions:

Solve the following trig functions using a unit circle and your knowledge of special triangles:

The Unit Circle

Solutions:

The Unit Circle

Still got questions? No problem! Don’t hesitate to comment with any questions or check out the video above for even more examples. Happy calculating! 🙂

Facebook ~ Twitter ~ TikTok ~ Youtube

Related Trigonometry Posts:

Law of Sines

Basic Right Triangle Trigonometric Ratios (SOH CAH TOA)

4545 90 Special Triangles

30 60 90 Special Triangles

Graphing Trig Functions

Transforming Trig Functions

Factoring Trig Functions

Law of Cosines

Trig Identities

Synthetic Division and Factoring Polynomials: Algebra 2/Trig.

Hey there math friends! In this post we will go over how and when to use synthetic division to factor polynomials! So far, in algebra we have gotten used to factoring polynomials with variables raised to the second power, but this post explores how to factor polynomials with variables raised to the third degree and beyond!

If you have any questions don’t hesitate to comment or check out the video below. Also, don’t forget to master your skills with the practice questions at the end of this post. Happy calculating! 🙂

What is Synthetic Division?

Synthetic Division is a shortcut that allows us to easily divide polynomials as opposed to using the long division method. We can only use synthetic division when we divide a polynomial by a binomial in the form of (x-c), where c is a constant number.

Example #1:

*Notice we can use synthetic division in this case because we are dividing by (x+4) which follows our parameters (x-c), where c is equal to 4.

Synthetic Division
Synthetic Division
Synthetic Division
Synthetic Division
Synthetic Division
Synthetic Division
Synthetic Division
Synthetic Division
Synthetic Division

Example #2: Factoring Polynomials

Let’s take a look at the following example and use synthetic division to factor the given polynomial:

Synthetic Division

Check!

The great thing about these questions is that we can always check our work! If we wanted to check our answer, we could simply distribute 2(x+1)(x+3)(x-2) and get our original polynomial, f(x)=2x3+4x2-10x-12.

Try the practice problems on your own below!

Looking to brush up on how to divide polynomials the long way using long division? Check out this post here!

Still got questions? No problem! Don’t hesitate to comment with any questions or check out the video above. Happy calculating! 🙂

Facebook ~ Twitter ~ TikTok ~ Youtube

Imaginary and Complex Numbers: Algebra 2/Trig.

Happy Wednesday and back to school season math friends! This post introduces imaginary and complex numbers when raised to any power exponent and when multiplied together as a binomial. When it comes to all types of learners, we got you between the video, blog post, and practice problems below. Happy calculating! 🙂

What are Imaginary Numbers?

Imaginary numbers happen when there is a negative under a radical and looks something like this:

Imaginary and Complex Numbers

Why does this work?

In math, we cannot have a negative under a radical because the number under the square root represents a number times itself, which will always give us a positive number.

Example:

Imaginary and Complex Numbers
complex numbers algebra 2

But wait, there’s more:

When raised to a power, imaginary numbers can have the following different values:

Imaginary and Complex Numbers

Knowing these rules, we can evaluate imaginary numbers, that are raised to any value exponent! Take a look below:

complex numbers algebra 2

-> We use long division, and divide our exponent value 54, by 4.

Imaginary and Complex Numbers

-> Now take the value of the remainder, which is 2, and replace our original exponent. Then evaluate the new value of the exponent based on our rules.

Imaginary and Complex Numbers

What are Complex Numbers?

Complex numbers combine imaginary numbers and real numbers within one expression in a+bi form. For example, (3+2i) is a complex number. Let’s evaluate a binomial multiplying two complex numbers together and see what happens:

-> There are several ways to multiply these complex numbers together. To make it easy, I’m going to show the Box method below:

Try mastering imaginary and complex numbers on your own with the questions below!

Practice:

complex numbers algebra 2

Solutions:

complex numbers algebra 2

Still got questions? No problem! Don’t hesitate to comment with any questions or check out the video above. Don’t forget to sign up for FREE weekly MathSux videos, lessons, and practice questions. Thanks for stopping by and happy calculating! 🙂

Facebook ~ Twitter ~ TikTok ~ Youtube

Also, if you’re looking to learn more about dividing polynomials, check out this post here!

Looking for more on Quadratic Equations and functions? Check out the following Related posts!

Factoring Review

Factor by Grouping

Completing the Square

The Discriminant

Is it a Function?

Focus and Directrix of a Parabola

Quadratic Equations with 2 Imaginary Solutions

Expanding Cubed Binomials: Algebra 2/Trig.

Greetings math friends! This post will go over expanding cubed binomials using two different methods to get the same answer. We’re so used to seeing squared binomials such as, Screen Shot 2020-08-19 at 11.29.14 AM.png, and expanding them without a second thought.  But what happens when our reliable squared binomials are now raised to the third power, such as,Screen Shot 2020-08-19 at 11.29.48 AM?  Luckily for us, there is a Rule we can use:

Screen Shot 2020-08-18 at 10.12.33 PM

But where did this rule come from?  And how can we so blindly trust it? In this post we will prove why the above rule works for expanding cubed binomials using 2 different methods:

Screen Shot 2020-08-19 at 11.31.13 AM

Why bother? Proving this rule will allow us to expand and simplify any cubic binomial given to us in the future! And since we are proving it 2 different ways, you can choose the method that best works for you.

Method #1: The Box Method

Screen Shot 2020-08-18 at 10.14.37 PM

Step 1: First, focus on the left side of the equation by expanding (a+b)3:

Expanding Cubed Binomials

Step 2: Now we are going to create our first box, multiplying (a+b)(a+b). Notice we put each term of (a+b) on either side of the box. Then multiplied each term where they meet.

Screen Shot 2020-08-18 at 10.15.50 PM

Step 3: Combine like terms ab and ab, then add each term together to get a2+2ab+b2.

Expanding Cubed Binomials

Step 4: Multiply (a2+2ab+b2)(a+b) making a bigger box to include each term.

Expanding Cubed Binomials

Step 5: Now combine like terms (2a2b and a2b) and (2ab2 and ab2), then add each term together and get our answer: a3+3a2b+3ab2+b3.

Expanding Cubed Binomials
Screen Shot 2020-08-18 at 10.21.05 PM.png

Method #2: The Distribution Method

Screen Shot 2020-08-18 at 10.17.54 PM.png

Let’s expand the cubed binomial using the distribution method step by step below:

Expanding Cubed Binomials
Screen Shot 2020-08-18 at 10.21.05 PM.png

Now that we’ve gone over 2 different methods of cubic binomial expansion, try the following practice questions on your own using your favorite method!

Practice Questions: Expand and simplify the following.

Screen Shot 2020-08-18 at 10.21.56 PM

Solutions:

Screen Shot 2020-08-18 at 10.22.19 PM.png

Still, got questions?  No problem! Check out the video above or comment below! Happy calculating! 🙂

Facebook ~ Twitter ~ TikTok ~ Youtube

**Bonus: Test your skills with this Regents question on Binomial Cubic Expansion!

Recursive Rule

Welcome to Mathsux! This post is going to show you everything you need to know about how to use a Recursive Formula by looking at three different examples of a recursive rule. Check out the video below for more of an explanation and test your skills with the practice questions at the bottom of this page.  Please let me know if you have any questions in the comments section below and happy calculating! 🙂

What is a Recursive Formula or a Recursive Rule?

A Recursive Formula is a type of formula that forms a sequence based on the previous term value.  The recursive rules for each formula vary, but we are always given the first term and a formula to find the consecutive terms in the recursive sequence.

Recursive formula can be written as an arithmetic sequence (a sequence where the same number is either added or subtracted to each subsequent term to form a pattern) and recursive formulas can also be written as arithmetic sequences (a sequence where the same number is either multiplied or divided to each subsequent term to form a pattern). We’ll go over an example of each but both types of recursive rules are treated the same exact way!

What does all of this mean?  Check out the example below for a clearer picture.

Example #1: Arithmetic Recursive Sequence

recursive rules

Step 1: First, let’s decode what these formulas are saying.

recursive rules

Step 2: The first term, represented by a1, is and will always be given to us. In this case, our first term has the value a1=2 and represents the first term of our recursive sequence.

a1= First Term=2

Step 3: We then plug in the value of our first term, which is a1=2 into our formula an+4 to get 2+4=6. The number 6 now has the value of our second term in the recursive sequence.

a1= 2 First Term

a2= (2)+4=6 Second Term

Step 4: Now we are going to continue the pattern, plugging in the value of each previous term to find the next consecutive terms in our recursive sequence.

The pattern can be more easily seen below. Notice we are able to find the value of all 5 terms of the recursive sequence for the solution only given the first term and recursive formula at the beginning of our question.

algebra 2 recursive formula
recursive formula examples

Step 5: We found the recursive sequence we were looking for: 2, 6, 10, 14, 18. Since the question was originally only asking for the value of the fifth term we know our solution only needs to be the value of the fifth term which is 18.

Example #2: Geometric Recursive Sequence

Step 1: First, let’s decode what these formulas are saying.

algebra 2 recursive formula

Step 2: The first term, represented by a1, is and will always be given to us. In this case, our first term has the value a1=1 and represents the first term of our recursive sequence.

a1= First Term=1

Step 3: We then plug in the value of our first term, which is a1=1 into our formula 2an+1 to get 21+1=3. The number 3 now has the value of our second term in the recursive sequence.

a1= 1 First Term

a2= 2(1)+1=3 Second Term

Step 4: Now we are going to continue the pattern, plugging in the value of each previous term to find the next term in our recursive sequence.

The pattern can be more easily seen below. Notice we are able to find the value of all 3 terms of the recursive sequence for the solution only given the first term and recursive formula at the beginning of our question.

algebra 2 recursive formula

***Note this was written in a different notation but is solved in the exact same way! This recursive formula is a geometric sequence.

Step 5: We found the recursive sequence we were looking for: 1,3,9. Since the question was originally only asking for the value of the third term we know our solution only needs to be the value of the third term which is 9.

Example #3:

Step 1: First, let’s decode what these formulas are saying.

Step 2: The first term, represented by a1, is and will always be given to us. In this case, our first term has the value a1=4 and represents the first term of our recursive sequence.

a1= First Term=4

Step 3: We then plug in the value of our first term, which is a1=4 into our formula 3an-1-2 to get 3(2)-1=5. The number 5 now has the value of our second term in the recursive sequence.

a1= 4 First Term

a2= 3(2)-1=5 Second Term

Step 4: Now we are going to continue the pattern, plugging in the value of each previous term to find the next term in our recursive sequence.

The pattern can be more easily seen below. Notice we are able to find the value of all 3 terms of the recursive sequence for the solution only given the first term and recursive formula at the beginning of our question.

Step 5: We found the recursive sequence we were looking for: 4,10,28. Since the question was originally only asking for the value of the third term we know our solution only needs to be the value of the third term which is 28.

algebra 2 recursive formula

Think you are ready to solve a recursive equation on your own?! Try finding the specific term in each given recursive function below:

Practice Questions:

Solutions:

algebra 2 recursive formula

Related Posts:

Looking to learn more about sequences? You’ve come to the right place! Check out these sequence resources and posts below. Personally, I recommend looking at the arithmetic sequence or geometric sequence posts next!

Arithmetic Sequence

Geometric Sequence

Finite Arithmetic Series

Finite Geometric Series

Infinite Geometric Series

Golden Ratio in the Real World

Fibonacci Sequence

Still, got questions? No problem! Don’t hesitate to comment below or reach out via email. And if you would like to see more MathSux content, please help support us by following ad subscribing to one of our platforms. Thanks so much for stopping by and happy calculating!

Facebook ~ Twitter ~ TikTok ~ Youtube

***Bonus! Want to test yourself with a similar NYS Regents question on Recursive Formulas?  Click here! And if you want to learn about even more sequences, check out the link here!

How to Solve Log Equations: Algebra 2/Trig.

Welcome to Mathsux! Today, we’re going to go over how to solve log equations, yay! But before we get into finding x, though, we need to go over what log equations are and why we use them in the first place…..just in case you were curious!

Also, if you have any questions about anything here, don’t hesitate to comment below or shoot me an email.  Happy calculating! 🙂

What are Log Equations?

Logarithms are the inverses of exponential functions.  This means that when graphed, they are symmetrical along the line y=x.  Check it out below!

How to Solve Log Equations

When on the same set of axis, notice how the functions are symmetrical over the line y=x:

How to Solve Log Equations

We use logarithms to find the unknown values of exponents, such as the x value in the equation,.  This is a simple example, where we know the value of x is equal to 2,(Screen Shot 2020-06-24 at 9.32.30 PM.png). But what if it were to get more complicated?  That’s where logs come in!

How to Solve Log Equations?

Logarithms follow a swooping pattern that allows us to write it in exponential form, let’s take a look at some Examples below:

How to Solve Log Equations

But wait there’s more! Logs have a set of Rules that makes solving log equations a breeze!

How to Solve Log Equations

We can use these rules to help us algebraically solve logarithmic equations, let’s look at an example that applies the Product Rule.

Example:

Screen Shot 2020-06-24 at 9.36.08 PM.png
Screen Shot 2020-06-24 at 9.36.50 PM
Screen Shot 2020-06-24 at 9.46.07 PM.png
Screen Shot 2020-06-24 at 9.38.32 PM

Try the following practice questions on your own!

Practice Questions:

Screen Shot 2020-06-24 at 9.39.16 PM.png

Solutions:

Screen Shot 2020-06-24 at 9.40.37 PM

Still got questions?  No problem! Check out the video that goes over the same example outlined above.  And for more info. on logarithms check out this post that goes over a NYS Regent’s question here.  Subscribe below to get the latest FREE math videos, lessons, and practice questions from MathSux. Thanks for stopping by and happy calculating! 🙂

Facebook ~ Twitter ~ TikTok ~ Youtube

****Check out this Bonus Video on How to Change Log Bases****

4 Ways to Factor Trinomials: Algebra

Greeting math peeps and welcome to MathSux! In this post, we are going to go over 4 ways to Factor Trinomials and get the same answer, including, (1) Quadratic Formula (2) Product/Sum, (3) Completing the Square, and (4) Graphing on a Calculator.  If you’re looking for more don’t forget to check out the video and practice questions below.  Happy Calculating! 🙂

Also, if need a review on Factor by Grouping or Difference of Two Squares (DOTS) check out the hyperlinks here!

*If you haven’t done so, check out the video that goes over this exact problem, and don’t forget to subscribe!

We will take this step by step, showing 4 ways to factor trinomials, getting the same answer each and every time! Let’s get to it!

4 Ways to Factor Trinomials

Screen Shot 2020-06-02 at 3.03.55 PM

(1) Quadratic Formula:

4 Ways to Factor Trinomials

____________________________________________________________________

(2) Product/Sum:

4 Ways to Factor Trinomials____________________________________________________________________

(3) Completing the Square:

4 Ways to Factor Trinomials____________________________________________________________________

(4) Graph:

4 Ways to Factor Trinomials

Choose the factoring method that works best for you and try the practice problems on your own below!

Practice Questions:

Screen Shot 2020-06-02 at 3.09.58 PM

Solutions:

Screen Shot 2020-06-02 at 3.10.30 PM

Want a review of all the different factoring methods out there?  Check out the ones left out here (DOTS and GCF) and happy calculating! 🙂

For even more ways to factor quadratic equations, check out How to factor by Grouping here! 🙂

Looking for more on Quadratic Equations and functions? Check out the following Related posts!

Factoring Review

Factor by Grouping

Completing the Square

The Discriminant

Is it a Function?

Imaginary and Complex Numbers

Quadratic Equations with 2 Imaginary Solutions

Focus and Directrix of a Parabola

Also, if you want more Mathsux?  Don’t forget to check out our Youtube channel and more below! If you have any questions, please don’t hesitate to comment below. Happy Calculating! 🙂

Facebook ~ Twitter ~ TikTok ~ Youtube