Hi everyone and welcome to MathSux! In this post we are going to go over summation notation (aka sigma notation). The summing of a series isn’t hard as long as you know how to read the notation! We will go over an example and breakdown what each part of this notation represents step by step. When you are ready, please don’t forget to check out the practice questions at the end of this post to truly master the topic. Thanks for stopping by and happy calculating! 🙂
What is Summation Notation?
Summationnotation lets us write a series in an easy and short-handed way. Before we go any further we also need to define a series!
Series: The sum of adding each term within an infinite sequence. This can include arithmetic or geometric sequences we are already familiar with. For example, let’s say we have the arithmetic sequence: 2,4,6,8, ….. now with a series we are adding all of these terms together: 2+4+6+8+……
Now back to summations. Summations allow us to quickly understand that the sequence being added together is done so on an infinite or finite basis by giving us a range of values for which the unknown variable can be evaluated and summed together. Summation notation is represented with the capital Greek letter sigma, Σ, with numbers below and above as limits for calculation and the series that must be evaluated to the right.
If this sounds confusing, don’t worry, it might sound more confusing than it actually is! Take a look at the breakdown for sigma notation below:
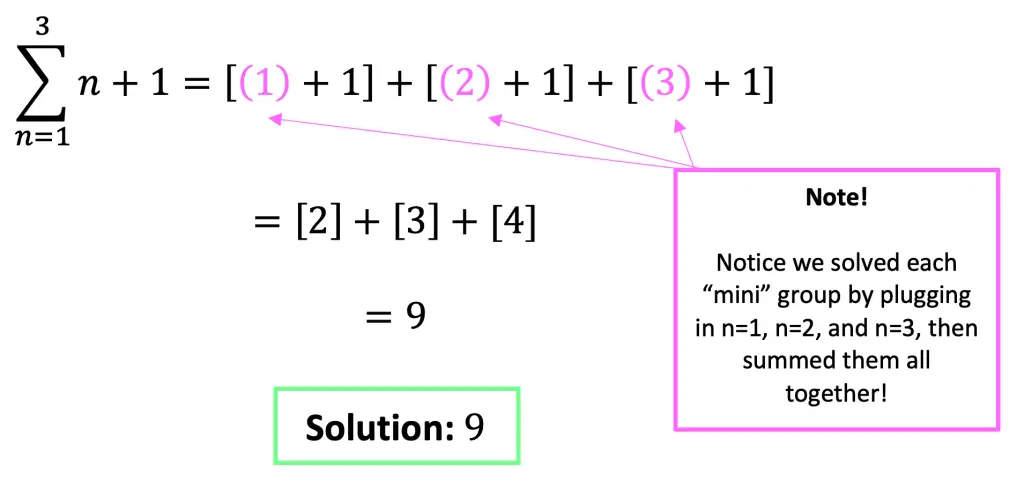
Wait, what does the above summation say?
Translation: It tells us to evaluate the expression, n+1 by plugging in 1 for n, 2 for n, and 3 for n and then wants us to sum all three solutions together.
Take a look below to see how to solve this step by step:
Check out the video above to see more examples step by step! When you’re ready to try them on your own, check out the practice problems below:
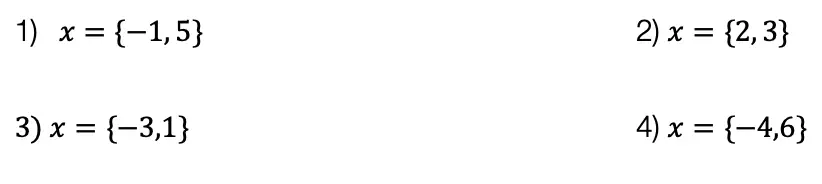
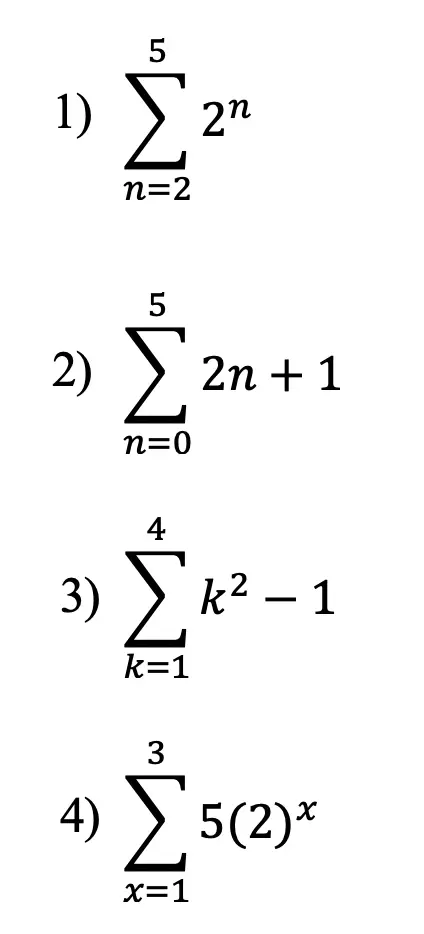
Practice Questions:
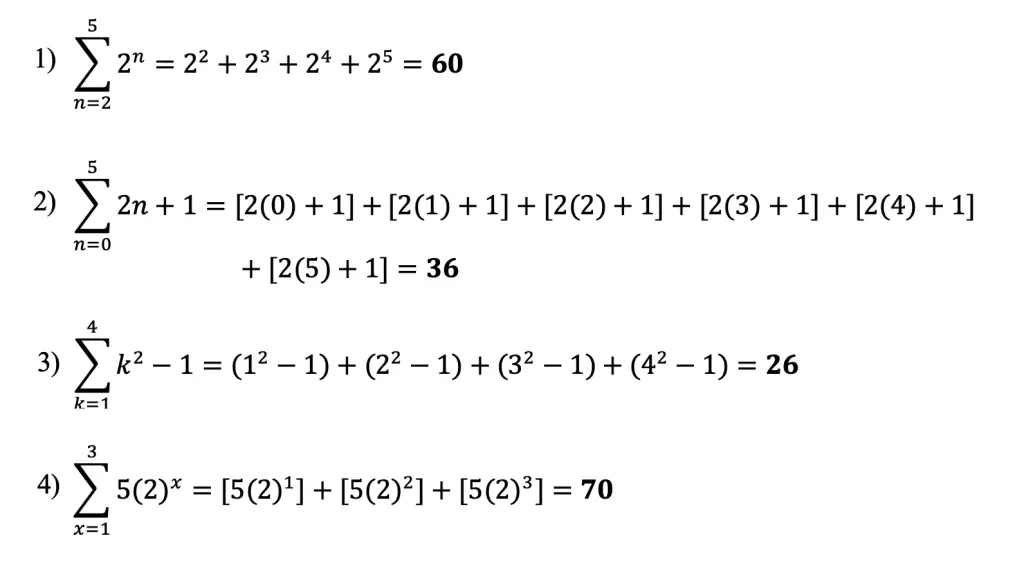
Solutions:
Still got questions? No problem! Don’t hesitate to comment with any questions below. Thanks for stopping by and happy calculating! 🙂
Looking for something similar to sigma notation? Check out this post on geometric sequences here! If you’re looking for more statistics formulas, check out how to find expected value!
Happy Wednesday math friends! In this post we’re going to dive into rotations about a point! In this post we will be rotating points, segments, and shapes, learn the difference between clockwise and counterclockwise rotations, derive rotation rules, and even use a protractor and ruler to find rotated points. The fun doesn’t end there though, check out the video and practice questions below for even more! And as always happy calculating! 🙂
What are Rotations?
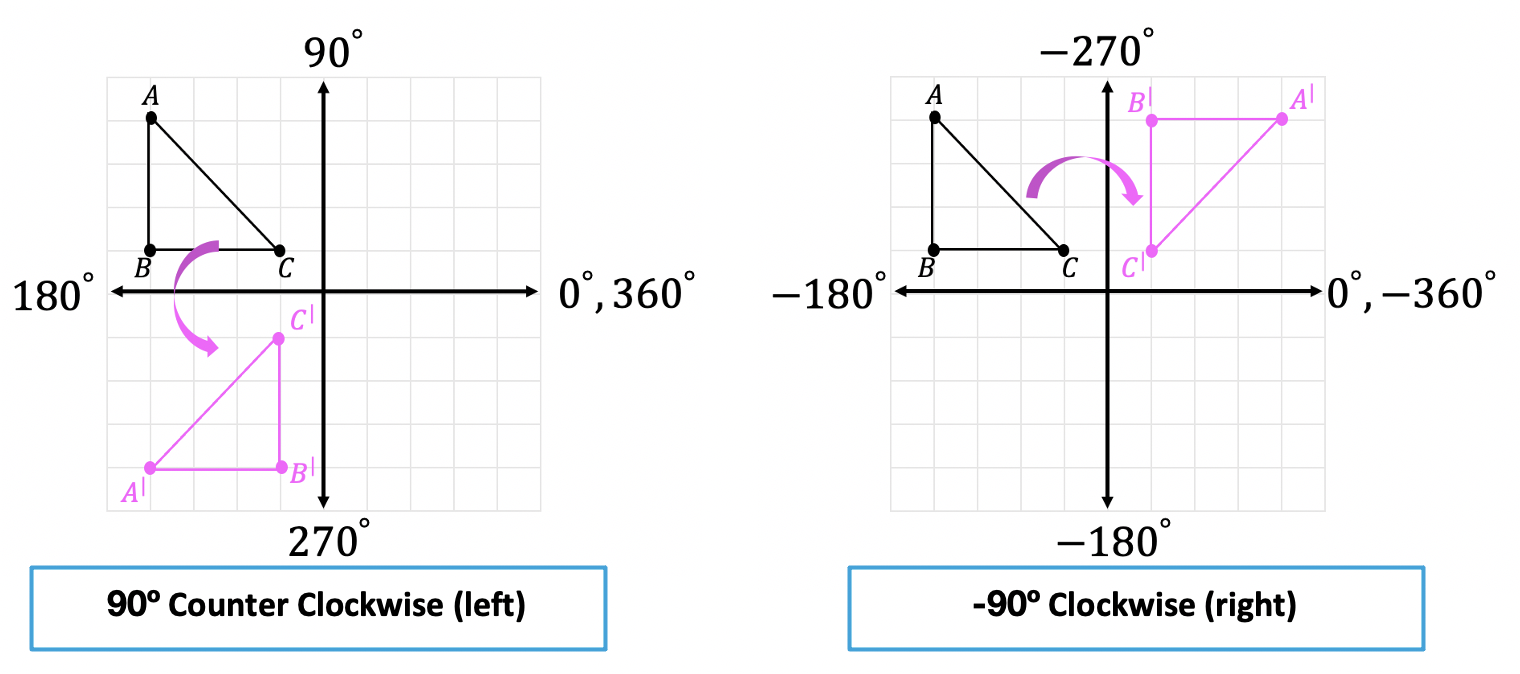
Rotations are a type of transformation in geometry where we take a point, line, or shape and rotate it clockwise or counterclockwise, usually by 90º,180º, 270º, -90º, -180º, or -270º.
A positive degree rotation runs counter clockwise and a negative degree rotation runs clockwise. Let’s take a look at the difference in rotation types below and notice the different directions each rotation goes:
How do we rotate a shape?
There are a couple of ways to do this take a look at our choices below:
We can visualize the rotation or use tracing paper to map it out and rotate by hand.
Use a protractor and measure out the needed rotation.
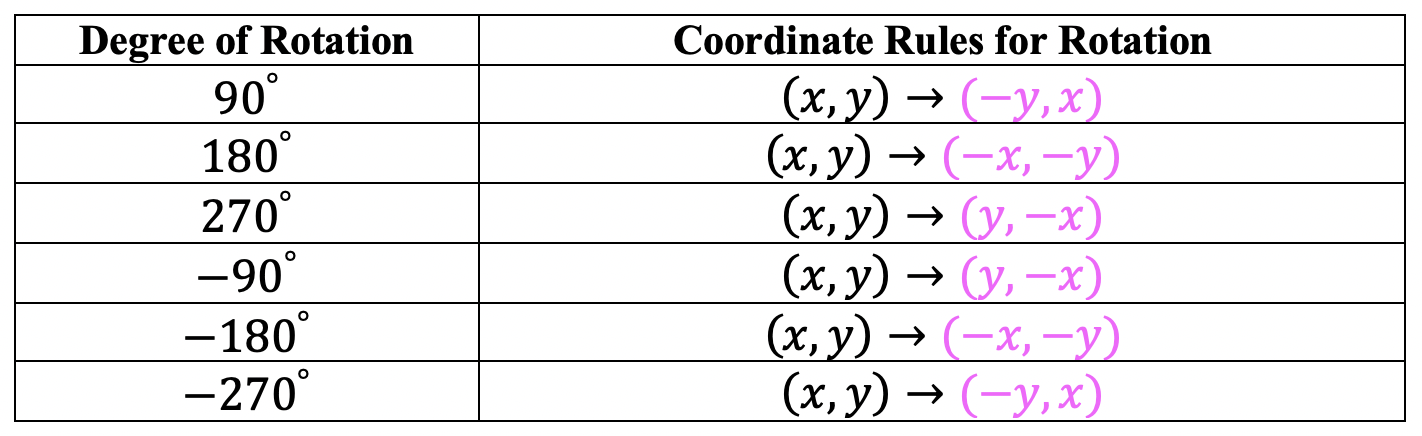
Know the rotation rules mapped out below. Yes, it’s memorizing but if you need more options check out numbers 1 and 2 above!
Rotation Rules:
Where did these rules come from?
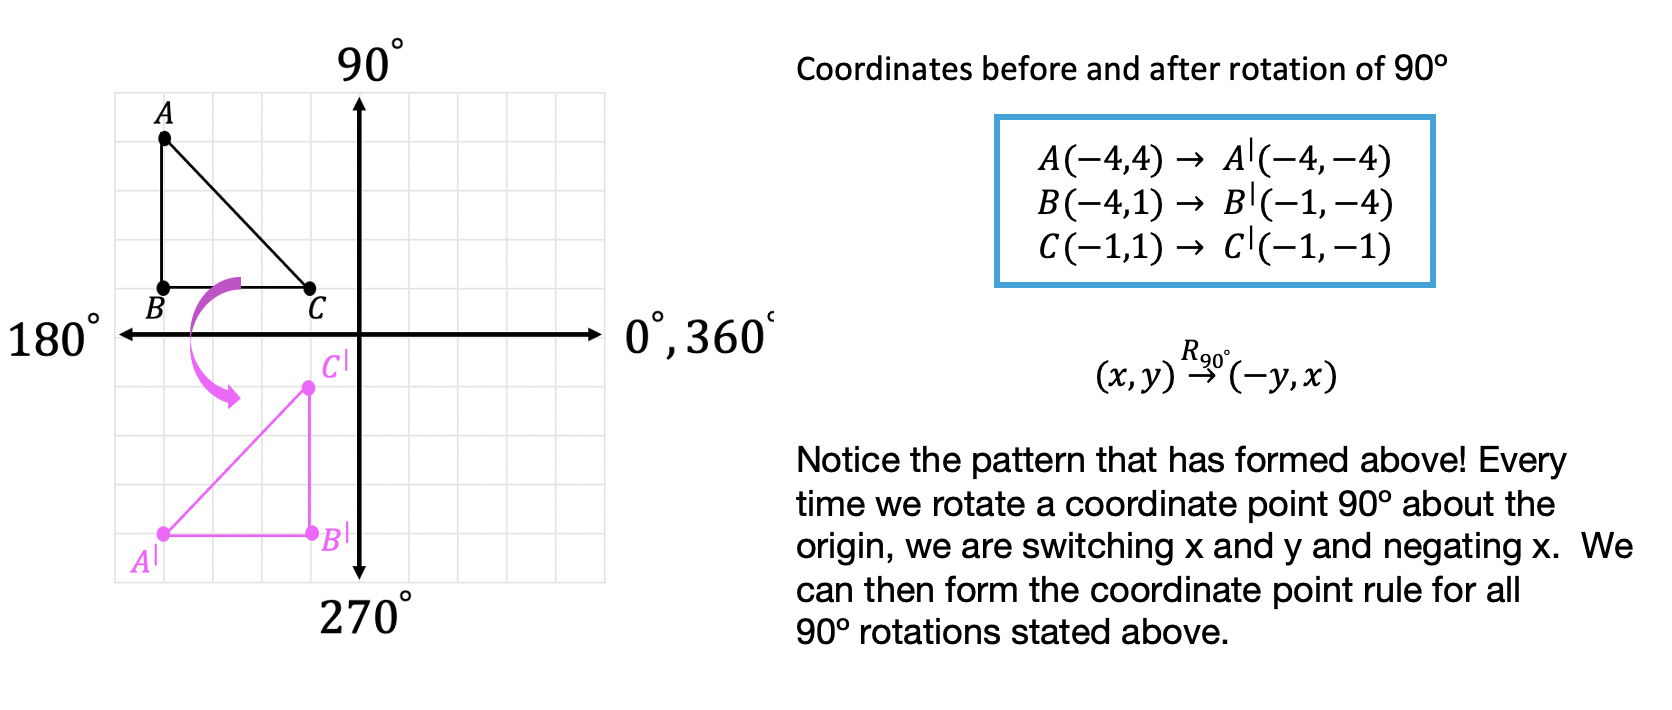
To derive our rotation rules, we can take a look at our first example, when we rotated triangle ABC 90º counterclockwise about the origin. If we compare our coordinate point for triangle ABC before and after the rotation we can see a pattern, check it out below:
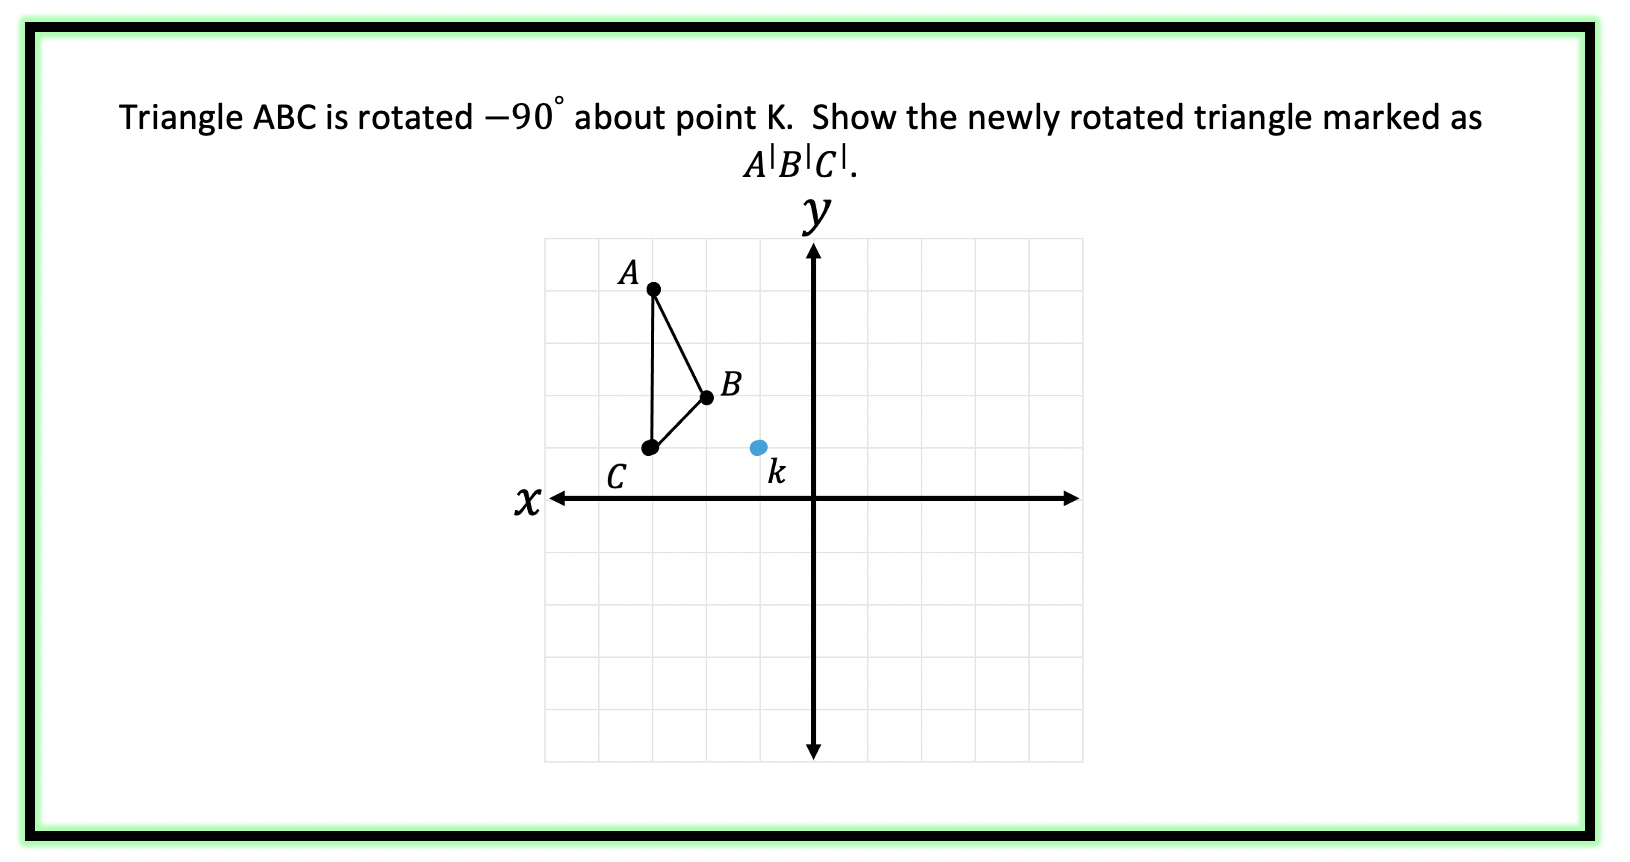
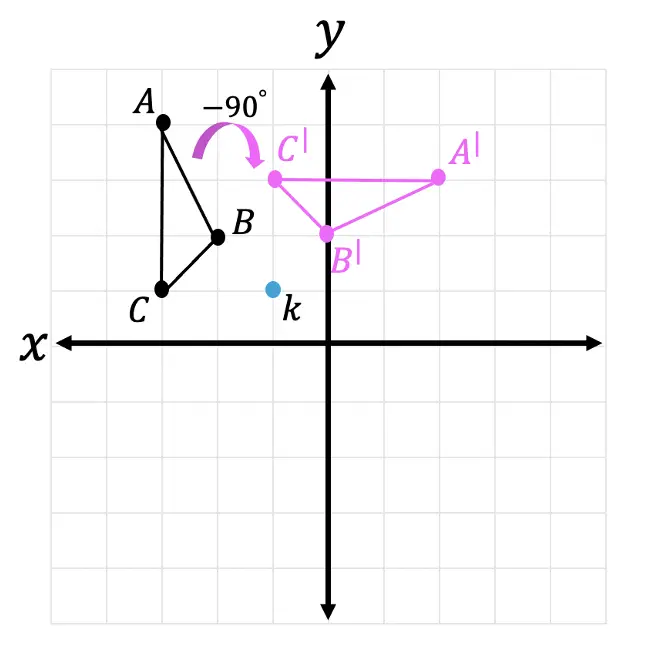
The rotation rules above only apply to those being rotated about the origin (the point (0,0)) on the coordinate plane. But points, lines, and shapes can be rotates by any point (not just the origin)! When that happens, we need to use our protractor and/or knowledge of rotations to help us find the answer. Let’s take a look at the Examples below:
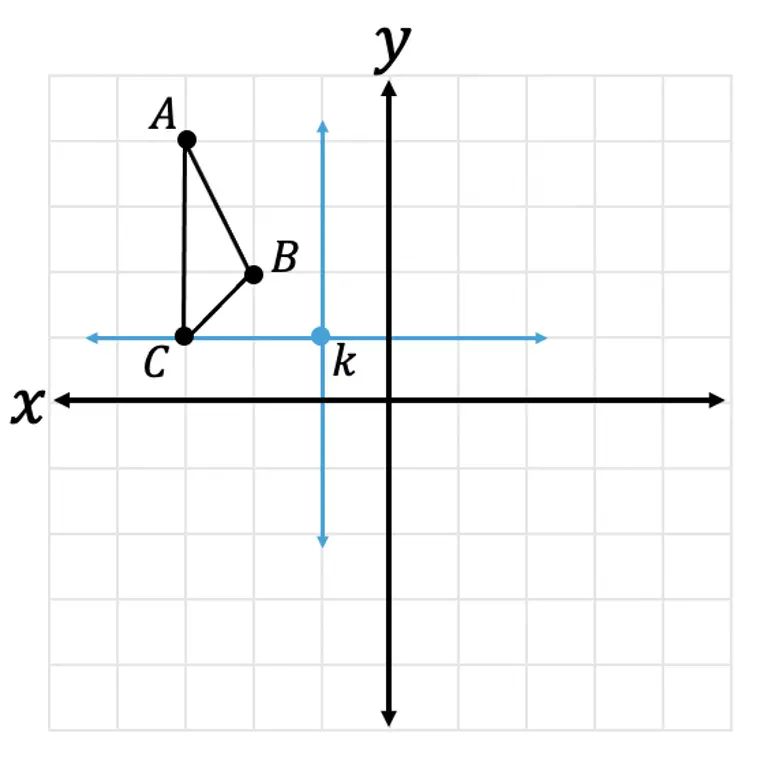
Example #1:
Step 1: First, let’s look at our point of rotation, notice it is not the origin we rotating about but point k! To understand where our triangle is in relation to point k, let’s draw an x and y axes starting at this point:
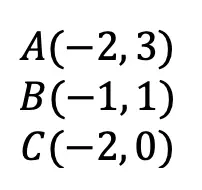
Step 2: Now let’s look at the coordinate point of our triangle, using our new axes that start at point k.
Step 2: Next, let’s take a look at our rule for rotating a coordinate -90º and apply it to our newly rotated triangles coordinates:
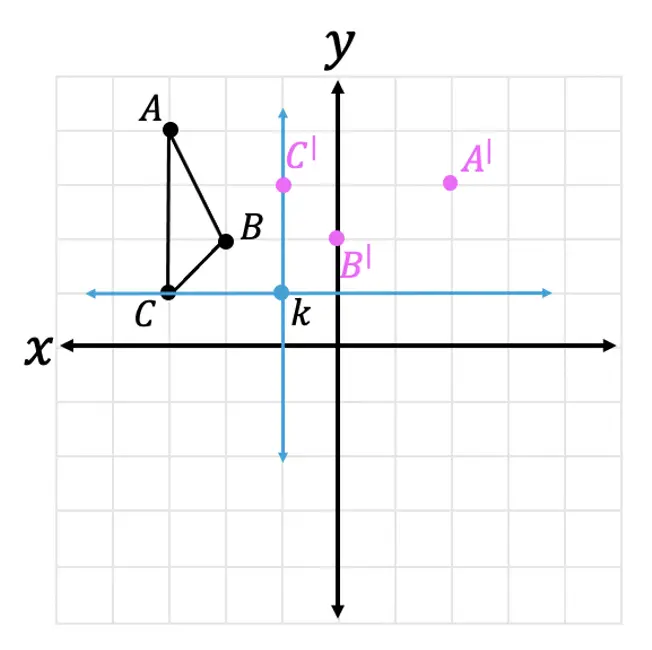
Step 3: Now let’s graph our newly found coordinate points for our new triangle .
Step 4: Finally let’s connect all our new coordinates to form our solution:
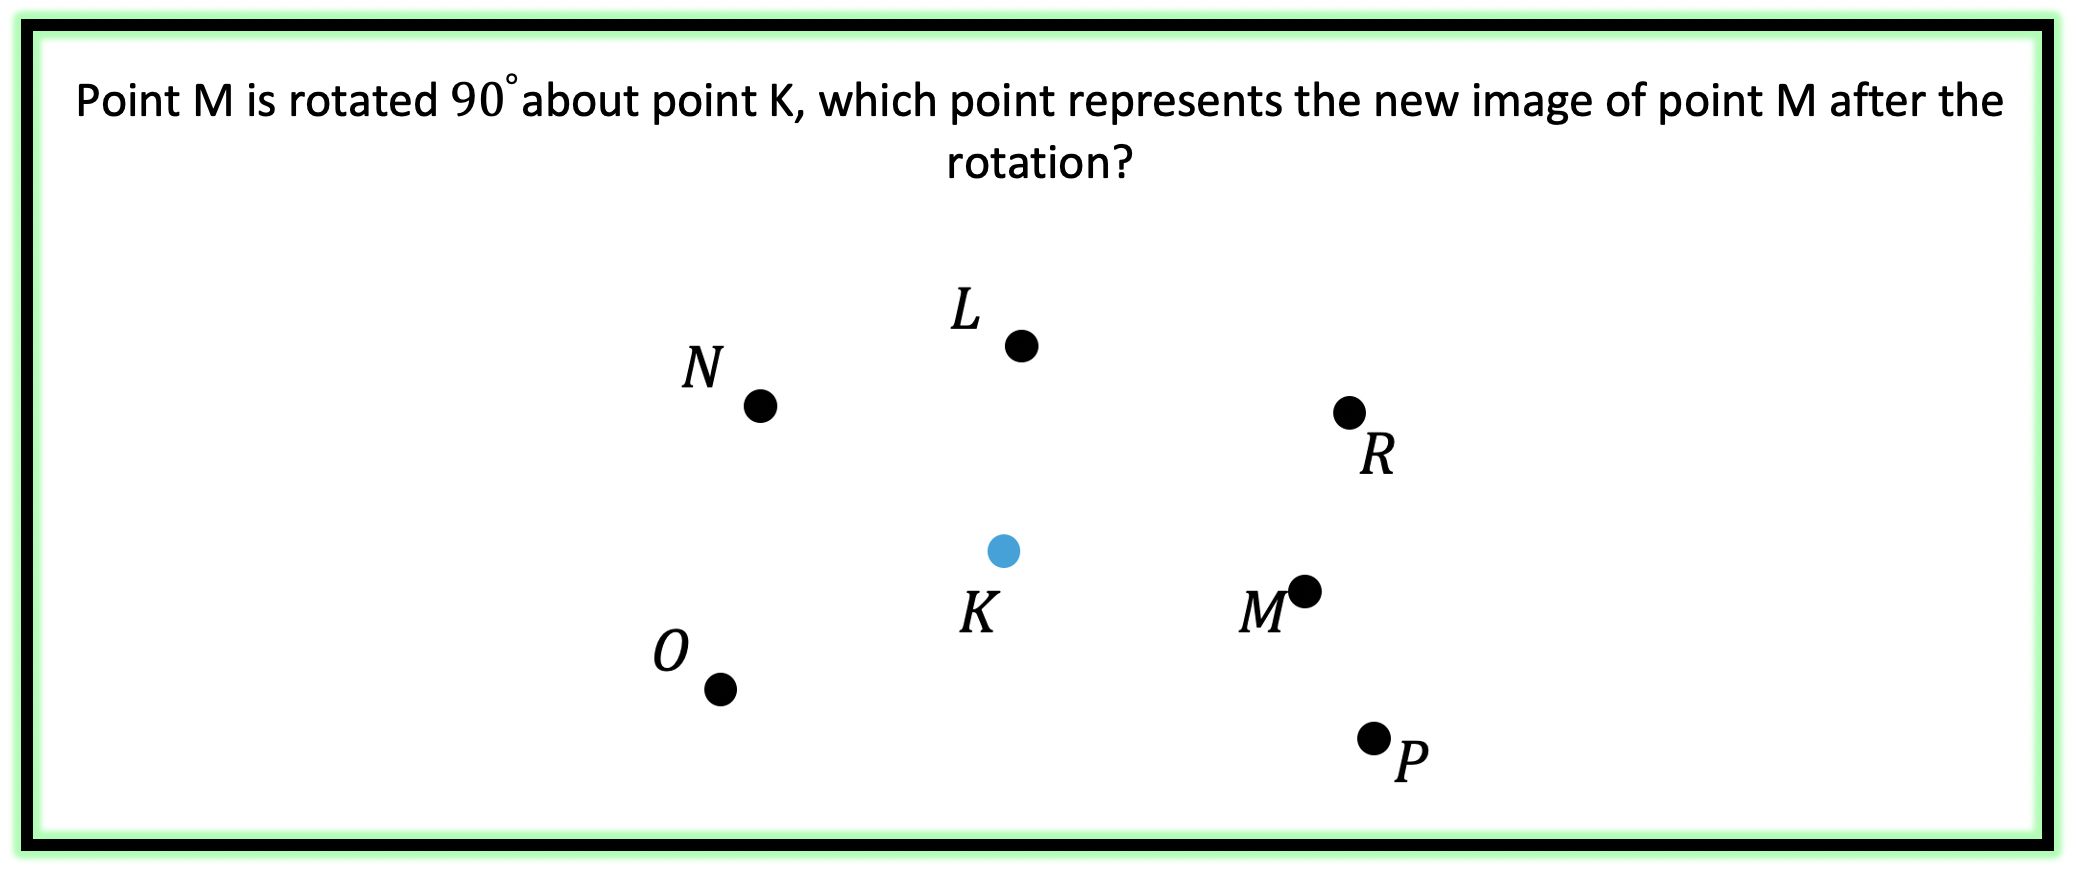
Another type of question with rotations, may not involve the coordinate plane at all! Let’s look at the next example:
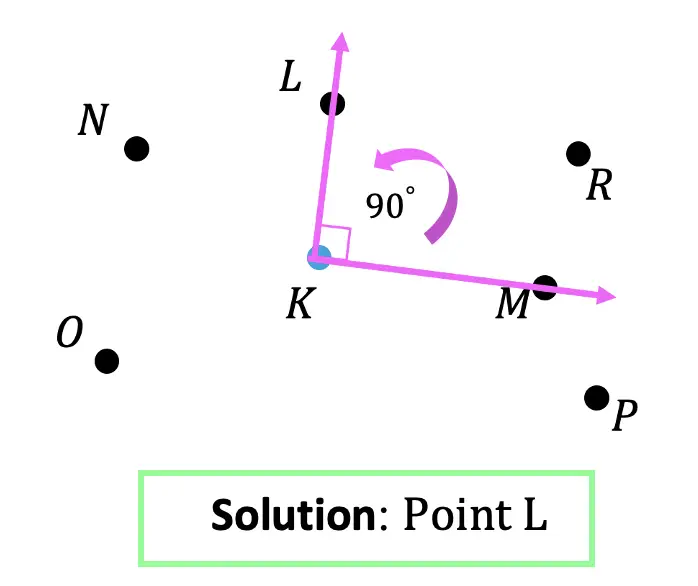
Example #2:
Step 1: First, let’s identify the point we are rotating (Point M) and the point we are rotating about (Point K).
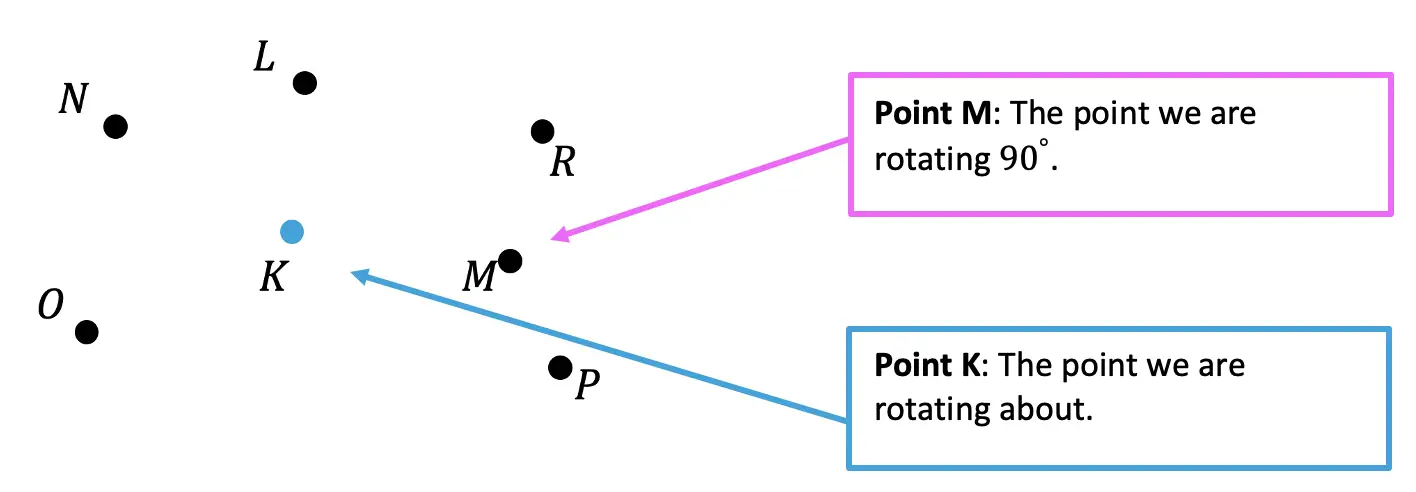
Step 2: Next we need to identify the direction of rotation. Since we are rotating Point M 90º, we know we are going to be rotating this point to the left in the clockwise direction.
Step 3: Now we can draw a line from the point of origin, Point K, to Point M.
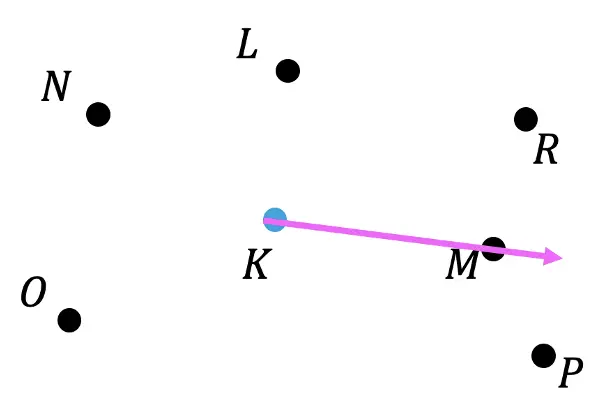
Step 4: Now, using a protractor and ruler, measure out 90º, draw a line, and notice that point L lands on our 90º line. This is our solution! (Note: For help on how to use a protractor, check out the video above).
Ready for more? Check out the practice questions below to master your rotation skills!
Practice Questions:
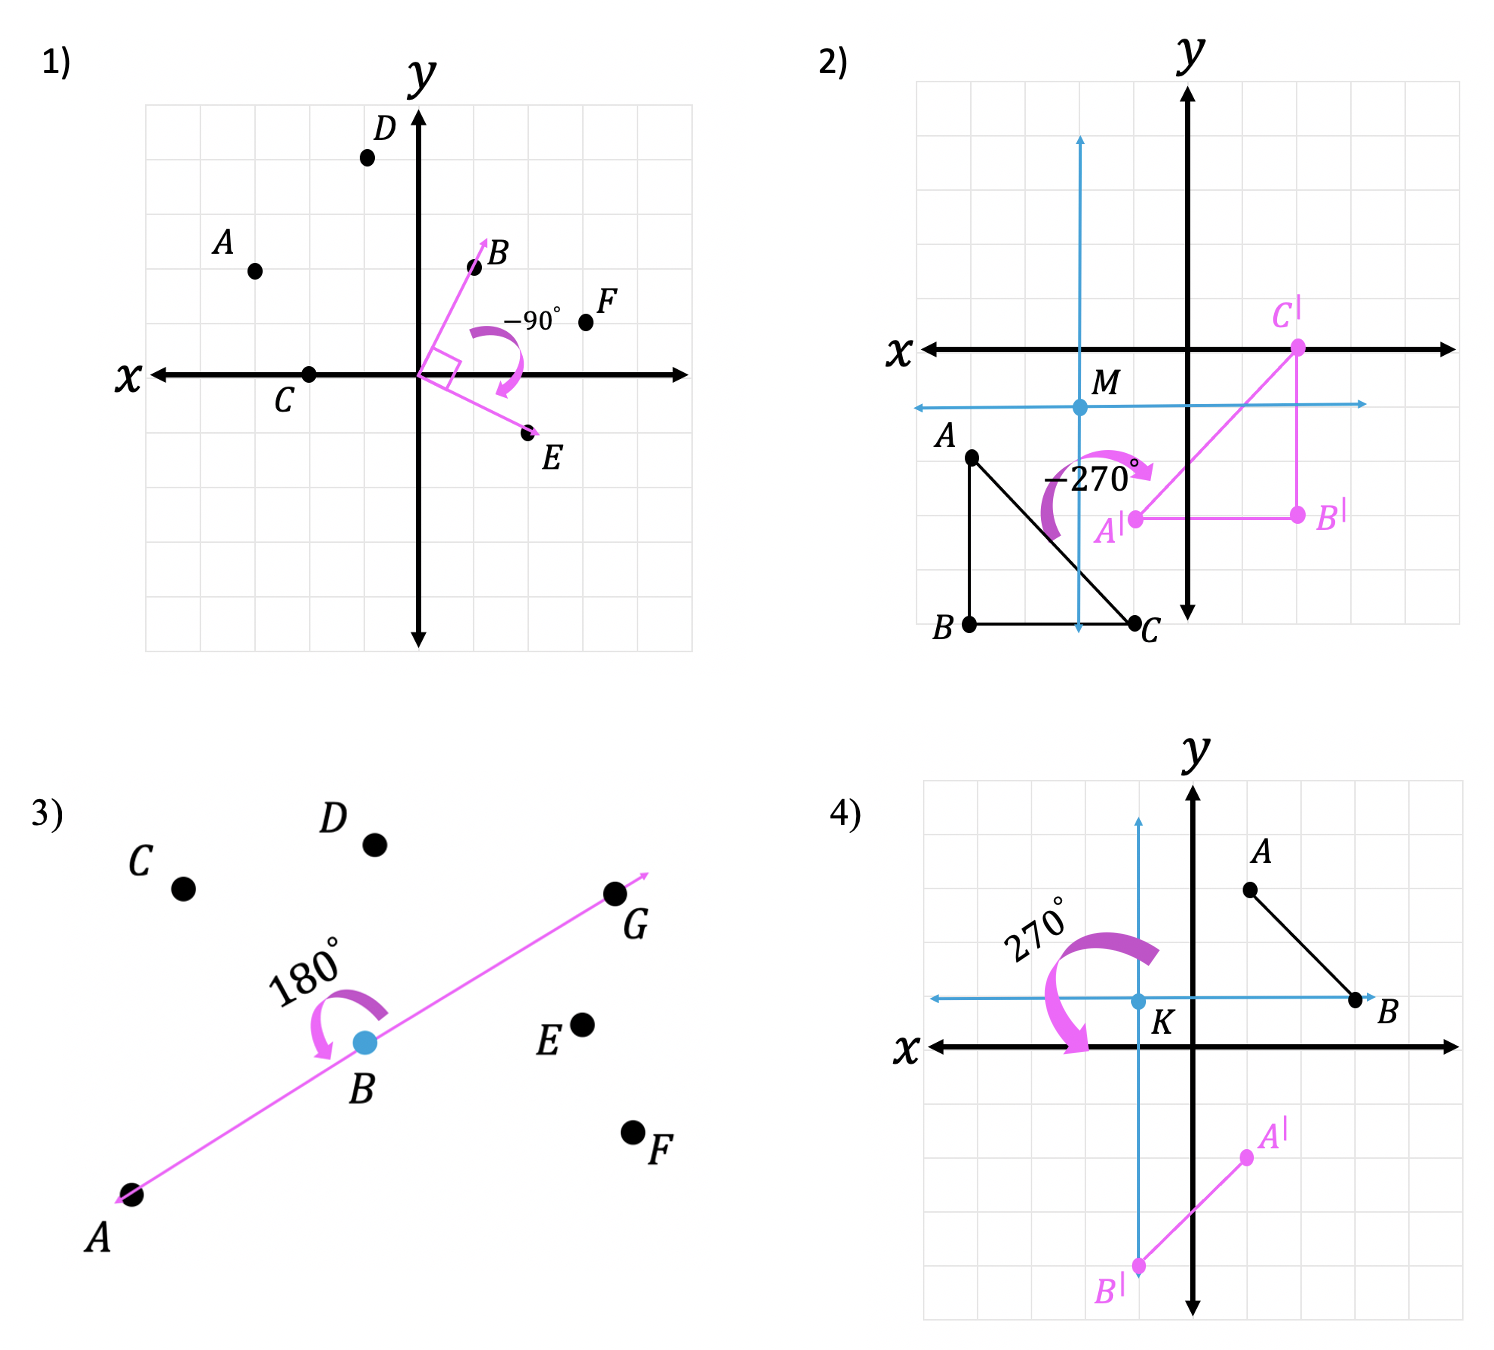
Point B is rotated -90º about the origin. Which point represents newly rotated point B?
2. Triangle ABC is rotated -270º about point M. Show newly rotated triangle ABC as A prime B prime C prime.
3. Point G is rotated about point B by 180º. Which point represents newly rotated point B?
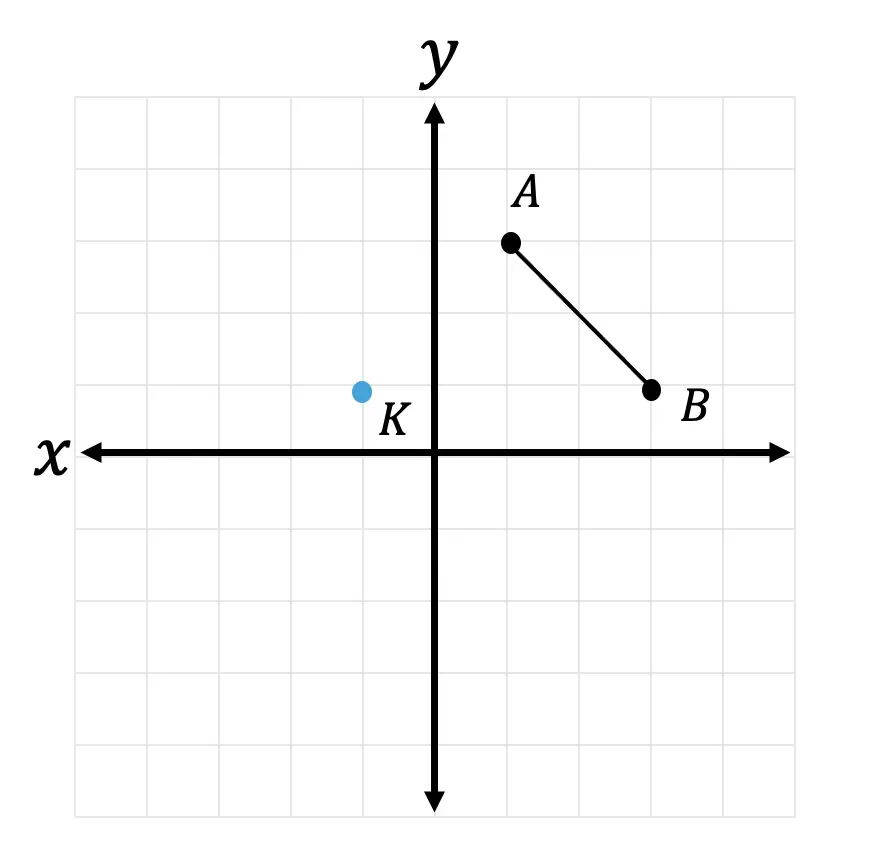
4. Segment AB is rotated 270º about point K. Show newly rotated segment AB.
Solutions:
Still got questions on how to rotations about a point? No problem! Don’t hesitate to comment with any questions or check out the video above for even more examples. Happy calculating! 🙂
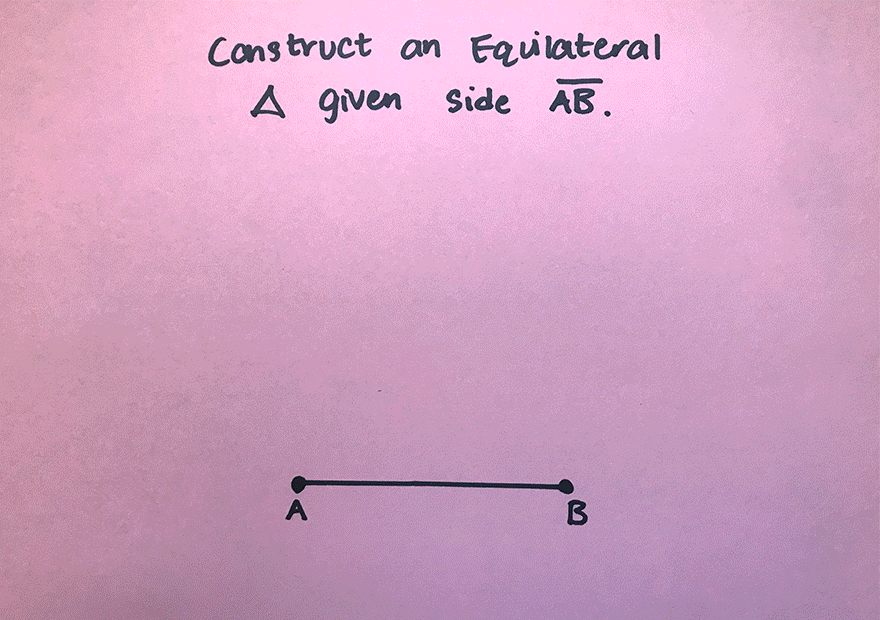
Happy Wednesday math peeps! This post introduces constructions by showing us how to construct an equilateral triangle by using a compass and straightedge (or ruler). For anyone new to constructions in geometry, this is the perfect topic for art aficionados since there is more drawing here than there is actual math!
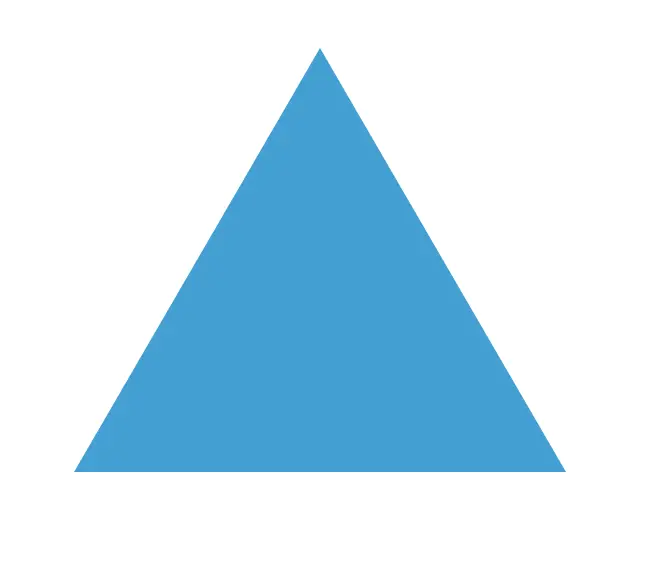
What is an Equilateral Triangle?
Equilateral Triangle: An equilateral triangle is a triangle with three equal sides. Not an easy one to forget, the equilateral triangle is super easy to construct given the right tools (compass+ straightedge). Take a look below:
Equilateral Triangle: Triangle with all equal sides
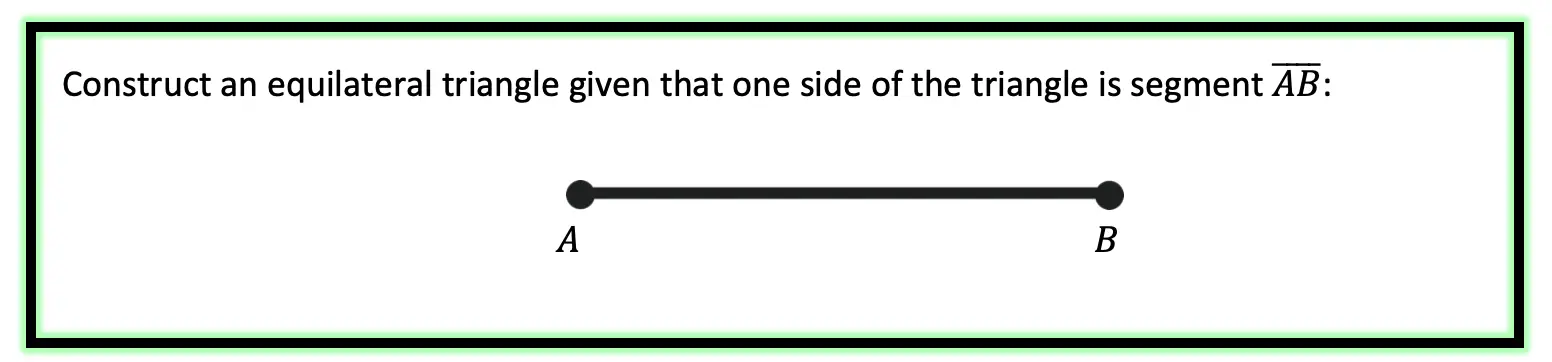
Construct an Equilateral Triangle Example:
Check out the GIF below to see how to construct an equilateral triangle step by step using a compass and straightedge with pictures and explanations below!
Solution:
What’s Happening in this GIF?
1. Using a compass, we measure the distance of line segment .
2. With the compass point remaining on point A, we then draw an arc that has the same distance as line segment .
3. With the compass now placed on point B, draw an arc that has the same distance as line segment .
4. Notice where the arcs intersect? Using a ruler, connect points A and B to the new intersection point. This will create two new equal sides of our triangle!
5. We have now officially constructed a triangle with all equal side lengths!
Constructions and Related Posts:
Looking to construct more than just an equilateral triangle? Check out these related posts on geometry constructions!
Looking to get the best construction tools? Any compass and straight-edge will do the trick, but personally, I prefer to use my favorite mini math toolbox from Staedler. Stadler has a geometry math set that comes with a mini ruler, compass, protractor, and eraser in a nice travel-sized pack that is perfect for students on the go and for keeping everything organized….did I mention it’s only $7.99 on Amazon?! This is the same set I use for every construction video in this post. Check out the link below and let me know what you think!
Looking to learn more about triangles? Check out this post on right triangle trigonometry here! And if you’re looking for even more geometry constructions, check out the link here!
Greetings math friends! This post will go over expanding cubed binomials using two different methods to get the same answer. We’re so used to seeing squared binomials such as, , and expanding them without a second thought. But what happens when our reliable squared binomials are now raised to the third power, such as,? Luckily for us, there is a Rule we can use:
But where did this rule come from? And how can we so blindly trust it? In this post we will prove why the above rule works for expanding cubed binomials using 2 different methods:
Why bother? Proving this rule will allow us to expand and simplify any cubic binomial given to us in the future! And since we are proving it 2 different ways, you can choose the method that best works for you.
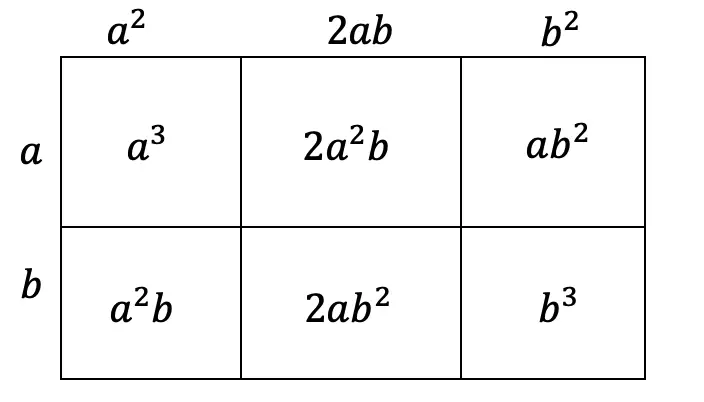
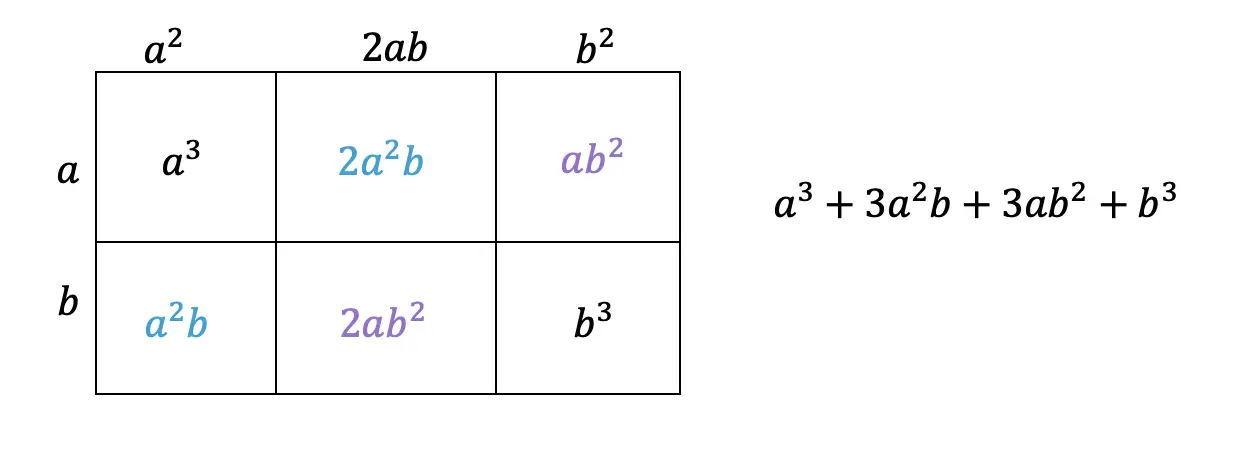
Method #1: The Box Method
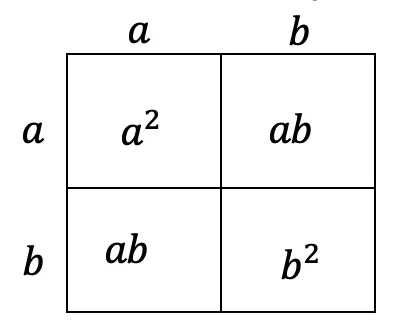
Step 1: First, focus on the left side of the equation by expanding (a+b)3:
Step 2: Now we are going to create our first box, multiplying (a+b)(a+b). Notice we put each term of (a+b) on either side of the box. Then multiplied each term where they meet.
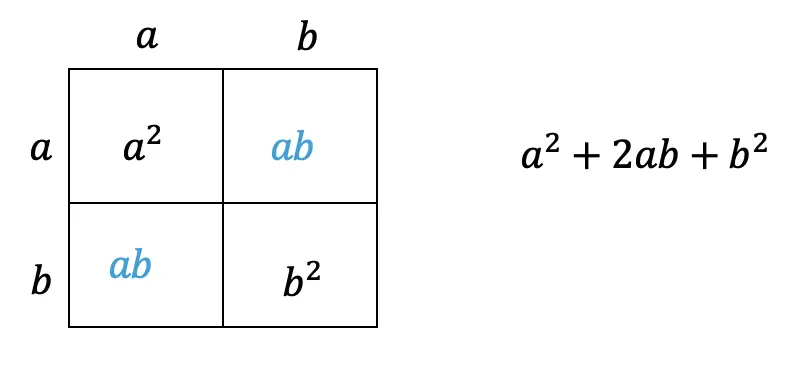
Step 3: Combine like terms ab and ab, then add each term together to get a2+2ab+b2.
Step 4: Multiply (a2+2ab+b2)(a+b) making a bigger box to include each term.
Step 5: Now combine like terms (2a2b and a2b) and (2ab2and ab2), then add each term together and get our answer: a3+3a2b+3ab2+b3.
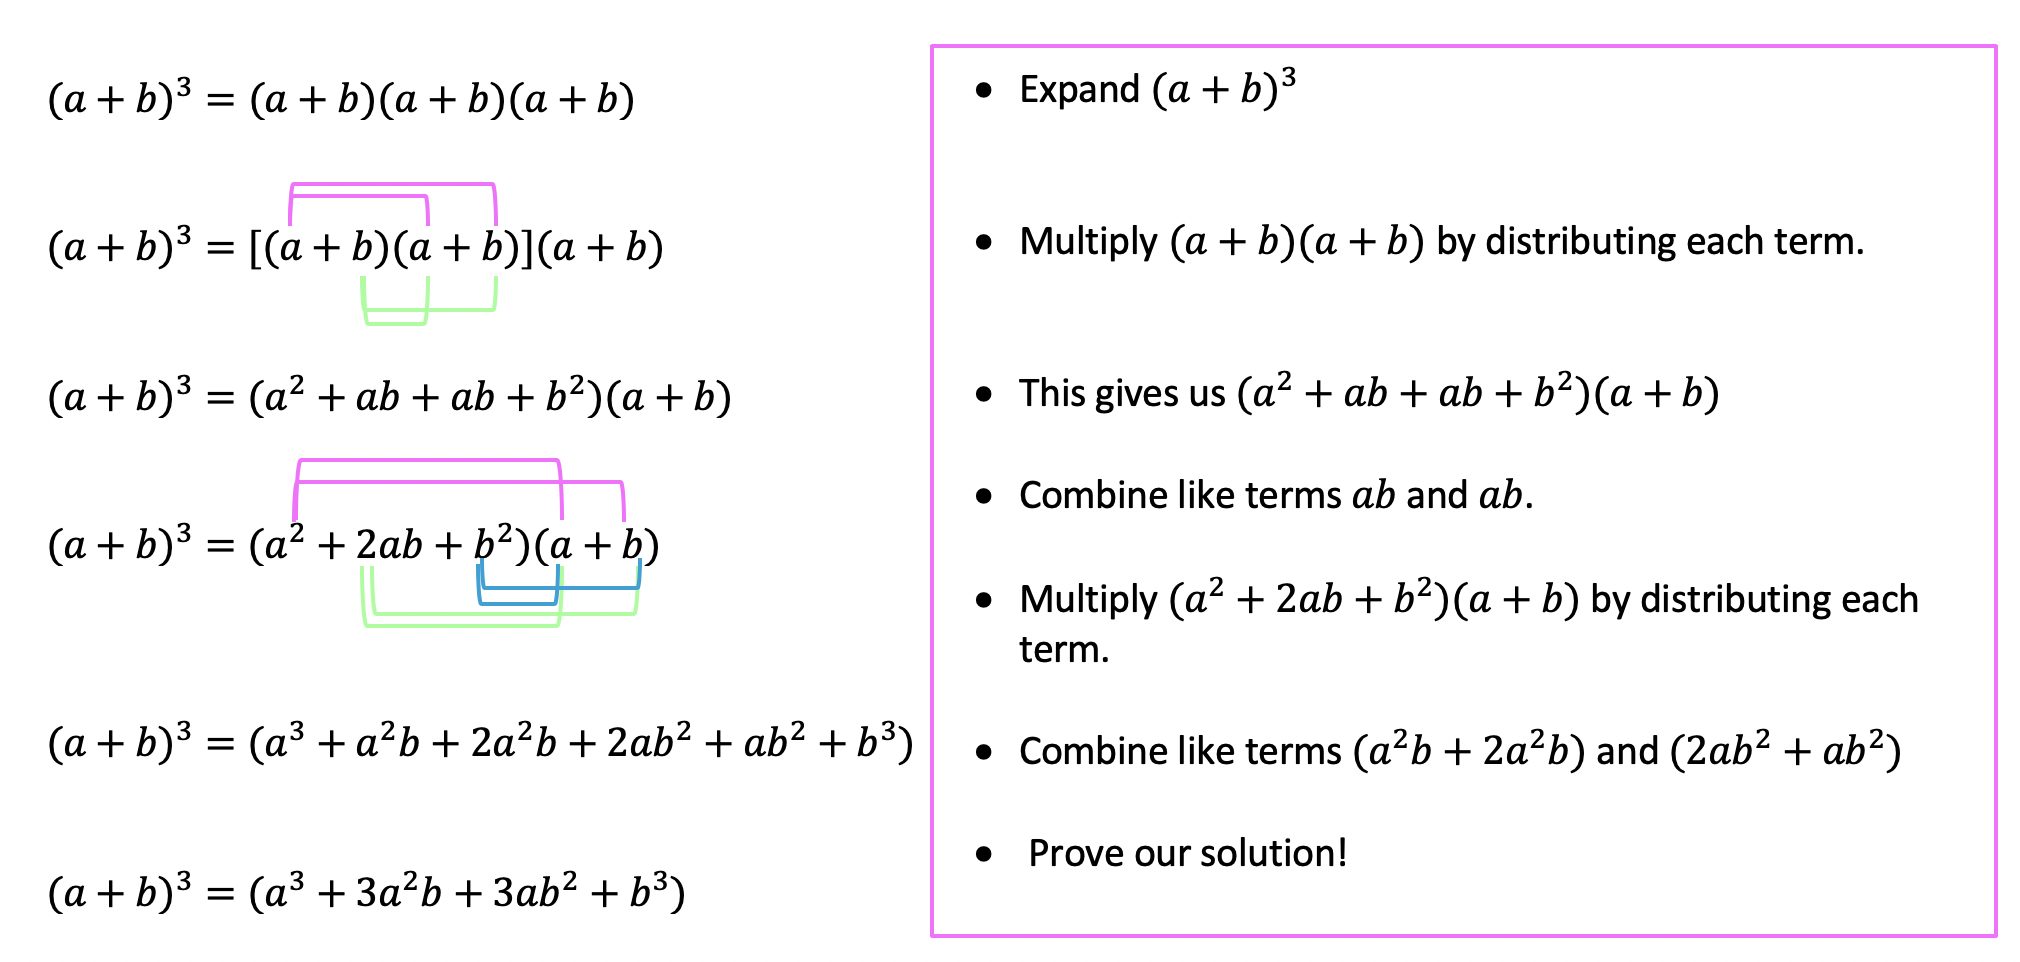
Method #2: The Distribution Method
Let’s expand the cubed binomial using the distribution method step by step below:
Now that we’ve gone over 2 different methods of cubic binomial expansion, try the following practice questions on your own using your favorite method!
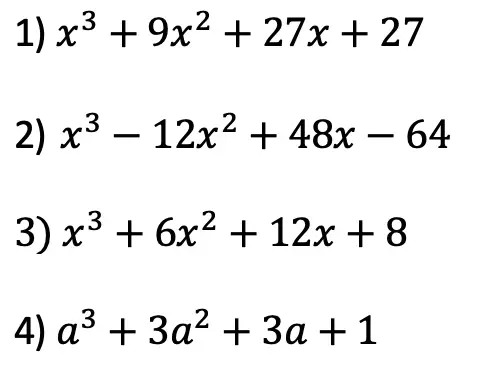
Practice Questions: Expand and simplify the following.
Solutions:
Still, got questions? No problem! Check out the video above or comment below! Happy calculating! 🙂
Welcome to Mathsux! This post is going to show you everything you need to know about how to use a Recursive Formulaby looking at three different examples of a recursive rule. Check out the video below for more of an explanation and test your skills with the practice questions at the bottom of this page. Please let me know if you have any questions in the comments section below and happy calculating! 🙂
What is a Recursive Formula or a Recursive Rule?
A Recursive Formula is a type of formula that forms a sequence based on the previous term value. The recursive rules for each formula vary, but we are always given the first term and a formula to find the consecutive terms in the recursive sequence.
Recursive formula can be written as an arithmetic sequence (a sequence where the same number is either added or subtracted to each subsequent term to form a pattern) and recursive formulas can also be written as arithmetic sequences (a sequence where the same number is either multiplied or divided to each subsequent term to form a pattern). We’ll go over an example of each but both types of recursive rules are treated the same exact way!
What does all of this mean? Check out the example below for a clearer picture.
Example #1: Arithmetic Recursive Sequence
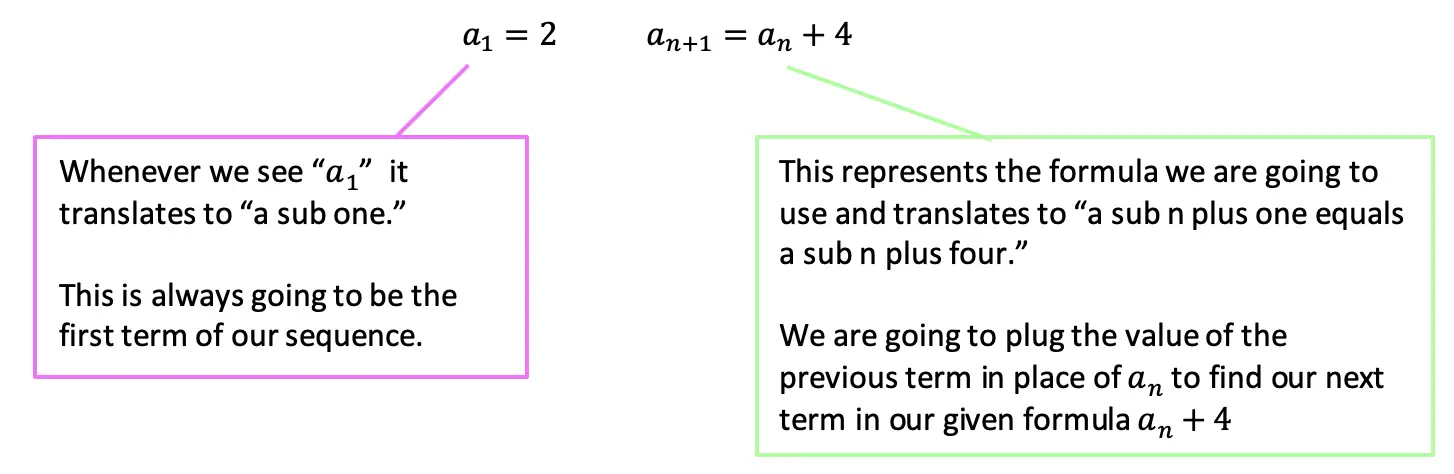
Step 1: First, let’s decode what these formulas are saying.
Step 2: The first term, represented by a1, is and will always be given to us. In this case, our first term has the value a1=2 and represents the first term of our recursive sequence.
a1= First Term=2
Step 3: We then plug in the value of our first term, which is a1=2 into our formula an+4 to get 2+4=6. The number 6 now has the value of our second term in the recursive sequence.
a1= 2 First Term
a2= (2)+4=6 Second Term
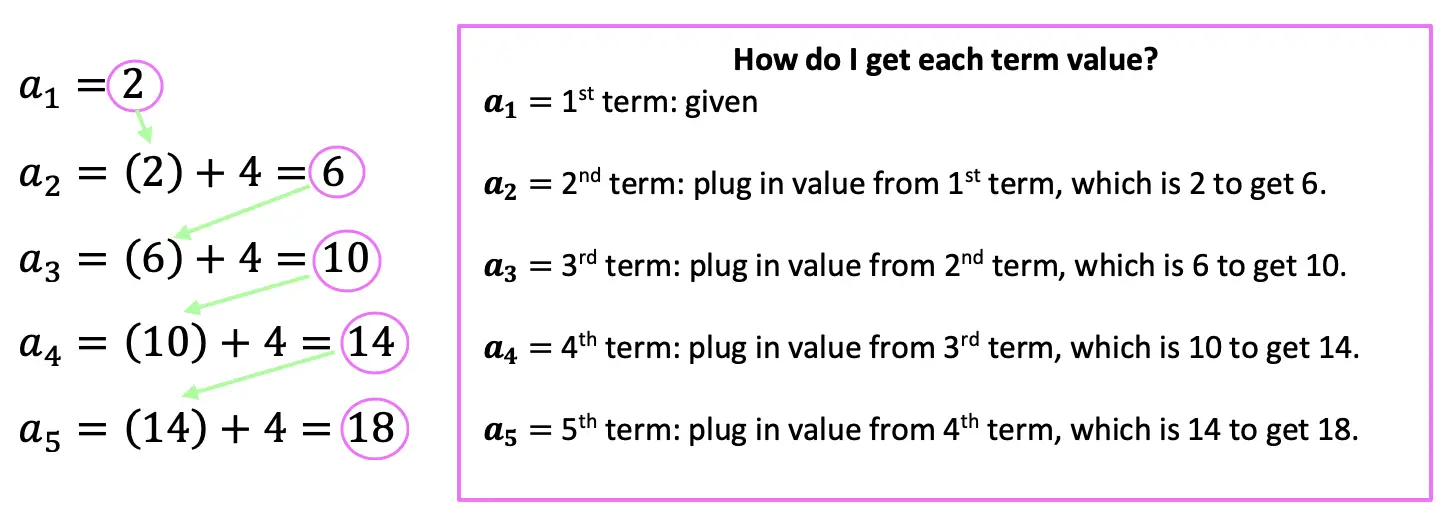
Step 4: Now we are going to continue the pattern, plugging in the value of each previous term to find the next consecutive terms in our recursive sequence.
The pattern can be more easily seen below. Notice we are able to find the value of all 5 terms of the recursive sequence for the solution only given the first term and recursive formula at the beginning of our question.
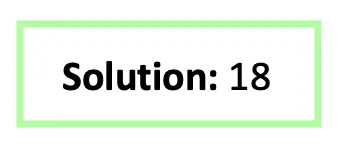
Step 5: We found the recursive sequence we were looking for: 2, 6, 10, 14, 18. Since the question was originally only asking for the value of the fifth term we know our solution only needs to be the value of the fifth term which is 18.
Example #2: Geometric Recursive Sequence
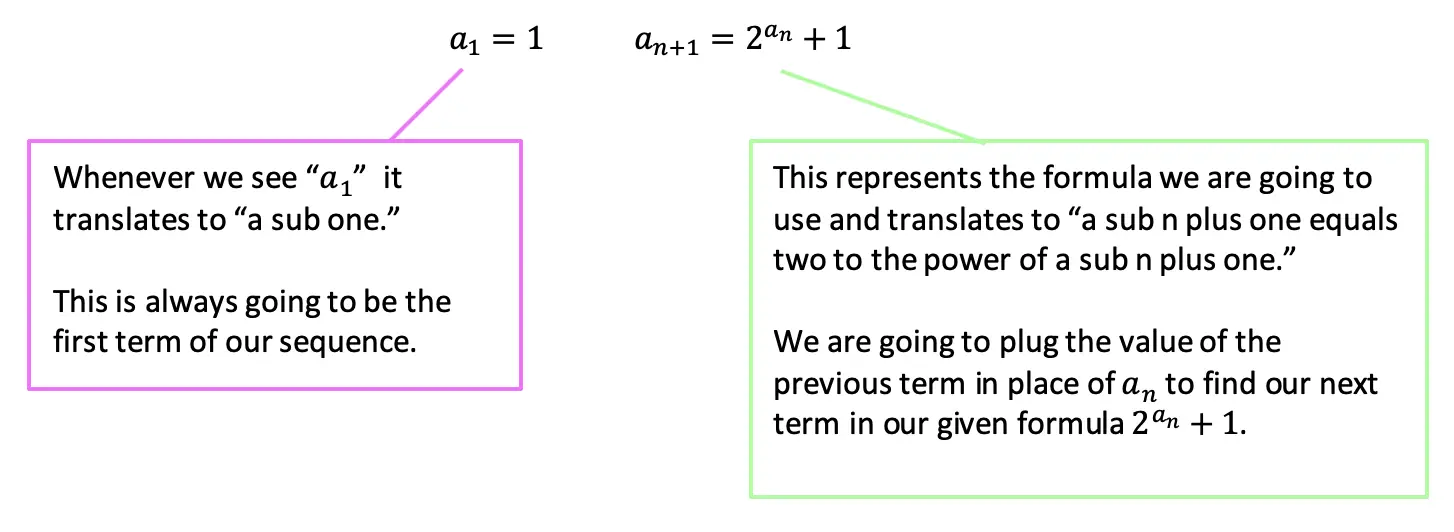
Step 1: First, let’s decode what these formulas are saying.
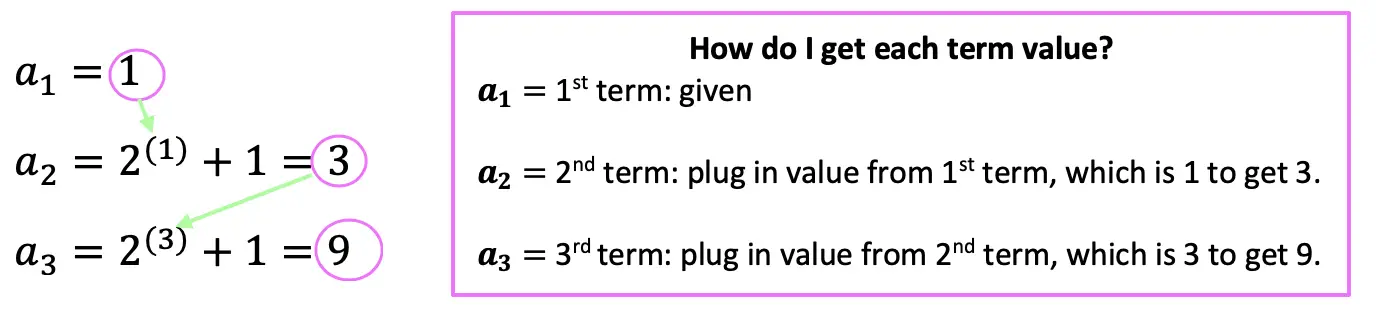
Step 2: The first term, represented by a1, is and will always be given to us. In this case, our first term has the value a1=1 and represents the first term of our recursive sequence.
a1= First Term=1
Step 3: We then plug in the value of our first term, which is a1=1 into our formula 2an+1 to get 21+1=3. The number 3 now has the value of our second term in the recursive sequence.
a1= 1 First Term
a2= 2(1)+1=3 Second Term
Step 4: Now we are going to continue the pattern, plugging in the value of each previous term to find the next term in our recursive sequence.
The pattern can be more easily seen below. Notice we are able to find the value of all 3 terms of the recursive sequence for the solution only given the first term and recursive formula at the beginning of our question.
***Note this was written in a different notation but is solved in the exact same way! This recursive formula is a geometric sequence.
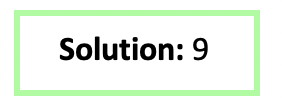
Step 5: We found the recursive sequence we were looking for: 1,3,9. Since the question was originally only asking for the value of the third term we know our solution only needs to be the value of the third term which is 9.
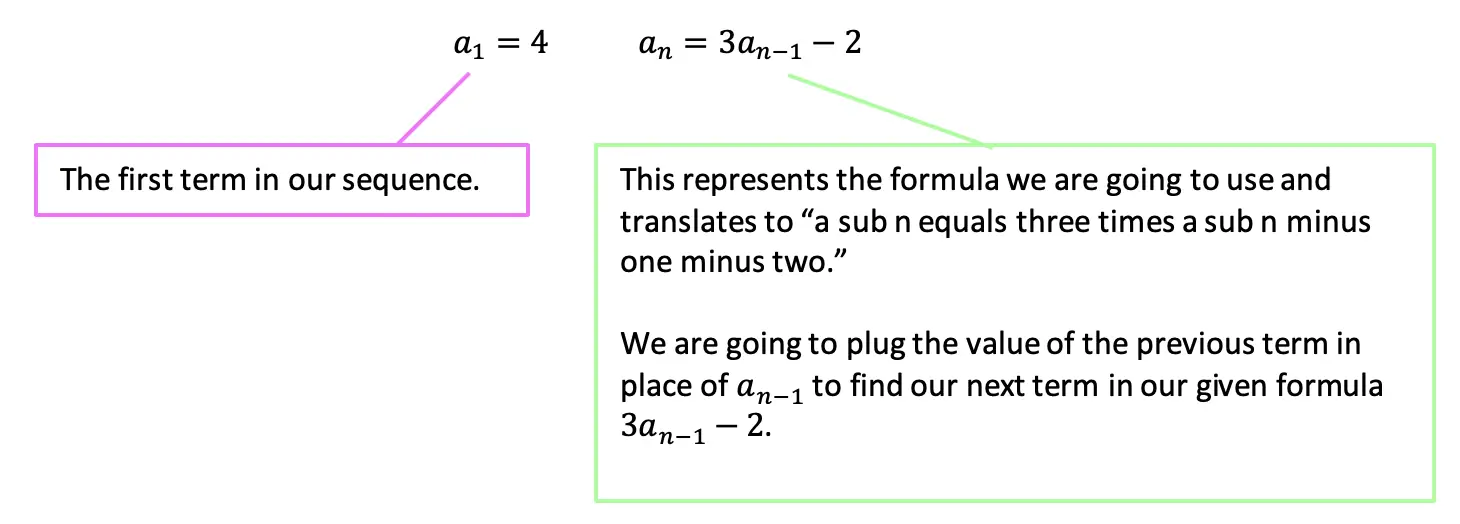
Example #3:
Step 1: First, let’s decode what these formulas are saying.
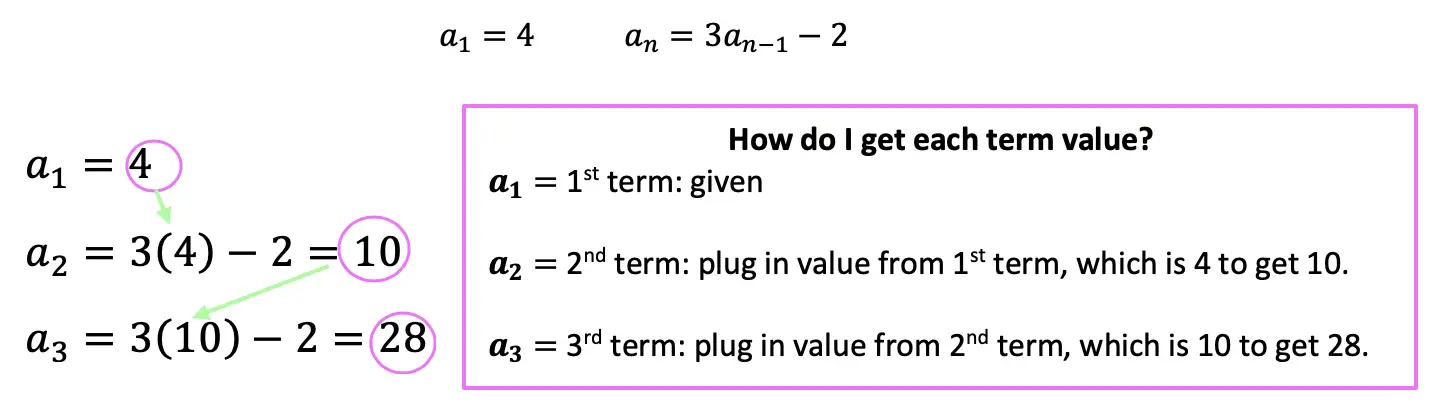
Step 2: The first term, represented by a1, is and will always be given to us. In this case, our first term has the value a1=4 and represents the first term of our recursive sequence.
a1= First Term=4
Step 3: We then plug in the value of our first term, which is a1=4 into our formula 3an-1-2 to get 3(2)-1=5. The number 5 now has the value of our second term in the recursive sequence.
a1= 4 First Term
a2= 3(2)-1=5 Second Term
Step 4: Now we are going to continue the pattern, plugging in the value of each previous term to find the next term in our recursive sequence.
The pattern can be more easily seen below. Notice we are able to find the value of all 3 terms of the recursive sequence for the solution only given the first term and recursive formula at the beginning of our question.
Step 5: We found the recursive sequence we were looking for: 4,10,28. Since the question was originally only asking for the value of the third term we know our solution only needs to be the value of the third term which is 28.
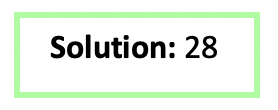
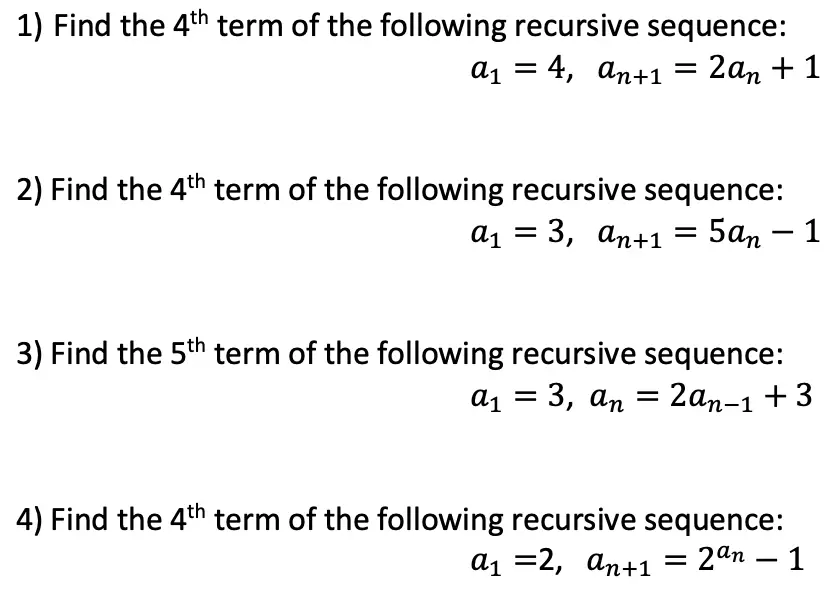
Think you are ready to solve a recursive equation on your own?! Try finding the specific term in each given recursive function below:
Practice Questions:
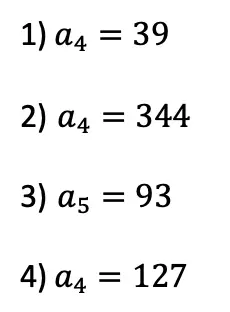
Solutions:
Related Posts:
Looking to learn more about sequences? You’ve come to the right place! Check out these sequence resources and posts below. Personally, I recommend looking at the arithmetic sequence or geometric sequence posts next!
Still, got questions? No problem! Don’t hesitate to comment below or reach out via email. And if you would like to see more MathSux content, please help support us by following ad subscribing to one of our platforms. Thanks so much for stopping by and happy calculating!
***Bonus! Want to test yourself with a similar NYS Regents question on Recursive Formulas? Click here! And if you want to learn about even more sequences, check out the link here!
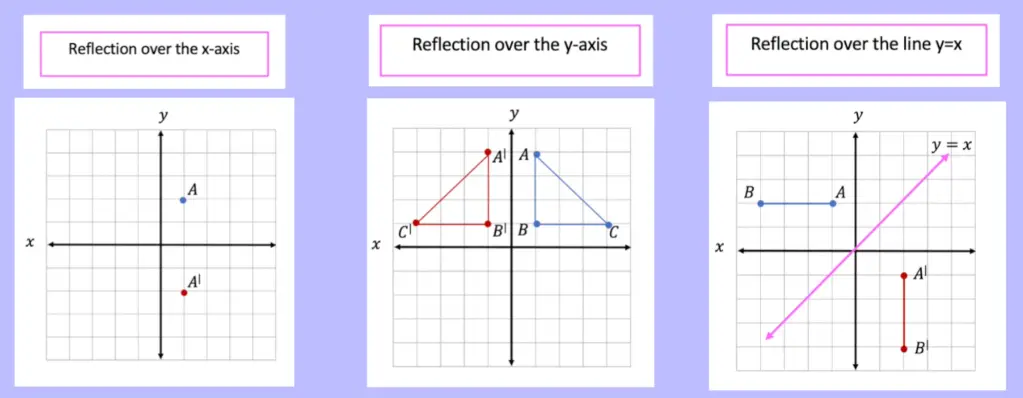
Greetings and welcome to Mathsux! Today we are going to go over reflections geometry, one of the many types of transformations that come up in geometry. And thankfully, reflection transformation is one of the easiest types to master, especially if you’re more of a visual learner/artistic type person. In this post, we will go over a reflection across the line x=-2, but if you want to see a reflection across the x axis, the y axis, and the line y=x, please check out the math video below! So let’s get to it! And if you’re new to transformations, check out translations here.
What are Reflections?
A Reflection on a coordinate plane is exactly what you think! A reflection is a type of transformation in geometry where we reflect a point, a line segment, or a shape over a line to create a mirror image of itself. Think of the wings of a butterfly, a page being folded in half, or anywhere else where there is perfect symmetry, each of these are great examples of a reflection!
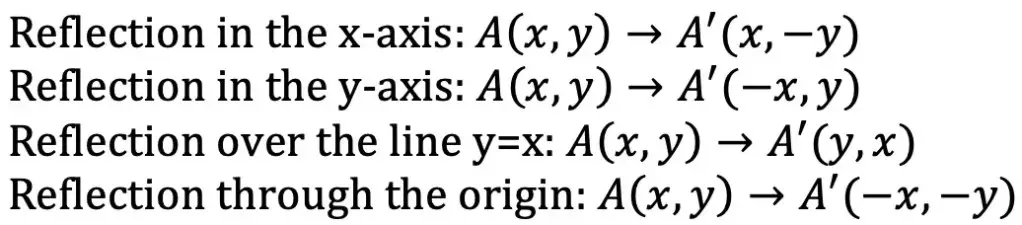
Reflection Rules:
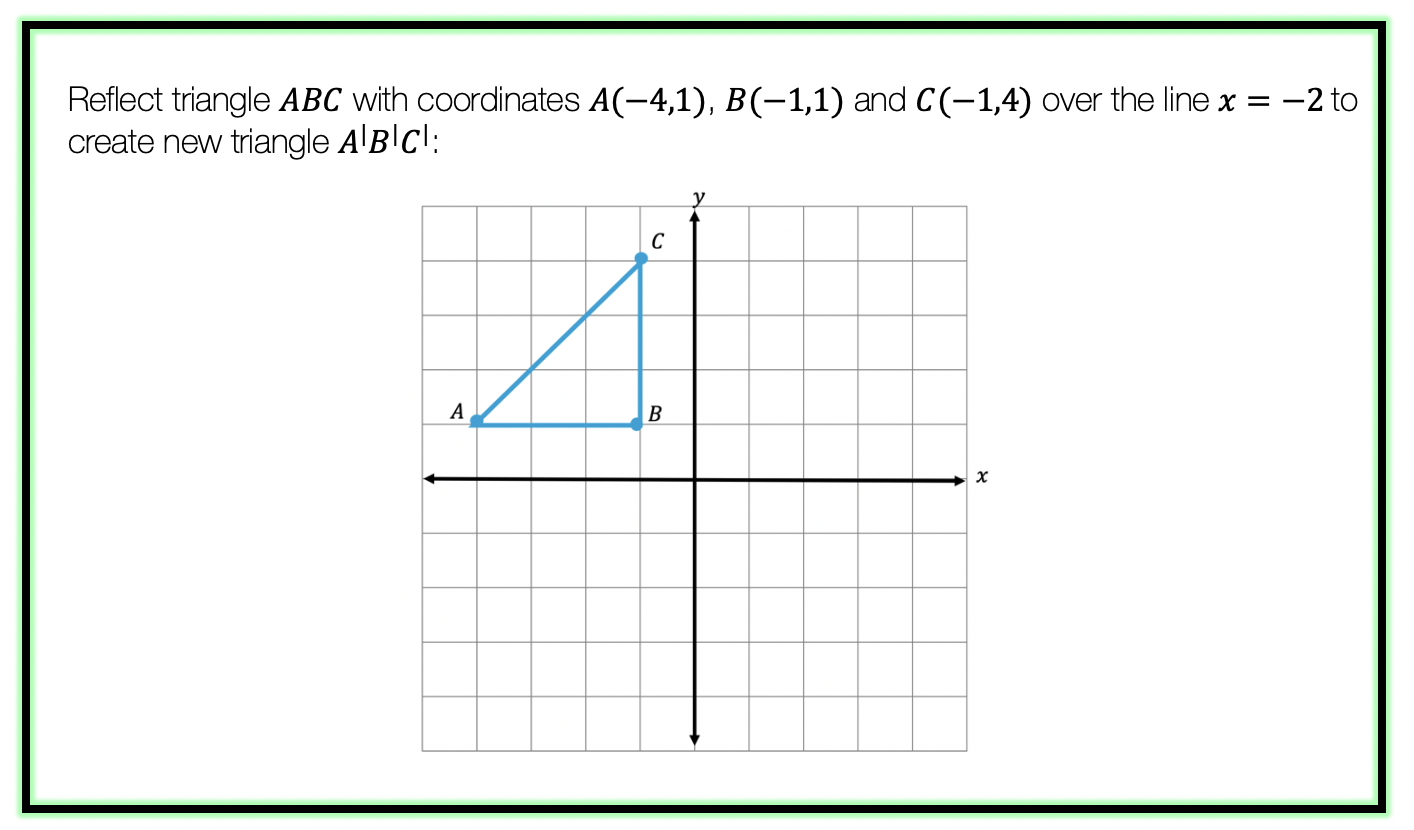
If you are completely new to reflections, you may want to check out the video above that goes into deriving reflection rules over the different axis. But for those of you more comfortable with reflection, check out the example below where we reflect the image of a triangle onto itself over the line x=-2.
Example:
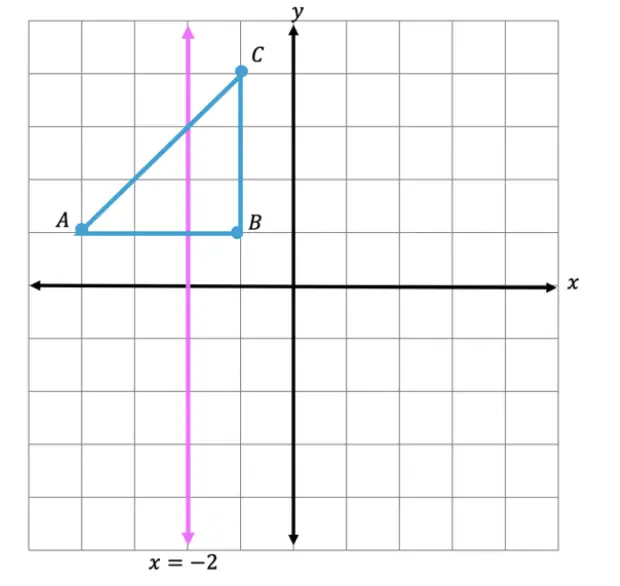
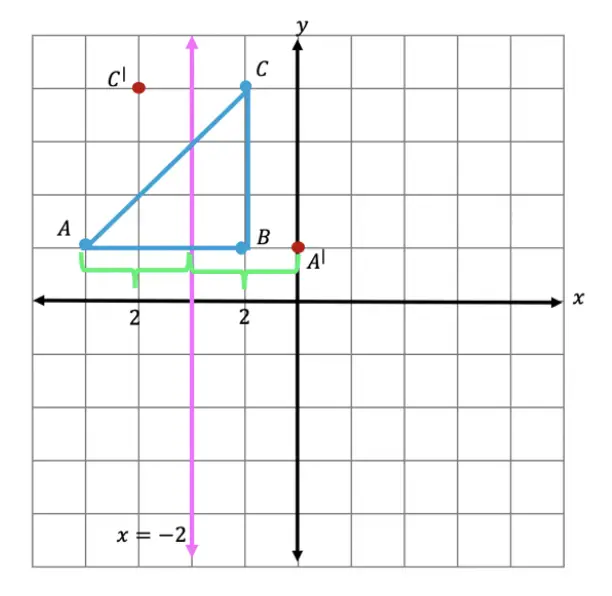
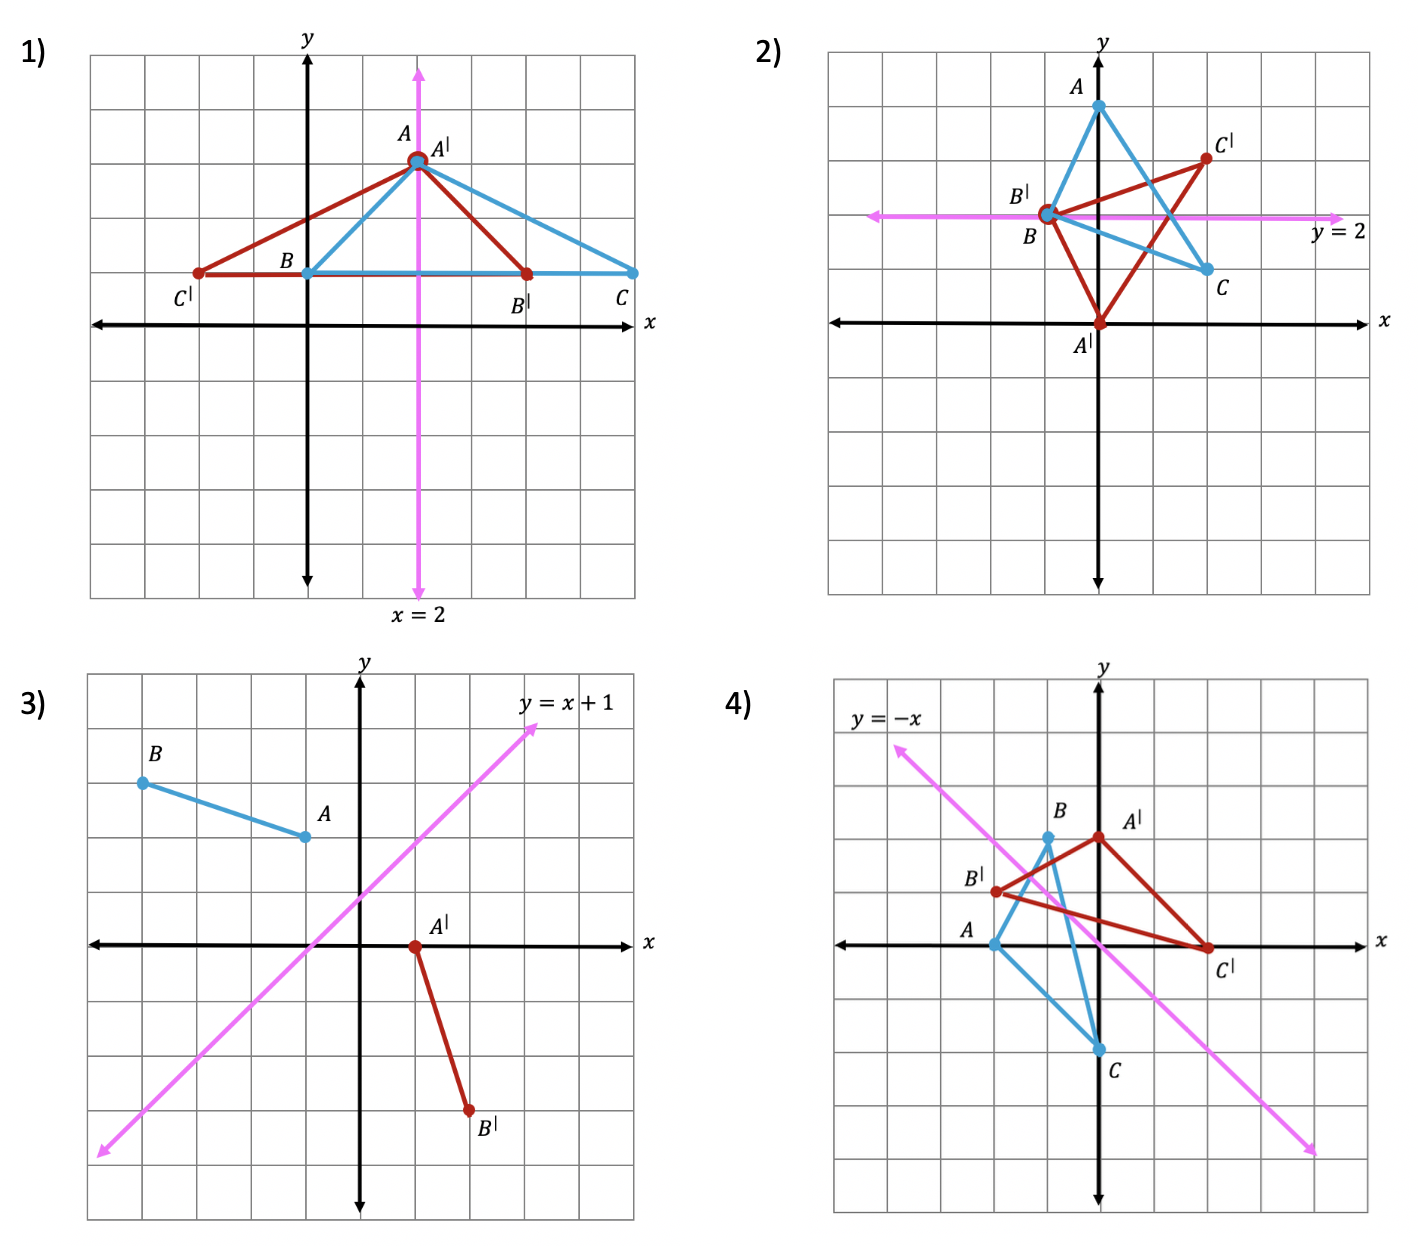
Step 1: First, let’s draw in line x=-2. Note that whenever we have x equal to a number, we end up drawing a vertical line at that point on the x axis, in this case at x=-2.
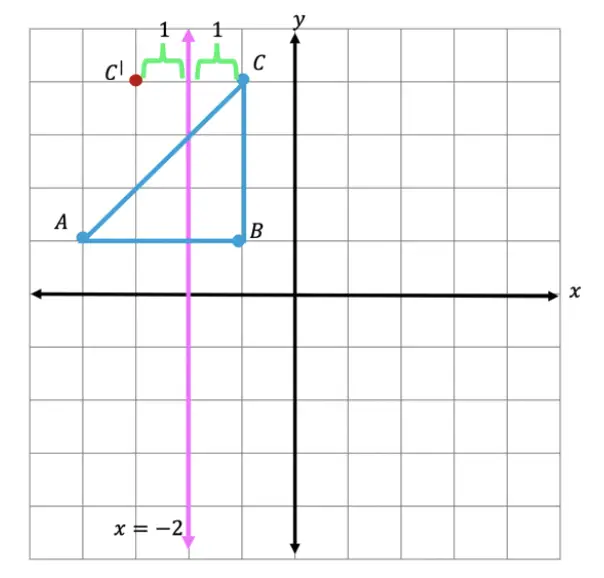
Step 2: Find the distance each point is from the line x=-2 and reflect it on the other side, measuring the same distance.
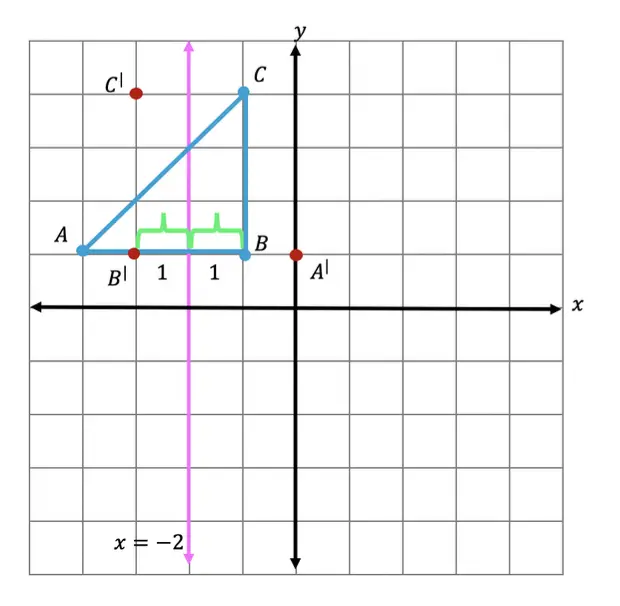
First, let’s look at point C, notice it’s 1 unit away from the line x=-2 on the right. To reflect point c, we are going to count 1 unit but this time to the left of the line x=-2 and label our new point, C|.
Step 3: Now we are going to reflect coordinate point A in much the same way! Notice that point A is 2 units away on the left of line x=-2, we then want to measure 2 units to the right of our line x=-2 and mark our new coordinate point, A|.
Step 4: Lastly, we want to reflect coordinate point B. This time, point B is 1 unit away on the right side of the line x=-2, we then measure 1 unit to the opposite direction of our line, x=-2, and mark our new point, B|.
Step 5: Now that we have all the newly reflected coordinate points of our triangle, finally, we can now connect them all, for our fully reflected image of right triangle A|B|C|.
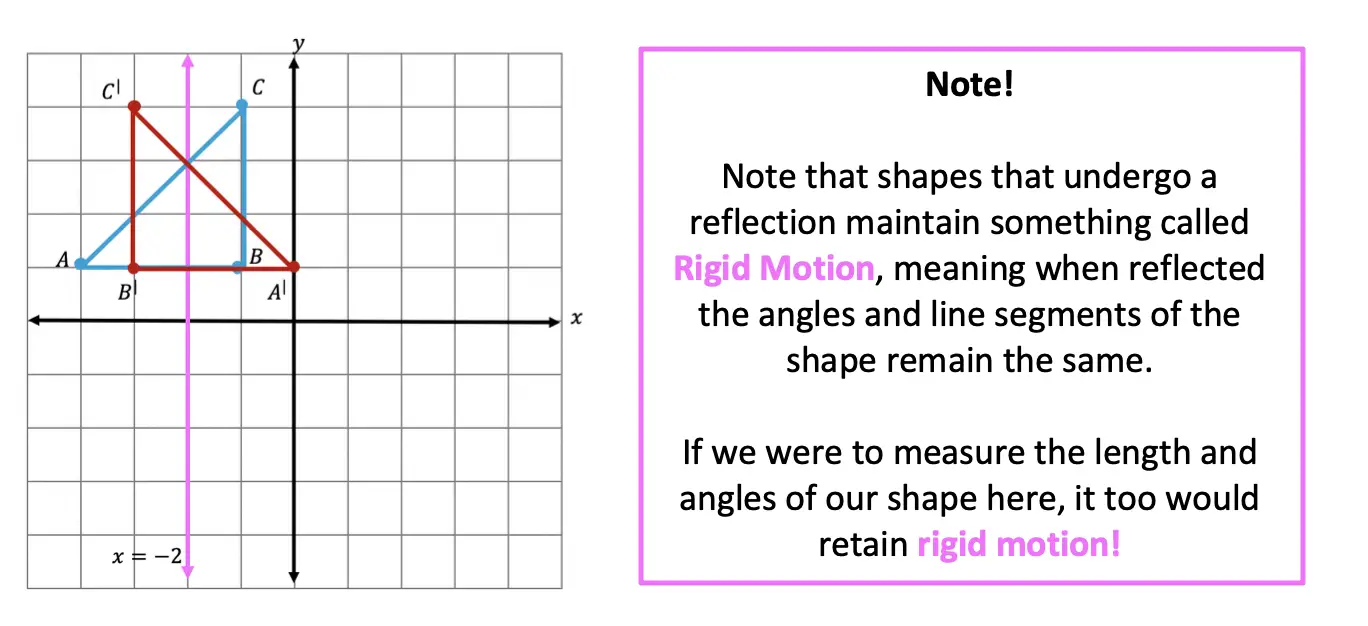
Notice our newly reflected triangle is not just a mirror image of itself, but when the original figure is reflected it actually ends up overlapping onto itself!? How did this happen? That is because this our reflection line came right down the middle of our original image, triangle ABC. Shapes that reflect onto themselves are a bit tricky but not impossible, just remember to measure out the distance of each coordinate point and reflections should be a breeze!
Rigid Motion:
Reflections are a special type of transformation in geometry that maintains rigid motion, meaning when a point, line, or shape is reflected the angles, and line segments retain their value. For example, if we were to measure the area of both right triangles, before and after reflection, we would find the areas to remain unchanged. Meaning the area of triangle ABC is equal to the area of triangle A|B|C| . Another rigid transformation includes rotations and translations.
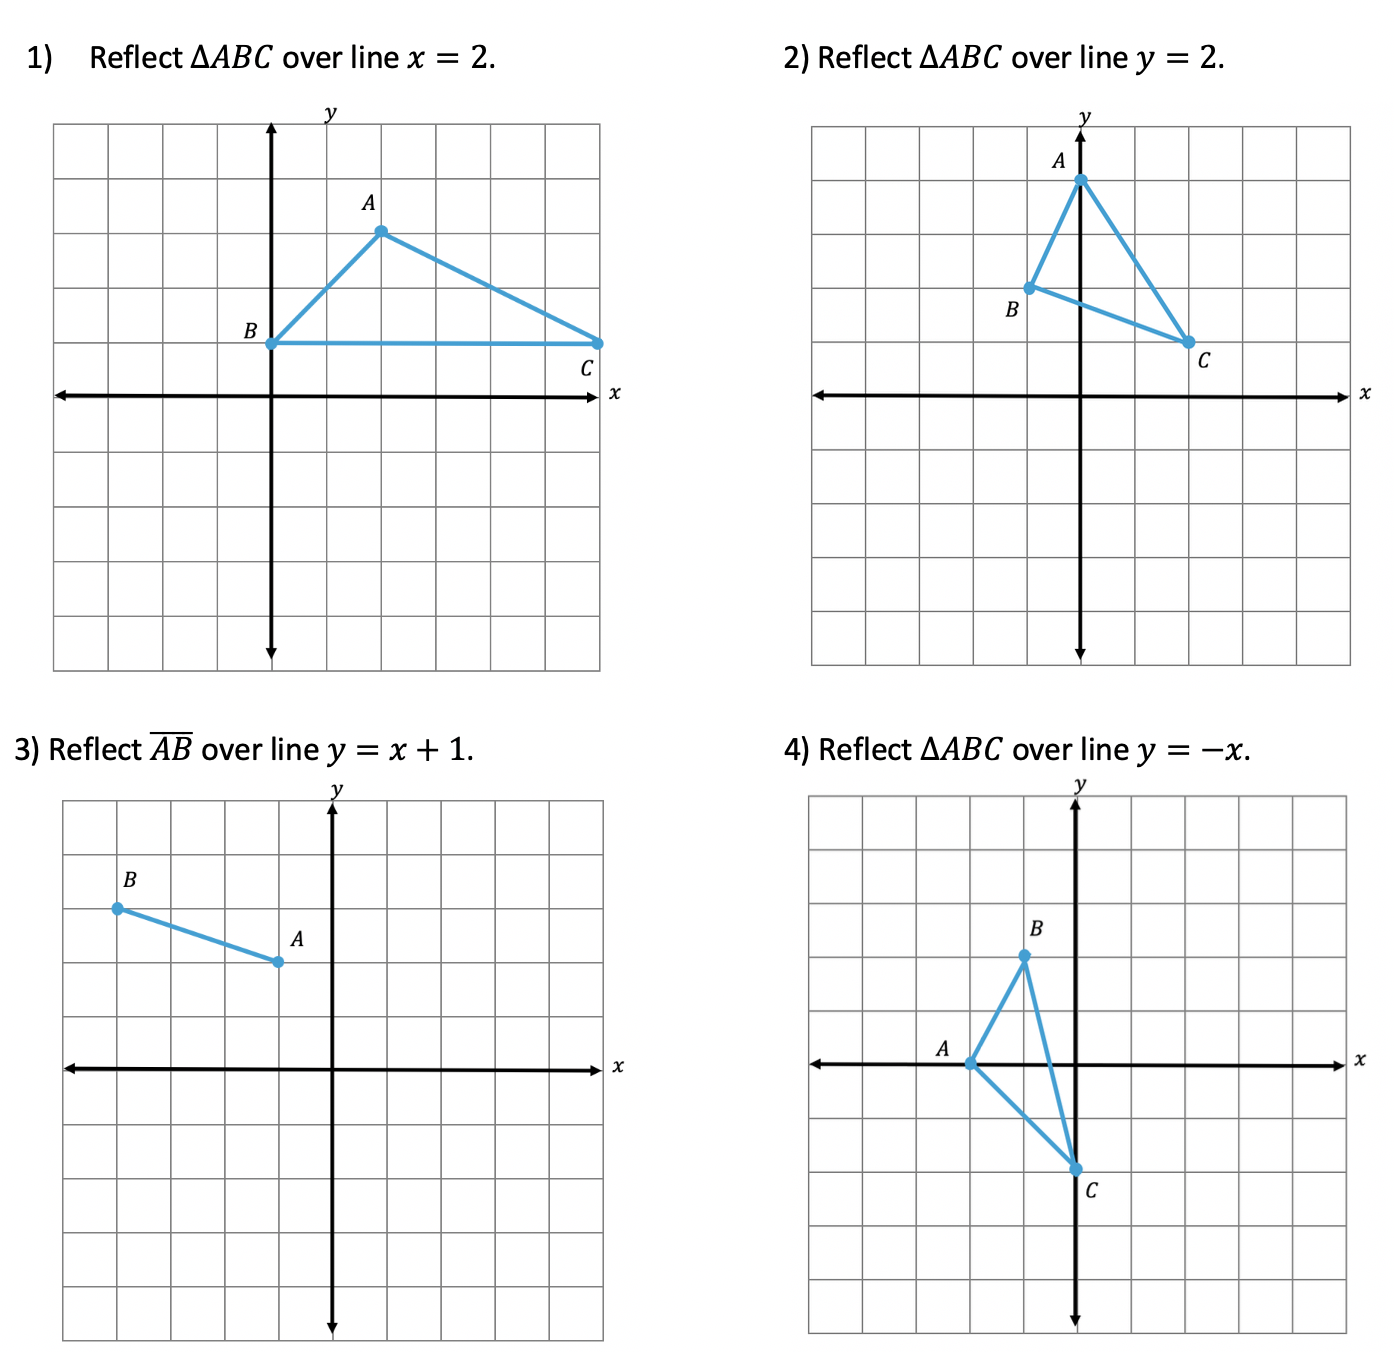
Looking to practice your new reflection skills? Try the reflection practice problems below, with solutions to each question, to truly master the topic! Happy calculating!
Practice Questions:
Solutions:
Still got questions? No problem! Check out the video above or comment below! There is also a bonus video if you scroll all the way down at the end of this post for anyone who wants to see how to reflect a line over the line x=2. See how it differs and how it is similar to the example shown here. Happy calculating! 🙂
Don’t forget to follow MathSux on social media for the latest tips and tricks to ace math!
And if you are looking for more Transformations Check out the related posts below and let me know if you have any questions? Or maybe you just want to share your favorite type of transformation? Either way, happy calculating!
Happy Wednesday math friends! Today, we’re going to go over how to solve absolute value equations. Solving for absolute value equations supplies us with the magic of two potential answers since absolute value is measured by the distance from zero. And if this sounds confusing, fear not, because everything is explained below!
Also, if you have any questions about anything here, don’t hesitate to comment. Happy calculating! 🙂
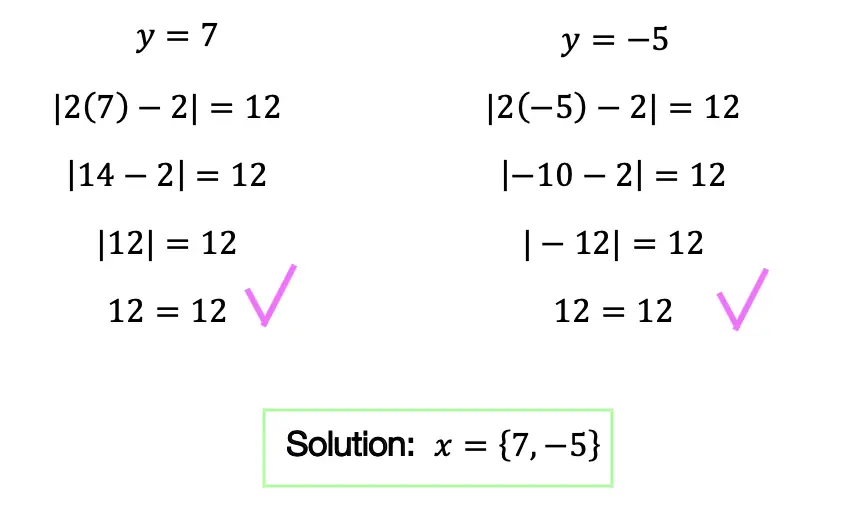
Absolute Value measures the “absolute value” or absolute distance from zero. For example, the absolute value of 4 is 4 and the absolute value of -4 is also 4. Take a look at the number line below for a clearer picture:
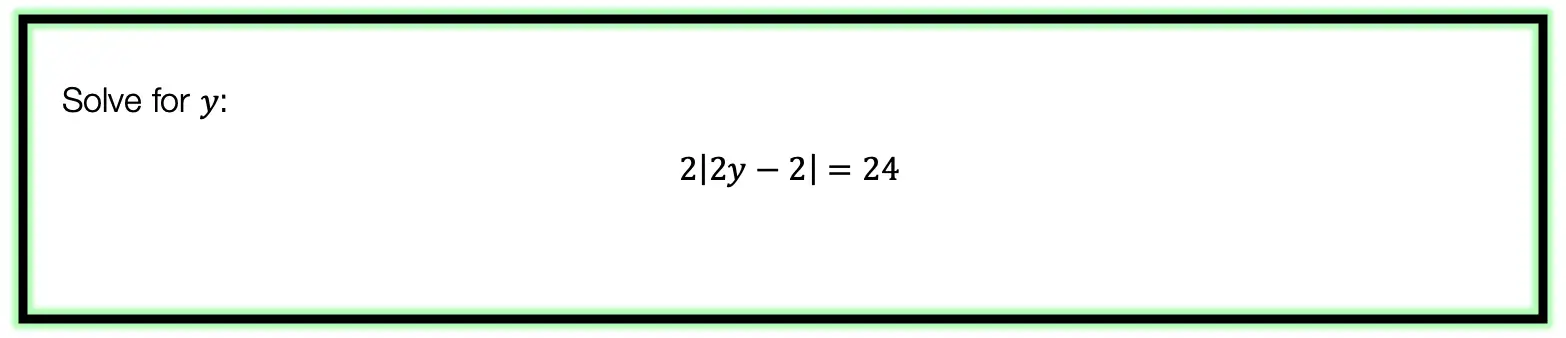
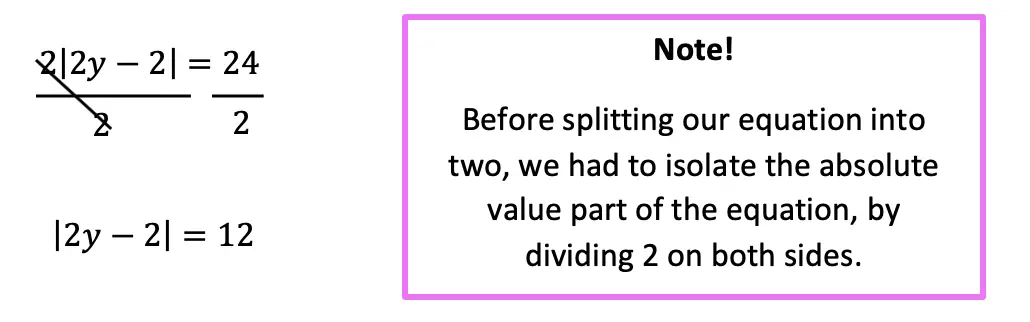
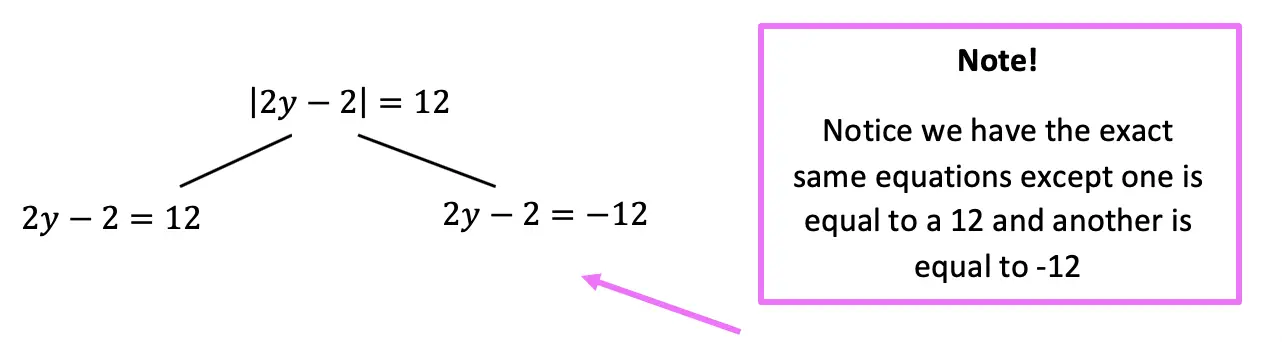
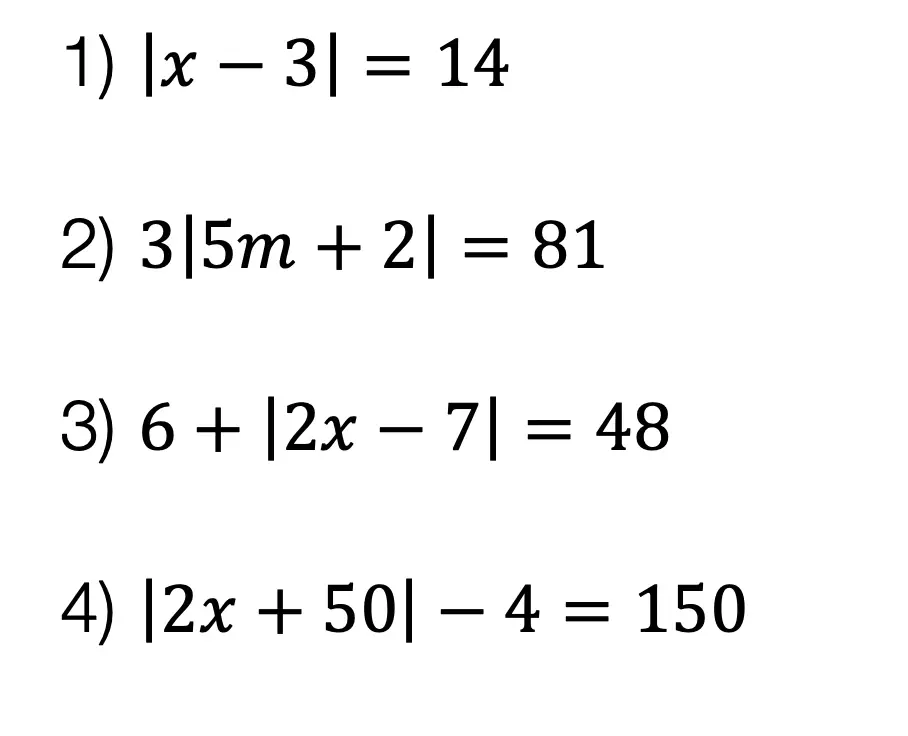
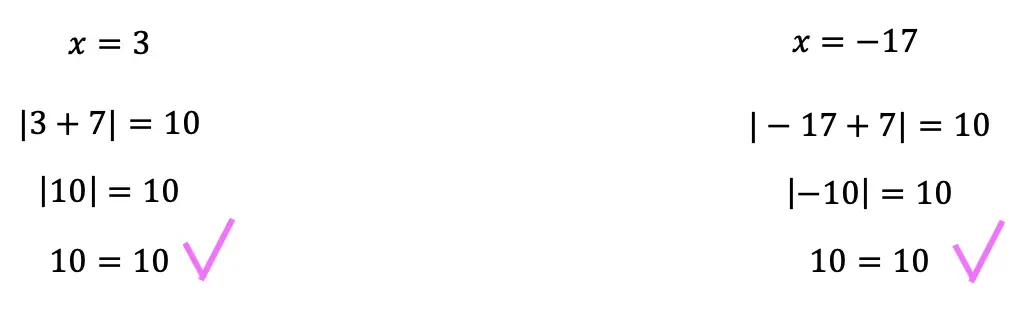
Now let’s see how we can apply our knowledge of absolute value equations when there is a missing variable!
Now let’s look at a slightly different example:
Practice Questions: Given the following right triangles, find the missing lengths and side angles rounding to the nearest whole number.
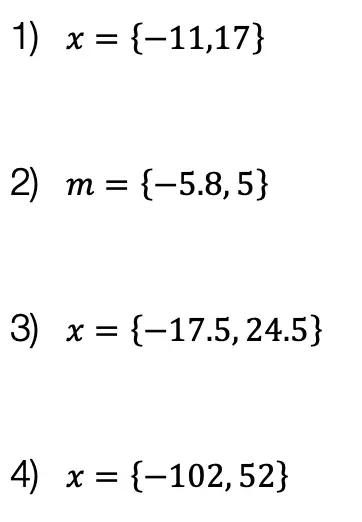
Solutions:
Still got questions? No problem! Check out the video the same examples outlined above. Happy calculating! 🙂
Hi everyone, welcome back to Mathsux! This week we’ll be reviewing how to graph an equation of a line in y=mx+b form. And if you have not checked out the video below, please do! Happy calculating! 🙂
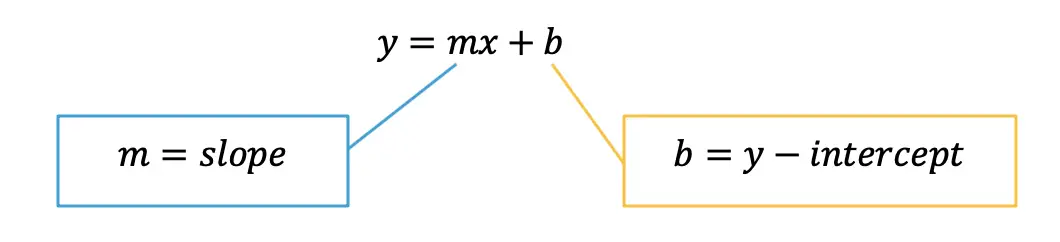
An equation of a line can be represented by the following formula:
y=mx+b
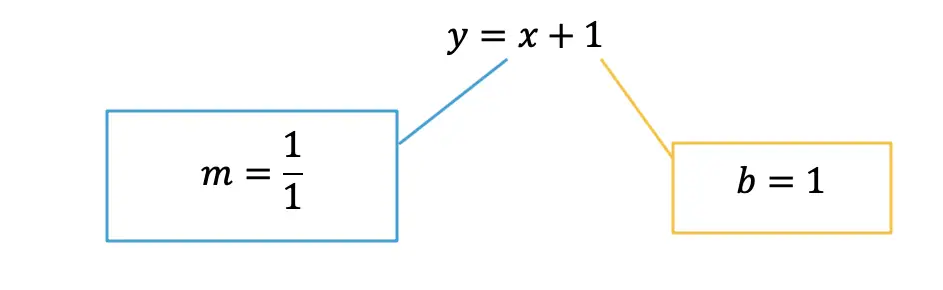
Y-Intercept: This is represented by b, the stand-alone number in y=mx+b. This represents where the line hits the y-axis. This is always the first point you want to start with when graphing at coordinate point (0,b).
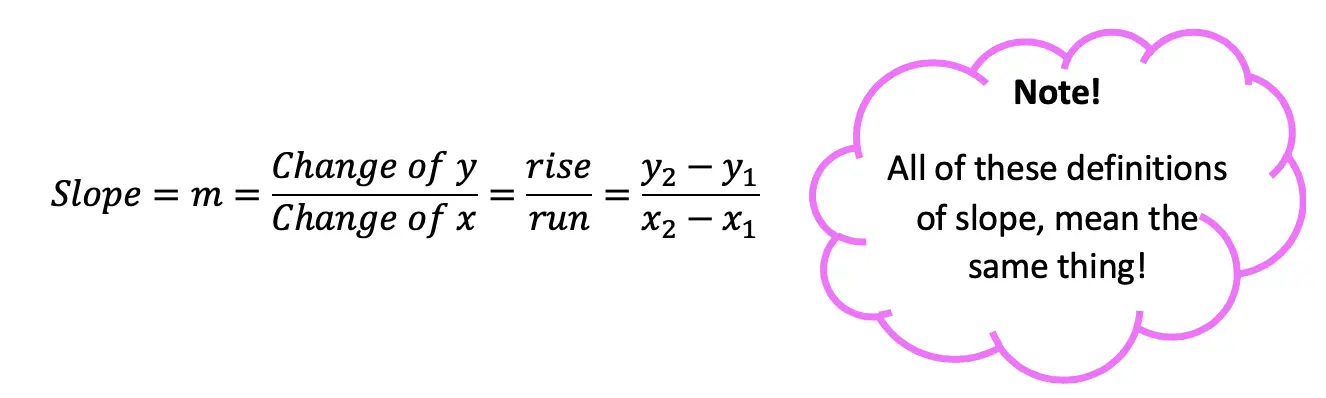
Slope:This is represented by m, the number next to x in y=mx+b. Slope tells us how much we go up or down the y-axis and left or right on the x- axis in fraction form:
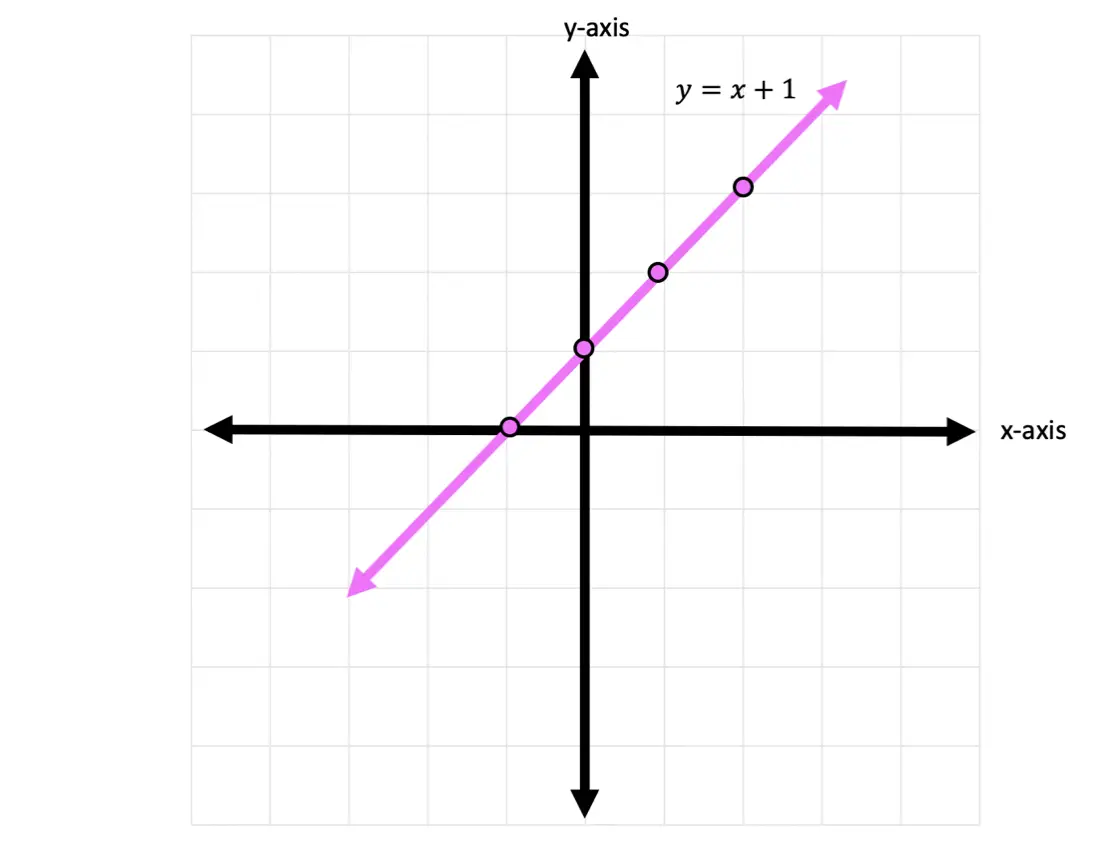
Now let’s check out an Example!
Graph the following:
-> First, let’s identify the slope and y-intercept of our line.
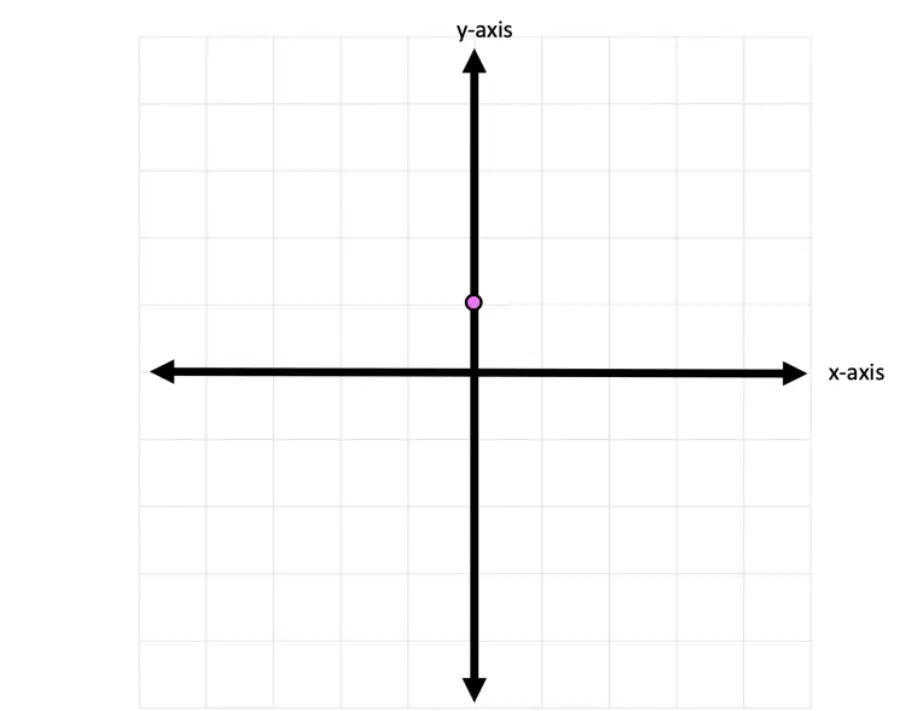
-> To start, let’s graph the first point on our graph, the y-intercept at point (0,1):
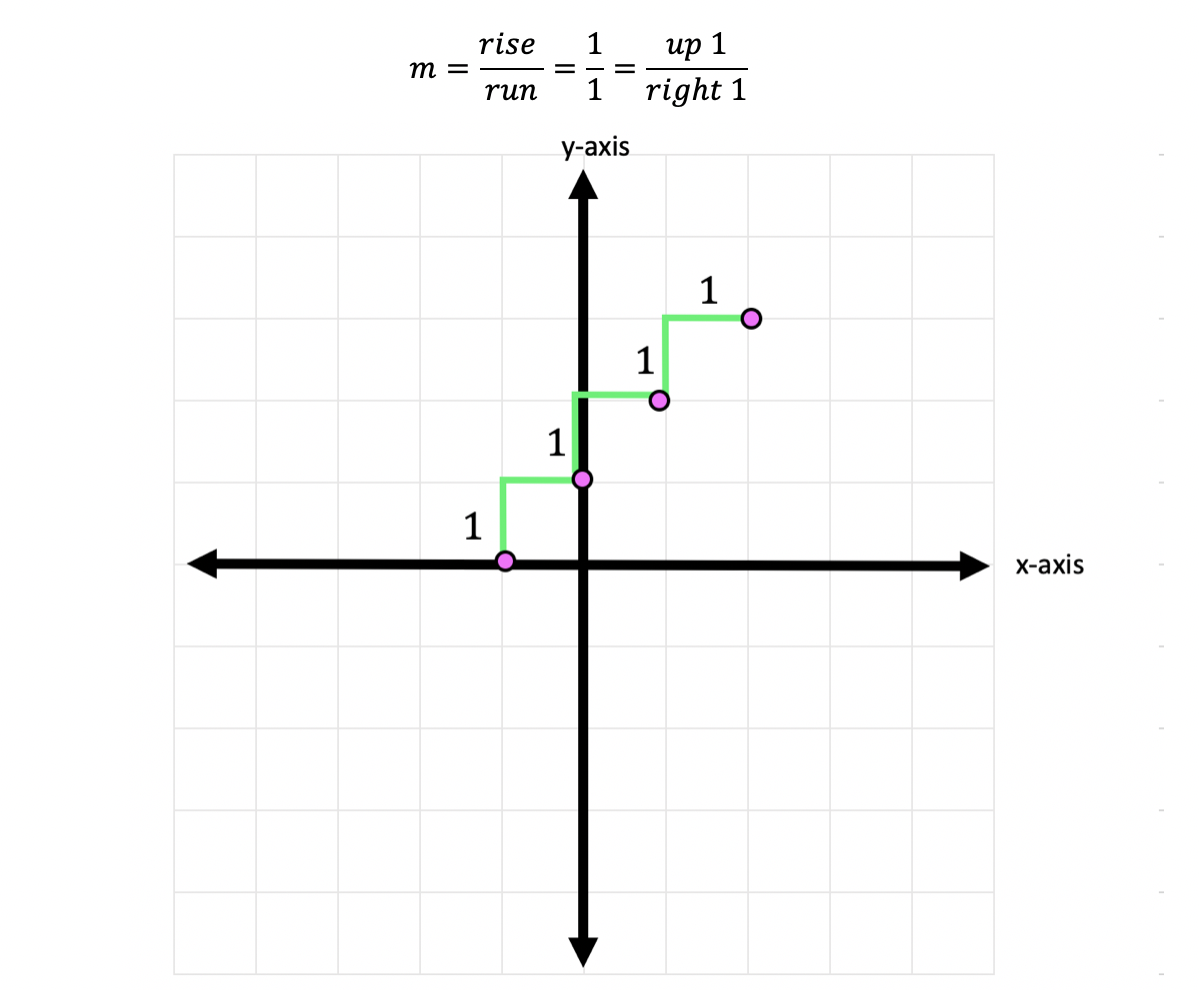
-> Now for the slope. We are going to go up one and over to the right one for each point, since our slope is 1/1.
-> Connect all of our coordinate points and label our graph.
Try the following practice questions on your own!
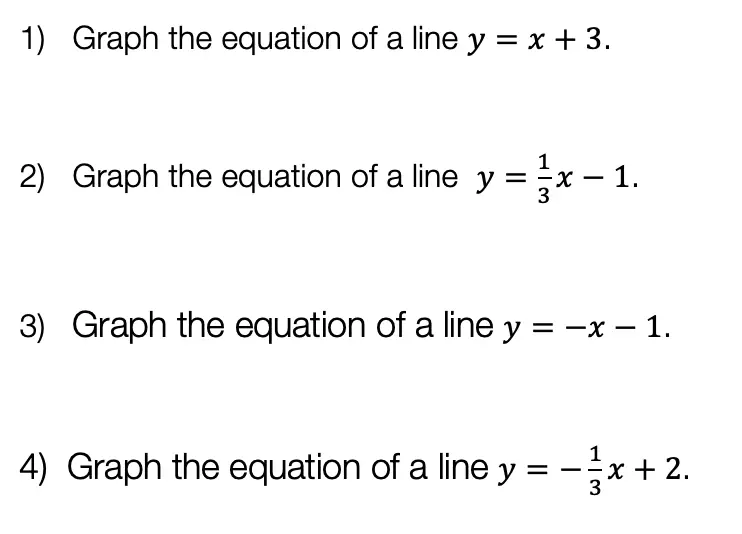
Practice Questions:
Want more Mathsux? Don’t forget to check out our Youtube channel and more below! And if you have any questions, please don’t hesitate to comment below. Happy Calculating! 🙂
Need to brush up on slope? Click here to see how to find the rate of change.
Happy Wednesday math friends! Today we’re going to go over the difference between perpendicular and parallel lines, then we’ll use our knowledge of the equation of a line (y=mx+b) to see how to find perpendicular and parallel lines through a given point. This is a common question that comes up on the NYS Geometry Regents and is something we should prepare for, so let’s go!
If you need any further explanation, don’t hesitate to check out the Youtube video below that goes into detail on how to find perpendicular and parallel lines through a given point one step at a time. Happy calculating! 🙂
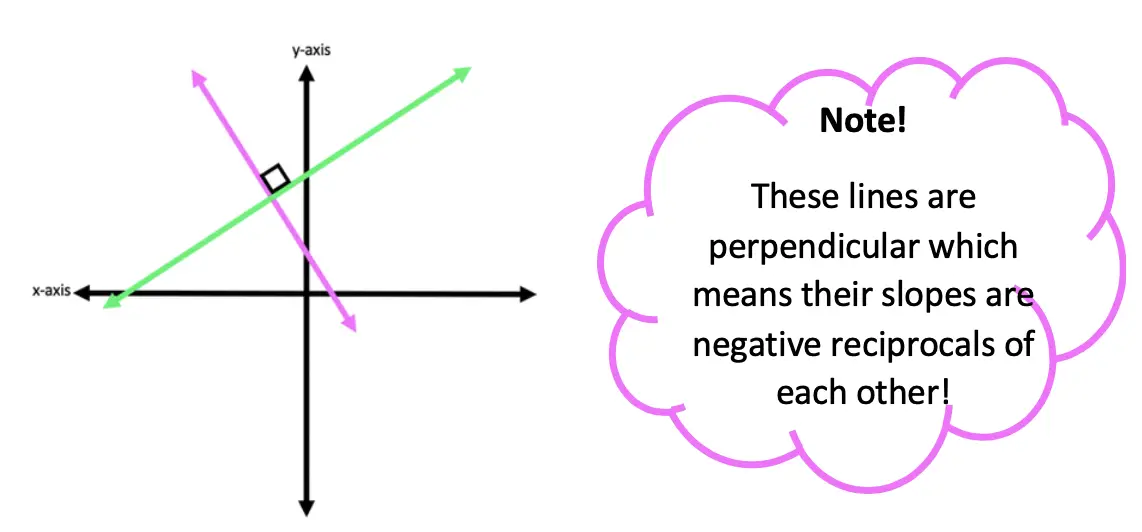
Perpendicular Lines:
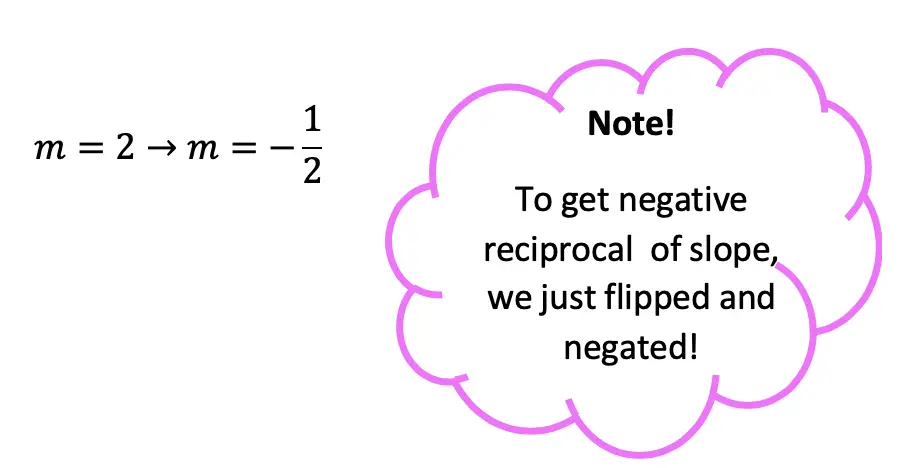
Perpendicular Lines:Lines that intersect to create a 90-degree angle and can look something like the graph below. Their slopes are negative reciprocals of each other which means they are flipped and negated. See below for example!
Example: Find an equation of a line that passes through the point (1,3) and is perpendicular to line y=2x+1 .
Parallel Lines:
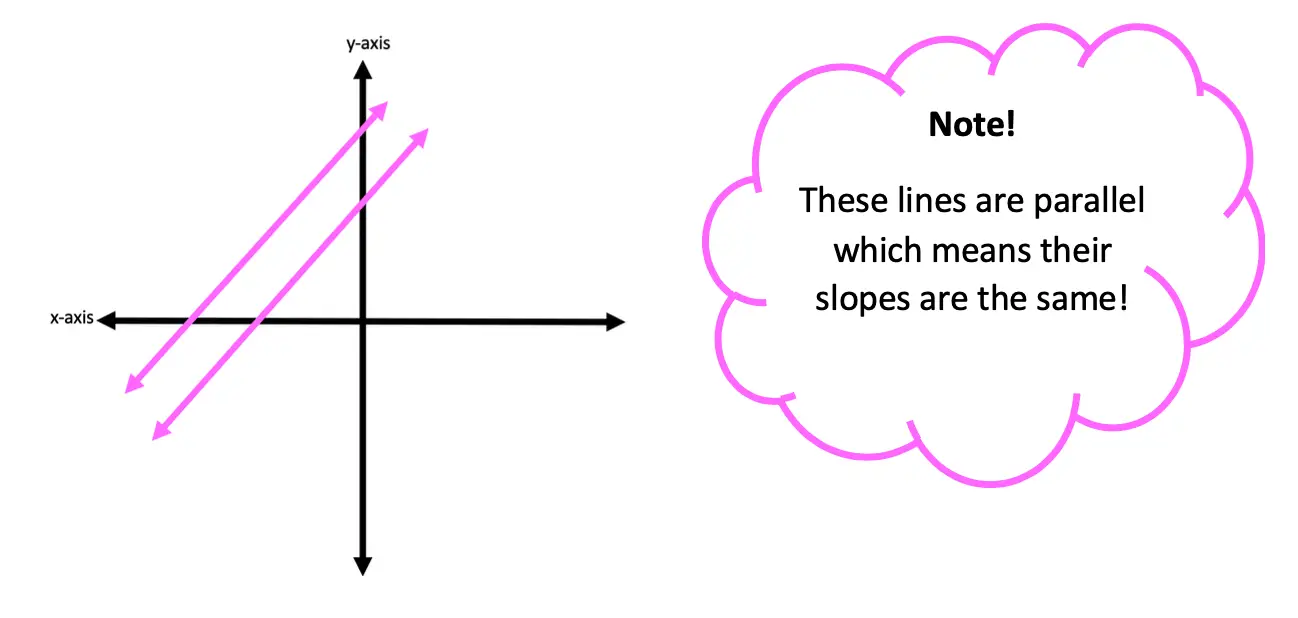
Parallel lines are lines that go in the same direction and have the same slope (but have different y-intercepts). Check out the example below!
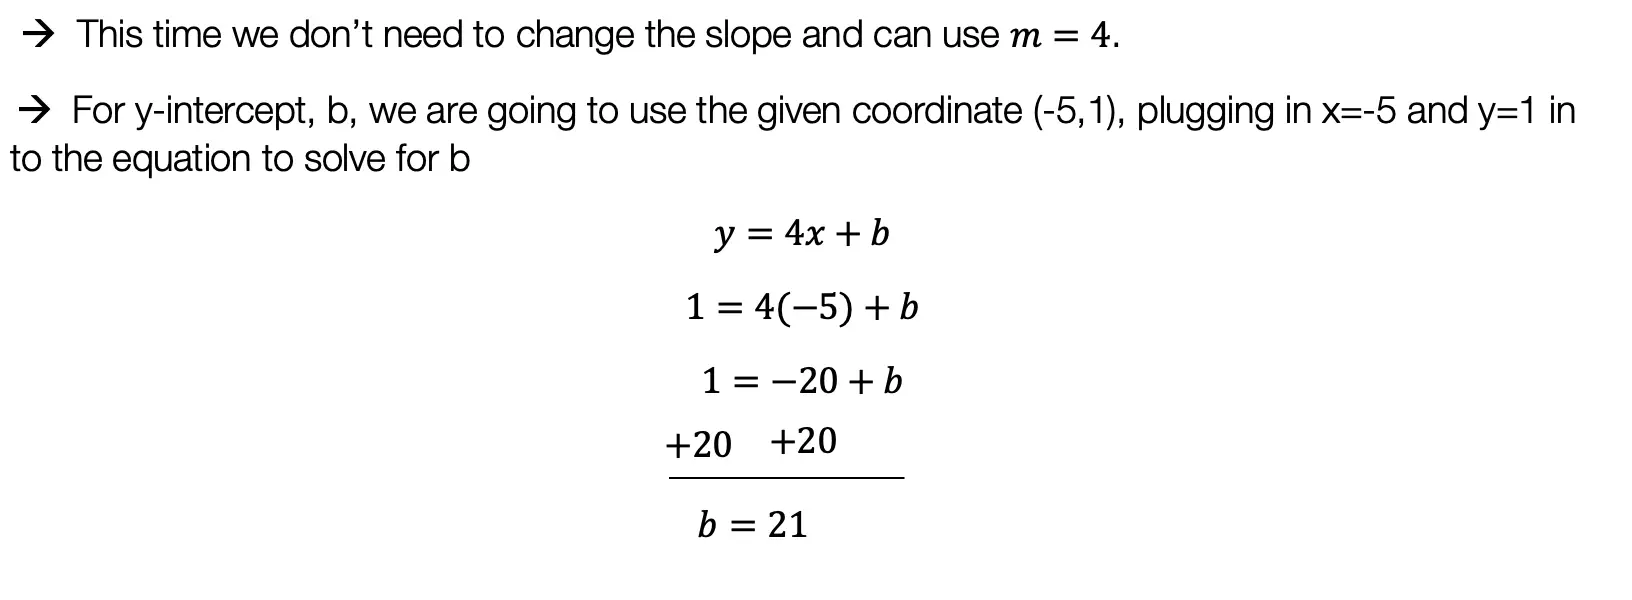
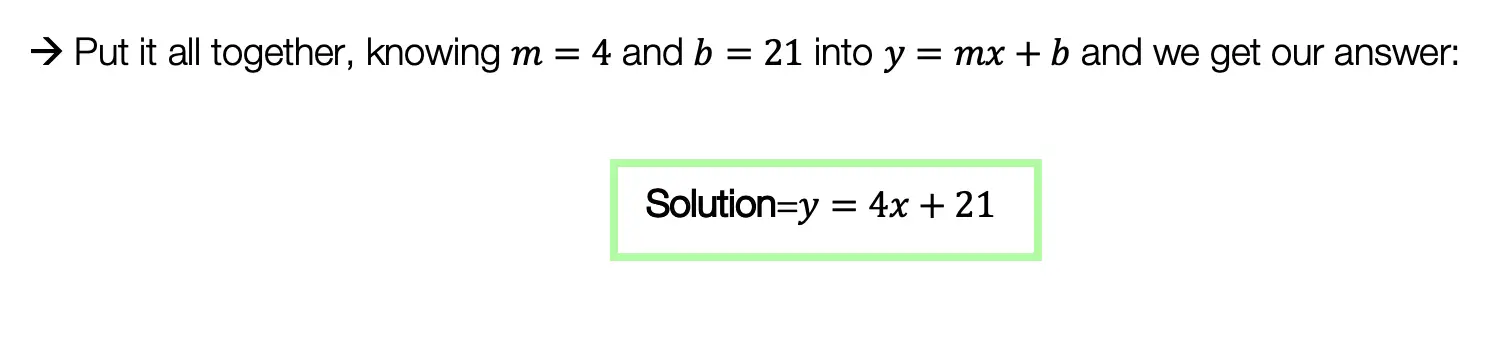
Example: Find an equation of a line that goes through the point (-5,1) and is parallel to line y=4x+2.
Try the following practice questions on your own!
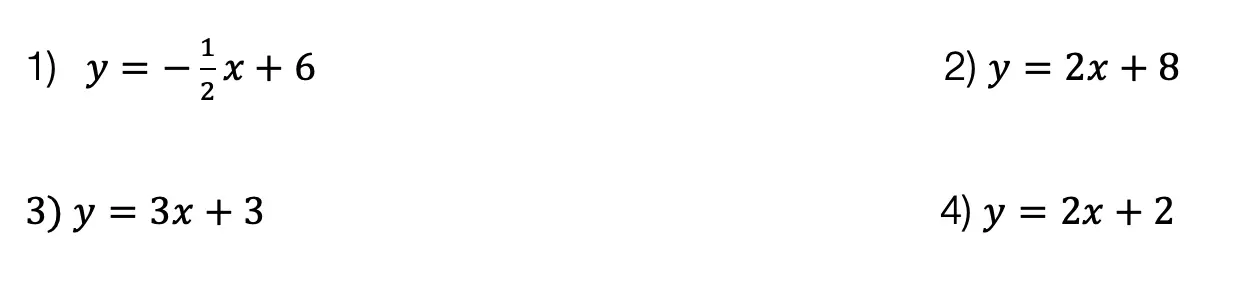
Practice Questions:
1) Find an equation of a line that passes through the point (2,5) and is perpendicular to line y=2x+1.
2) Find an equation of a line that goes through the point (-2,4) and is perpendicular to line
3) Find an equation of a line that goes through the point (1,6) and is parallel to line y=3x+2.
4) Find an equation of a line that goes through the point (-2,-2) and is parallel to line y=2x+1.
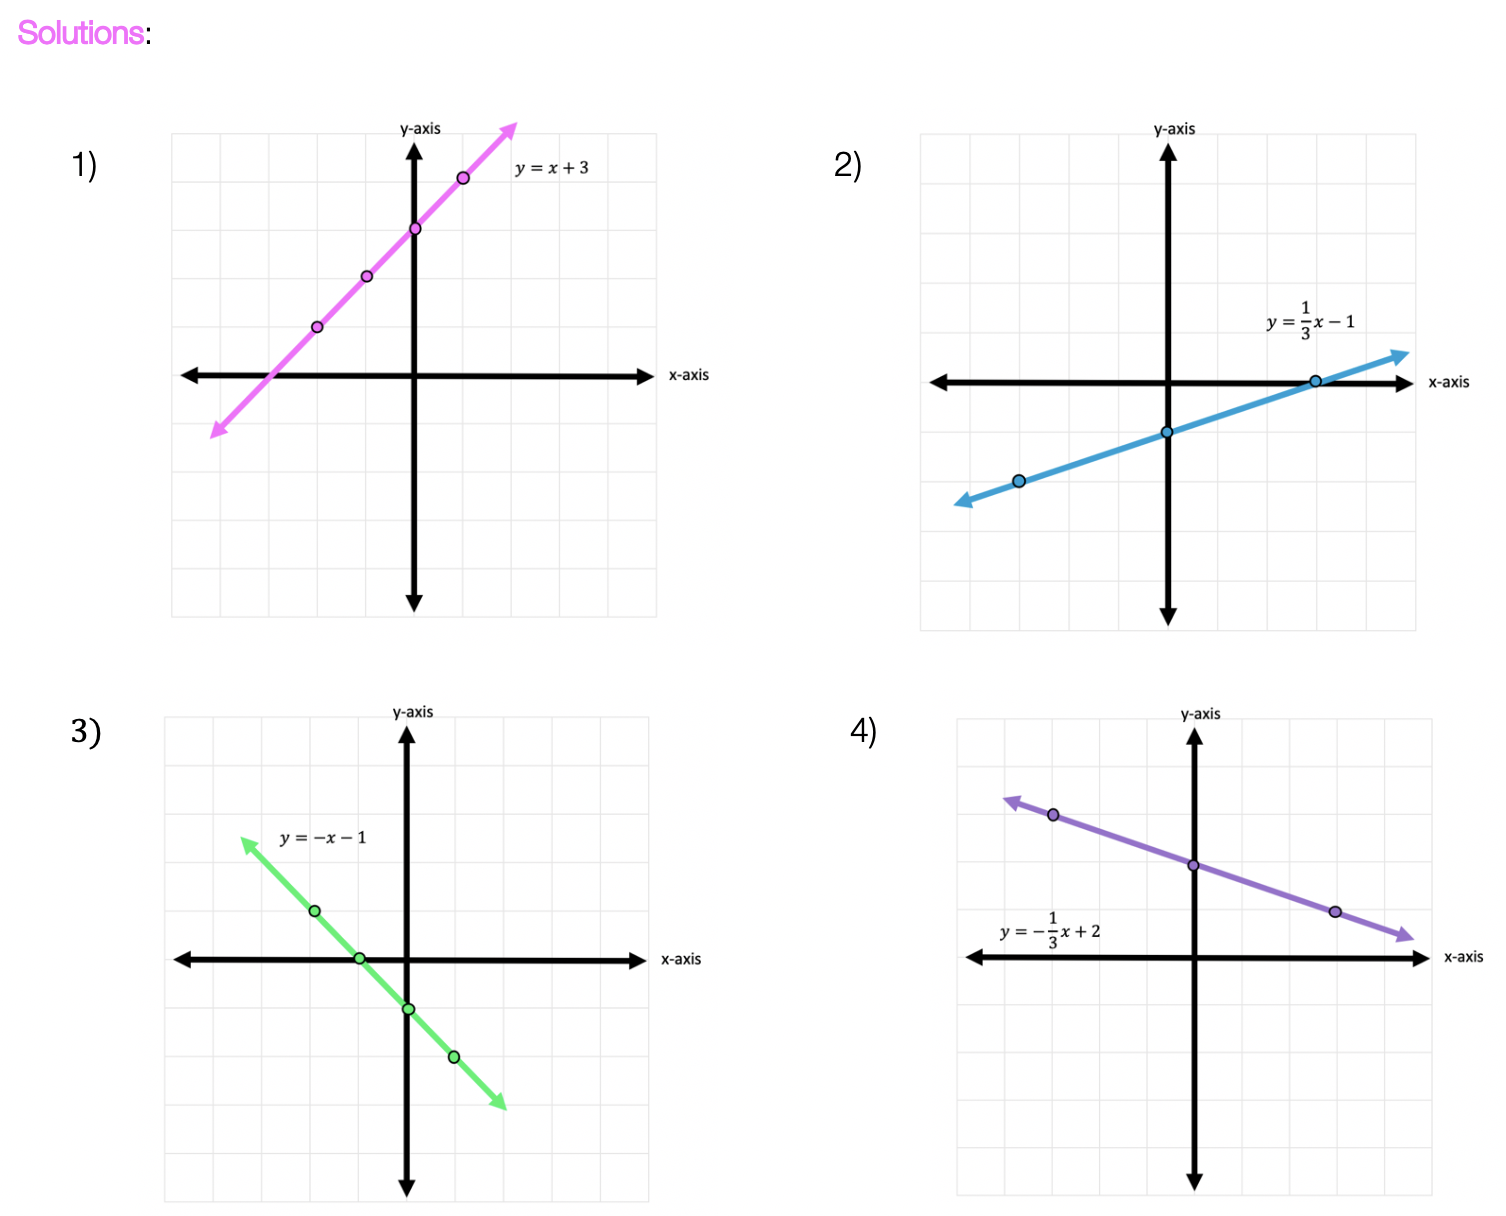
Solutions:
Need more of an explanation? Check out the video that goes over these types of questions up on Youtube (video at top of post) and let me know if you have still any questions.
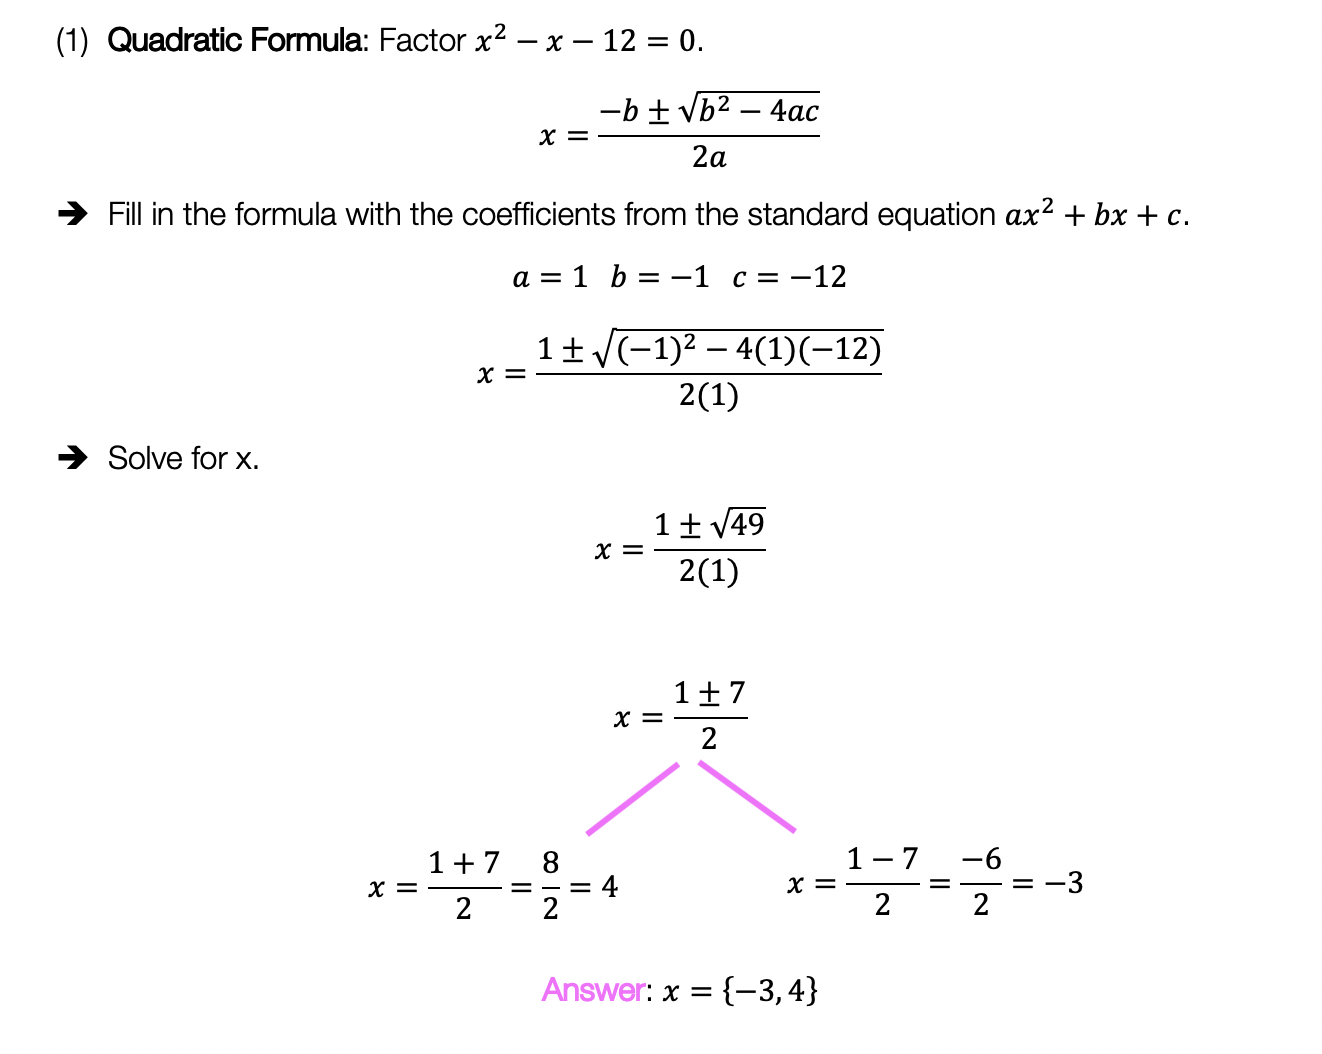
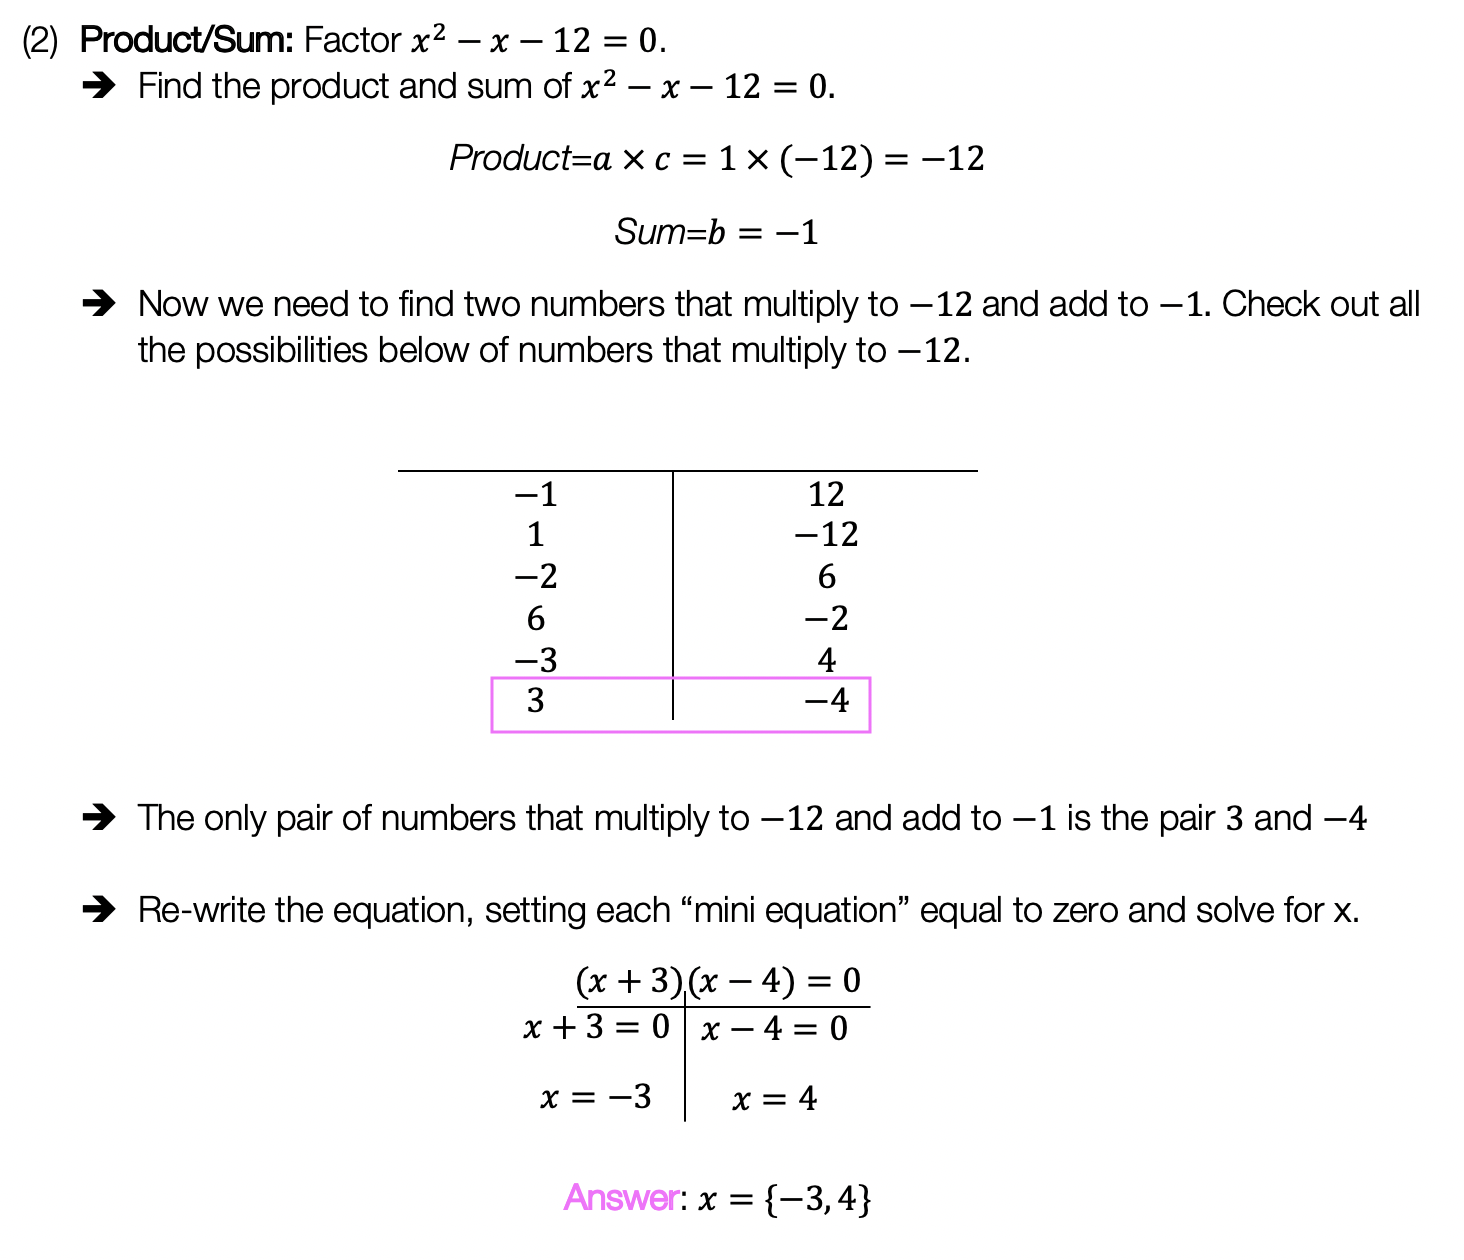
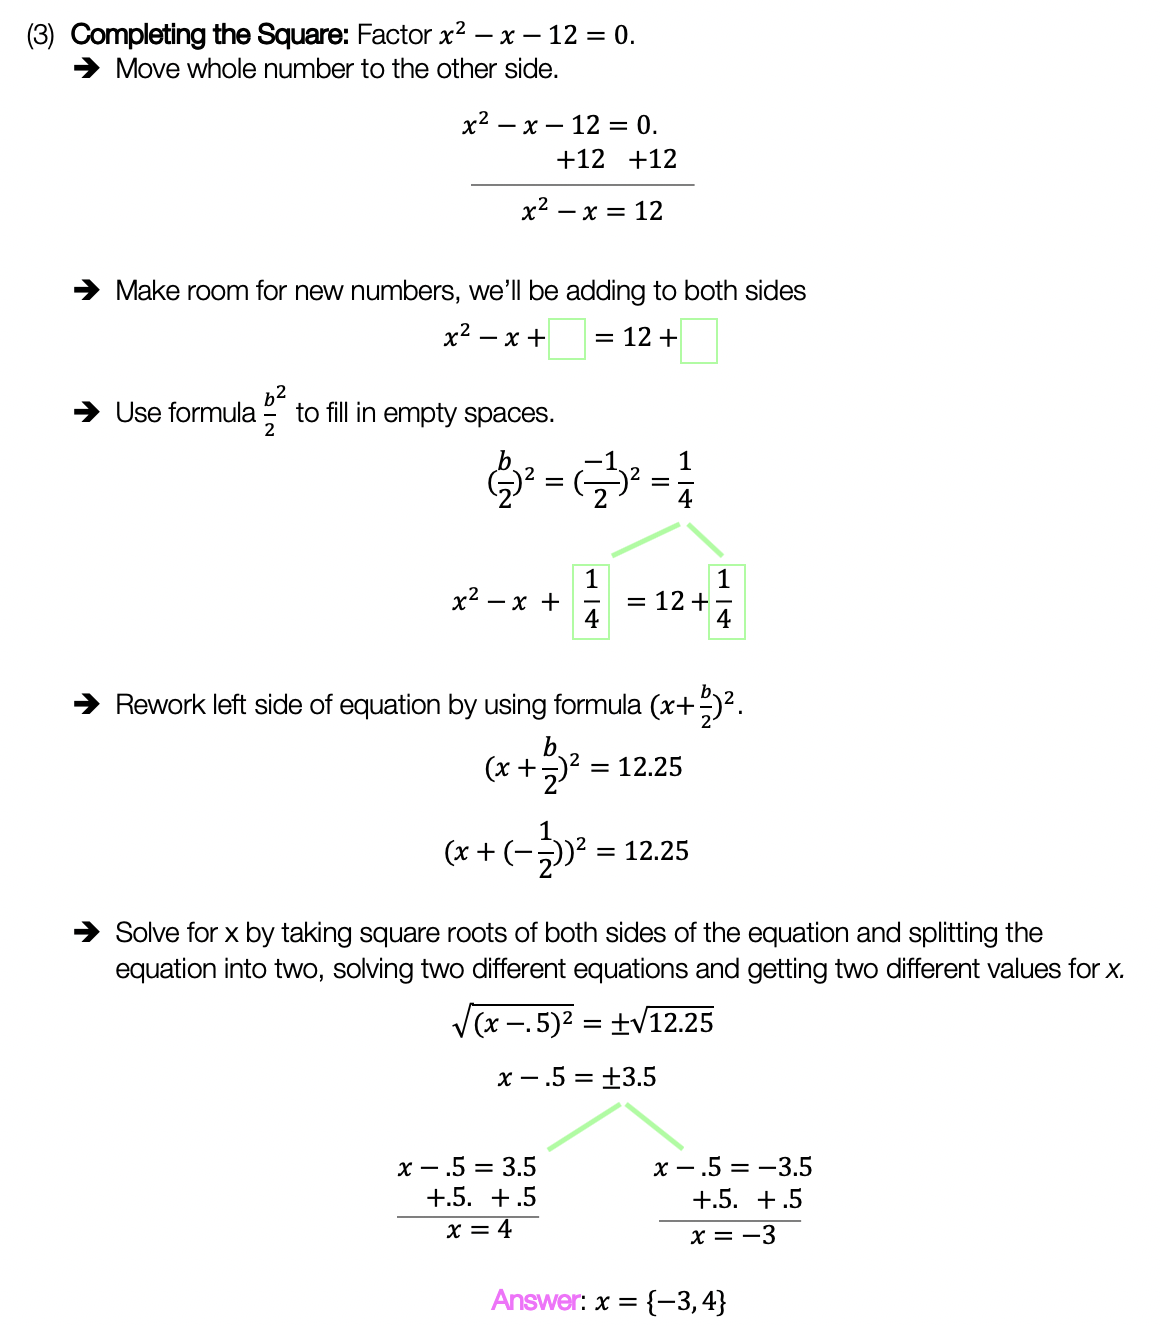
Greeting math peeps and welcome to MathSux! In this post, we are going to go over 4 ways to Factor Trinomials and get the same answer, including, (1) Quadratic Formula (2) Product/Sum, (3) Completing the Square, and (4) Graphing on a Calculator. If you’re looking for more don’t forget to check out the video and practice questions below. Happy Calculating! 🙂
Also, if you want more Mathsux? Don’t forget to check out our Youtube channel and more below! If you have any questions, please don’t hesitate to comment below. Happy Calculating! 🙂


 Now let’s look at a slightly different example: