How to Construct an Equilateral Triangle?: Geometry

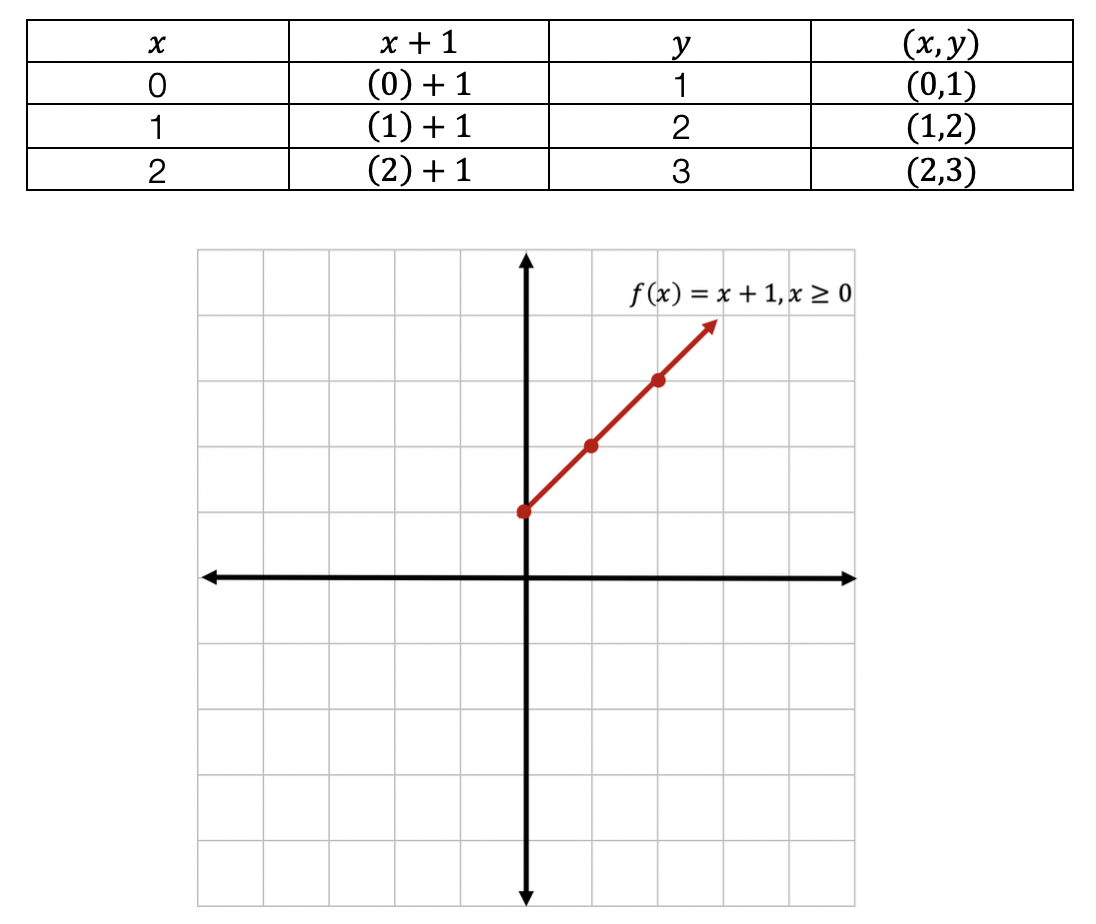
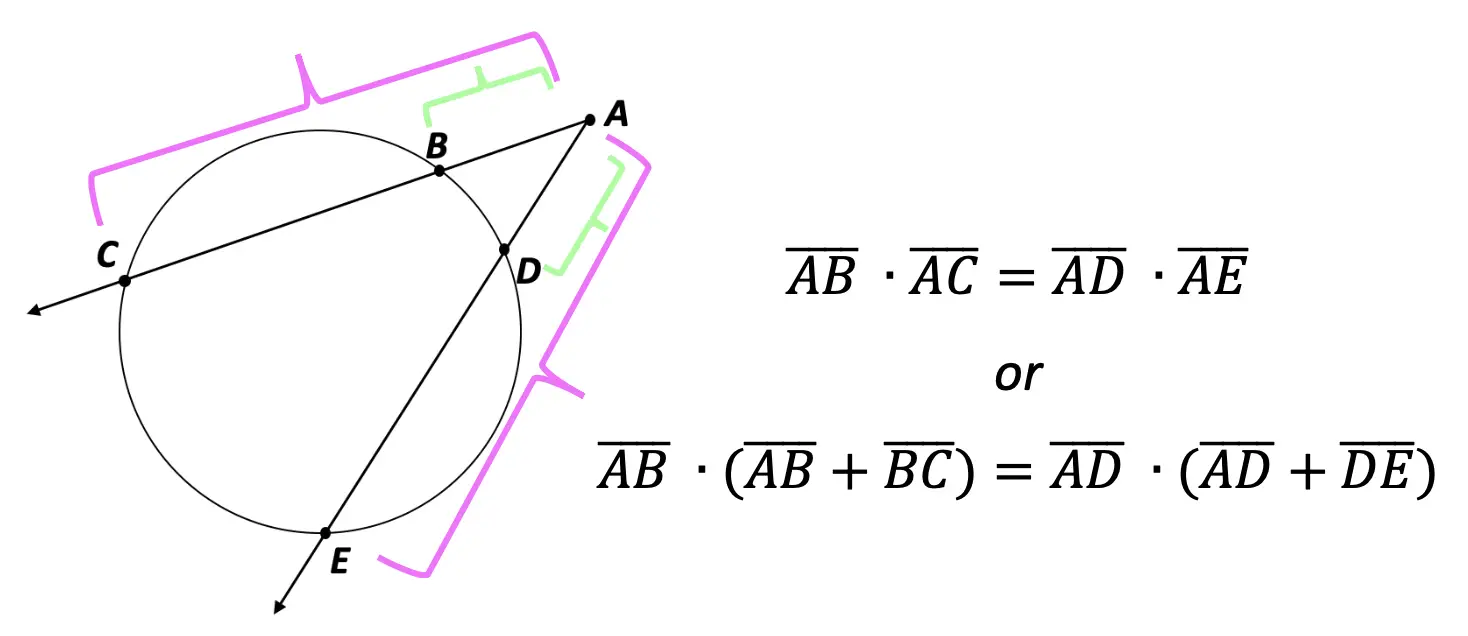
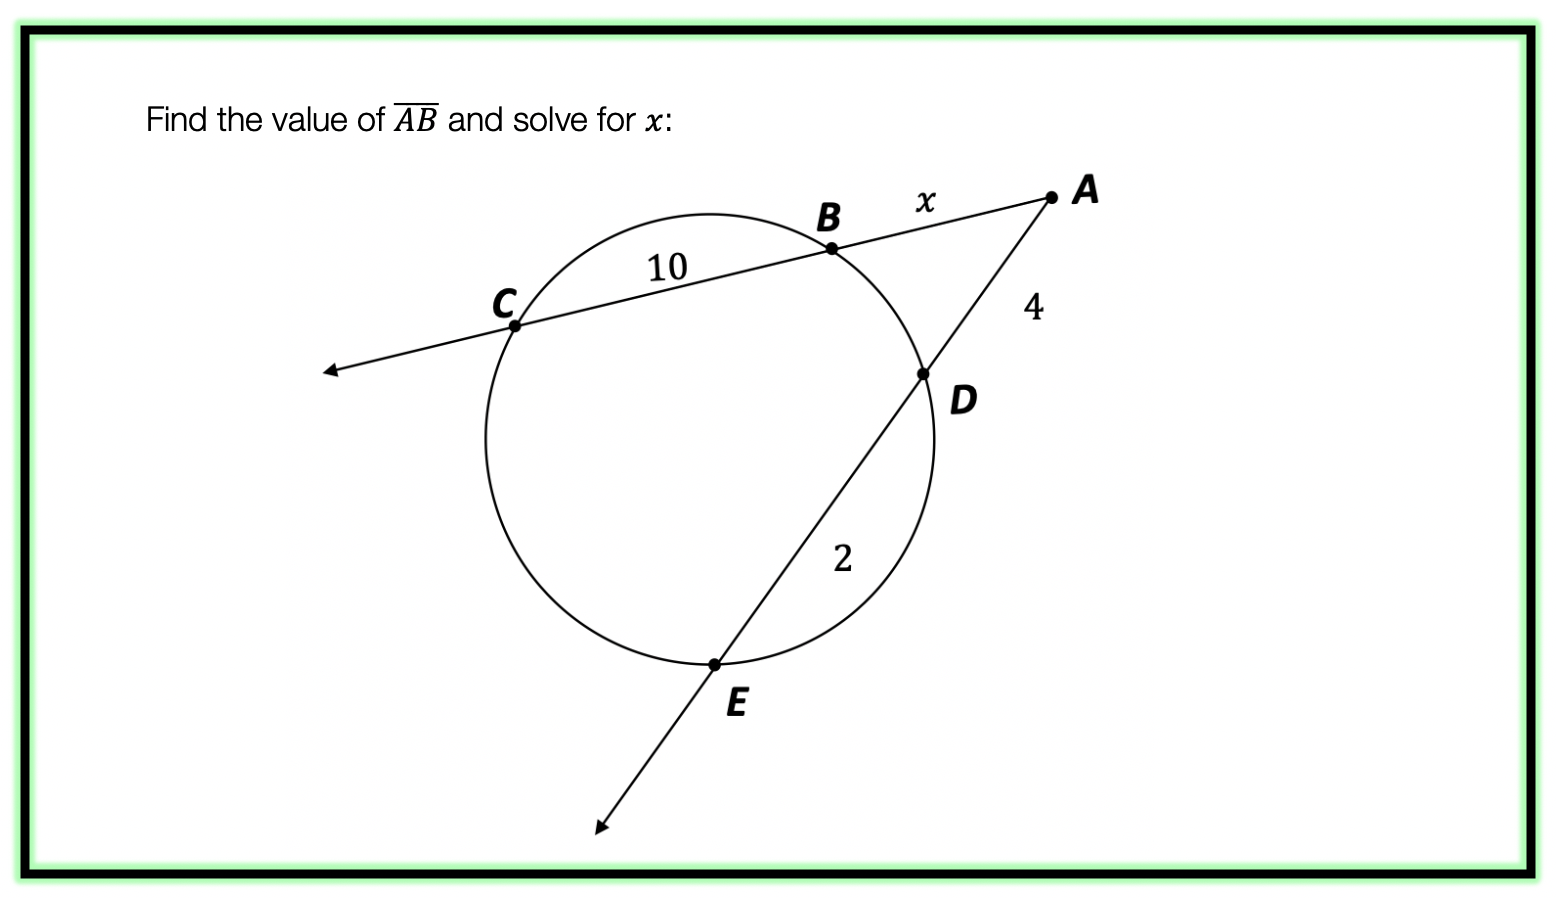
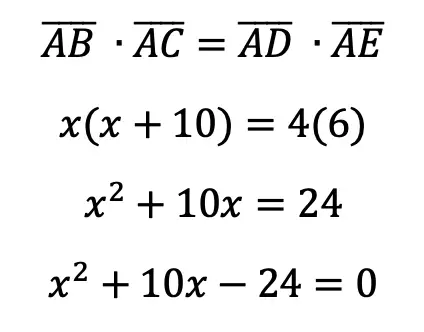
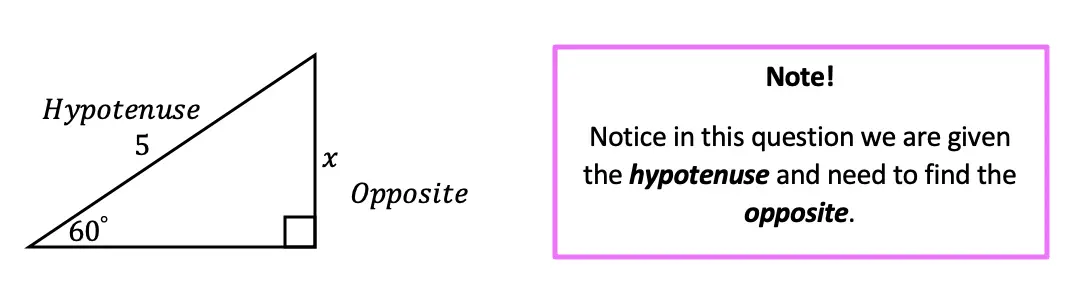
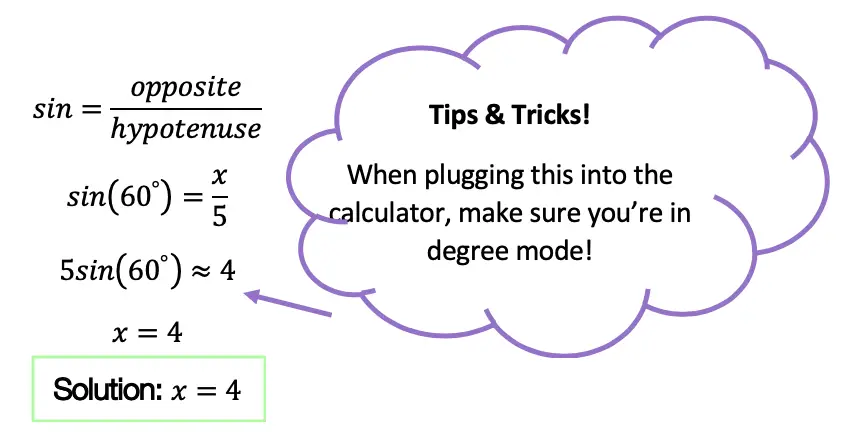
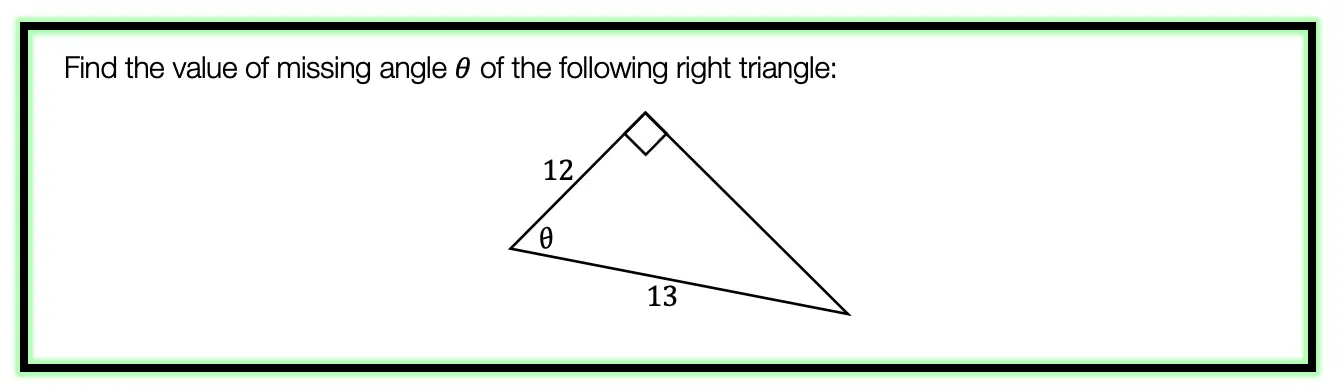
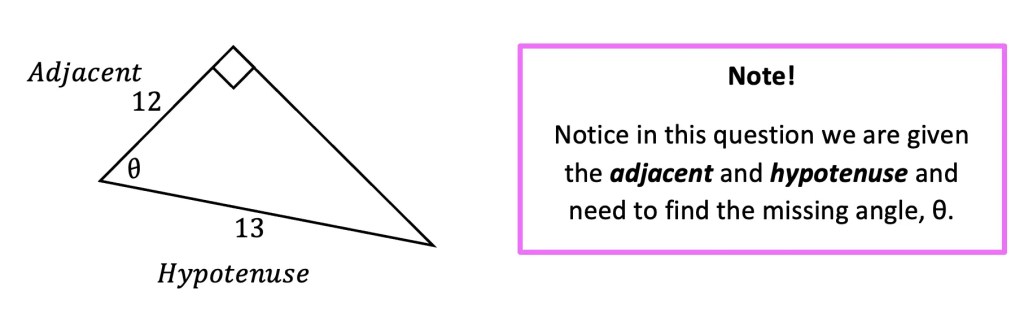
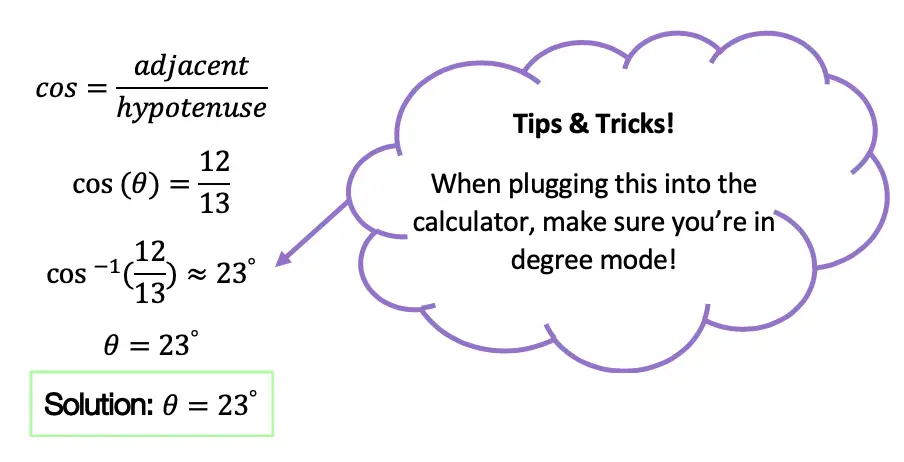
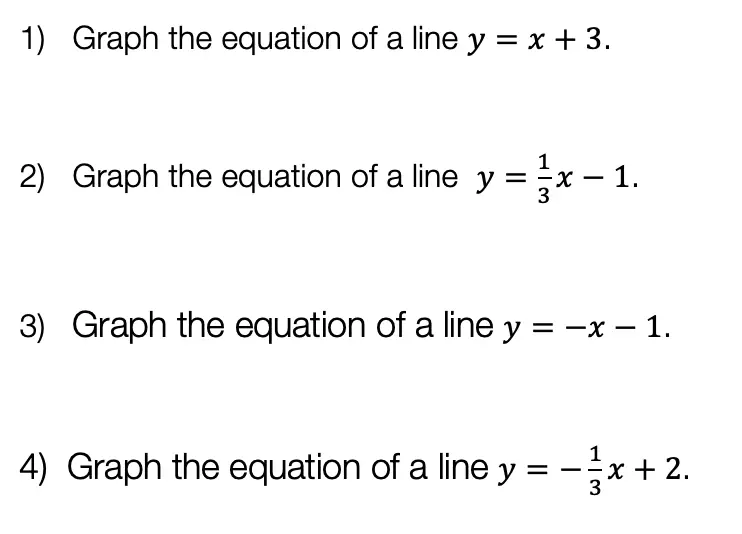
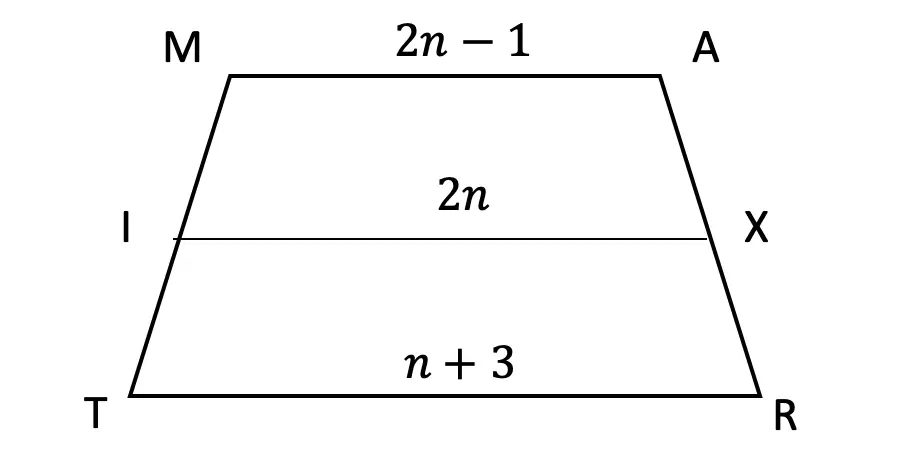
Happy Wednesday math peeps! This post introduces constructions by showing us how to construct an equilateral triangle by using a compass and straightedge (or ruler). For anyone new to constructions in geometry, this is the perfect topic for art aficionados since there is more drawing here than there is actual math!

What is an Equilateral Triangle?

Equilateral Triangle: An equilateral triangle is a triangle with three equal sides.  Not an easy one to forget, the equilateral triangle is super easy to construct given the right tools (compass+ straightedge). Take a look below:

equilateral triangle
equal sides
Equilateral Triangle: Triangle with all equal sides

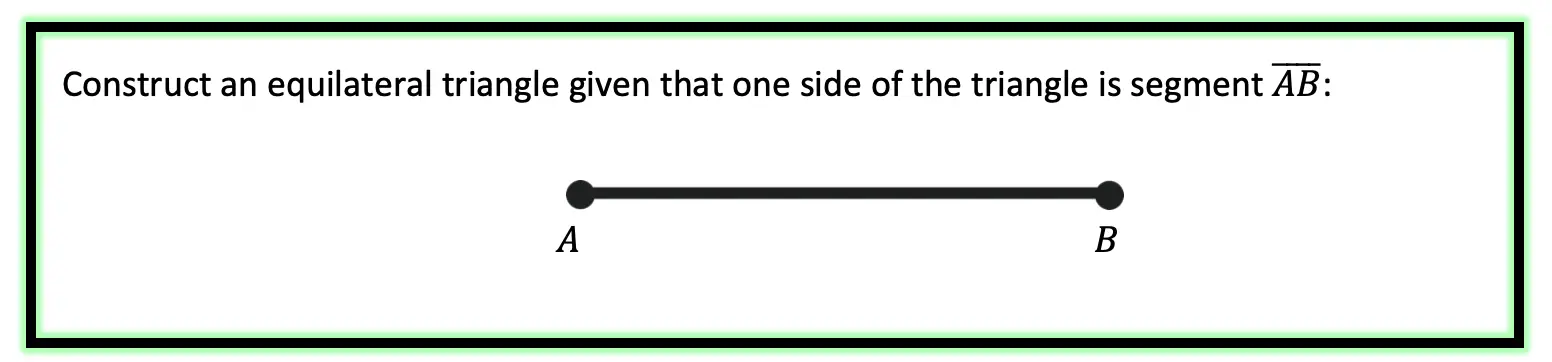
Construct an Equilateral Triangle Example:

equilateral triangle
line segment ab

Check out the GIF below to see how to construct an equilateral triangle step by step using a compass and straightedge with pictures and explanations below!

Solution:

How to Construct an Equilateral Triangle b c

What’s Happening in this GIF? 

1. Using a compass, we measure the distance of line segment Screen Shot 2020-08-25 at 4.19.02 PM.

 2. With the compass point remaining on point A, we then draw an arc that has the same distance as line segment Screen Shot 2020-08-25 at 4.19.02 PM.

 3. With the compass now placed on point B, draw an arc that has the same distance as line segment Screen Shot 2020-08-25 at 4.19.02 PM.

4. Notice where the arcs intersect? Using a ruler, connect points A and B to the new intersection point. This will create two new equal sides of our triangle!

5. We have now officially constructed a triangle with all equal side lengths!

Constructions and Related Posts:

Looking to construct more than just an equilateral triangle? Check out these related posts on geometry constructions!

Construct a Perpendicular Bisector

Perpendicular Line through a Point

Angle Bisector

Construct a 45º angle

Altitudes of a Triangle (Acute, Obtuse, Right)

Construct a Square inscribed in a Circle

Best Geometry Tools!

Looking to get the best construction tools? Any compass and straight-edge will do the trick, but personally, I prefer to use my favorite mini math toolbox from Staedler. Stadler has a geometry math set that comes with a mini ruler, compass, protractor, and eraser in a nice travel-sized pack that is perfect for students on the go and for keeping everything organized….did I mention it’s only $7.99 on Amazon?! This is the same set I use for every construction video in this post. Check out the link below and let me know what you think!

Still got questions? No problem! Don’t hesitate to comment with any questions. Happy calculating! 🙂

Facebook ~ Twitter ~ TikTok ~ Youtube

Looking to learn more about triangles? Check out this post on right triangle trigonometry here! And if you’re looking for even more geometry constructions, check out the link here!

Reflections: Geometry

Greetings and welcome to Mathsux! Today we are going to go over reflections geometry, one of the many types of transformations that come up in geometry. And thankfully, reflection transformation is one of the easiest types to master, especially if you’re more of a visual learner/artistic type person. In this post, we will go over a reflection across the line x=-2, but if you want to see a reflection across the x axis, the y axis, and the line y=x, please check out the math video below! So let’s get to it! And if you’re new to transformations, check out translations here.

What are Reflections?

A Reflection on a coordinate plane is exactly what you think! A reflection is a type of transformation in geometry where we reflect a point, a line segment, or a shape over a line to create a mirror image of itself.  Think of the wings of a butterfly, a page being folded in half, or anywhere else where there is perfect symmetry, each of these are great examples of a reflection!

Reflection Rules:

reflections geometry

If you are completely new to reflections, you may want to check out the video above that goes into deriving reflection rules over the different axis. But for those of you more comfortable with reflection, check out the example below where we reflect the image of a triangle onto itself over the line x=-2.

Example:

Screen Shot 2020-08-04 at 5.19.40 PM

Step 1: First, let’s draw in line x=-2. Note that whenever we have x equal to a number, we end up drawing a vertical line at that point on the x axis, in this case at x=-2.

reflections

Step 2: Find the distance each point is from the line x=-2 and reflect it on the other side, measuring the same distance.

First, let’s look at point C, notice it’s 1 unit away from the line x=-2 on the right. To reflect point c, we are going to count 1 unit but this time to the left of the line x=-2 and label our new point, C|.

reflections

Step 3: Now we are going to reflect coordinate point A in much the same way! Notice that point A is 2 units away on the left of line x=-2, we then want to measure 2 units to the right of our line x=-2 and mark our new coordinate point, A|.

reflections

Step 4: Lastly, we want to reflect coordinate point B. This time, point B is 1 unit away on the right side of the line x=-2, we then measure 1 unit to the opposite direction of our line, x=-2, and mark our new point, B|.

reflections

Step 5: Now that we have all the newly reflected coordinate points of our triangle, finally, we can now connect them all, for our fully reflected image of right triangle A|B|C|.

Notice our newly reflected triangle is not just a mirror image of itself, but when the original figure is reflected it actually ends up overlapping onto itself!? How did this happen? That is because this our reflection line came right down the middle of our original image, triangle ABC. Shapes that reflect onto themselves are a bit tricky but not impossible, just remember to measure out the distance of each coordinate point and reflections should be a breeze!

Rigid Motion:

Reflections are a special type of transformation in geometry that maintains rigid motion, meaning when a point, line, or shape is reflected the angles, and line segments retain their value. For example, if we were to measure the area of both right triangles, before and after reflection, we would find the areas to remain unchanged. Meaning the area of triangle ABC is equal to the area of triangle A|B|C| . Another rigid transformation includes rotations and translations.

Looking to practice your new reflection skills? Try the reflection practice problems below, with solutions to each question, to truly master the topic! Happy calculating!

Practice Questions:

reflections

Solutions:

Still got questions?  No problem! Check out the video above or comment below! There is also a bonus video if you scroll all the way down at the end of this post for anyone who wants to see how to reflect a line over the line x=2. See how it differs and how it is similar to the example shown here. Happy calculating! 🙂

Don’t forget to follow MathSux on social media for the latest tips and tricks to ace math!

Facebook ~ Twitter ~ TikTok ~ Youtube

And if you are looking for more Transformations Check out the related posts below and let me know if you have any questions? Or maybe you just want to share your favorite type of transformation? Either way, happy calculating!

Translations

Dilations

Rotation

Piecewise Functions: Algebra

Greetings, today’s post is for those in need of a piecewise functions review!  This will cover how to graph each part of that oh so intimidating piecewise functions.  There’s x’s, there are commas, there are inequalities, oh my! We’ll figure out what’s going on here and graph each part of the piecewise-function one step at a time.  Then check yourself with the practice questions at the end of this post. Happy calculating! 🙂

piecewise functions

What are Piece-Wise Functions?

Exactly what they sound like! A function that has multiple pieces or parts of a function.  Notice our function below has different pieces/parts to it.  There are different lines within, each with their own domain.

Now let’s look again at how to solve our example, solving step by step:

piecewise functions example
Screen Shot 2020-07-21 at 10.02.41 AM
piecewise functions

Translation: We are going to graph the line f(x)=x+1 for the domain where x > 0

To make sure all our x-values are greater than or equal to zero, we create a table plugging in x-values greater than or equal to zero into the first part of our function, x+1.  Then plot the coordinate points x and y on our graph.

Screen Shot 2020-07-21 at 10.04.33 AM
Screen Shot 2020-07-21 at 10.05.00 AM.png
Screen Shot 2020-07-21 at 10.06.46 AM

Translation: We are going to graph the line  f(x)=x-3 for the domain where x < 0.

To make sure all our x-values are less than zero, let’s create a table plugging in negative x-values values leading up to zero into the second part of our function, x-3.  Then plot the coordinate points x and y on our graph.

piecewise functions
Screen Shot 2020-07-21 at 10.07.57 AM

Ready to try the practice problems below on your own!?

Practice Questions:

Graph each piecewise function:

piecewise functions examples

Solutions:

piecewise functions examples

Still got questions?  No problem! Check out the video above or comment below for any questions. Happy calculating! 🙂

Facebook ~ Twitter ~ TikTok ~ Youtube

***Bonus! Want to test yourself with a similar NYS Regents question on piecewise functions?  Click here.

Intersecting Secants Theorem: Geometry

Ahoy! Today we’re going to cover the Intersecting Secants Theorem!  If you forgot what a secant is in the first place, don’t worry because all it is a line that goes through a circle.  Not so scary right? I was never scared of lines that go through circles before, no reason to start now.

If you have any questions about anything here, don’t hesitate to comment below and check out my video for more of an explanation. Stay positive math peeps and happy calculating! 🙂

Wait, what are Secants?

Screen Shot 2020-07-14 at 10.07.54 PM

Intersecting Secants Theorem: When secants intersect an amazing thing happens! Their line segments are in proportion, meaning we can use something called the Intersecting Secants Theorem to find missing line segments.  Check it out below: 

Intersecting Secants Theorem

Let’s now see how we can apply the intersecting Secants Theorem to find missing length.

Screen Shot 2020-07-14 at 10.45.29 PM.png

Step 1: First, let’s write our formula for Intersecting Secants.

Intersecting Secants Theorem

Step 2: Now fill in our formulas with the given values and simplify.

Intersecting Secants Theorem

Step 3: All we have to do now is solve for x! I use the product.sum method here, but choose the factoring method that best works for you!

Intersecting Secants Theorem

Step 4: Since we have to reject one of our answers, that leaves us with our one and only solution x=2.

Screen Shot 2020-07-14 at 10.14.41 PM.png

Ready to try the practice problems below on your own!?

Practice Questions: Find the value of the missing line segments x.

Intersecting Secants Theorem

Solutions:

Screen Shot 2020-07-20 at 9.30.55 AM.png

Still got questions?  No problem! Check out the video above or comment below for any questions and follow for the latest MathSux posts. Happy calculating! 🙂

Facebook ~ Twitter ~ TikTok ~ Youtube

To review a similar NYS Regents question check out this post here.

Circle Theorems & Formulas

Central Angle Theorem

Inscribed Angles & Intercepted Arcs

Area of a Sector

Circle Theorems

How to use SOH CAH TOA: Geometry

Greeting math friends and welcome to Mathsux! In this post, we are going to start with the very basics of trigonometry by going over how to find a missing angle and/or side length of right triangles while using the famous trigonometric function sine, cosine, or tangent, (aka how to use SOH CAH TOA).  Woo hoo! These are the basics of right triangle trigonometry, and provide the base for mastering so many more interesting things to come in trigonometry! So, let’s get to it!

SOH CAH TOA is an acronym that stands for the following trig functions and parts of a right triangle. We’ll explain more in this post!

SOH CAH TOA

Sin =
Opposite/Hypotenuse
Cosine=
Adjacent/Hypotenuse
Tangent=
Opposite/Adjacent
Note that SOH CAH TOA works on right triangles only!

Also, if you have any questions about anything here, don’t hesitate to comment below or watch the video below. Also, don’t forget to subscribe to MathSux for FREE math videos, lessons, and practice questions every week. Happy calculating! 🙂

What does SOH CAH TOA stand for?

A Trigonometric Ratio, more commonly known as Sine, Cosine, and Tangent, are trig ratios that naturally exist within a right triangle.  This means that the sides and angles of a right triangle are in proportion within itself.  It also means that if we are missing a side or an angle of a right triangle, based on what we’re given, we can figure out what the value of the sides or angles are, based on these ratios!

Let’s take a look at what Sine, Cosine, and Tangent are all about!

How to use SOH CAH TOA

Ready for your first right angled triangle example? Check it out below!

SOH CAH TOA Example #1:

Screen Shot 2020-07-04 at 5.04.02 PM

Now let’s see how we can apply trig ratios when there is a missing side or angle in a right triangle!

Step 1: First, let’s identify the different sides of our right triangle depending on which angle we are focusing on, which in this case is a 60º angle. Based on the locations of our angle, we can label each side as the hypotenuse, adjacent, or the opposite.

Notice below, that the opposite side labeled x, is labeled the “opposite” side because it is opposite to our given angle, 60º. The remaining side is considered the adjacent side of our triangle because it is directly next to our given angle, 60º.

How to use SOH CAH TOA

Step 2: Now, let’s write out SOH CAH TOA. Notice the only trig function that uses both the hypotenuse and the opposite is sine! Knowing to use the sine function, let’s fill in our formula using the hypotenuse = 5 and opposite = x in order to find the value for missing side length x.

In order to use the sin function correctly, we’re going to need to plug in our given angle, which is 60º, and then set up our proportion. sin(60º)=x/5. By using the sine function, our calculator, and a little bit of algebra we’ll be able to solve for the unknown side.

How to use SOH CAH TOA

Ready for another example?! Check out another SOH CAH TOA problem using right triangles below!

Right Triangle Trig Example #2:

Screen Shot 2020-07-04 at 5.05.01 PM.png

Step 1: First, let’s identify the different parts of the right triangle we are given (the hypotenuse, adjacent, and the opposite). Notice in this example, we are given the adjacent and hypotenuse and need to find the value of the unknown angle, θ.

Step 2: Next, let’s write out our acronym, SOH CAH TOA, to see which trig function can help us with our question! Notice the only trig function that uses both adjacent and hypotenuse is cosine. This is what we will use to solve for the unknown angle, θ.

We use cosine, by setting up our proportion, cos(θ)=adjacent/ hypotenuse, knowing we can then plug in 12 for our adjacent value, and 13 for our hypotenuse value.

How to use SOH CAH TOA

Think you’re ready to test out SOH CAH TOA on your own? Try the following Practice Questions on your own!

Practice Questions:

Given the following right triangles, find the missing lengths and side angles rounding to the nearest whole number.

Solutions:

Screen Shot 2020-07-04 at 5.06.37 PM.png

Still got questions?  No problem! Check out the video the same examples outlined above and happy calculating! 🙂

Facebook ~ Twitter ~ TikTok ~ Youtube

Related Trigonometry Posts:

The Unit Circle

Basic Right Triangle Trigonometric Ratios (SOH CAH TOA)

4545 90 Special Triangles

30 60 90 Special Triangles

Graphing Trig Functions

Transforming Trig Functions

Factoring Trig Functions

Law of Cosines

Trig Identities

Law of Sines

How to Solve Log Equations: Algebra 2/Trig.

Welcome to Mathsux! Today, we’re going to go over how to solve log equations, yay! But before we get into finding x, though, we need to go over what log equations are and why we use them in the first place…..just in case you were curious!

Also, if you have any questions about anything here, don’t hesitate to comment below or shoot me an email.  Happy calculating! 🙂

What are Log Equations?

Logarithms are the inverses of exponential functions.  This means that when graphed, they are symmetrical along the line y=x.  Check it out below!

How to Solve Log Equations

When on the same set of axis, notice how the functions are symmetrical over the line y=x:

How to Solve Log Equations

We use logarithms to find the unknown values of exponents, such as the x value in the equation,.  This is a simple example, where we know the value of x is equal to 2,(Screen Shot 2020-06-24 at 9.32.30 PM.png). But what if it were to get more complicated?  That’s where logs come in!

How to Solve Log Equations?

Logarithms follow a swooping pattern that allows us to write it in exponential form, let’s take a look at some Examples below:

How to Solve Log Equations

But wait there’s more! Logs have a set of Rules that makes solving log equations a breeze!

How to Solve Log Equations

We can use these rules to help us algebraically solve logarithmic equations, let’s look at an example that applies the Product Rule.

Example:

Screen Shot 2020-06-24 at 9.36.08 PM.png
Screen Shot 2020-06-24 at 9.36.50 PM
Screen Shot 2020-06-24 at 9.46.07 PM.png
Screen Shot 2020-06-24 at 9.38.32 PM

Try the following practice questions on your own!

Practice Questions:

Screen Shot 2020-06-24 at 9.39.16 PM.png

Solutions:

Screen Shot 2020-06-24 at 9.40.37 PM

Still got questions?  No problem! Check out the video that goes over the same example outlined above.  And for more info. on logarithms check out this post that goes over a NYS Regent’s question here.  Subscribe below to get the latest FREE math videos, lessons, and practice questions from MathSux. Thanks for stopping by and happy calculating! 🙂

Facebook ~ Twitter ~ TikTok ~ Youtube

****Check out this Bonus Video on How to Change Log Bases****

How to Graph Equation of a Line, y=mx+b: Algebra

Hi everyone, welcome back to Mathsux! This week we’ll be reviewing how to graph an equation of a line in y=mx+b form. And if you have not checked out the video below, please do! Happy calculating! 🙂

how to graph y=mx+b

An equation of a line can be represented by the following formula:

y=mx+b

Y-Intercept: This is represented by b, the stand-alone number in y=mx+b. This represents where the line hits the y-axis.  This is always the first point you want to start with when graphing at coordinate point (0,b).

Slope: This is represented by m, the number next to x in y=mx+b. Slope tells us how much we go up or down the y-axis and left or right on the x- axis in fraction form:

how to graph equation of a line

Now let’s check out an Example!

Graph the following:

Screen Shot 2020-06-17 at 9.10.42 PM

-> First, let’s identify the slope and y-intercept of our line.

how to graph equation of a line

-> To start, let’s graph the first point on our graph, the y-intercept at point (0,1):

how to graph equation of a line

-> Now for the slope. We are going to go up one and over to the right one for each point, since our slope is 1/1.

how to graph equation of a line

-> Connect all of our coordinate points and label our graph.

how to graph equation of a line

Try the following practice questions on your own!

Practice Questions:

how to graph equation of a line

Want more Mathsux?  Don’t forget to check out our Youtube channel and more below! And if you have any questions, please don’t hesitate to comment below. Happy Calculating! 🙂

Need to brush up on slope? Click here to see how to find the rate of change.

Facebook ~ Twitter ~ TikTok ~ Youtube

4 Ways to Factor Trinomials: Algebra

Greeting math peeps and welcome to MathSux! In this post, we are going to go over 4 ways to Factor Trinomials and get the same answer, including, (1) Quadratic Formula (2) Product/Sum, (3) Completing the Square, and (4) Graphing on a Calculator.  If you’re looking for more don’t forget to check out the video and practice questions below.  Happy Calculating! 🙂

Also, if need a review on Factor by Grouping or Difference of Two Squares (DOTS) check out the hyperlinks here!

*If you haven’t done so, check out the video that goes over this exact problem, and don’t forget to subscribe!

We will take this step by step, showing 4 ways to factor trinomials, getting the same answer each and every time! Let’s get to it!

4 Ways to Factor Trinomials

Screen Shot 2020-06-02 at 3.03.55 PM

(1) Quadratic Formula:

4 Ways to Factor Trinomials

____________________________________________________________________

(2) Product/Sum:

4 Ways to Factor Trinomials____________________________________________________________________

(3) Completing the Square:

4 Ways to Factor Trinomials____________________________________________________________________

(4) Graph:

4 Ways to Factor Trinomials

Choose the factoring method that works best for you and try the practice problems on your own below!

Practice Questions:

Screen Shot 2020-06-02 at 3.09.58 PM

Solutions:

Screen Shot 2020-06-02 at 3.10.30 PM

Want a review of all the different factoring methods out there?  Check out the ones left out here (DOTS and GCF) and happy calculating! 🙂

For even more ways to factor quadratic equations, check out How to factor by Grouping here! 🙂

Looking for more on Quadratic Equations and functions? Check out the following Related posts!

Factoring Review

Factor by Grouping

Completing the Square

The Discriminant

Is it a Function?

Imaginary and Complex Numbers

Quadratic Equations with 2 Imaginary Solutions

Focus and Directrix of a Parabola

Also, if you want more Mathsux?  Don’t forget to check out our Youtube channel and more below! If you have any questions, please don’t hesitate to comment below. Happy Calculating! 🙂

Facebook ~ Twitter ~ TikTok ~ Youtube

Median of a Trapezoid Theorem: Geometry

Hi everyone and welcome to Math Sux! In this post, we are going to look at how to use and applythe median of a trapezoid theorem. Thankfully, it is not a scary formula, and one we can easily master with a dose of algebra. The only hard part remaining, is remembering this thing! Take a look below to see a step by step tutorial on how to use the median of a trapezoid theorem and check out the practice questions at the end of this post to truly master the topic. Happy calculating! 🙂

*If you haven’t done so, check out the video that goes over this exact problem, also please don’t forget to subscribe!

Medians of a Trapezoid copy
Screen Shot 2020-06-02 at 7.31.07 AM

Step 1:  Let’s apply the Median of a Trapezoid Theorem to this question!  A little rusty?  No problem, check out the Theorem below.

Median of a Trapezoid Theorem

Median of a Trapezoid Theorem: The median of a trapezoid is equal to the sum of both bases.Step 2: Now that we found the value of x , we can plug it back into the equation for Screen Shot 2020-06-02 at 7.33.44 AMmedian,  to find the value of median Screen Shot 2020-06-02 at 7.34.25 AM

Screen Shot 2020-06-02 at 7.34.48 AM

Want more practice?  Your wish is my command! Check out the practice problems below:

Practice Questions:

Median of a Trapezoid Theorem

1.Screen Shot 2020-06-02 at 7.35.29 AMis the median of trapezoid ABCDEF, find the value of the median, given the following:2. Screen Shot 2020-06-02 at 9.01.08 AMis the median of trapezoid ACTIVE, find the value of the median, given the following:3.Screen Shot 2020-06-02 at 9.17.01 AMis the median of  trapezoid DRAGON, find the value of the median, given the following:

Median of a Trapezoid Theorem

4. Screen Shot 2020-06-02 at 9.23.08 AMis the median of trapezoid MATRIX, find the value of the median, given the following:

Solutions:

Screen Shot 2020-06-02 at 9.25.05 AM

Need more of an explanation?  Check out the detailed video and practice problems. Happy calculating! 🙂

Facebook ~ Twitter ~ TikTok ~ Youtube

Completing the Square: Algebra

Want to learn the ins and out of completing the square?  Then you’ve come to the right place! Learn how to Complete the Square step by step in the video and article below, then try the practice problems at the end of this post to truly master the topic! If you’re looking for more on completing the square, check out this post here. Happy Calculating! 🙂

Check out the video below for an in-depth look at completing the square:

Completing the square

To answer this question, there are several steps we must follow including:

Step 1: Move the whole number, which in this case is 16, to the other side of the equation.This image has an empty alt attribute; its file name is Screen-Shot-2020-12-25-at-6.07.43-PM.png

This image has an empty alt attribute; its file name is Screen-Shot-2020-12-25-at-6.08.19-PM.png

Step 2: Make space for our new number on both sides of the equation.  This number is going to be found by using a particular formula shown below:

Completing the square

Step 3: Add the number 9 to both sides of the equation, which we found using our formula.

Completing the square

Step 4: Combine like terms on the right side of the equation, adding 16+9 to get 25.

Completing the square

Step 5: Now, we need to re-write the left side of the equation using the following formula.

Completing the square

Step 6: Finally, we solve for x by taking the positive and negative square root to get the following answer and solve for two different equations:

 Completing the square

This image has an empty alt attribute; its file name is Screen-Shot-2020-12-25-at-6.29.22-PM.png

Practice Questions:

completing the square

Solutions:

completing the square

Want more Mathsux?  Don’t forget to check out our Youtube channel and more below! And if you have any questions, please don’t hesitate to comment below. Happy Calculating! 🙂

Need more of an explanation?  Check out why we complete the square in the first place here ! 🙂

Facebook ~ Twitter ~ TikTok ~ Youtube

Looking for more on Quadratic Equations and Functions? Check out the following Related posts!

Factoring Review

Factor by Grouping

Is it a Function?

The Discriminant

4 Ways to Factor Trinomials

Imaginary and Complex Numbers

Quadratic Equations with 2 Imaginary Solutions

Focus and Directrix of a Parabola