Rotations about a Point: Geometry

rotations about a point

Happy Wednesday math friends! In this post we’re going to dive into rotations about a point! In this post we will be rotating points, segments, and shapes, learn the difference between clockwise and counterclockwise rotations, derive rotation rules, and even use a protractor and ruler to find rotated points. The fun doesn’t end there though, check out the video and practice questions below for even more! And as always happy calculating! 🙂

What are Rotations?

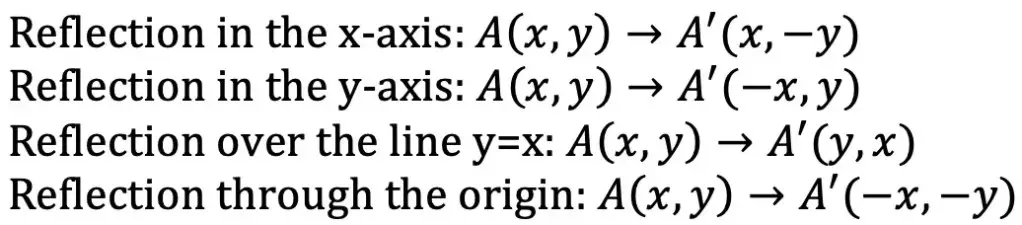
Rotations are a type of transformation in geometry where we take a point, line, or shape and rotate it clockwise or counterclockwise, usually by 90º,180º, 270º, -90º, -180º, or -270º.

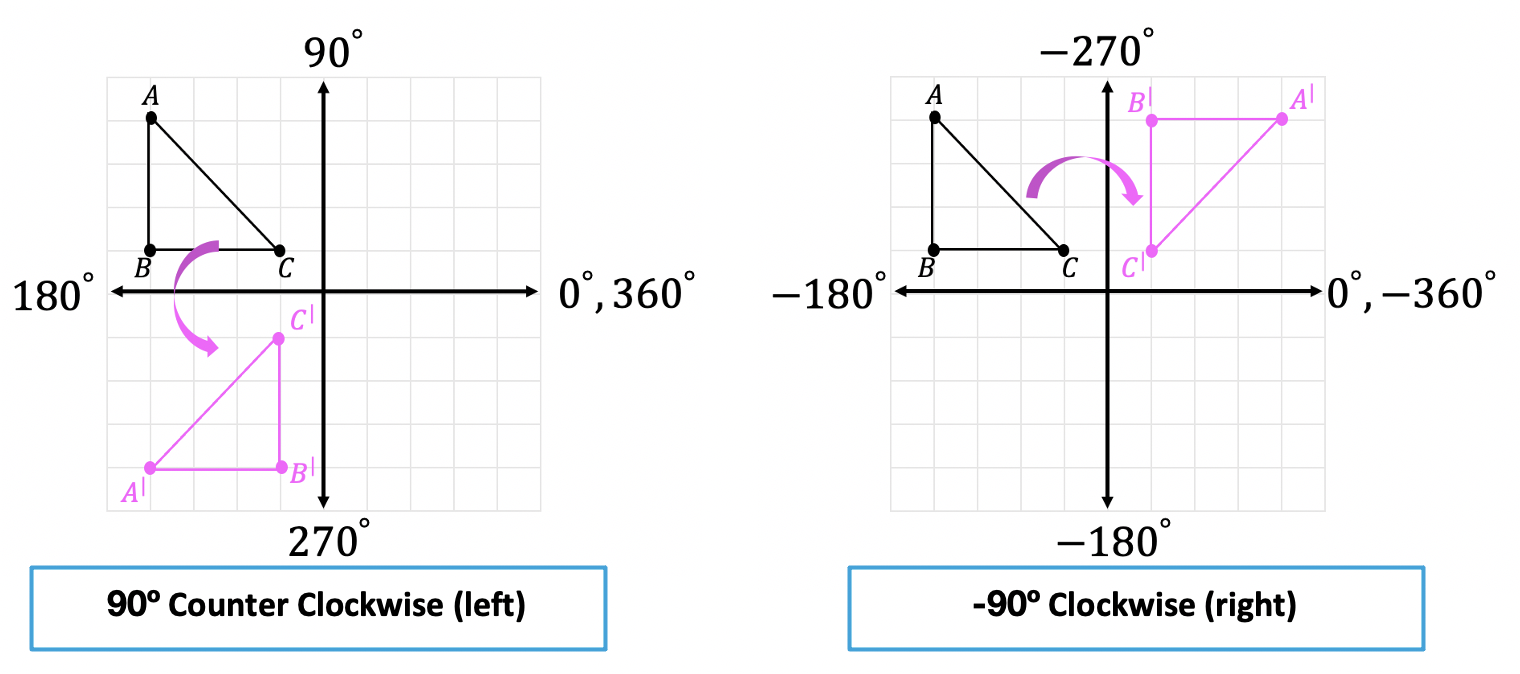
A positive degree rotation runs counter clockwise and a negative degree rotation runs clockwise.  Let’s take a look at the difference in rotation types below and notice the different directions each rotation goes:

rotations 90 degrees

How do we rotate a shape?

There are a couple of ways to do this take a look at our choices below:

  1. We can visualize the rotation or use tracing paper to map it out and rotate by hand.
  2. Use a protractor and measure out the needed rotation.
  3. Know the rotation rules mapped out below.  Yes, it’s memorizing but if you need more options check out numbers 1 and 2 above!
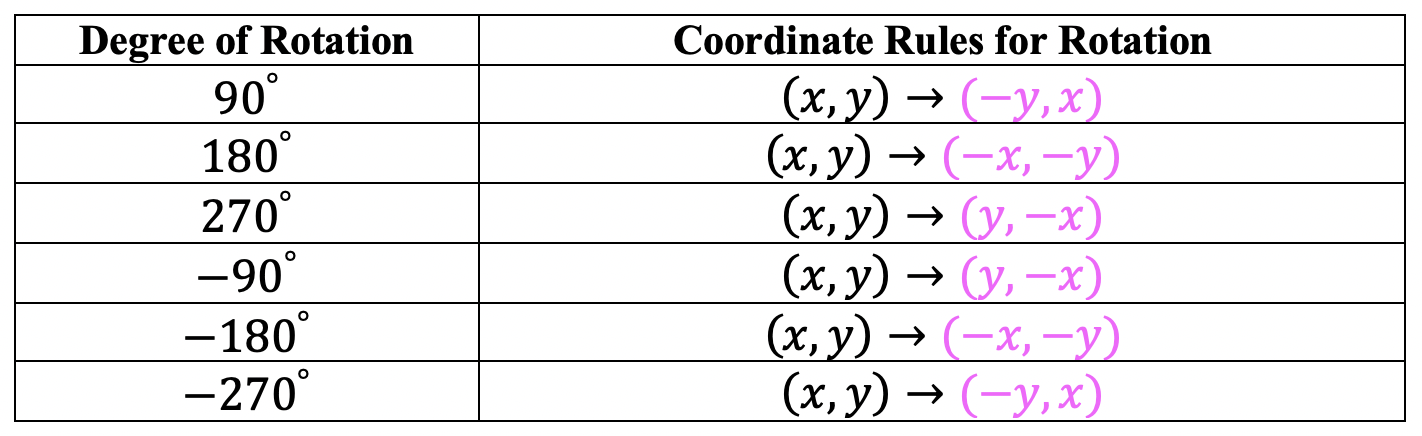
Rotation Rules:

rotations 90 degrees

Where did these rules come from?

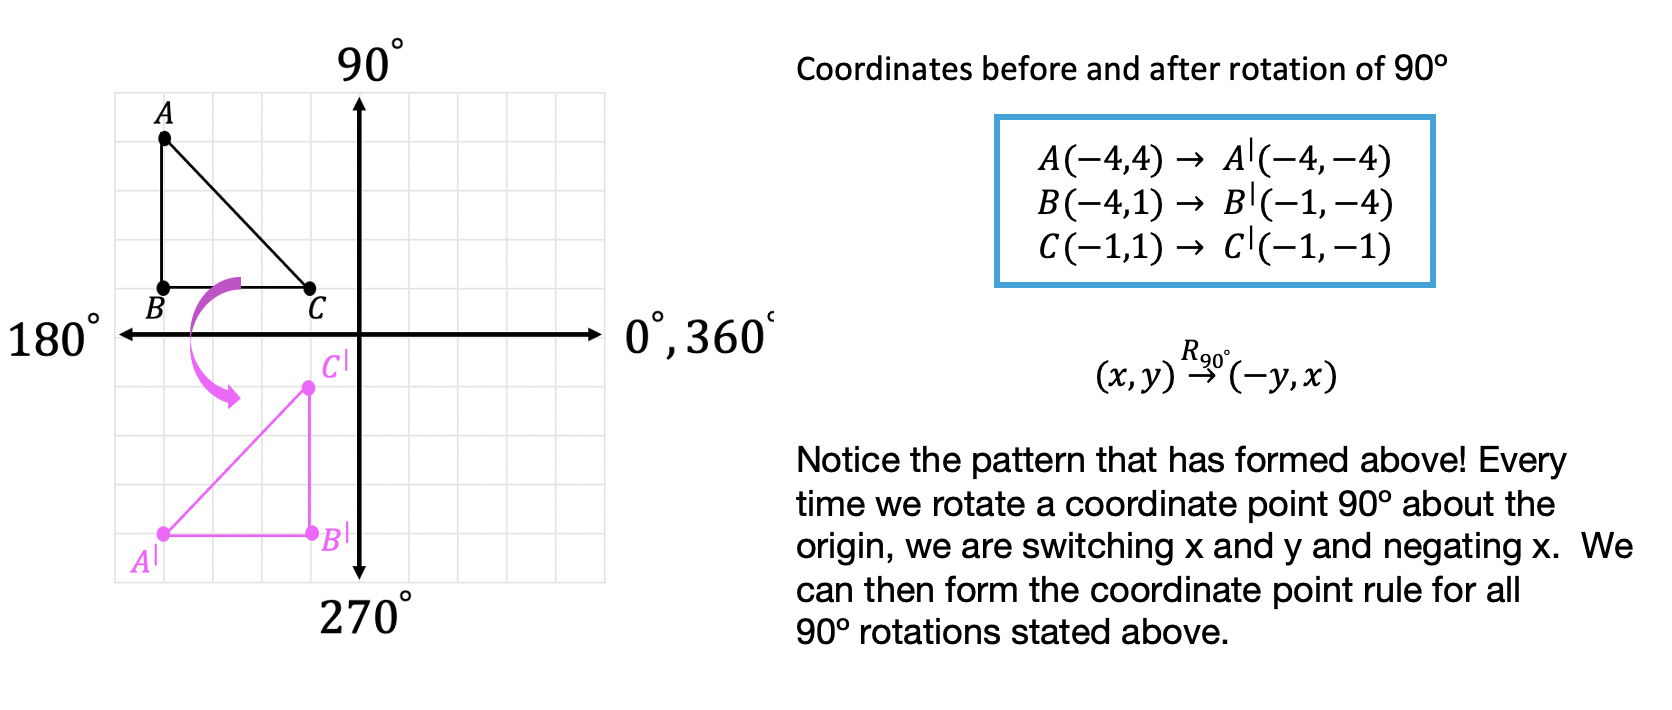
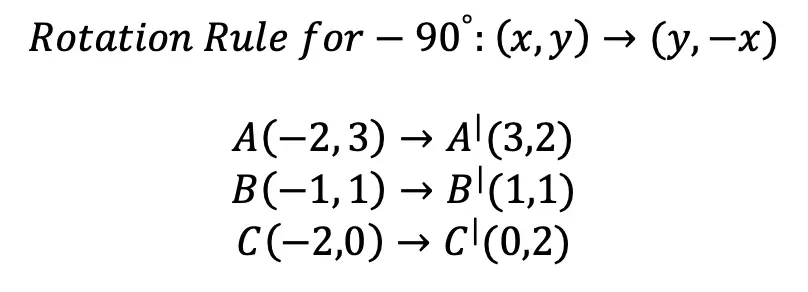
To derive our rotation rules, we can take a look at our first example, when we rotated triangle ABC 90º counterclockwise about the origin. If we compare our coordinate point for triangle ABC before and after the rotation we can see a pattern, check it out below:

rotations

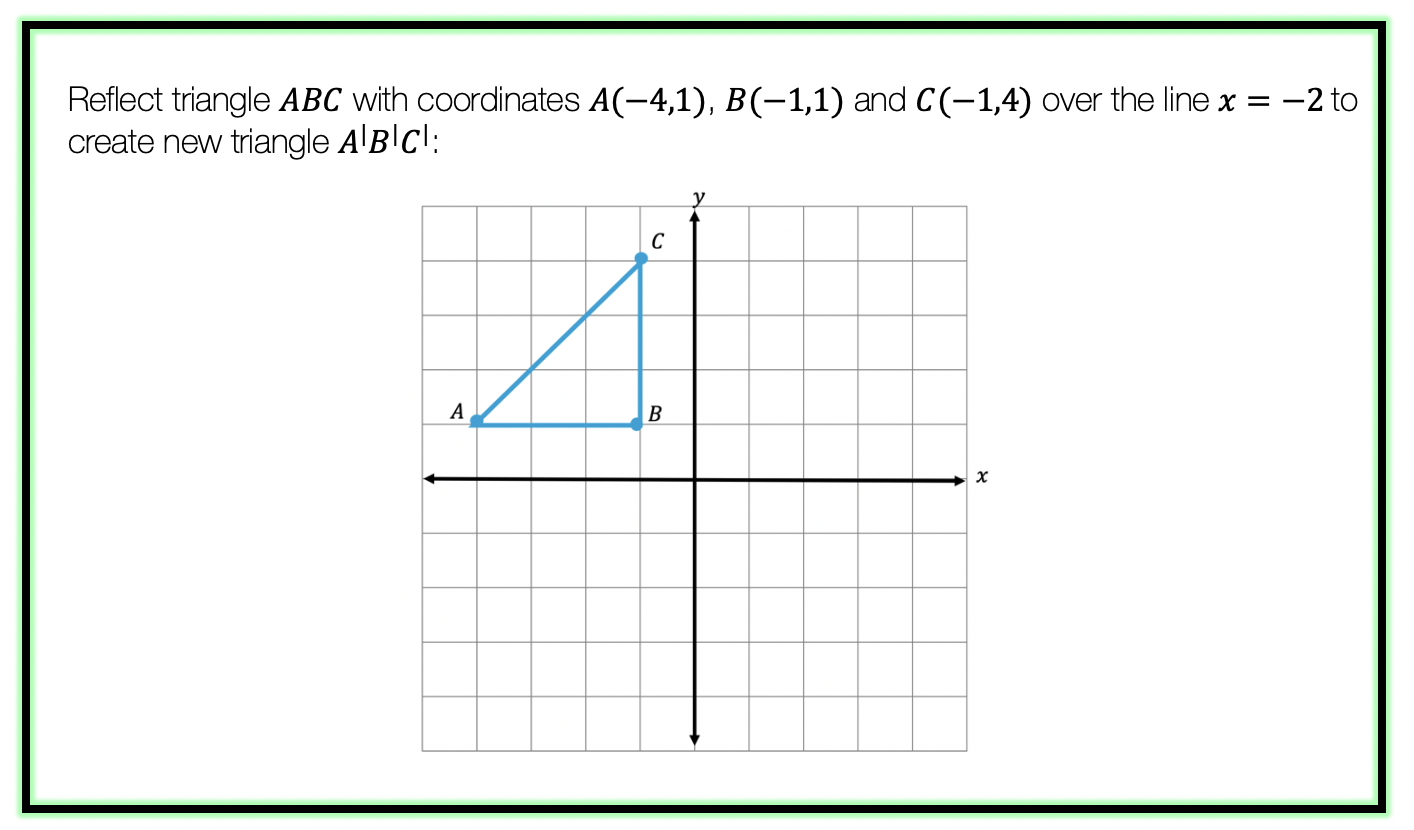
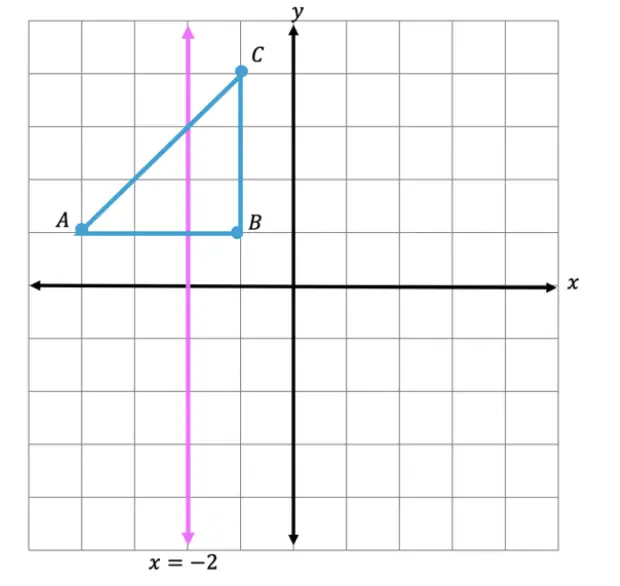
The rotation rules above only apply to those being rotated about the origin (the point (0,0)) on the coordinate plane.  But points, lines, and shapes can be rotates by any point (not just the origin)!  When that happens, we need to use our protractor and/or knowledge of rotations to help us find the answer. Let’s take a look at the Examples below:

Example #1:

rotations

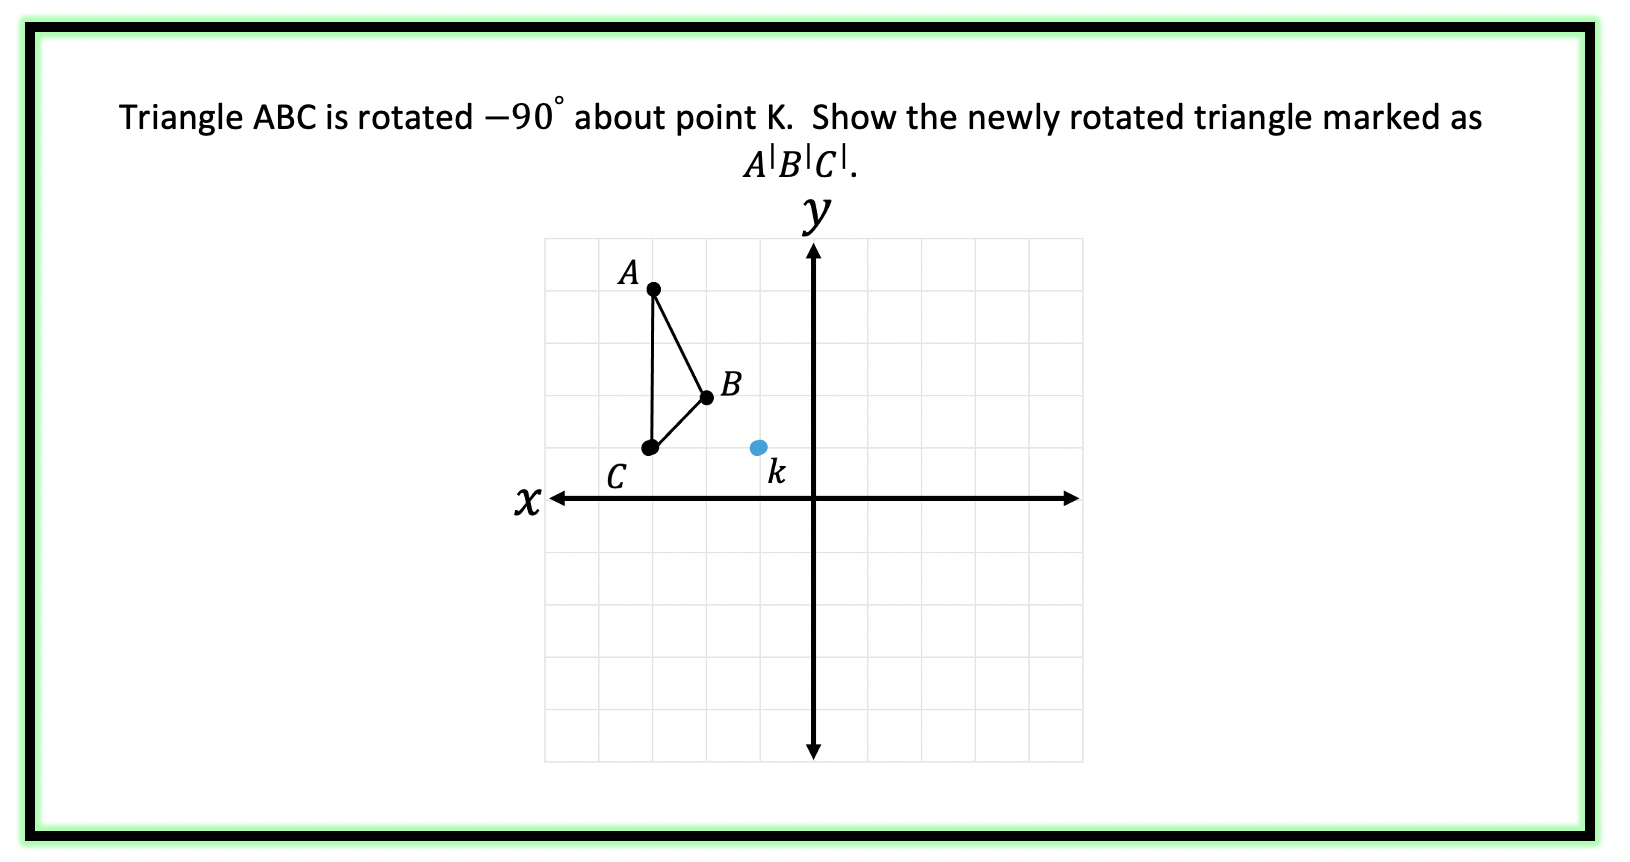
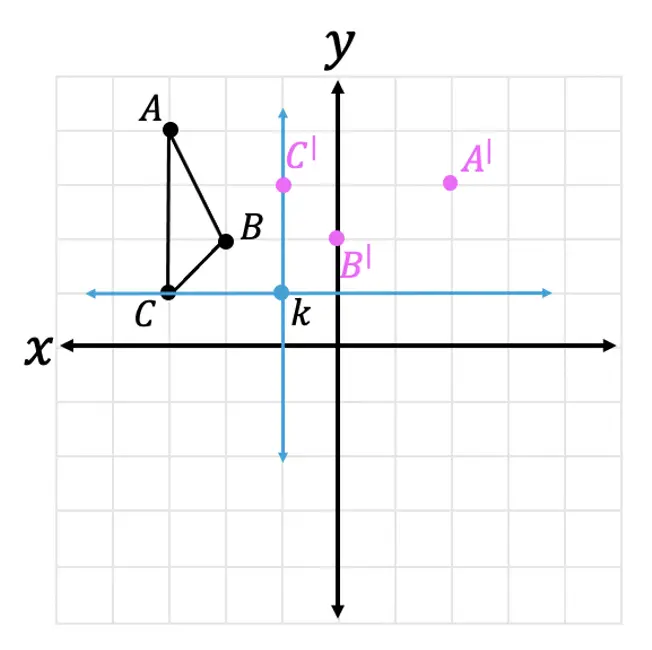
Step 1: First, let’s look at our point of rotation, notice it is not the origin we rotating about but point k!  To understand where our triangle is in relation to point k, let’s draw an x and y axes starting at this point:

rotations

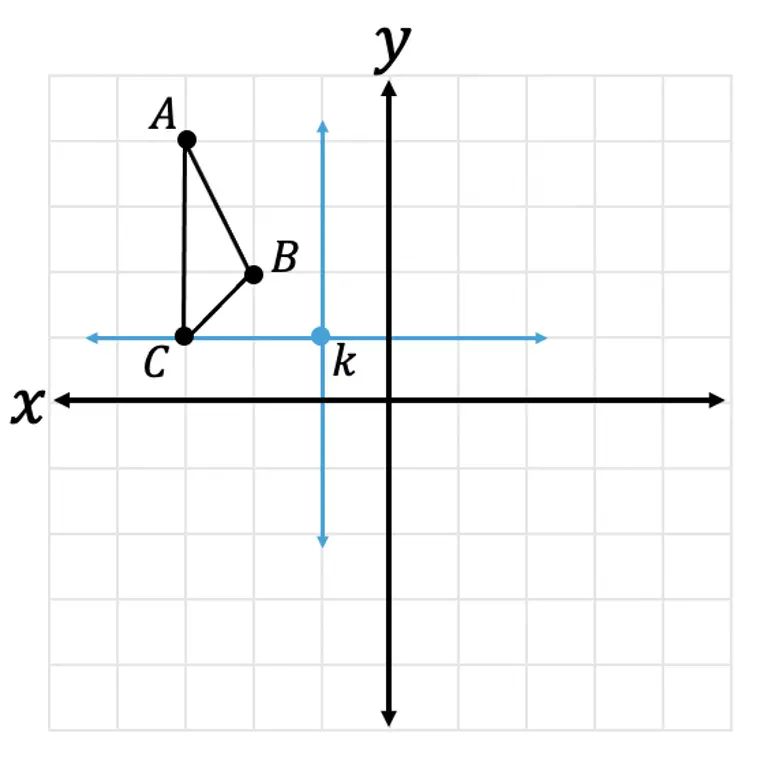
Step 2: Now let’s look at the coordinate point of our triangle, using our new axes that start at point k.

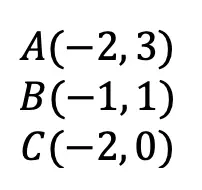
Step 2: Next, let’s take a look at our rule for rotating a coordinate -90º and apply it to our newly rotated triangles coordinates:

rotations

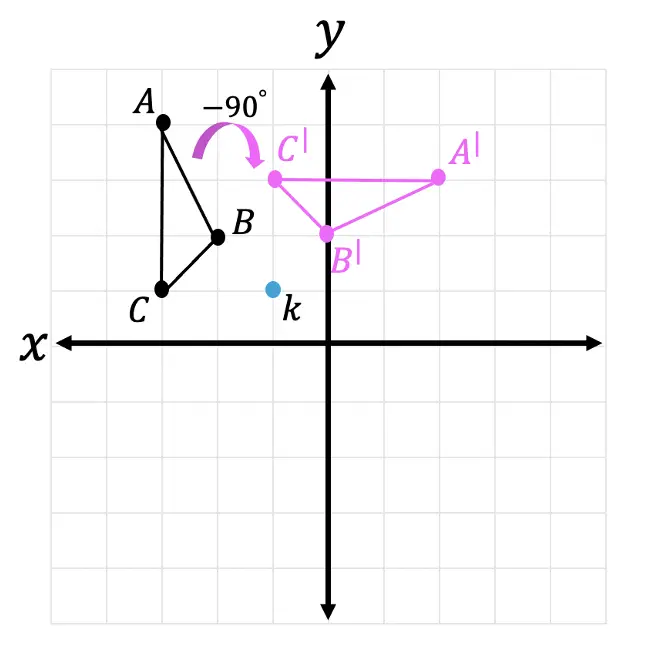
Step 3: Now let’s graph our newly found coordinate points for our new triangle .

rotations about a point

Step 4: Finally let’s connect all our new coordinates to form our solution:

rotations about a point

Another type of question with rotations, may not involve the coordinate plane at all! Let’s look at the next example:
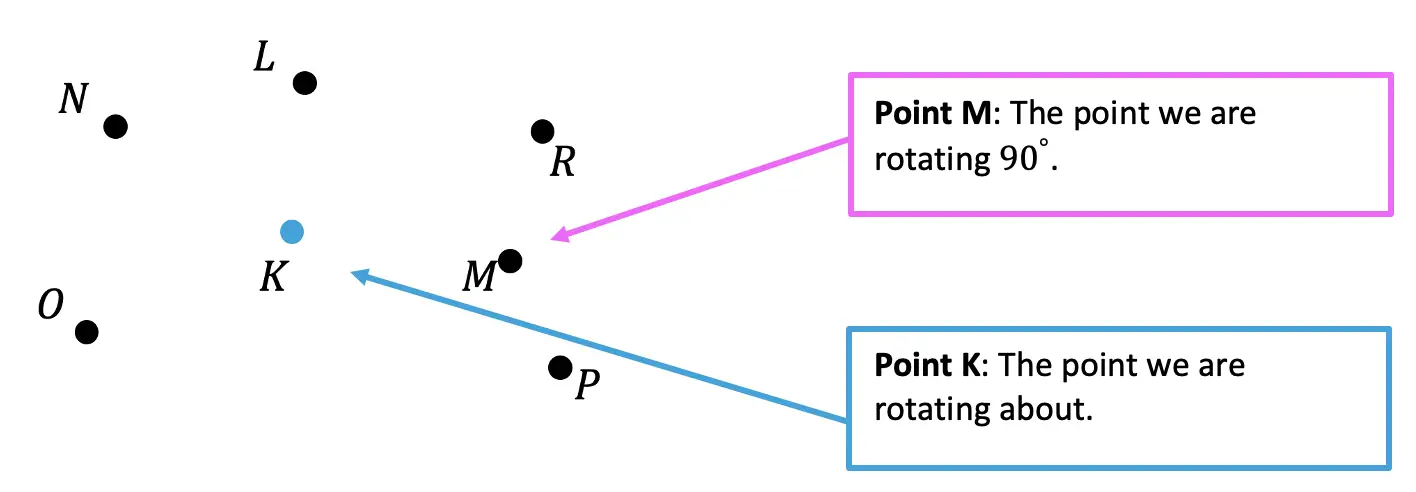
Example #2:

rotations about a point

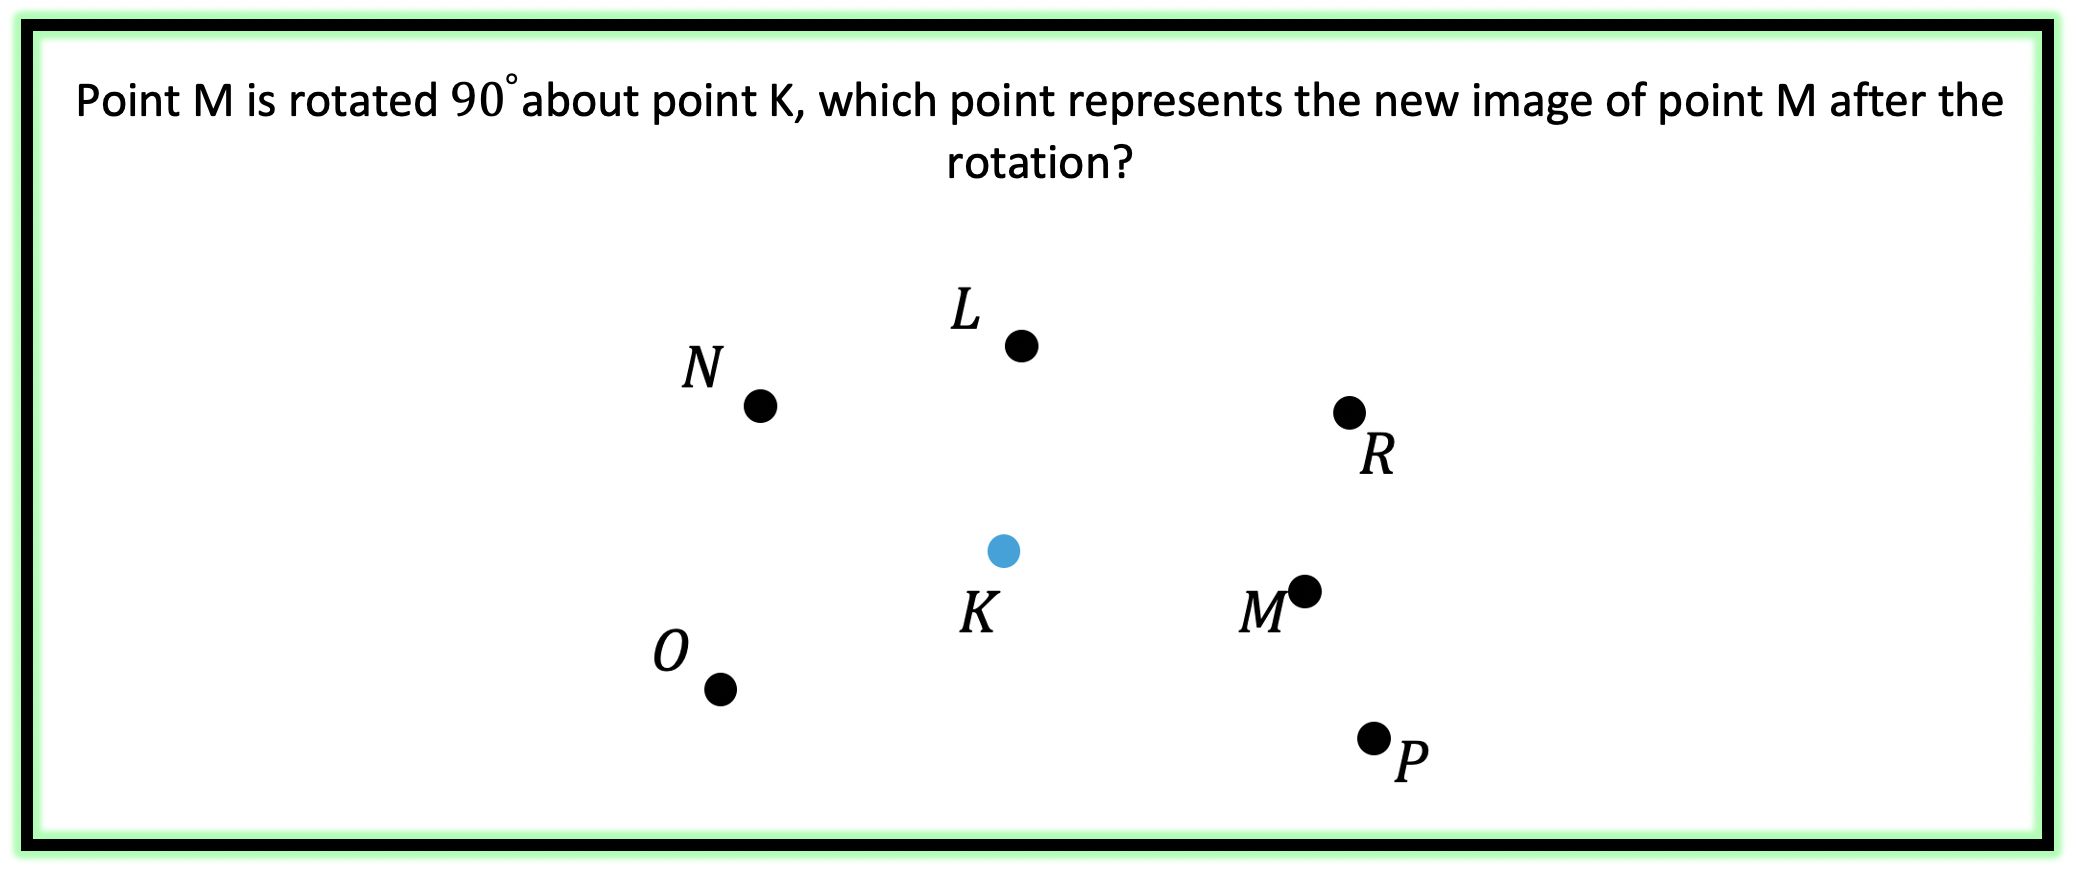
Step 1: First, let’s identify the point we are rotating (Point M) and the point we are rotating about (Point K).

rotations about a point

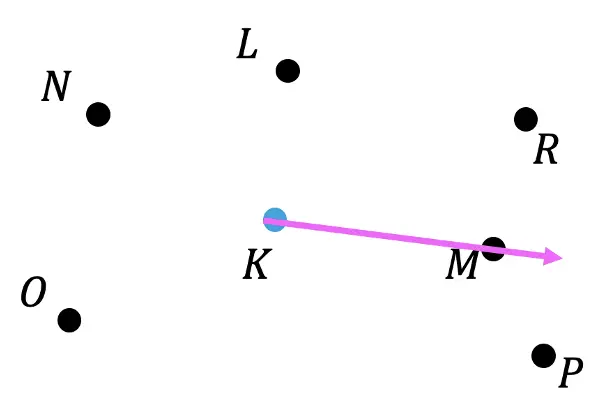
Step 2: Next we need to identify the direction of rotation.  Since we are rotating Point M 90º, we know we are going to be rotating this point to the left in the clockwise direction.

Step 3: Now we can draw a line from the point of origin, Point K, to Point M.

rotations about a point

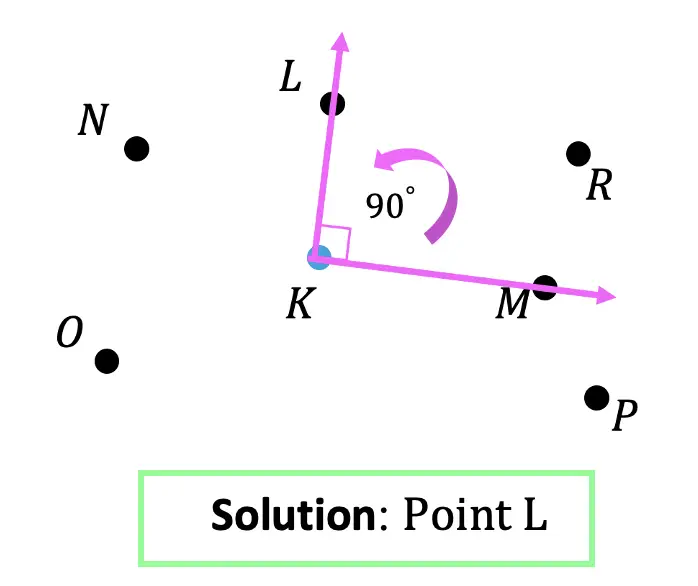
Step 4: Now, using a protractor and ruler, measure out 90º, draw a line, and notice that point L lands on our 90º line. This is our solution! (Note: For help on how to use a protractor, check out the video above).

rotations about a point

Ready for more? Check out the practice questions below to master your rotation skills!
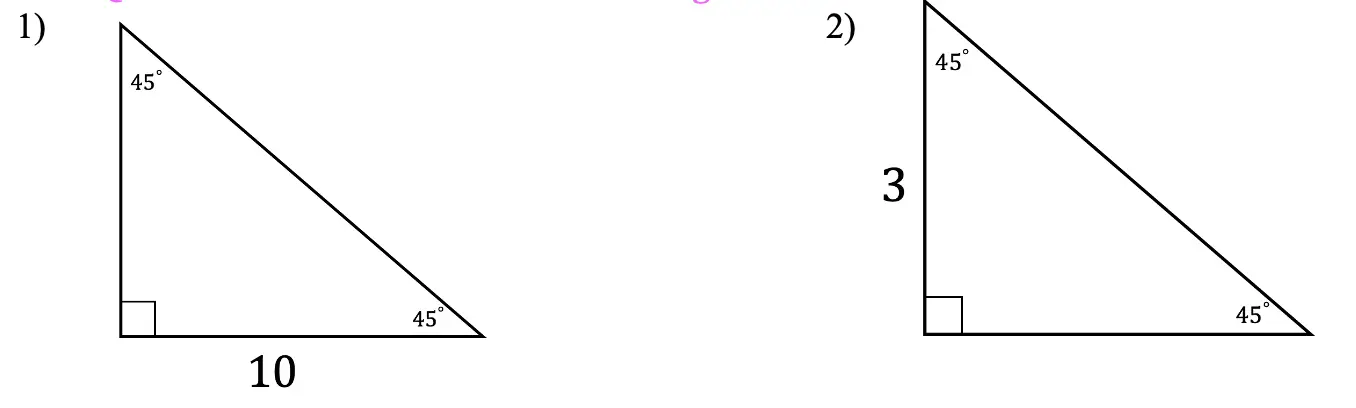
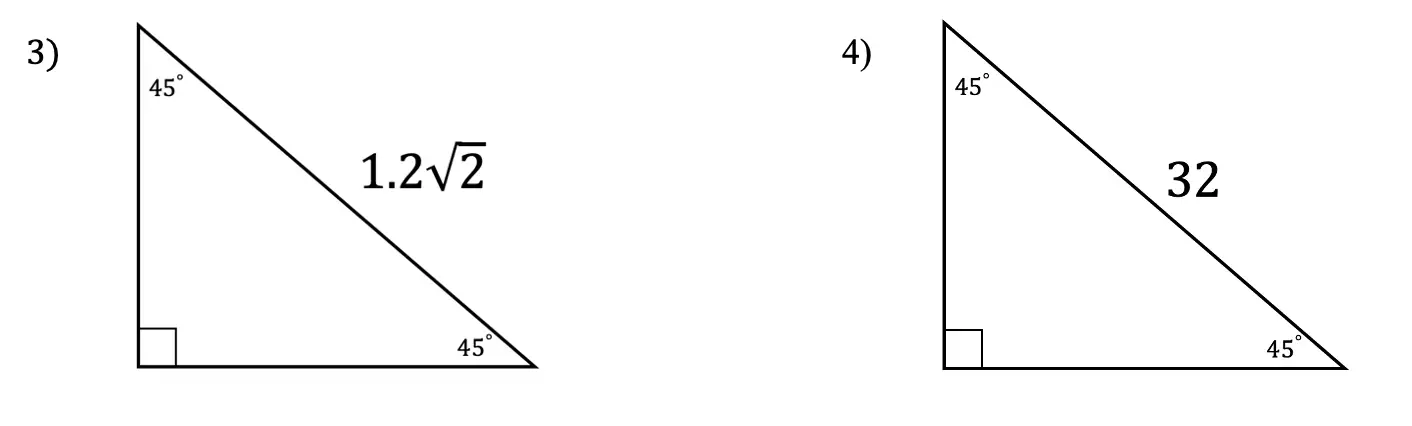
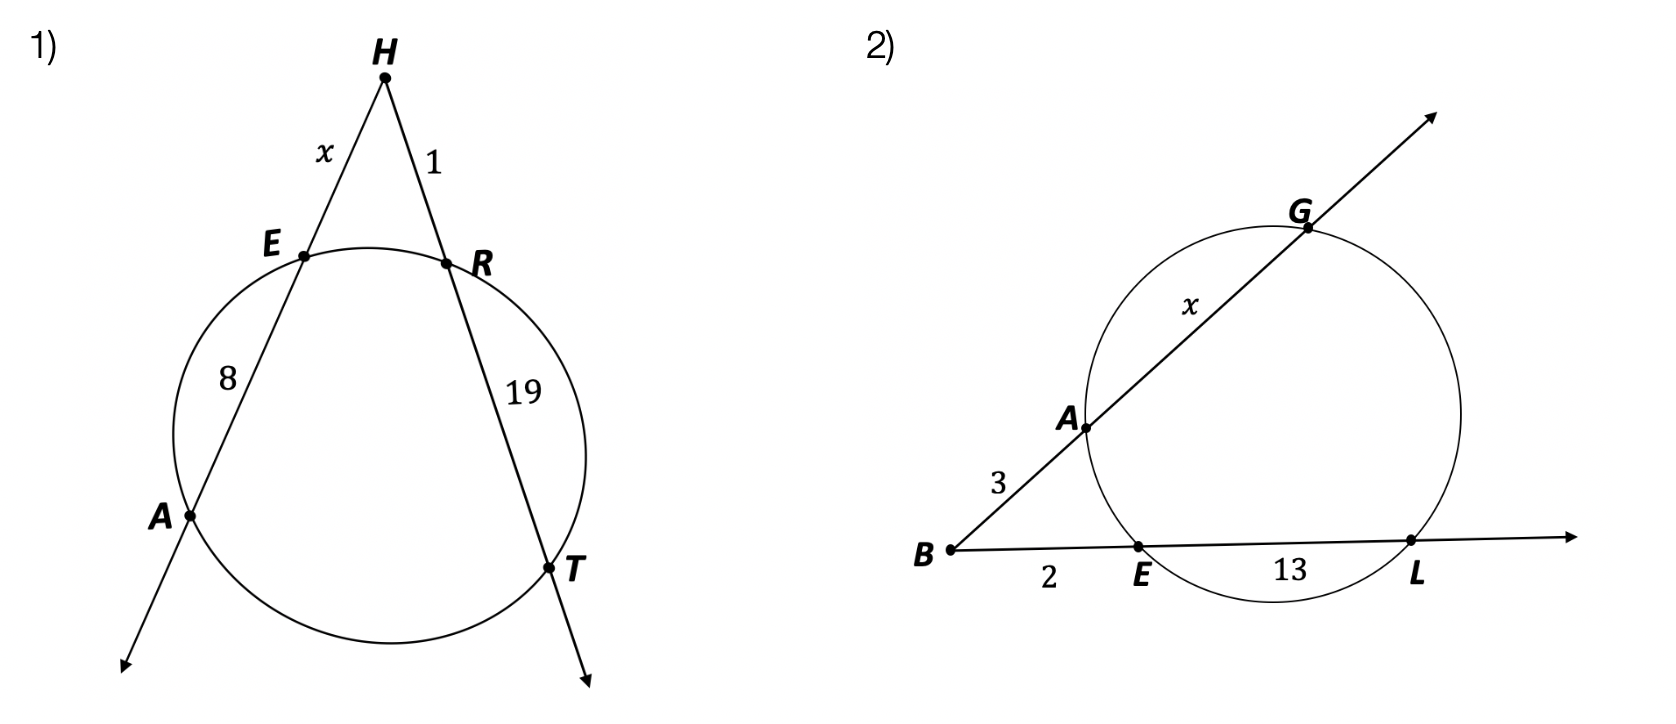
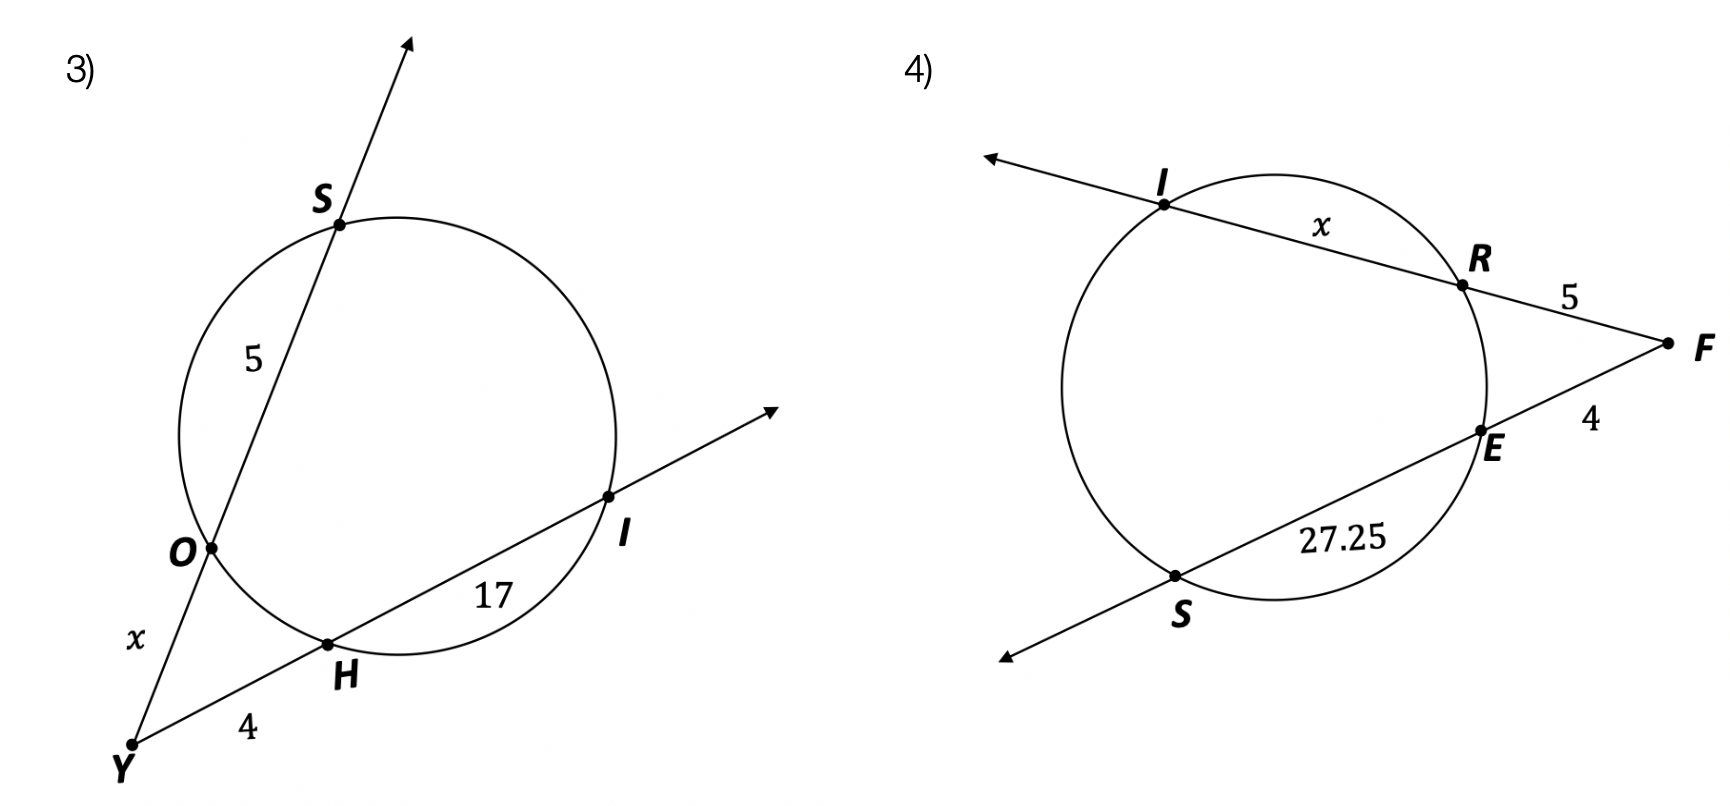
Practice Questions:

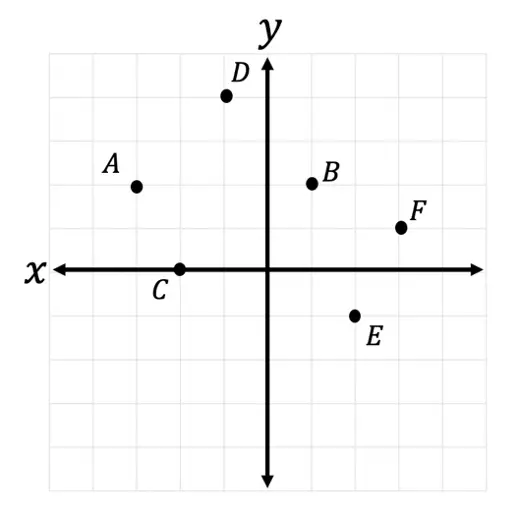
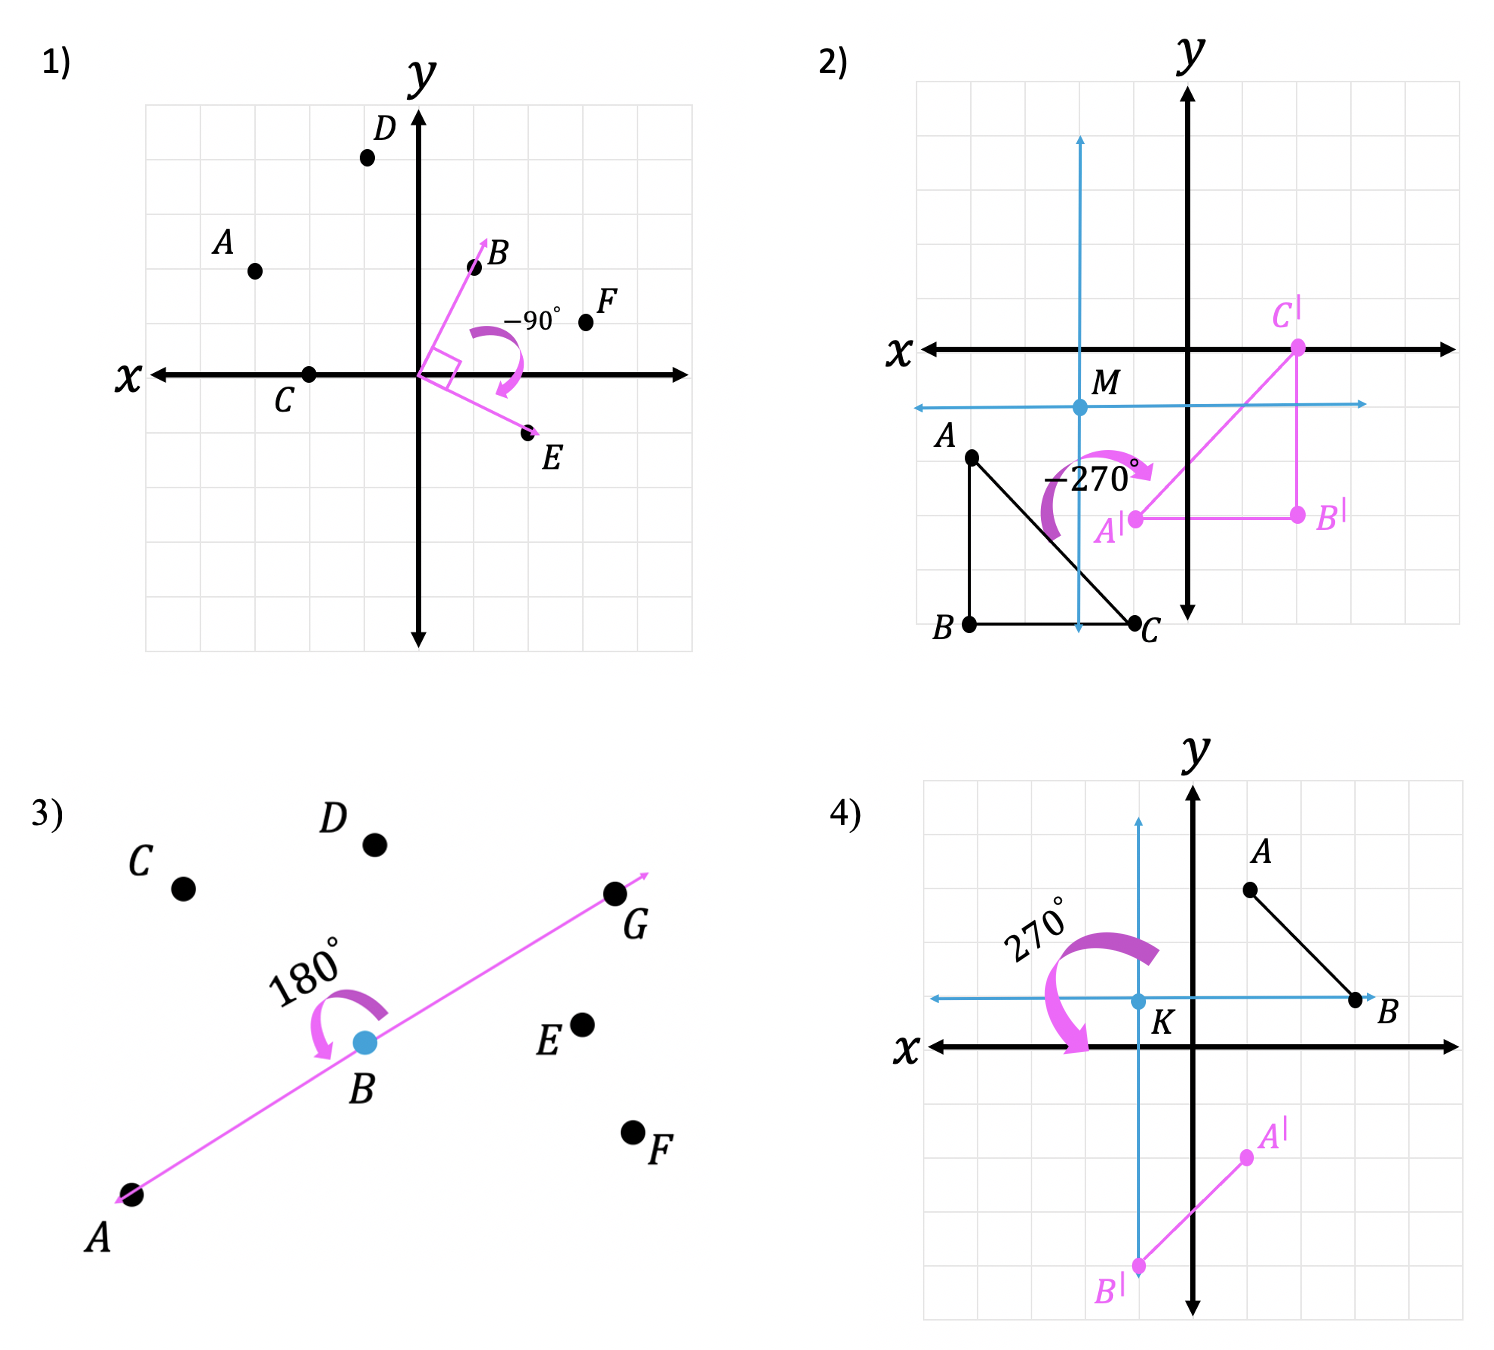
  1. Point B is rotated -90º about the origin. Which point represents newly rotated point B?    

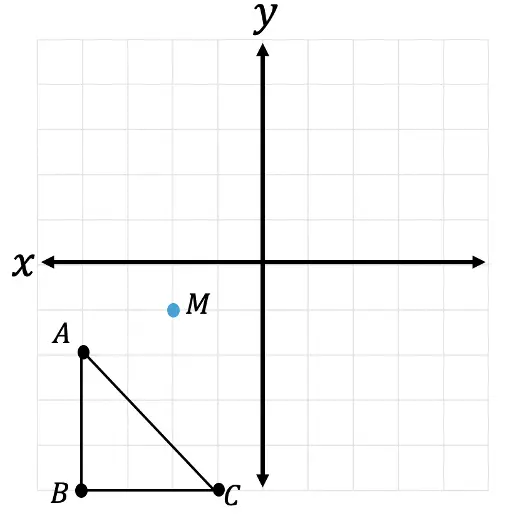
2. Triangle ABC is rotated -270º about point M.  Show newly rotated triangle ABC as A prime B prime C prime.

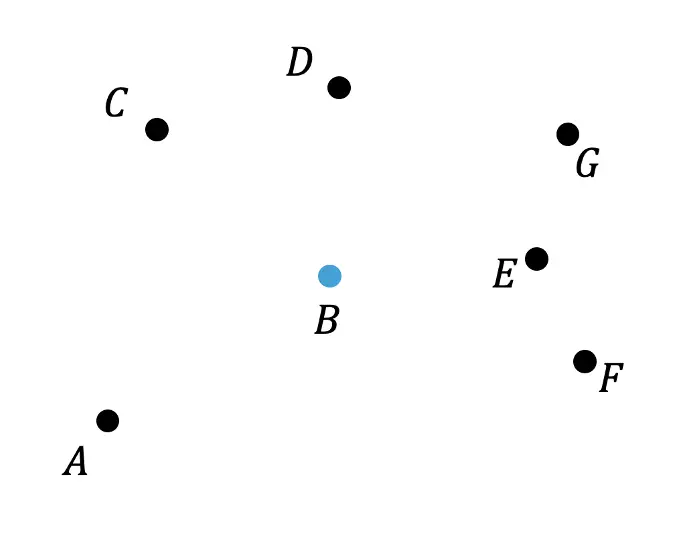
3. Point G is rotated about point B by 180º. Which point represents newly rotated point B?

rotations about a point

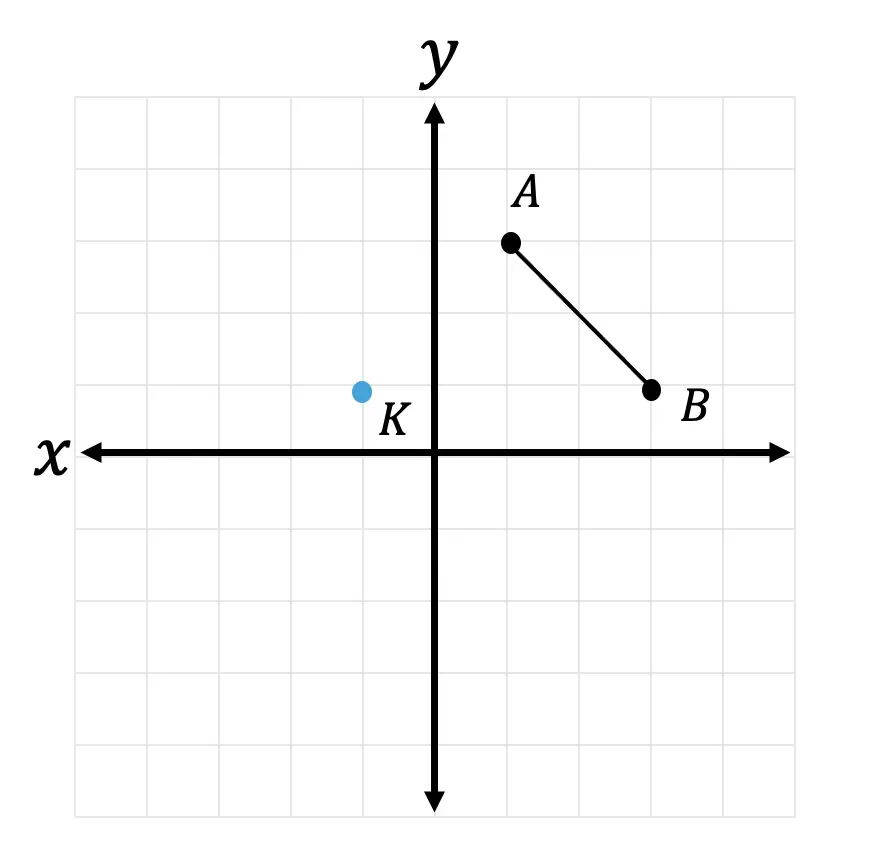
4.  Segment AB is rotated 270º about point K.  Show newly rotated segment AB.
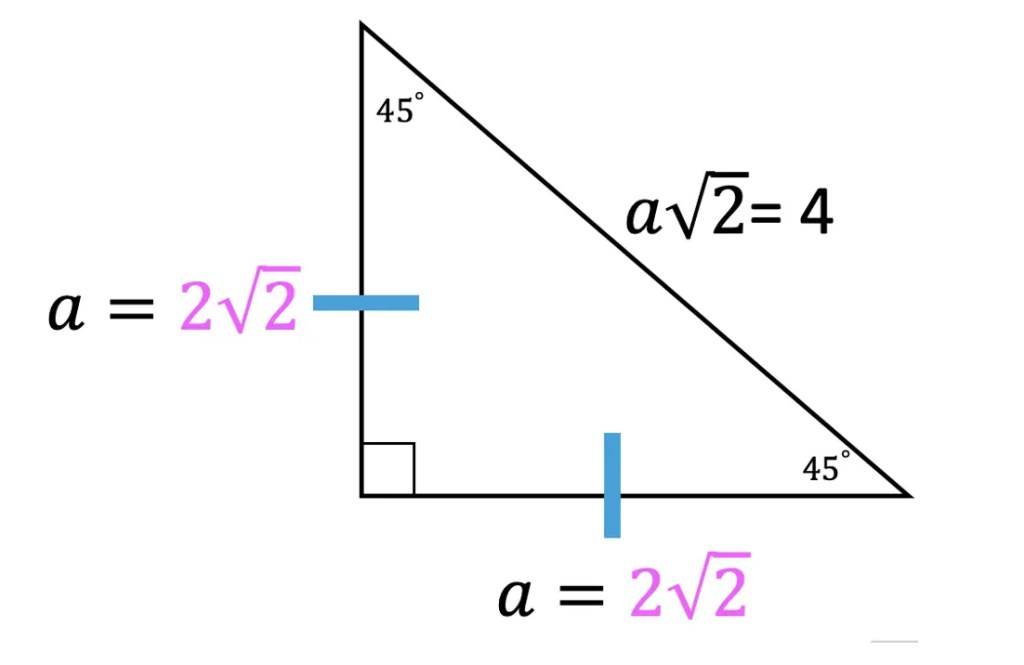
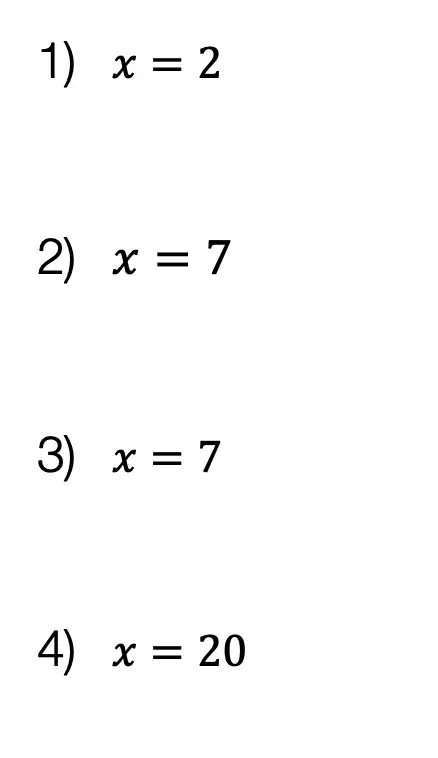
Solutions:

Still got questions on how to rotations about a point? No problem! Don’t hesitate to comment with any questions or check out the video above for even more examples. Happy calculating! 🙂

Facebook ~ Twitter ~ TikTok ~ Youtube

Looking for more Transformations? Check out the related posts below!

Translations

Dilations

Reflections

45 45 90 Triangle

45 45 90 triangle

Greetings math folks! For anyone familiar with trigonometry and SOH CAH TOA trigonometric ratio you should know that there is something special about right triangles. We are about to learn more about right triangles, as there are two distinct types of special right triangles in this world that we need to know, this includes the 45 45 90 triangle and the 30 60 90 triangle. In this post, we are going to go over the 45 45 90 special right triangle! If you are looking for the other very famous special triangle, (30 60 90), check out this post here.

With the help of this special triangle, we are going to see how to find the missing sides of a right triangle when given only one of its lengths (and the angles of the right triangle given are 45 45 90). For even more examples, check out the video and practice questions below and at the end of this post. Happy calculating! 🙂

45 45 90 Right Triangle Ratio:

45 45 90 ratio
angle

Looking above at our 45 45 90 special triangle, notice it contains one right angle and 2 equal angles of 45 degrees. Based on these angle proportions, we are able to infer information about each sides length, thats where our ratio comes in!

45 45 90 Triangle – Why is it special? Where did come from?

45 45 90 special right triangles are “special” because they are a type of Isosceles Right Triangle, meaning they have two equal sides (marked in blue below).  If we know that the isosceles triangle has two equal lengths, we can find the value of the length of the hypotenuse by using the Pythagorean Theorem based on the other two equal sides.  Check out how we derive the 45 45 90 ratio below!

equal length

Notice, we started with the Pythagorean Theorem, then filled in our variables based on each given sides length. Next, we combined like terms and then took the square root of each side of the equation. Lastly, we found the value of hypotenuse, c, based on the other two legs, which is equal to the length of a times radical 2.

Now that we know the length of the hypotenuse in terms of each sides length a, we can re-label our triangle. Since we found the length of the hypotenuse in relation to the two equal legs, notice that this creates a ratio that applies to each and every triangle out there!

45 45 90 triangles

How do I use this ratio?

Ok, great we have derived the 45 45 90 ratio, but what do I do with this thing and how do I use it?

45 45 90 triangle

Knowing the above ratio, allows us to find the length of any missing side of a 45 45 90 special triangle (when given the value of one of its sides).

Let’s now try some 45 45 90 right triangle examples with missing sides below:

Example #1:

Step 1: First, let’s look at our ratio and compare it to our given right triangle.

45 45 90 triangle sides

Step 2: Notice we are given the value of the bottom leg, a=8. Knowing this we can fill in each length of our right triangle based on the ratio of a 45 45 90 special triangle shown below:

45 45 90 triangle sides

Now let’s look at an example where we are given the length of the hypotenuse and need to find the values of the other two missing sides of a 45 45 90 right triangle.

Example #2:

congruent

Step 1: First, let’s look at our ratio and compare it to our given right triangle.

Step 2: In this case, we need to do a little math to find the value of a, based on the Pythagorean Theorem. See how we use the Pythagorean Theorem step by step below to find the value of missing sides represented by a.

Write out the Pythagorean Theorem Formula
Fill in the values from our given 45 45 90 triangle based on the side lengths
Combine like terms a2 + a2 = 2a2 given.
Take the square root of both sides of the equation
Divide both sides by radical 2 to get a alone
Rationalize the denominator by multiplying the numerator and denominator by radical 2 and simplify

We have found our solution!
45 45 90 special triangles

Now try mastering the art of the 45 45 90 special triangle on your own with the practice problems below!

Practice Questions:

Find the value of each missing side length of each 45 45 90 right triangle.

leg
problem

Solutions:

Still got questions? No problem! Don’t hesitate to comment with any questions or check out the video above. Happy calculating! 🙂

Facebook ~ Twitter ~ TikTok ~ Youtube

Related Trigonometry Posts:

The Unit Circle

Basic Right Triangle Trigonometric Ratios (SOH CAH TOA)

Transforming Trig Functions

30 60 90 Special Triangles

Graphing Trigonometric Functions

Trig Identities

Factoring Trigonometric Functions

Law of Cosines

Law of Sines

Transversals and Parallel Lines: Geometry

Happy Wednesday math friends! In this post we are going to look at transversals and parallel lines and find the oh so many congruent and supplementary angles they form when they come together! Congruent angles that form with these types of lines are more commonly known as Alternate Interior Angles, Alternate Exterior Angles, Corresponding angles, and Supplementary angles. Let’s look at this one step at a time:

What are Transversals and Parallel Lines?

When two parallel lines are cut by a diagonal line ( called a transversal) it looks something like this:

parallel lines and transversals

Each angle above has at least one congruent counterpart. There are several different types of congruent relationships that happen when a transversal cuts two parallel lines and we are going to break each down:

Transversals and parallel Lines

1) Alternate Interior Angles:

When a transversal line cuts across two parallel lines, opposite interior angles are congruent.

parallel lines and transversals

2) Alternate Exterior Angles:

When a transversal line cuts across two parallel lines, opposite exterior angles are congruent.

parallel lines and transversals

3) Corresponding Angles:

When a transversal line cuts across two parallel lines, corresponding angles are congruent.

Transversals and parallel Lines

4) Supplementary Angles:

Supplementary angles are a pair of angles that add to 180 degrees. 180 degrees is the value of distance found within a straight line, which is why you’ll find so many supplementary angles below:

parallel lines and transversals

Knowing the different sets of congruent and supplementary angles, we can easily find any missing angle values when faced with the following question:

Transversals and parallel Lines

-> Using our knowledge of congruent and supplementary angles we should be able to figure this out! Right away we can find angle 2 by noticing angle 1 and angle 2 are supplementary angles (add to 180 degrees). 

-> Knowing angle 2 is 50 degrees, we can now fill in the rest of our transversal angles based on our corresponding and supplementary rules.

Transversals and parallel Lines

Try the following transversal and parallel lines questions below! Some may a bit harder than the previous example, if you get stuck, check out the video that goes over a similar example above and happy calculating! 🙂

Practice Questions:

  1. Find the value of the missing angles given line r  is parallel to line  s and line t is a transversal. 
Transversals and parallel Lines

2. Find the value of the missing angles given line r is parallel to line s and line t is a transversal. 

Transversals and parallel Lines

Solutions:

Transversals and parallel Lines

Still got questions? No problem! Don’t hesitate to comment with any questions or check out the video above. Happy calculating! 🙂

Facebook ~ Twitter ~ TikTok ~ Youtube

Also, if you’re looking to learn about the difference between parallel and perpendicular lines, check out this post here!

How to Construct an Equilateral Triangle?: Geometry

Happy Wednesday math peeps! This post introduces constructions by showing us how to construct an equilateral triangle by using a compass and straightedge (or ruler). For anyone new to constructions in geometry, this is the perfect topic for art aficionados since there is more drawing here than there is actual math!

What is an Equilateral Triangle?

Equilateral Triangle: An equilateral triangle is a triangle with three equal sides.  Not an easy one to forget, the equilateral triangle is super easy to construct given the right tools (compass+ straightedge). Take a look below:

equilateral triangle
equal sides
Equilateral Triangle: Triangle with all equal sides

Construct an Equilateral Triangle Example:

equilateral triangle
line segment ab

Check out the GIF below to see how to construct an equilateral triangle step by step using a compass and straightedge with pictures and explanations below!

Solution:

How to Construct an Equilateral Triangle b c

What’s Happening in this GIF? 

1. Using a compass, we measure the distance of line segment Screen Shot 2020-08-25 at 4.19.02 PM.

 2. With the compass point remaining on point A, we then draw an arc that has the same distance as line segment Screen Shot 2020-08-25 at 4.19.02 PM.

 3. With the compass now placed on point B, draw an arc that has the same distance as line segment Screen Shot 2020-08-25 at 4.19.02 PM.

4. Notice where the arcs intersect? Using a ruler, connect points A and B to the new intersection point. This will create two new equal sides of our triangle!

5. We have now officially constructed a triangle with all equal side lengths!

Constructions and Related Posts:

Looking to construct more than just an equilateral triangle? Check out these related posts on geometry constructions!

Construct a Perpendicular Bisector

Perpendicular Line through a Point

Angle Bisector

Construct a 45º angle

Altitudes of a Triangle (Acute, Obtuse, Right)

Construct a Square inscribed in a Circle

Best Geometry Tools!

Looking to get the best construction tools? Any compass and straight-edge will do the trick, but personally, I prefer to use my favorite mini math toolbox from Staedler. Stadler has a geometry math set that comes with a mini ruler, compass, protractor, and eraser in a nice travel-sized pack that is perfect for students on the go and for keeping everything organized….did I mention it’s only $7.99 on Amazon?! This is the same set I use for every construction video in this post. Check out the link below and let me know what you think!

Still got questions? No problem! Don’t hesitate to comment with any questions. Happy calculating! 🙂

Facebook ~ Twitter ~ TikTok ~ Youtube

Looking to learn more about triangles? Check out this post on right triangle trigonometry here! And if you’re looking for even more geometry constructions, check out the link here!

Reflections: Geometry

Greetings and welcome to Mathsux! Today we are going to go over reflections geometry, one of the many types of transformations that come up in geometry. And thankfully, reflection transformation is one of the easiest types to master, especially if you’re more of a visual learner/artistic type person. In this post, we will go over a reflection across the line x=-2, but if you want to see a reflection across the x axis, the y axis, and the line y=x, please check out the math video below! So let’s get to it! And if you’re new to transformations, check out translations here.

What are Reflections?

A Reflection on a coordinate plane is exactly what you think! A reflection is a type of transformation in geometry where we reflect a point, a line segment, or a shape over a line to create a mirror image of itself.  Think of the wings of a butterfly, a page being folded in half, or anywhere else where there is perfect symmetry, each of these are great examples of a reflection!

Reflection Rules:

reflections geometry

If you are completely new to reflections, you may want to check out the video above that goes into deriving reflection rules over the different axis. But for those of you more comfortable with reflection, check out the example below where we reflect the image of a triangle onto itself over the line x=-2.

Example:

Screen Shot 2020-08-04 at 5.19.40 PM

Step 1: First, let’s draw in line x=-2. Note that whenever we have x equal to a number, we end up drawing a vertical line at that point on the x axis, in this case at x=-2.

reflections

Step 2: Find the distance each point is from the line x=-2 and reflect it on the other side, measuring the same distance.

First, let’s look at point C, notice it’s 1 unit away from the line x=-2 on the right. To reflect point c, we are going to count 1 unit but this time to the left of the line x=-2 and label our new point, C|.

reflections

Step 3: Now we are going to reflect coordinate point A in much the same way! Notice that point A is 2 units away on the left of line x=-2, we then want to measure 2 units to the right of our line x=-2 and mark our new coordinate point, A|.

reflections

Step 4: Lastly, we want to reflect coordinate point B. This time, point B is 1 unit away on the right side of the line x=-2, we then measure 1 unit to the opposite direction of our line, x=-2, and mark our new point, B|.

reflections

Step 5: Now that we have all the newly reflected coordinate points of our triangle, finally, we can now connect them all, for our fully reflected image of right triangle A|B|C|.

Notice our newly reflected triangle is not just a mirror image of itself, but when the original figure is reflected it actually ends up overlapping onto itself!? How did this happen? That is because this our reflection line came right down the middle of our original image, triangle ABC. Shapes that reflect onto themselves are a bit tricky but not impossible, just remember to measure out the distance of each coordinate point and reflections should be a breeze!

Rigid Motion:

Reflections are a special type of transformation in geometry that maintains rigid motion, meaning when a point, line, or shape is reflected the angles, and line segments retain their value. For example, if we were to measure the area of both right triangles, before and after reflection, we would find the areas to remain unchanged. Meaning the area of triangle ABC is equal to the area of triangle A|B|C| . Another rigid transformation includes rotations and translations.

Looking to practice your new reflection skills? Try the reflection practice problems below, with solutions to each question, to truly master the topic! Happy calculating!

Practice Questions:

reflections

Solutions:

Still got questions?  No problem! Check out the video above or comment below! There is also a bonus video if you scroll all the way down at the end of this post for anyone who wants to see how to reflect a line over the line x=2. See how it differs and how it is similar to the example shown here. Happy calculating! 🙂

Don’t forget to follow MathSux on social media for the latest tips and tricks to ace math!

Facebook ~ Twitter ~ TikTok ~ Youtube

And if you are looking for more Transformations Check out the related posts below and let me know if you have any questions? Or maybe you just want to share your favorite type of transformation? Either way, happy calculating!

Translations

Dilations

Rotation

Intersecting Secants Theorem: Geometry

Ahoy! Today we’re going to cover the Intersecting Secants Theorem!  If you forgot what a secant is in the first place, don’t worry because all it is a line that goes through a circle.  Not so scary right? I was never scared of lines that go through circles before, no reason to start now.

If you have any questions about anything here, don’t hesitate to comment below and check out my video for more of an explanation. Stay positive math peeps and happy calculating! 🙂

Wait, what are Secants?

Screen Shot 2020-07-14 at 10.07.54 PM

Intersecting Secants Theorem: When secants intersect an amazing thing happens! Their line segments are in proportion, meaning we can use something called the Intersecting Secants Theorem to find missing line segments.  Check it out below: 

Intersecting Secants Theorem

Let’s now see how we can apply the intersecting Secants Theorem to find missing length.

Screen Shot 2020-07-14 at 10.45.29 PM.png

Step 1: First, let’s write our formula for Intersecting Secants.

Intersecting Secants Theorem

Step 2: Now fill in our formulas with the given values and simplify.

Intersecting Secants Theorem

Step 3: All we have to do now is solve for x! I use the product.sum method here, but choose the factoring method that best works for you!

Intersecting Secants Theorem

Step 4: Since we have to reject one of our answers, that leaves us with our one and only solution x=2.

Screen Shot 2020-07-14 at 10.14.41 PM.png

Ready to try the practice problems below on your own!?

Practice Questions: Find the value of the missing line segments x.

Intersecting Secants Theorem

Solutions:

Screen Shot 2020-07-20 at 9.30.55 AM.png

Still got questions?  No problem! Check out the video above or comment below for any questions and follow for the latest MathSux posts. Happy calculating! 🙂

Facebook ~ Twitter ~ TikTok ~ Youtube

To review a similar NYS Regents question check out this post here.

Circle Theorems & Formulas

Central Angle Theorem

Inscribed Angles & Intercepted Arcs

Area of a Sector

Circle Theorems

How to use SOH CAH TOA: Geometry

Greeting math friends and welcome to Mathsux! In this post, we are going to start with the very basics of trigonometry by going over how to find a missing angle and/or side length of right triangles while using the famous trigonometric function sine, cosine, or tangent, (aka how to use SOH CAH TOA).  Woo hoo! These are the basics of right triangle trigonometry, and provide the base for mastering so many more interesting things to come in trigonometry! So, let’s get to it!

SOH CAH TOA is an acronym that stands for the following trig functions and parts of a right triangle. We’ll explain more in this post!

SOH CAH TOA

Sin =
Opposite/Hypotenuse
Cosine=
Adjacent/Hypotenuse
Tangent=
Opposite/Adjacent
Note that SOH CAH TOA works on right triangles only!

Also, if you have any questions about anything here, don’t hesitate to comment below or watch the video below. Also, don’t forget to subscribe to MathSux for FREE math videos, lessons, and practice questions every week. Happy calculating! 🙂

What does SOH CAH TOA stand for?

A Trigonometric Ratio, more commonly known as Sine, Cosine, and Tangent, are trig ratios that naturally exist within a right triangle.  This means that the sides and angles of a right triangle are in proportion within itself.  It also means that if we are missing a side or an angle of a right triangle, based on what we’re given, we can figure out what the value of the sides or angles are, based on these ratios!

Let’s take a look at what Sine, Cosine, and Tangent are all about!

How to use SOH CAH TOA

Ready for your first right angled triangle example? Check it out below!

SOH CAH TOA Example #1:

Screen Shot 2020-07-04 at 5.04.02 PM

Now let’s see how we can apply trig ratios when there is a missing side or angle in a right triangle!

Step 1: First, let’s identify the different sides of our right triangle depending on which angle we are focusing on, which in this case is a 60º angle. Based on the locations of our angle, we can label each side as the hypotenuse, adjacent, or the opposite.

Notice below, that the opposite side labeled x, is labeled the “opposite” side because it is opposite to our given angle, 60º. The remaining side is considered the adjacent side of our triangle because it is directly next to our given angle, 60º.

How to use SOH CAH TOA

Step 2: Now, let’s write out SOH CAH TOA. Notice the only trig function that uses both the hypotenuse and the opposite is sine! Knowing to use the sine function, let’s fill in our formula using the hypotenuse = 5 and opposite = x in order to find the value for missing side length x.

In order to use the sin function correctly, we’re going to need to plug in our given angle, which is 60º, and then set up our proportion. sin(60º)=x/5. By using the sine function, our calculator, and a little bit of algebra we’ll be able to solve for the unknown side.

How to use SOH CAH TOA

Ready for another example?! Check out another SOH CAH TOA problem using right triangles below!

Right Triangle Trig Example #2:

Screen Shot 2020-07-04 at 5.05.01 PM.png

Step 1: First, let’s identify the different parts of the right triangle we are given (the hypotenuse, adjacent, and the opposite). Notice in this example, we are given the adjacent and hypotenuse and need to find the value of the unknown angle, θ.

Step 2: Next, let’s write out our acronym, SOH CAH TOA, to see which trig function can help us with our question! Notice the only trig function that uses both adjacent and hypotenuse is cosine. This is what we will use to solve for the unknown angle, θ.

We use cosine, by setting up our proportion, cos(θ)=adjacent/ hypotenuse, knowing we can then plug in 12 for our adjacent value, and 13 for our hypotenuse value.

How to use SOH CAH TOA

Think you’re ready to test out SOH CAH TOA on your own? Try the following Practice Questions on your own!

Practice Questions:

Given the following right triangles, find the missing lengths and side angles rounding to the nearest whole number.

Solutions:

Screen Shot 2020-07-04 at 5.06.37 PM.png

Still got questions?  No problem! Check out the video the same examples outlined above and happy calculating! 🙂

Facebook ~ Twitter ~ TikTok ~ Youtube

Related Trigonometry Posts:

The Unit Circle

Basic Right Triangle Trigonometric Ratios (SOH CAH TOA)

4545 90 Special Triangles

30 60 90 Special Triangles

Graphing Trig Functions

Transforming Trig Functions

Factoring Trig Functions

Law of Cosines

Trig Identities

Law of Sines

Perpendicular & Parallel Lines Through a Given Point: Geometry

Happy Wednesday math friends! Today we’re going to go over the difference between perpendicular and parallel lines, then we’ll use our knowledge of the equation of a line (y=mx+b) to see how to find perpendicular and parallel lines through a given point.  This is a common question that comes up on the NYS Geometry Regents and is something we should prepare for, so let’s go!

If you need any further explanation, don’t hesitate to check out the Youtube video below that goes into detail on how to find perpendicular and parallel lines through a given point one step at a time. Happy calculating! 🙂

Perpendicular Lines:

Perpendicular & Parallel Lines Through a Given Point

Perpendicular Lines: Lines that intersect to create a 90-degree angle and can look something like the graph below.  Their slopes are negative reciprocals of each other which means they are flipped and negated. See below for example!

Example: Find an equation of a line that passes through the point (1,3) and is perpendicular to line y=2x+1 .

Screen Shot 2020-06-10 at 10.28.20 AM
Perpendicular & Parallel Lines Through a Given Point
Screen Shot 2020-06-10 at 10.29.06 AM

Parallel Lines:

Parallel lines are lines that go in the same direction and have the same slope (but have different y-intercepts). Check out the example below!

Perpendicular & Parallel Lines Through a Given Point

Example: Find an equation of a line that goes through the point (-5,1) and is parallel to line y=4x+2.

Screen Shot 2020-06-10 at 10.34.46 AM
Screen Shot 2020-06-10 at 10.35.23 AM

Try the following practice questions on your own!

Practice Questions:

1) Find an equation of a line that passes through the point (2,5) and is perpendicular to line y=2x+1.

 2) Find an equation of a line that goes through the point (-2,4) and is perpendicular to lineScreen Shot 2020-06-10 at 11.24.06 AM

 3)  Find an equation of a line that goes through the point (1,6) and is parallel to line y=3x+2.

4)  Find an equation of a line that goes through the point (-2,-2)  and is parallel to line y=2x+1.

Solutions:

Screen Shot 2020-06-10 at 11.22.05 AM

Need more of an explanation? Check out the video that goes over these types of questions up on Youtube (video at top of post) and let me know if you have still any questions.

Happy Calculating! 🙂

Facebook ~ Twitter ~ TikTok ~ Youtube

Looking for more on Perpendicular and parallel lines? Check out this Regents question on perpendicular lines here!

Median of a Trapezoid Theorem: Geometry

Hi everyone and welcome to Math Sux! In this post, we are going to look at how to use and applythe median of a trapezoid theorem. Thankfully, it is not a scary formula, and one we can easily master with a dose of algebra. The only hard part remaining, is remembering this thing! Take a look below to see a step by step tutorial on how to use the median of a trapezoid theorem and check out the practice questions at the end of this post to truly master the topic. Happy calculating! 🙂

*If you haven’t done so, check out the video that goes over this exact problem, also please don’t forget to subscribe!

Medians of a Trapezoid copy
Screen Shot 2020-06-02 at 7.31.07 AM

Step 1:  Let’s apply the Median of a Trapezoid Theorem to this question!  A little rusty?  No problem, check out the Theorem below.

Median of a Trapezoid Theorem

Median of a Trapezoid Theorem: The median of a trapezoid is equal to the sum of both bases.Step 2: Now that we found the value of x , we can plug it back into the equation for Screen Shot 2020-06-02 at 7.33.44 AMmedian,  to find the value of median Screen Shot 2020-06-02 at 7.34.25 AM

Screen Shot 2020-06-02 at 7.34.48 AM

Want more practice?  Your wish is my command! Check out the practice problems below:

Practice Questions:

Median of a Trapezoid Theorem

1.Screen Shot 2020-06-02 at 7.35.29 AMis the median of trapezoid ABCDEF, find the value of the median, given the following:2. Screen Shot 2020-06-02 at 9.01.08 AMis the median of trapezoid ACTIVE, find the value of the median, given the following:3.Screen Shot 2020-06-02 at 9.17.01 AMis the median of  trapezoid DRAGON, find the value of the median, given the following:

Median of a Trapezoid Theorem

4. Screen Shot 2020-06-02 at 9.23.08 AMis the median of trapezoid MATRIX, find the value of the median, given the following:

Solutions:

Screen Shot 2020-06-02 at 9.25.05 AM

Need more of an explanation?  Check out the detailed video and practice problems. Happy calculating! 🙂

Facebook ~ Twitter ~ TikTok ~ Youtube

Area of a Sector: Geometry

Youtube Area of a sector copy

Hi math friends, has anyone been cooking more during quarantine?  We all know there is more time for cookin’ and eatin’ cakes but have you ever been curious about the exact amount of cake you are actually eating?! Well, you’re in luck because today we are going to go over how to find the area of a piece of cake, otherwise known as the Area of a Sector!

Now, we’ll all be able to calculate just how much we are overdoing it on that pie! Hopefully, everyone is eating better than I am (I should really calm down on the cupcakes).  Ok, now to our question:

*Also, If you haven’t done so, check out the video that goes over this exact problem, and don’t forget to subscribe!

Screen Shot 2020-05-19 at 4.18.42 PM

Explanation:

How do I answer this question? 

We must apply/adjust the formula for the area of a circle to find the area of the blue shaded region otherwise known as the sector of this circle.                                                    

How do we do this?    

Before we begin let’s review the formula for the area of a circle. Just a quick reminder of what each piece of the formula represents:

area of a sector

Step 1: Now let’s fill in our formula, we know the radius is 5, so let’s fill that in below:

Screen Shot 2020-05-19 at 4.26.08 PM

Step 2: Ok, great! But wait, this is for a sector; We need only a piece of the circle, not the whole thing.  In other words, we need a fraction of the circle. How can we represent the area of the shaded region as a fraction?

Well, we can use the given central angle value, Screen Shot 2020-05-19 at 4.27.17 PM, and place it over the whole value of the circle,Screen Shot 2020-05-21 at 4.01.12 PM . Then multiply that by the area of the entire circle. This will give us the value we are looking for!

area of a sector
area of a sector

Step 3: Multiply and solve!

Ready for more? Try solving these next few examples on your own to truly master area of a sector!

Practice Questions:

Find the area of each shaded region given the central angle and radius for each circle:

area of a sector

Solutions:

Screen Shot 2020-05-19 at 4.30.36 PM

What do you think of finding the area of sector? Are you going to measure the area of your next slice of pizza?  Do you have any recipes to recommend?  Let me know in the comments and happy calculating! 🙂

Facebook ~ Twitter ~ TikTok ~ Youtube

Looking for more about circles? Check out this post on the circle formula here!

Circle Theorems and Formulas:

Central Angle Theorem

Intersecting Secants Theorem

Inscribed Angles and Intercepted Arc

Circle Theorems